Writing and debugging a component for GWT and Vaadin

The Google Web Toolkit and Vaadin frameworks do pretty well when you just use them. If you suddenly needed to expand their functionality, then you have to seriously sweat. In this article I want to tell how to write a simple component in GWT, add the Vaadin server part to it and use it in my application. I will not create a completely empty GWT / Vaadin project and configure GWT compilation from the very beginning, instead I will take an application based on CUBA.Platform , in which I will implement the component itself, and then try it out. This will show how well everything fits into this application. I would like to pay special attention to debugging the component, since it is nontrivial and always causes difficulties for developers.
I want to warn that not everything described in the article relates to GWT and Vaadin, some of the steps and techniques are applicable only in the context of using CUBA.Platform, due to this, setting up the environment and some routine actions are greatly simplified.
Environment preparation
We will use an empty project created in CUBA Studio for experiments . CUBA is our platform for developing business applications in Java, which allows you to quickly create a data model and application interface, determine the logic of working with data and manage user rights. At the heart of the UI platform, the Vaadin web framework is actively used, which allows us to implement many interesting ideas.
First, create a GWT module that will compile in JavaScript. Run the action 'Create web toolkit module' in Studio. This is a simple auxiliary operation, which does not make sense to perform manually. Studio will generate a GWT descriptor for the AppWidgetSet.gwt.xml module, a directory for the module and an empty package, and also add the necessary tasks to the build.gradle assembly description.
The next step, run the action 'Create or update IDE project files' to generate the IntelliJ IDEA project files, and go write the component code in the IDE.
To program the component itself, we don’t need any special IDE features other than highlighting Java code, so it’s not necessary to use IntelliJ Idea, we can use Eclipse or Netbeans just as well. Thanks to the Google Web Toolkit, we can use familiar Java tools, and this is a great advantage when developing large-scale projects.
Writing a component

The component itself will be quite simple - a rating field in the form of 5 stars. This is an input field in which the user selects a rating with the mouse. It has a state on the server and the display should change when it changes.
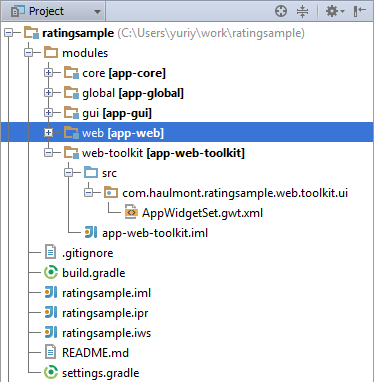
This is how our new web-toolkit module looks in the Idea project window. The root package contains the GWT module descriptor.
AppWidgetSet.gwt.xml
It inherits the base module CUBA.Platform and is the starting point of the entire client part of our application (the one that runs in the browser). By default, implementations of GWT components should be located in the 'client' subpackage. Let's create a client package and in it a ratingfield subpackage.
The first part of our component is the GWT widget. The RatingFieldWidget class, which we will place in the web-toolkit module:
RatingFieldWidget.java
package com.haulmont.ratingsample.web.toolkit.ui.client.ratingfield;
import com.google.gwt.dom.client.DivElement;
import com.google.gwt.dom.client.SpanElement;
import com.google.gwt.dom.client.Style.Display;
import com.google.gwt.user.client.DOM;
import com.google.gwt.user.client.Event;
import com.google.gwt.user.client.ui.FocusWidget;
import java.util.ArrayList;
import java.util.List;
// класс GWT виджета
public class RatingFieldWidget extends FocusWidget {
    private static final String CLASSNAME = "ratingfield";
     // API для реакции на клики
    public interface StarClickListener {
            void starClicked(int value);
    }
    protected List stars = new ArrayList(5);
    protected StarClickListener listener;
    protected int value = 0;
    public RatingFieldWidget() {
        DivElement container = DOM.createDiv().cast();
        container.getStyle().setDisplay(Display.INLINE_BLOCK);
        for (int i = 0; i < 5; i++) {
            SpanElement star = DOM.createSpan().cast();
            // Добавляем элемент звезды в контейнер
            DOM.insertChild(container, star, i);
            // Подписываемся на событие ONCLICK
            DOM.sinkEvents(star, Event.ONCLICK);
            stars.add(star);
        }
        setElement(container);
        setStylePrimaryName(CLASSNAME);
    }
    // главный метод обработки событий в виджетах GWT
    @Override
    public void onBrowserEvent(Event event) {
        super.onBrowserEvent(event);
        switch (event.getTypeInt()) {
            // Реагируем на события ONCLICK
            case Event.ONCLICK:
                SpanElement element = event.getEventTarget().cast();
                // только если клик по звезде
                int index = stars.indexOf(element);
                if (index >= 0) {
                    int value = index + 1;
                    // устанавливаем внутреннее значение
                    setValue(value);
                    // уведомляем интересующихся
                    if (listener != null) {
                        listener.starClicked(value);
                    }
                }
                break;
            }
    }
    // Понадобиться если на сервере зададут другой primaryStyleName
     // это часто случается при наследовании классов компонентов
    @Override
    public void setStylePrimaryName(String style) {
        super.setStylePrimaryName(style);
        for (SpanElement star : stars) {
            star.setClassName(style + "-star");
        }
        updateStarsStyle(this.value);
}
// Позволим изменять состояние стороннему коду
public void setValue(int value) {
        this.value = value;
        updateStarsStyle(value);
    }
    // обновляем визуальное представление
    private void updateStarsStyle(int value) {
            for (SpanElement star : stars) {
                star.removeClassName(getStylePrimaryName() + "-star-selected");
            }
            for (int i = 0; i < value; i++) {
                stars.get(i).addClassName(getStylePrimaryName() + "-star-selected");
            }
    }
}
A widget is an isolated class that is responsible for displaying and responding to events. He does not need to know about the server side, he only defines the interfaces for working with it. In our case, this is the setValue method and the StarClickListener interface.
It is worth noting that there is not a single JavaScript line in the entire widget code, which is pretty good for large and complex components. But do not forget that this Java code will be compiled in JavaScript and many parts of the standard Java library, for example, reflection and input-output, may not be available to you (for complete compatibility information, see here: www.gwtproject.org/doc/latest/RefJreEmulation.html )
We determine the appearance
As you may have noticed, there are no references to appearance in the widget code except for assigning style names to key elements. This technique is constantly used in the development of components and allows you to determine the appearance in CSS based on combinations of styles.
In order to determine the appearance of our component, first, create style files. To do this, we can use the action 'Create theme extension' for the theme 'halo'. This theme uses FontAwesome font glyphs instead of icons, which we will use. Studio will create empty SCSS files for our experiments in the themes directory of the web module.
It is customary to separate the styles of each component into a separate file componentname.scss in the components / componentname directory in the SCSS admixture format:
ratingfield.scss
@mixin ratingfield($primary-stylename: ratingfield) {
  .#{$primary-stylename}-star {
    font-family: FontAwesome;
    font-size: $v-font-size--h2;
    padding-right: round($v-unit-size/4);
    cursor: pointer;
    &:after {
          content: '\f006'; // 'fa-star-o'
    }
  }
  .#{$primary-stylename}-star-selected {
    &:after {
          content: '\f005'; // 'fa-star'
    }
  }
  .#{$primary-stylename} .#{$primary-stylename}-star:last-child {
    padding-right: 0;
  }
  .#{$primary-stylename}.v-disabled .#{$primary-stylename}-star {
    cursor: default;
  }
}
Then such a file is included in the main theme file
halo-ext.scss
@import "../halo/halo";
@import "components/ratingfield/ratingfield";
/* Define your theme modifications inside next mixin */
@mixin halo-ext {
  @include halo;
  @include ratingfield;
}
A few words about SCSS. This is a CSS style description format for using variables, impurities, and calculated values. It is actively used in many web frameworks, in Vaadin 7 it is the basic format of application themes. In the CUBA.Platform application, we can simply use this format, since Studio takes on the dirty work of organizing the assembly of SCSS themes.
The format of the description in the form of an impurity will help us if the component has heirs with a different primary-stylename. We simply enable ancestor styles using the SCSS include .
For our stars, we use two FontAwesome glyphs - 'fa-star' and 'fa-star-o'. CSS itself is quite simple and includes only star symbols in two states and a mouse cursor for them.
To switch themes in the application, select halo on the Project Properties page in CUBA.Studio.
Add the server side
Up to this point, we could use the widget we wrote in some GWT application, since it did not depend on the server in any way. Now let's talk about the Vaadin framework and its server-oriented model. It has a couple of features:
- the entire state of the components and input fields is stored on the server and can be restored even after the page is completely refreshed or the connection with the server
is disconnected - all useful application code, with the exception of the client part, is executed on the server.
That is, Vaadin components are hidden from the developer the way they work in the browser and the careless Java developer HTML / CSS never sees (well, or almost never sees, or else it’s still useful to write components).
Create the package com.haulmont.ratingsample.web.toolkit.ui in the web module. In it we will place the code of our component RatingField. We inherit a class from the Vaadin AbstractField class, which defines the basic logic of the input fields.
The key server components of the Vaadin component:
1) The RatingField component class defines the API for the server code, various get / set methods for working, event listeners and connection of data sources. Application developers always use the methods of this class in their code.
RatingField.java
package com.haulmont.ratingsample.web.toolkit.ui;
import com.haulmont.ratingsample.web.toolkit.ui.client.RatingFieldServerRpc;
import com.haulmont.ratingsample.web.toolkit.ui.client.RatingFieldState;
import com.vaadin.ui.AbstractField;
// Наше поле будет иметь тип значения Integer
public class RatingField extends AbstractField {
    public RatingField() {
            // регистрируем особую реализацию интерфейса, которая будет вызвана при запросе с клиента
        registerRpc(new RatingFieldServerRpc() {
            @Override
            public void starClicked(int value) {
                setValue(value, true);
            }
        });
    }
    // тип значения поля
    @Override
    public Class getType() {
            return Integer.class;
    }
    // определяем свой класс для состояния
    @Override
    protected RatingFieldState getState() {
            return (RatingFieldState) super.getState();
    }
    @Override
    protected RatingFieldState getState(boolean markAsDirty) {
            return (RatingFieldState) super.getState(markAsDirty);
    }
    // при вызове setValue из прикладного кода нужно обновить состояние
    @Override
    protected void setInternalValue(Integer newValue) {
        super.setInternalValue(newValue);
            if (newValue == null) {
                newValue = 0;
            }
            getState().value = newValue;
    }
}
2) The RatingFieldState status class is responsible for what data will be sent between the client and server. It defines public fields that will be automatically serialized on the server and deserialized on the client.
RatingFieldState.java
package com.haulmont.ratingsample.web.toolkit.ui.client;
import com.vaadin.shared.AbstractFieldState;
public class RatingFieldState extends AbstractFieldState {
    {   // изменим главное имя стиля компонента
            primaryStyleName = "ratingfield";
    }
    // объявим поле для нашего значения
    public int value = 0;
}
3) RatingFieldServerRpc interface - defines the server API for the client part, its methods can be called from the client using the remote procedure call mechanism built into Vaadin. We implement this interface in the component itself, in this case, we simply call the setValue method of our field.
RatingFieldServerRpc.java
package com.haulmont.ratingsample.web.toolkit.ui.client;
import com.vaadin.shared.communication.ServerRpc;
public interface RatingFieldServerRpc extends ServerRpc {
    // метод будет вызываться в клиентском коде
    void starClicked(int value);
}
An important point is that the state classes and rpc should be located in the 'client' subpackage, so the tenacious paws of the GWT compiler will easily get to them to create their JavaScript representation for the client code. In addition, classes should not use code that cannot be compiled by GWT.
Now the time has come to associate our client code with the server side. Connector classes play this role in Vaadin. They are placed next to widget classes. The connector class is annotated by Connect (ComponentName.class), and the correspondence of the client part of the server is set:
RatingFieldConnector.java
package com.haulmont.ratingsample.web.toolkit.ui.client.ratingfield;
import com.haulmont.ratingsample.web.toolkit.ui.RatingField;
import com.haulmont.ratingsample.web.toolkit.ui.client.RatingFieldServerRpc;
import com.haulmont.ratingsample.web.toolkit.ui.client.RatingFieldState;
import com.vaadin.client.communication.StateChangeEvent;
import com.vaadin.client.ui.AbstractFieldConnector;
import com.vaadin.shared.ui.Connect;
// Связываем наш коннектор с серверной реализацией RatingField
// наследуем коннектор для AbstractField
@Connect(RatingField.class)
public class RatingFieldConnector extends AbstractFieldConnector {
    // мы будем использовать виджет RatingFieldWidget
    @Override
    public RatingFieldWidget getWidget() {
            RatingFieldWidget widget = (RatingFieldWidget) super.getWidget();
        if (widget.listener == null) {
widget.listener = new RatingFieldWidget.StarClickListener() {
                @Override
                public void starClicked(int value) {
                getRpcProxy(RatingFieldServerRpc.class).starClicked(value);
                }
            };
        }
        return widget;
    }
    // наш тип состояния - RatingFieldState
    @Override
    public RatingFieldState getState() {
            return (RatingFieldState) super.getState();
    }
    // реагируем на изменение состояния на сервере
    @Override
    public void onStateChanged(StateChangeEvent stateChangeEvent) {
        super.onStateChanged(stateChangeEvent);
      // если значение на сервере изменилось, обновляем виджет
        if (stateChangeEvent.hasPropertyChanged("value")) {
            getWidget().setValue(getState().value);
        }
    }
}
Trial run
To try all this in practice, we will carry out several preparatory steps:
1) Create a database for the application from the Studio menu: Run - Create database
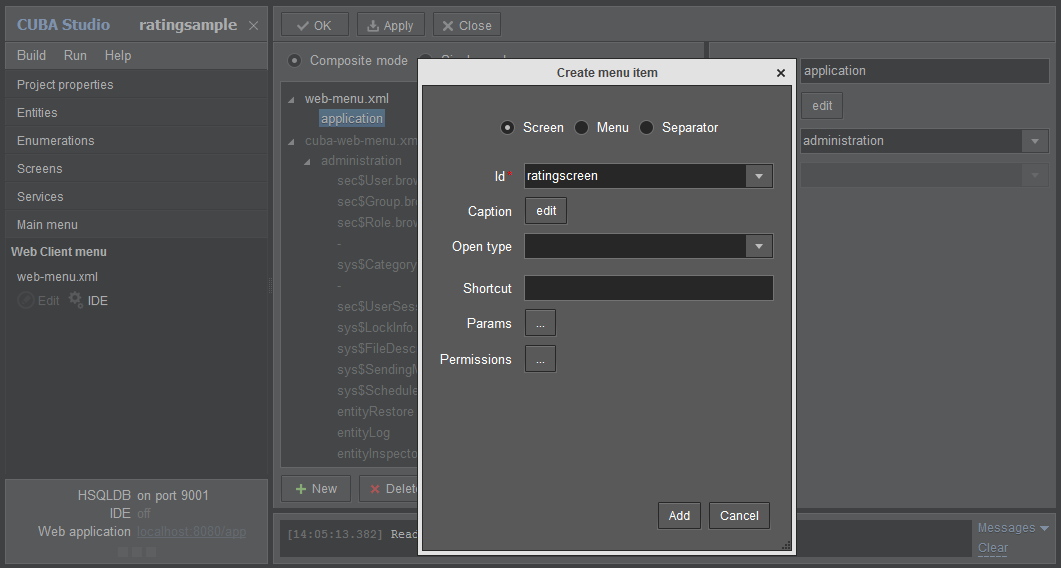
2) Create a screen for placing the component in the web module:

3) Add a screen to the application menu: Main menu - Edit
4) Now let's move on to editing our screen in the IDE.
We need a container for our component, let's declare it in the screen XML:
rating-screen.xml
We’ll open the RatingScreen.java screen controller class and add the code for placing our component on the screen:
RatingScreen.java
package com.haulmont.ratingsample.web;
import com.haulmont.ratingsample.web.toolkit.ui.RatingField;
import com.haulmont.cuba.gui.components.AbstractWindow;
import com.haulmont.cuba.gui.components.BoxLayout;
import com.haulmont.cuba.web.gui.components.WebComponentsHelper;
import javax.inject.Inject;
import java.util.Map;
public class RatingScreen extends AbstractWindow {
    @Inject
    private BoxLayout container;
    @Override
    public void init(Map params) {
        super.init(params);
        // используем API CUBA чтобы добраться до Vaadin реализации контейнера:
        com.vaadin.ui.Layout containerLayout = WebComponentsHelper.unwrap(container);
        // используем наш компонент как в обычном Vaadin приложении:
        RatingField field = new RatingField();
        field.setCaption("Rate this!");
        containerLayout.addComponent(field);
    }
}
The Web module perfectly supports the integration of Vaadin components, both third-party and self-written. You can directly use them as if you were writing an application on pure Vaadin.
We start the application from Studio: Start application server, go to http: // localhost: 8080 / app to see the result:
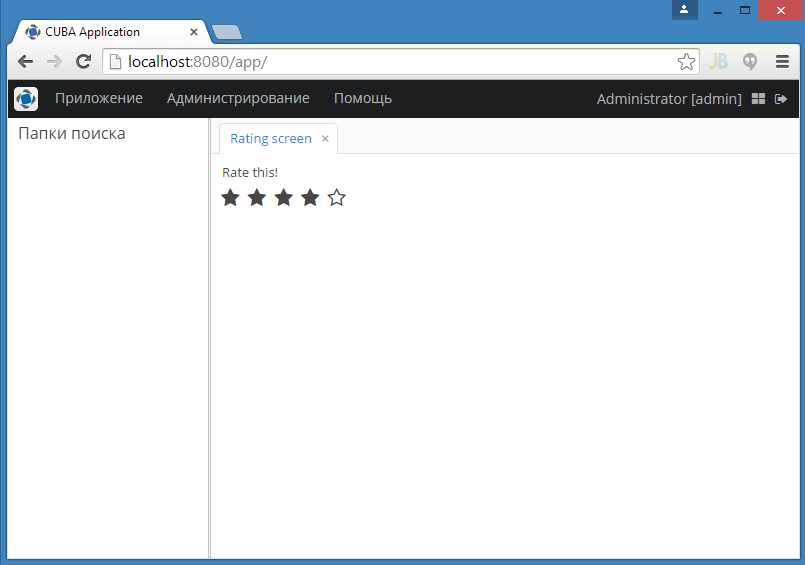
We are pleased with the fully functional component that we can now use from our Java code on the server. All code is suitable for use in any Vaadin application.
The full application code can be found here: github.com/Haulmont/ratingsample.git
Debugging in the browser
We will only consider debugging widget code, since debugging Java component code on the server is quite simple.
Debugging any GWT code is completely nontrivial and requires accuracy. For debugging, use the SuperDevMode mode. Your project needs to build with GWT 2.5.1 or later. This mode involves the use of mapping Java code to JavaScript code in a browser (source-maps, see developer.chrome.com/devtools/docs/javascript-debugging#source-maps ). That is, you will see and debug Java code in the browser, but with some limitations.
The scheme of work is as follows:
- You start the com.google.gwt.dev.codeserver.CodeServer server giving the browser side the correspondence of JS code and Java code, as well as collecting your widget when updating the page
- Open an application with options? Debug & superdevmode
- Configure Developer Tools, F12, in the lower right corner there is a button to open the settings. Mark the option Enable source maps
- Refresh the page, open the Sources tab in Developer Tools. All Java classes of GWT widgets should be shown there. In the Chrome debugger, you can set breakpoints, watch variables, and execute expressions.
- When changing the widget code in the project, it is enough to refresh the page, the widget set will be rebuilt and picked up by the browser. This allows you to see widget code changes on the fly, which significantly speeds up development.
We try to run everything in our project:
1) To start this mode, we need to add the runtime dependency servletApi for the web-toolkit module in the build.gradle file:
build.gradle
...
configure(webToolkitModule) {
    dependencies {
        ...
        runtime(servletApi)
    }
...
2) Perform the 'Create or update IDE project files' action in Studio so that Idea sees a new dependency
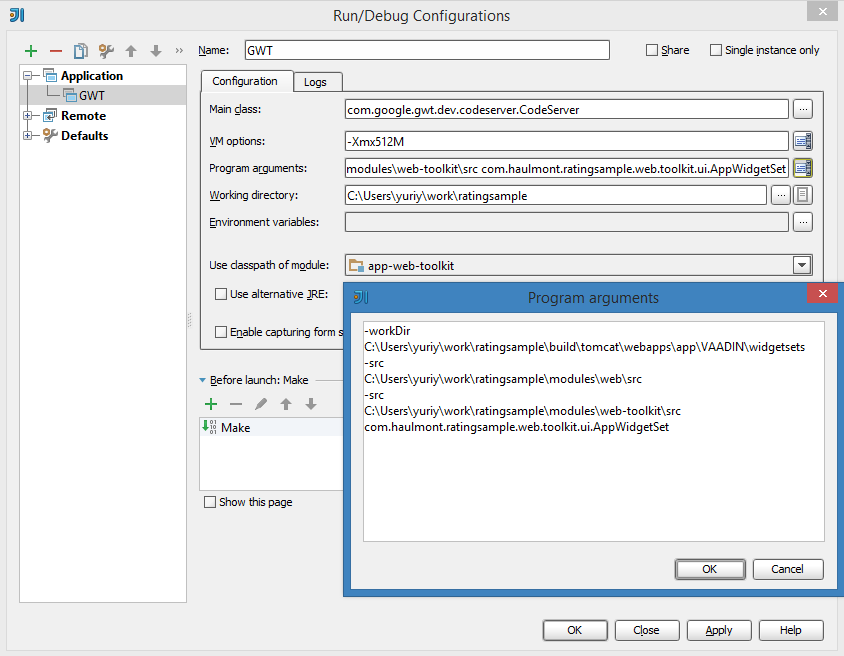
3) Create a new launch configuration in Idea with the Application type and the following parameters:
Main class: com.google.gwt.dev.codeserver.CodeServer
VM options: -Xmx512M
Use classpath of module: app-web-toolkit
Program arguments: -workDir C: \ Users \ yuriy \ work \ ratingsample \ build \ tomcat \ webapps \ app \ VAADIN \ widgetsets -src C: \ Users \ yuriy \ work \ ratingsample \ modules \ web \ src -src C: \ Users \ yuriy \ work \ ratingsample \ modules \ web-toolkit \ src com.haulmont.ratingsample.web.toolkit.ui.AppWidgetSet
Paths to build \ tomcat \ webapps directories \ app \ VAADIN \ widgetsets, modules \ web \ src and modules \ web-toolkit \ src must be replaced with your own.
4) Run in Studio: Run-Start application server
5) Run the previously created GWT configuration in Idea
6) Go to the address http: // localhost: 8080 / app? Debug & superdevmode
7) Open DevTools in Chrome and see your Java code:

The advantage of this method is that it does not require special support from the IDE, it works quickly and allows you to debug code directly in the browser. The disadvantages include the fact that you cannot access Java code during debugging, as well as breakpoints with Java conditions, and it’s somehow unusual. There is also a fat minus - old browsers do not know how to source-maps at all, which makes normal debugging difficult.
Instead of a conclusion
GWT is a very strong and developed web framework; in recent years, it has been actively used by a large number of developers around the world. Google does not forget about its brainchild and actively uses it, most recently they released Gmail Inbox ( http://gmailblog.blogspot.ru/2014/11/going-under-hood-of-inbox.html ), which intensively uses GWT for web interface.
Vaadin also does not lag behind and is now one of the best server-side options for GWT. Server-oriented model allows you to develop faster, easier to maintain applications and less worry about data security. The complexity of improving the functionality of GWT and Vaadin is quite isolated and should not be scared, the advantages of these technologies for development cover all their disadvantages.
We have been actively using Vaadin for 5+ years and are confident in it. I advise everyone to consider it as the main framework for building web applications, especially business-oriented.
Thanks for attention!