 November 18, 2014 at 10:35
Install, configure and use chkrootkit vulnerability scanner
- Tutorial
In my previous publication about the rkhunter vulnerability scanner, the chrootkit scanner was mentioned in the comments by the indexator hub user. With similar functionality with rkhunter, there are a number of differences that will be interesting to consider in this article. It is also interesting that recently a new version of the scanner was released, the development of which seemed frozen since 2009.

Chkrootkit is short for check rootkit. Rootkits, in turn, are malicious applications designed to covertly penetrate the server and disguise themselves as normal processes or programs in order to gain full access to the server.
The chkrootkit shell script is designed to help system administrators check the system for known rootkits. The first question that may arise with this information is: Why shell? Why not perl or bash like the same rkunter? The developers sought to unify the script as much as possible so that it runs on all systems with a shell. And at the time of the beginning of the development of the script, the same perl was far from everywhere.
The essence of the search is simple. Using system tools like strings and grep (to be more precise, the FAQ on the developer's site lists the programs used - awk, cut, echo, egrep, find, head, id, ls, netstat, ps, strings, sed, uname ) chkrootkit looks for suspicious code fragments in programs, compares running processes with information from / proc, revealing discrepancies.
The tool consists of a number of modules responsible for different verification methods
Alas, the search for facts of deleting lines from log files is not 100% guaranteed.
Currently, the latest version is 0.50 dated June 4, 2014. The developers promise the scanner will work under FreeBSD starting with 2.0 and others from the * BSD family, various Linux distributions with kernels from 2.2 and higher, MacOS X, Solaris and other more exotic operating systems.
CentOS has version 0.49 in the EPEL repositories; in ports / packages, FreeBSD is missing. To build the latest version, you will need to install gcc. Using CentOS 6.x as an example, it will look like this:
Install gcc:
Download the latest version from the official ftp:
Unpack:
Go to the directory:
We collect modules:
Run the shell script:
I also checked it on FreeBSD 10.1 - the assembly of the modules and the verification passed without problems.
In principle, you can not collect modules, and then on checks where additional modules are required, there will be errors like:
By default, a full system check is performed on all available tests, a list of which can be obtained by running the script with the '-l' switch. Unfortunately, I could not find in the documentation a description of all the tests that can be run, but this can be discussed in the comments.
Please note that chrootkit does not take a snapshot of the current files and does not save in its database, like the same rkunter.
As launch keys, you can specify which of the tests to run.
For example,
will search for malicious code and running traffic interceptors
Messages that may be issued during scanning
For regular system checks, you can add chkrootkit scan execution to the scheduler as root.
For a daily full scan of the system with all available modules and tests, followed by sending a report to the mailbox.
In ISPmanager5, this can be configured from the convenient scheduler interface, which is located in the “System” section.
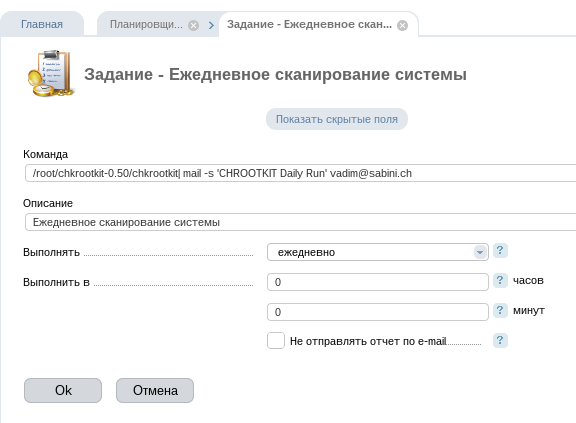
But since it is highly likely that the infected OS can change values during scanning, it is recommended to run chkrootkit to check the system when the server boots in recovery mode or from boot live image.
In this case, the procedure is as follows:
Official site of the project: http://www.chkrootkit.org/
PS: I wish chkrootkit to always display “nothing found” or “not infected” messages on your systems.
Chkrootkit is short for check rootkit. Rootkits, in turn, are malicious applications designed to covertly penetrate the server and disguise themselves as normal processes or programs in order to gain full access to the server.
The chkrootkit shell script is designed to help system administrators check the system for known rootkits. The first question that may arise with this information is: Why shell? Why not perl or bash like the same rkunter? The developers sought to unify the script as much as possible so that it runs on all systems with a shell. And at the time of the beginning of the development of the script, the same perl was far from everywhere.
The essence of the search is simple. Using system tools like strings and grep (to be more precise, the FAQ on the developer's site lists the programs used - awk, cut, echo, egrep, find, head, id, ls, netstat, ps, strings, sed, uname ) chkrootkit looks for suspicious code fragments in programs, compares running processes with information from / proc, revealing discrepancies.
The tool consists of a number of modules responsible for different verification methods
- chkrootkit: a shell script that checks system binaries for modification with rootkits.
- ifpromisc.c: module for searching interfaces that work on packet capture.
- chklastlog.c: a module that checks for the fact of deleting entries from the lastlog log file.
- chkwtmp.c: similar to the previous module, checks the wtmp log file.
- chkutmp.c: checks the utmp log file for traces of deleting records.
- check_wtmpx.c: relevant for Solaris OS. verifies the removal of entries from the wtmpx log.
- chkproc.c: search for traces of famous LKM Trojans (Linux Kernel Module).
- chkdirs.c: Search for traces of famous LKM Trojans (Linux Kernel Module).
- strings.c: an analogue of the strings utility.
Alas, the search for facts of deleting lines from log files is not 100% guaranteed.
Currently, the latest version is 0.50 dated June 4, 2014. The developers promise the scanner will work under FreeBSD starting with 2.0 and others from the * BSD family, various Linux distributions with kernels from 2.2 and higher, MacOS X, Solaris and other more exotic operating systems.
CentOS has version 0.49 in the EPEL repositories; in ports / packages, FreeBSD is missing. To build the latest version, you will need to install gcc. Using CentOS 6.x as an example, it will look like this:
Install gcc:
yum install gccDownload the latest version from the official ftp:
wget ftp://ftp.pangeia.com.br/pub/seg/pac/chkrootkit.tar.gzUnpack:
tar -xzf chkrootkit.tar.gzGo to the directory:
cd chkrootkit-0.50We collect modules:
make senseRun the shell script:
./chkrootkit
I also checked it on FreeBSD 10.1 - the assembly of the modules and the verification passed without problems.
In principle, you can not collect modules, and then on checks where additional modules are required, there will be errors like:
Checking `ldsopreload'... can't exec ./strings-static, not tested
Checking `lkm'... not tested: can't exec
Checking `sniffer'... not tested: can't exec ./ifpromisc
Checking `wted'... not tested: can't exec ./chkwtmp
Checking `z2'... not tested: can't exec ./chklastlog
Checking `chkutmp'... not tested: can't exec ./chkutmp
By default, a full system check is performed on all available tests, a list of which can be obtained by running the script with the '-l' switch. Unfortunately, I could not find in the documentation a description of all the tests that can be run, but this can be discussed in the comments.
Please note that chrootkit does not take a snapshot of the current files and does not save in its database, like the same rkunter.
As launch keys, you can specify which of the tests to run.
For example,
./chkrootkit aliens snifferwill search for malicious code and running traffic interceptors
Messages that may be issued during scanning
- not infected - the scan did not detect anything suspicious
- INFECTED - a program with a high probability relates to a rootkit
- not tested - the test was not performed (for this OS there is no possibility of verification, no verification module, command-line parameters that disable this verification are set)
- not found - the program was not found and therefore was not tested
- Vulnerable but disabled - the probability that the application is malicious is high, but at the time of verification it was inactive.
For regular system checks, you can add chkrootkit scan execution to the scheduler as root.
crontab -e@daily /путь/до/chkrootkit | mail -s 'CHROOTKIT Daily Run' почтовый@ящикFor a daily full scan of the system with all available modules and tests, followed by sending a report to the mailbox.
In ISPmanager5, this can be configured from the convenient scheduler interface, which is located in the “System” section.
But since it is highly likely that the infected OS can change values during scanning, it is recommended to run chkrootkit to check the system when the server boots in recovery mode or from boot live image.
In this case, the procedure is as follows:
- boot from live image
- download the latest version of chkrootkit
- compile modules
- mount partitions on a (potentially) infected system
- scan chkrootkit -r / mnt /
Official site of the project: http://www.chkrootkit.org/
PS: I wish chkrootkit to always display “nothing found” or “not infected” messages on your systems.









