Difficult IPSec with Linux
Developing IT infrastructure sooner or later comes the task of integrating with any services of a large organization. This may be, for example, a bank or carrier. As a rule, in large organizations, well-established information security policies are in place, which in particular require the implementation of a service with an infrastructure external to them through encrypted channels - IPSec. At the same time, in small
The general scheme of the service is presented below. As a rule, in large organizations everything is already standardized, put on stream, all possible encryption and other networking things are done on separate equipment (tsiski-junipery and others like them), and, more importantly, by individual people (perhaps every blue square on the diagram below serve different people). You have one virtual machine with which the service will be launched and IPSec organized.
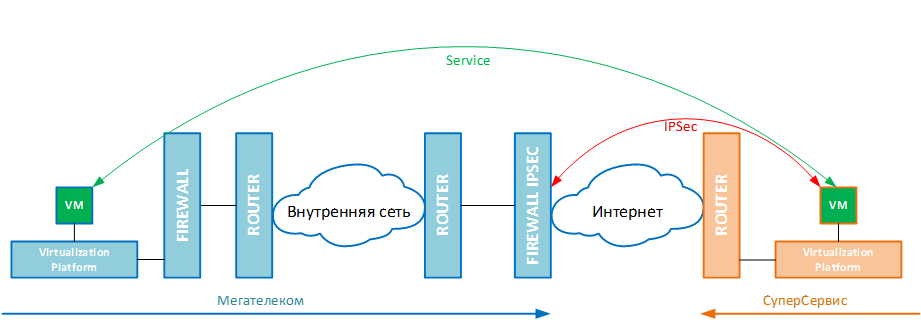
Please note that IPSec itself is organized between the same IP addresses (in my example
10.0.255.1 <-> 10.0.1.1), and the service itself between the others ( 192.168.255.1<-> 192.168.1.1). Such schemes are also called IPSec Network-Network . A simple example - you work in a young but very ambitious company SuperService., and you need to organize interaction with the closed API of MegaTelecom . Your infrastructure is one VDS server, the partner infrastructure is a bunch of network and server equipment. The task is divided into two stages:
- Arrange transportation (as will interconnection).
- Configure the service (run applications directly on the servers).
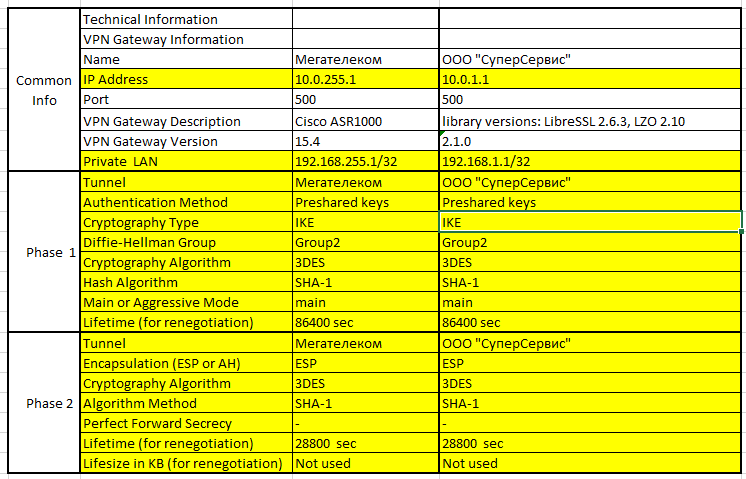
So, the SuperService manager decided to organize a connection to some large organization to solve a business problem. He turned to MegaTelecom , for which he was sent technical conditions for connection. One of these conditions is IPSec organization . This condition came in the form of an excel tablet , an example of which I presented below. In the picture I highlighted the technically significant parameters in yellow. The format may be different, but the essence remains the same.
Initially, it comes not completed on your part, it must be filled out and sent to the partner for approval. After agreeing, you can sit down and try to customize your Linux machine.
IPSec concept
Next, I will give a bit of theory for people who are not at all familiar with technology. Everything I describe further refers to pure Ethernet and IPv4. I will not go into the encryption algorithms, key exchange, instead focus on the network part.
IPSec is a set of techniques and protocols for establishing a secure connection.
Unlike other tunneling technologies (GRE, PPP, L2TP, even MPLS-TE) IPSec does not create explicit tunnel interfaces through which traffic can be routed. Instead, IPSec provides the concept of so-called Security Assotiations (SA) . SA is a tunnel from one network device to another. But do not forget that SA- not a network interface in the normal sense of the word, classic routing does not work here. Instead of the routing table, the concept of Security Policy (SP) works here . We explicitly prescribe something like an access list (ACL) for passing traffic through a specific SA. All these things are defined in the so-called ISAKMP framework .
ISAKMP is a description of IPSec procedures, referred to in the literature as its framework. It describes the terms SA, SP, SAD (Security Assotiations Database), SPD (Security Policy Database), the need to install auxiliary tunnels ... ISAKMP is designed not to depend on tunneling technologies, authentication algorithms and encryption. It simply introduces the necessary definitions.Before encrypting traffic, the parties must agree on the parameters (and keys) of this encryption. For this, an auxiliary tunnel (also called the ISAKMP tunnel) rises between both sides, which operates all the time. This bidirectional tunnel is a connection over UDP (by default on port 500). To organize this auxiliary tunnel, the parties must verify each other's authenticity (the password must match). This is done by the IKEv1 / 2 protocol (Internet Key Exchange) . And already through an organized ISAKMP tunnel, the parties agree to encrypt user traffic directly.
IKE (v1 / 2) - authentication protocol itself. It already implements key exchange algorithms and their application.
Thanks to the Cisco concept, ISAKMP and IKE are now considered synonymous.
The organization of IPSec itself is divided into two phases:
- Creating an auxiliary ISAKMP tunnel
- Creating a user data tunnel
As I wrote, in the concept of IPSec (and already correct to say, in the concept of ISAKMP ) tunnels are called SA .
The first phase (organization of ISAKMP SA) can be carried out in two modes:
- main - the parties alternately exchange the negotiation parameters. It is considered more secure, used for permanent channels (our case).
- aggressive - the initiator in one message sends all the necessary negotiation parameters, used when connecting a remote user for a temporary session (to make it faster).
It should be understood that the main SA-tunnels are unidirectional . For two-way data transmission over an IPSec channel, there must be two tunnels: source (src) → receiver (dst) and vice versa.
In all encryption methods, additional headers are added to the original IP packet, encapsulation occurs. There are two ways of this encapsulation - AH (Authentication Header) and ESP (Encapsulation Security Payload) . AH only authenticates the packet (digitally signed by the sender), ESP and authenticates (signs), and encrypts. Today, AH is practically not used, all are packaged in ESP.
You can encrypt and authenticate the source IP packet without taking into account the IP header (transport mode) or with it (tunnel mode). Transport is used when you plan to organize your tunnels using other technologies (not IPSec / ESP). For example, GRE, l2tp, ppp. For the purpose of connecting some service to the internal infrastructure of a large organization, it is practically not used. I used such a scenario to merge several offices into one VPN through IPSec. We are also more interested in tunnel mode. As you can see from the picture, one additional IP header is added here.
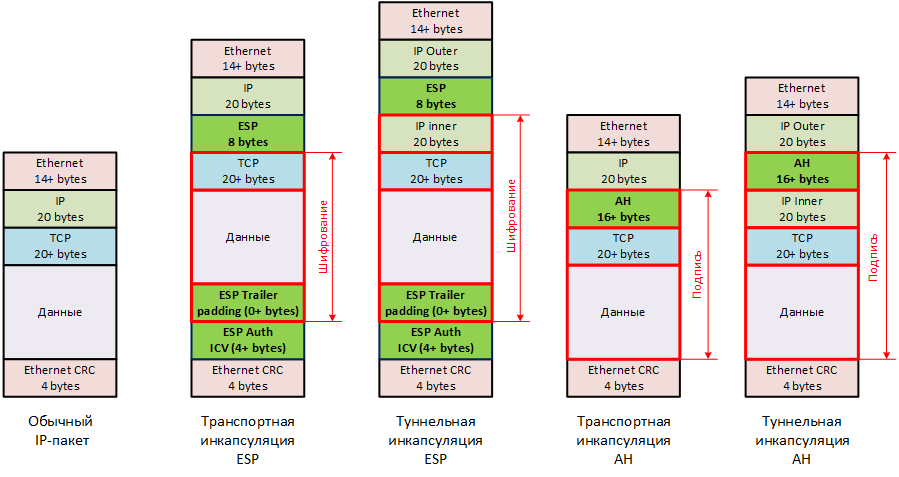
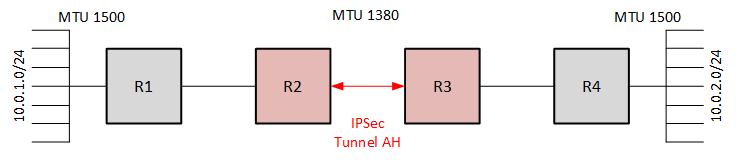
By the way, there is a real example of using AH-encapsulation. Suppose we have two networks connected to different routers. Hosts must transmit information with an MTU of 1500 bytes without fragmentation, but we have an intermediate section that supports only 1380 bytes. The whole trail is trusted. We can take advantage of the fact that IPSec does not create tunnel interfaces, in the classical sense through which traffic is not routed. We will create an AH type SA tunnel (we don’t need to encrypt it), then the traffic will go to it. Only external IP packets will be fragmented in traffic (by external IP headers), internal ones will be reassembled without changes.
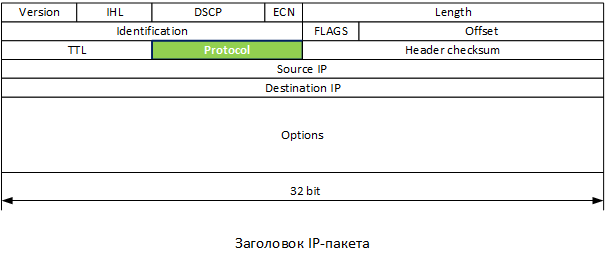
Note that the ESP header gets up to TCP / UDP transport . Remember, in the header of the IP packet is the Protocol field? Based on this field, the network equipment (and the final hosts) correctly process IP packets. So, for ESP, your number is 50. A complete list of protocols for this field can be viewed on the wiki , it can be very useful.
By itself, the tunnel does not rise, you need to send traffic there. As I wrote above, routing rules do not work here, you need to write Security Policy (SP) .
Policies consist of the source address, destination address, direction (in, out, fwd) and user tunnel parameters (ESP is described here as either AH, tunnel variant or transport). This is more like setting up rules for NATa. NAT is also not enough routing table entries. And there, too, the rules indicate where, where and how , and not where and through what . And also with an incorrect movement of the hand, you can fill up the entire connection on the remote server.
All IPSec manipulations add overhead headers. At a minimum, they will eat another 40 bytes from the source packet. Thus, for example, with a standard MTU for PPPoE of 1380 bytes of connections, the real MTU will be <1340.
Linux IPSec
Let's practice on the example of DEB-distributions. I will consider only the case with authorization based on the pre-shared-key (PSK) , we will configure the scheme from the beginning of the article.
IPSec itself is supported by the kernel, but this support is very limited. In fact, core modules do only what is associated with encryption and already received (transferred to the kernel) keys - packet processing. And in order to transfer the parameters and rules with which to handle traffic, separate software is required. There are several solutions for such software:
- KAME, migrated from BSD
- xSWAN (strongswan, freeswan, libreswan, etc)
- shorewall
It seemed to me the simplest (most predictable) version of KAME, and we will continue to turn it on.
#Для deb-дистрибутивов команда сама подтянет необходимые ядреные модули
root@localhost: ~# apt-get install racoon ipsec-tools
Traditionally KAME consisted of two components.
- A racoon daemon to manage the ISAKMP tunnel .
- Setkey utilities for managing SA data tunnels.
Let's start with the first. Racoon is responsible for authorization parameters for tunnels within IKE. This is a daemon, it is configured with one configuration file (
/etc/racoon.conf), it is started with a regular init-script ( /etc/init.d/racoon <start|stop|restart>).root @ localhost: ~ # cat /etc/racoon.conf
# Практически все данные в разделах remote и sainfo берутся из первоначального шаблона## Мы рассмотрим простейший пример с PSK авторизацией
path pre_shared_key "/etc/racoon/psk.txt";
log debug;
listen {
# Указываем интерфейс, с которого будет строиться будущий ISAKMP туннель
   isakmp 10.0.1.1 [500];
   strict_address;
}
# В разделе remote перчислены настройки для первой фазы IPSec.# Это в некотором смысле аналог tunnel-group в ASA.# Вместо конкретного IP-адреса можно указать anonymous# Это будет означать возможность подключения к вам с любого адреса. # Так делаются присоединения типа user-network# remote anonymous
remote 10.0.255.1 {
   nat_traversal off;
   exchange_mode main;
   my_identifier address 10.0.1.1;
   proposal {
      encryption_algorithm 3des;
      hash_algorithm sha1;
      authentication_method pre_shared_key;
      dh_group modp1024;
      lifetime time 86400 sec;
   }
}
# Вторая фаза IPSec. Аналог transform-set в ASA.## Предполагается, что для разных адресов взаимодействия# можно применять разные параметры шифрования второй фазы.# Конкретизация сервисов как раз указывается в первой строчке# sainfo address <src> address <dst># Скорее всего вам это не понадобится, вы будете писать первую строку так# sainfo anonymous
sainfo address 192.168.1.1 any address 192.168.255.1 any {
   pfs_group modp1024;
   lifetime time 28800 sec;
   encryption_algorithm 3des;
   authentication_algorithm hmac_sha1;
   compression_algorithm deflate;
}
root @ localhost: ~ # cat /etc/racoon/psk.txt
# Файлик с PSK-ключами# Формат <REMOTE IP ADDR> <PASSWORD># Важно - владелец файла должен быть такой же, от чьего имени запускается racoon
10.0.255.1 SUPERPASSWORD
As always, the details in Next will be dealt with the setkey utility . It also runs as a daemon ( ), but in fact it executes the script . As I said, it already sets up creates tunnels for user traffic. Namely sets SA and SP for them. This is something like a crypto-map on ASA. The easiest option for us is to add just SP. Then SA will be built automatically based on the parameters of the second phase, specified in the racoon settings . But it is possible not to use the second-phase parameters from racoon at all , but to set the SA through this utility. Details and syntax can be found in . And I will give you an example of the simplest configuration.
man 5 racoon.conf/etc/init.d/setkey <start|stop|restart>/etc/ipsec-tools.confman 8 setkeyroot @ localhost: ~ # cat /etc/ipsec-tools.conf
flush;
spdflush;
spdadd 192.168.1.1/32 192.168.255.1/32 any -P out ipsec
      esp/tunnel/10.0.1.1-10.0.255.1/require;
spdadd 192.168.255.1/32 192.168.1.1/32 any -P in ipsec
      esp/tunnel/10.0.255.1-10.0.1.1/require;
Currently, the setkey utility is duplicated by the iproute2 module .
Within it, there are two record management teams, SA and SP.
- ip xfrm state
- ip xfrm policy
In addition to managing the same utility, you can view the status of organized SAs and SPs applied to traffic . Read more in
man 8 ip-xfrm.Take another look at the original label. There are different IP addresses for IPSec and service. The internal IP address is filtered inside the Megatelecom infrastructure . But we only have one virtual machine. It should somehow appear internal IP-address, and packets into the tunnel must leave with him. There are several options to achieve this scenario:
- A static route without a nextop, but with an explicit indication of the outgoing interface and IP address.
- Setting routes based on policy based routing (PBR in Linux aka ip rule ).
- Address Translation ( NAT / MASQARADE ).
From my point of view, the first option is appropriate here.
We can add an additional (secondary) IP address to our interface, while it is better to make an alias for this interfaceroot@localhost: ~# ip addr add 192.168.1.1/32 dev eth1 label eth1:1
and configure the route to the server by Megatelecom from this IP address.root@localhost: ~# ip route add 192.168.255.1/32 dev eth1:1 src 192.168.1.1
But if you do this, nothing will start. The fact is that when adding a route in this form, the Linux station will try to determine the MAC address of the recipient, it will do it through ARP ... The computer will send ARP requestsWho has IP 192.168.255.1. Since 192.168.255.1 is not on the same network as 192.168.1.1 (mask / 32!), There will be no answer to ARP. But when you try to connect it will be returned from the local IP address will be returnedNo route to host. To defeat this, we need to set a static ARP record:root@localhost: ~# arp -s 192.168.255.1 00:00:00:00:00:01 -i eth1:1
Such a life hack. By the way, such manipulations can lead not quite to the correct operation of the Linux IP stack. In one of the cases, the teamsip routedid not lead to the desired result; they had to restart the network stack.
Health check
Do not forget, the tunnel will rise only when the traffic goes into it! It is necessary to start pinging from a specific interface (IP address) to the destination.
root@localhost: ~# ping -I 192.168.1.1 192.168.255.1With a slight delay, there should be answers from the reverse side (if of course ICMP is not closed anywhere on the site).
We can see if the ISAKMP tunnel is up.
racoonctl show-sa isakmp
root@localhost: ~# racoonctl show-sa isakmp
Destination        Cookies                                              Created
10.0.1.1.500       356a7e11111a93f:367111530375c065  2018-10-02 09:18:28
We can also see user data tunnels.
racoonctl show-sa esp
10.0.1.1 10.0.255.1
        esp mode=tunnel spi=2148175815(0x800a8fc7) reqid=0(0x00000000)
        E: 3des-cbc  799e587f 6a2b4b78 5590cc2a 3d3ee331 f7e7f472 01abcdef
        A: hmac-sha1  01c5161f 46679a36 5d07ee9d f159fc9a 01abcdef
        seq=0x00000000 replay=4 flags=0x00000000 state=mature
        created: Oct  2 09:22:44 2018   current: Oct  2 10:39:21 2018
        diff: 4597(s)   hard: 28800(s)  soft: 23040(s)
        last: Oct  2 09:22:45 2018      hard: 0(s)      soft: 0(s)
        current: 84(bytes)      hard: 0(bytes)  soft: 0(bytes)
        allocated: 1    hard: 0 soft: 0
        sadb_seq=1 pid=3764 refcnt=0
10.0.255.1 10.0.1.1
        esp mode=tunnel spi=45614328(0x02b804f8) reqid=0(0x00000000)
        E: 3des-cbc  97cedcf1 644e8bbb c22b4e2c fa08a874 01abcdef 211ad19e
        A: hmac-sha1  1ab3e79d 3fd924a0 01abcdef 6c9ac89a 01abcdef
        seq=0x00000000 replay=4 flags=0x00000000 state=mature
        created: Oct  2 09:22:44 2018   current: Oct  2 10:39:21 2018
        diff: 4597(s)   hard: 28800(s)  soft: 23040(s)
        last: Oct  2 09:22:45 2018      hard: 0(s)      soft: 0(s)
        current: 84(bytes)      hard: 0(bytes)  soft: 0(bytes)
        allocated: 1    hard: 0 soft: 0
        sadb_seq=0 pid=3764 refcnt=0
It can be useful in tcpdump to see the connection establishment logic. Here you can also see the phases of the establishment of the connection and the traffic already encrypted in ESP. Of course, there are techniques to decipher it, but usually this is already enough.
root @ localhost: ~ # tcpdump -i eth1 host 10.0.255.1
18:01:06.409631 IP 10.0.1.1.500 > 10.0.255.1.500: isakmp: phase 1 I ident
18:01:06.439276 IP 10.0.255.1.500 > 10.0.1.1.500: isakmp: phase 1 R ident
18:01:06.440840 IP 10.0.1.1.500 > 10.0.255.1.500: isakmp: phase 1 I ident
18:01:06.475244 IP 10.0.255.1.1.500 > 10.0.1.1.500: isakmp: phase 1 R ident
18:01:06.477032 IP 10.0.1.1.500 > 10.0.255.1.500: isakmp: phase 1 I ident[E]
18:01:06.487785 IP 10.0.255.1.500 > 10.0.1.1.500: isakmp: phase 1 R ident[E]
18:01:06.488048 IP 10.0.1.1.500 > 10.0.255.1.500: isakmp: phase 2/others I inf[E]
18:01:07.412451 IP 10.0.1.1.500 > 10.0.255.1.500: isakmp: phase 2/others I oakley-quick[E]
18:01:07.465363 IP 10.0.255.1.500 > 10.0.1.1.500: isakmp: phase 2/others R oakley-quick[E]
18:01:07.465940 IP 10.0.1.1.500 > 10.0.255.1.500: isakmp: phase 2/others I oakley-quick[E]
18:01:08.467373 IP 10.0.1.1 > 10.0.255.1: ESP(spi=0x7aabfa82,seq=0x1), length 116
18:01:08.480141 IP 10.0.255.1 > 10.0.1.1: ESP(spi=0x0386f867,seq=0x1), length 116
When connecting remotely via SSH, in order not to produce a bunch of windows, it is convenient to run tcpdump in the background: We start ping, telnet, netcat ...Also in the logs you can see the successful status of the connection. It shows the successful establishment of both phases of IPSec.root@localhost: ~# tcpdump -i eth1 -w ipsec.pcap esp &root@localhost: ~# killall tcpdump
root@localhost: ~# tcpdump -vr ipsec.pcap
root @ localhost: ~ # cat /var/log/daemon.log
Oct  3 17:53:26 vm22433 racoon: INFO: IPsec-SA request for 10.0.255.1 queued due to no phase1 found.
Oct  3 17:53:26 vm22433 racoon: INFO: initiate new phase 1 negotiation: 10.0.1.1[500]<=>10.0.255.1[500]
Oct  3 17:53:26 vm22433 racoon: INFO: begin Identity Protection mode.
Oct  3 17:53:26 vm22433 racoon: INFO: received Vendor ID: CISCO-UNITY
Oct  3 17:53:26 vm22433 racoon: INFO: received Vendor ID: DPD
Oct  3 17:53:26 vm22433 racoon: INFO: received Vendor ID: draft-ietf-ipsra-isakmp-xauth-06.txt
Oct  3 17:53:26 vm22433 racoon: INFO: ISAKMP-SA established 10.0.1.1[500]-10.0.255.1[500] spi:ebddc300af62ae42:abcdef0123
Oct  3 17:53:27 vm22433 racoon: INFO: initiate new phase 2 negotiation: 10.0.1.1[500]<=>10.0.255.1[500]
Oct  3 17:53:27 vm22433 racoon: INFO: received RESPONDER-LIFETIME: 4608000 kbytes
Oct  3 17:53:27 vm22433 racoon: WARNING: attribute has been modified.
Oct  3 17:53:27 vm22433 racoon: INFO: IPsec-SA established: ESP/Tunnel 10.0.1.1[500]->10.0.255.1[500] spi=238677(0xe39eabc)
Oct  3 17:53:27 vm22433 racoon: INFO: IPsec-SA established: ESP/Tunnel 10.0.1.1[500]->10.0.255.1500] spi=7204011111(0x44b4aaa)
That's all. It remains to add all the necessary manipulations to autoload, and you can start integrating applications.
PS: Request to report any errors or inaccuracies in the article by a personal message. When I correct an article, the comments will look silly.