200 microcomputers in 3 hours, or small-scale production of microelectronics in Shenzhen (for example, the VoCore project)

Everyone knows that China is a world leader in electronics manufacturing. We use this electronics daily. But how is it produced? I think many would be interested to look at this "kitchen" from the inside - how is the "preparation" of this electronics in reality.
With the help of this post, we will visit a real factory (one of several hundred in the city), which is engaged in the production of micro-electronics in the city of Shenzhen. We will see the stages of production - before our eyes the idea will turn from circuits and files into a ready-to-use board - a microcomputer.
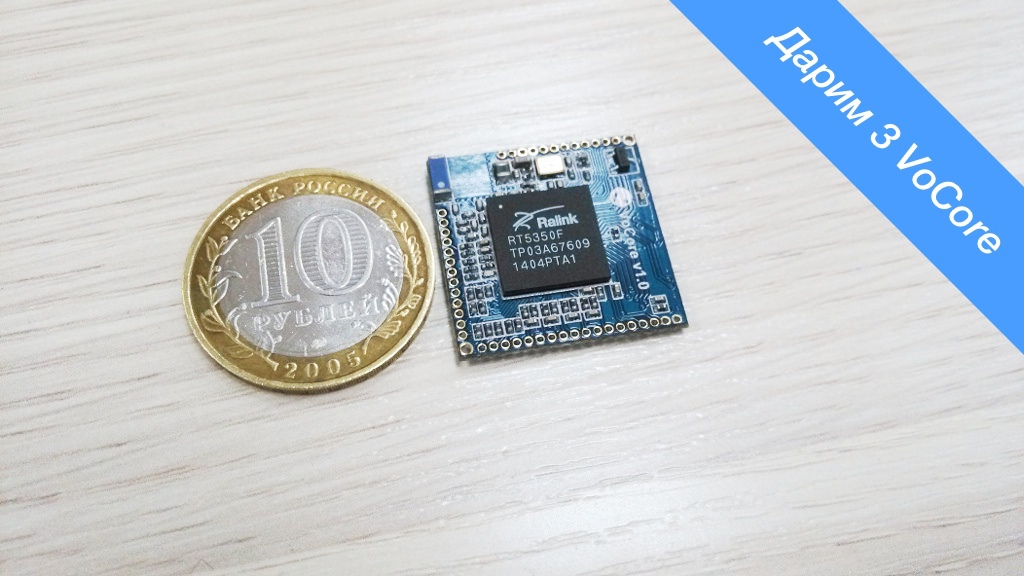
This microcomputer is a VoCore project that we recently talked about - a coin-sized microcomputer (25x25 mm) with Wi-Fi and Linux (OpenWRT).
Well, the workers have been waiting for us, let's begin.
A Brief History of Board Making
To communicate with the workers in the same language (that is, to understand what they generally do), a short excursion about the production of electronic circuit boards.
Yes, I am interested to know
Here is the board of the first computer that I had - Radio-86-RK (photo from here ).

Electronics is actually a set of components (radio -) (micro-) electronics interconnected by conductors. Modern electronics consists of a printed circuit board - on which paths, holes, seats, and the elements themselves are drawn.
The production scheme, briefly, looks like this:
1. Production of a printed circuit board (PCB)
2. Installation (soldering) of elements on the board.
Over time, the miniaturization of the components took place - the technology of surface mounting - SMT appeared, and the elements in the format for surface mounting - SMD. For manual soldering - this is not a special joy (although of course there are special equipment), but for automatic / robotic assembly - this is the very thing.

These SMD components are sold by reels:

One such SMD reel contains several thousand elements, and is the equivalent of a whole box in the usual way. Of course, SMD is convenient for transportation (low weight), and for storage in a warehouse.
If you look into the past, before printed circuit boards, there was a Mounted Mounting technique , for example: I

generally recommend looking at a good article History of the development of mounting technology , which discusses the main stages of development of mounting technology (the author of the article is a participant / curator of our hackspace spiritus_sancti ).
Electronics is actually a set of components (radio -) (micro-) electronics interconnected by conductors. Modern electronics consists of a printed circuit board - on which paths, holes, seats, and the elements themselves are drawn.
The production scheme, briefly, looks like this:
1. Production of a printed circuit board (PCB)
2. Installation (soldering) of elements on the board.
Over time, the miniaturization of the components took place - the technology of surface mounting - SMT appeared, and the elements in the format for surface mounting - SMD. For manual soldering - this is not a special joy (although of course there are special equipment), but for automatic / robotic assembly - this is the very thing.
These SMD components are sold by reels:
One such SMD reel contains several thousand elements, and is the equivalent of a whole box in the usual way. Of course, SMD is convenient for transportation (low weight), and for storage in a warehouse.
If you look into the past, before printed circuit boards, there was a Mounted Mounting technique , for example: I
generally recommend looking at a good article History of the development of mounting technology , which discusses the main stages of development of mounting technology (the author of the article is a participant / curator of our hackspace spiritus_sancti ).
VoCore Project

Let me remind you that from May to June 2014, a fundraising campaign for the VoCore project took place at the indiegogo crowdfunding service - the campaign ended successfully (almost 3,000 contributors), and VoCore is now in the release version - and the production and sending phase to investors begins.
These are just the witnesses for the production of these VoCore that we will be.
Production

The full production cycle includes the following steps (we consider SMD production technology, i.e. surface mounting):
1. Production of a printed circuit board (PCB)
2. Purchase of all necessary components (BOM)
3. Production of a stencil for solder paste (mask)
4. Application of paste through a stencil to a printed circuit board
5. Installation of components
6. Oven (for melting pasta)
7. Control
The factory itself is a large room with a set of various equipment necessary to perform one of the stages in the production cycle.
The beginning of a normal working day in Shenzhen - workers come to the factory.

Well, when the working day begins with a smile :)
A small workshop

By the way, in the white coat on the right is Wu Tong - one of the participants in the VoCore project (the founder is Qin Wei - Vonger ).
Board manufacture

The first step is to make a printed circuit board, but in our example, PCBs have already been manufactured.
Application of solder paste

Meet - this is the GKG G5 - automatic screen printer . Its task is to apply solder paste through a stencil (in which the corresponding holes) to the pads of the printed circuit board.

Solder paste - this is whereby the components will eventually be soldered to the board. They also include solder, flux and substances to ensure stickiness. In the case of surface mounting, the solder paste applied to the contacts on the board ensures the SMD components are glued to the board, and after heating, the resins (flux, adhesive components) evaporate (having completed their task), the solder melts - wetts the component and board contacts - and solidifies contact connection and mounting of the component on the board.
In order for the paste to hit precisely the contact pads, a stencil is preliminarily made (in the photo above, the worker applies a printed paste to the stencil).
The distribution of paste on the stencil

Here's what happened (below is our printed circuit board, with 10 VoCore boards - two rows of five):

The thickness of the stencil is fractions of a millimeter (it will be the paste on the contact pads that will be exactly the same height after removing the printed circuit board from the stencil )
And looking ahead (when the stove is on) - you can watch this video (29 seconds) to understand how this “solder paste” turns into solder.
solder paste in action
After the automatic paste application - from the screen printer, the printed circuit board (with freshly applied paste to the contacts) comes out and goes through the conveyor to the neighboring machine (left to right):

And on the right, we have the most interesting thing - the surface-mount robot.
Automatic component installation

Well, here is the most interesting stage - when the robotic system arranges the components (sometimes smaller than a millimeter) - on the board, on the contact pads (which already have the printed paste) - and the components stick to the pads on the paste.
Meet the photo (top left) - automatic installation of surface mount components . On the slide, a board is fed into it, on which the robotic system installs SMD components, from bobbin tapes. By the way, such machines are installed by the conveyor one after the other - if the number of components is large - then they are installed on the next (from its reels).

In the photo above - the system performs positioning according to the board.

In the area where the robot works - “telegraph tapes” go — these tapes contain components that are placed on the board.

After arranging the elements on the board, the next step is the stove.
Ready for the oven:

Stove

So we come to the final process - get acquainted - this is the JT NS-800 reflow oven - our solder paste reflow oven . A board with installed components is fed into it through the conveyor and it is necessary to ensure the temperature for melting the solder paste.
[pay attention to the rack of cartridges with bobbins of SMD components]
Here is

After the stove, the boards fall into the hands of Chinese girls for sorting

The control

At the end of production - there is a visual control of each board. Let's pay attention to the antistatic bracelet - without this, it is better not to work with microelectronics in production.
Finished result

This is the result of the whole process! In 3 hours, a batch of 200 pieces of VoCore (20 slats) was made.
Together
And now you can combine everything together. In fact, the whole process runs in one line, starting from a screen printer with printing paste, then several surface-mounted robots, and ending with the stove and control.
Here is the combined photo, and the arrow shows the direction of the process:

Application form, competition
Recall that we have an idea to order the production of VoCore at a factory (possibly the same one) - for a small batch for Russia - in this regard - if you are interested in a microcomputer - then mark it in our profile .
Also, if you have an interesting project based on OpenWRT, then you can participate in the competition and get VoCore for your project now for free - the conditions and terms of the competition are indicated at the end of the article (we will accept applications by October 12).
Acknowledgments
Once again, thanks to targence for the photos provided.