Boot into Vim or Vim with PID 1
- Transfer
- Tutorial
This is the answer to an excellent article from Pascal Bourguignon in which he talks about how to start Emacs with PID 1 .
As we all know, no one uses Emacs.
The proposal above as it hints that this is the beginning of another holy war. Please get started. If you want to tell me something, all my contacts are on my blog.
In fact, jokes aside. I think this is a great article, and after reading it I wanted to see if I could do something similar with Vim. Not in Linux user mode, but actually creating an ISO to boot. You can say “boot into Vim” if you so wish.
It is really quite simple. Compile Vim statically, install
init=to boot, and you're done. We will use the small (9Mb) distribution of Tiny Core, Core edition and configure it so that the download goes directly to our statically assembled Vim.
Putting Vim Together
Please follow my other guide on how to build a statically linked Vim . As a result, you will get an executable file, which we will use later in this guide.
Training
You will need a few tools to collect the ISO, namely
cpio, tar, gzip, advdefand mkisofs. They can most likely be installed using your package manager, if they are not already installed. Please do it first. First, create a directory to build:
mkdir vim-as-pid-1
cd vim-as-pid-1
Also create a couple of directories for building the ISO:
mkdir /tmp/isomount
mkdir extract
Download the latest version of Tiny Core, Core edition (without GUI):
wget http://distro.ibiblio.org/tinycorelinux/5.x/x86/release/Core-current.isoCopy files from downloaded ISO:
mount Core-current.iso /tmp/isomount/ -o loop,ro
cp -a /tmp/isomount/boot /tmp/
These commands will create a directory
/tmp/bootwith the loader and file core.gz. Do not forget to unmount it:umount /tmp/isomountWe will use the directory
/tmp/bootlater when we put everything together in an ISO file.Change ISO File
Go to the directory where it will be extracted
core.gz- the root directory of the file system:cd extractWe use
zcatand cpioto extract the root of the file system from core.gz:zcat /tmp/boot/core.gz | cpio -i -H newc -dWe now have the extracted root directory of the file system:
# ls
bin  dev  etc  home  init  lib  linuxrc  mnt  opt  proc  root  run  sbin  sys  tmp  usr  var
Place the Vim executable compiled in the previous step in the directory
bin/cp ~/vim bin/You can also make other settings, for example, edit the bootloader message. It is located in a file with a name
boot.msgin the directory /tmp/boot/isolinux/:# vim /tmp/boot/isolinux/boot.msg
^L
_
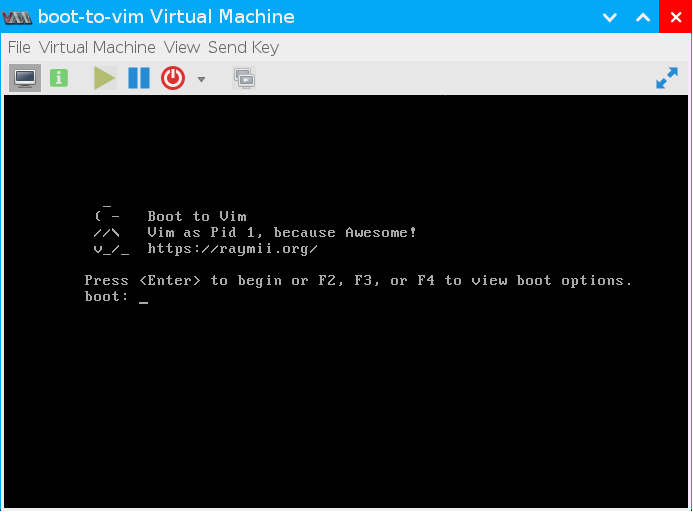
( - Boot to Vim
//\ Vim as Pid 1, because Awesome!
v_/_ https://raymii.org/
Press <Enter> to begin or F2, F3, or F4 to view boot options.Inittab change
To load directly into Vim, we need to change the initialization configuration. Edit the following file:
vim etc/inittabChange these lines:
::sysinit:/etc/init.d/rcS
tty1::respawn:/sbin/getty 38400 tty1
on:
::sysinit:/bin/vim
tty1::respawn:/bin/vim
Putting the brand new ISO
Make sure that we are still in the directory with the name
extract. Next, let's put in the following command to build a new file tinycore.gz, which our ISO will use as initramfs:find | cpio -o -H newc | gzip -2 > ../tinycore.gzCopy it to the file with the name
core.gzin the directory /tmp/bootthat we copied earlier:cp ../tinycore.gz /tmp/boot/core.gzCreate a new directory for the files that will be in the new ISO:
mkdir /tmp/newisoCopy the directory into it
/tmp/boot:cp -a /tmp/boot /tmp/newiso/Build ISO using
mkisofs:cd /tmp/
mkisofs -l -J -R -V Boot_To_Vim -no-emul-boot -boot-load-size 4 -boot-info-table -b boot/isolinux/isolinux.bin -c boot/isolinux/boot.cat -o Boot_to_Vim.iso newisoNow you
/tmphave a file with the name Boot_to_Vim.iso:ls -la /tmp/Boot_to_Vim.iso
-rw-r--r-- 1 root root 11044864 Sep 17 08:05 /tmp/Boot_to_Vim.isoYou can use it to boot into a virtual machine or to burn to disk. If you exit Vim, it will start again.
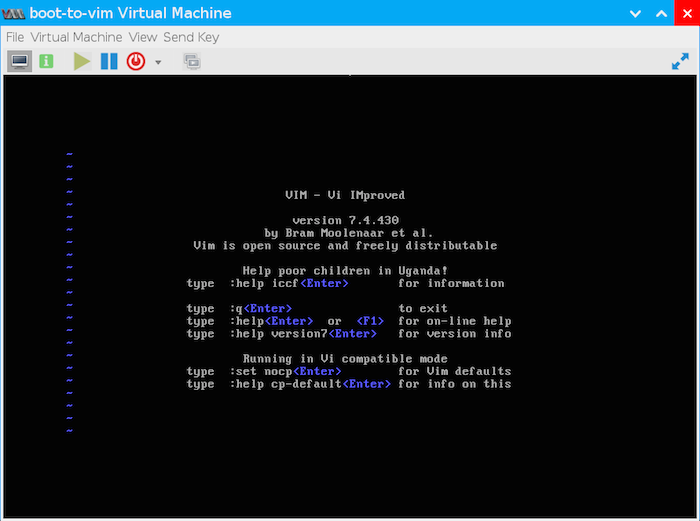
You can call a real shell by typing
:!shin command mode. To turn off, use the command :!halt. More Tiny Core remastering information can be found here .