Embed Touch ID in iOS app

Introduction
Starting with iOS 8, Apple opens access to the possibility of using Touch ID technology (authentication using the fingerprint scanner built into the iPhone 5s) in third-party applications. In this regard, I would like to share with you detailed information about what exactly has become available to developers, how to embed it in my application, what behavior it has, and also to share a convenient “wrapper” that implements the most, in my opinion, likely use case of Touch ID.
The required API is introduced in the new LocalAuthentication framework. At the moment, its functionality is limited to interacting with a fingerprint scanner, but judging by a more general name, its set of capabilities is likely to expand in the future. The framework does not provide any data about the user (which is generally logical), but only allows you to offer the user to authenticate using biometrics (currently this is a built-in fingerprint scanner; but specifically, there is no talk about the scanner in the framework, a more general one is used word Biometrics). At the output, we get the status: either authentication was successful, or something went wrong. In fact, at almost any point in time, you can determine whether the person who uses the device is its owner.
This suggests using Touch ID as an additional protection when performing any important operations. For example, when confirming the transfer of funds, changing any important settings, initializing secure chat, etc., that is, where the application must be as sure as possible that the smartphone is not in the hands of an attacker.
In order to make the post not only readable, but also reusable, I decided to describe the integration with Touch ID in the form of a “wrapper” that implements the scenario described above, which can save you several hours of working time in the future. The description is presented in the form of a "task-solution" so that it is clear what is being done and why. And so, let's get started.
Task
When performing important operations in the application, you must be able to request user authentication using the built-in biometrics. The need to request such authentication must be customizable by the user. It should also be borne in mind that the application can run on earlier versions of the operating system and on devices that do not have biometrics.
Decision
The solution will be presented in the BiometricAuthenticationFacade class.
First of all, consider the most important thing - interaction with the LocalAuthentication framework. This part is hidden from the user and is not accessible from the class interface.
In the class extension, declare a property to store the context:
@interfaceBiometricAuthenticationFacade ()@property (nonatomic, strong) LAContext *authenticationContext;
@end
We initialize the property, taking into account the availability of the API:
- (instancetype)init {
    self = [super init];
    if (self) {
        if (self.isIOS8AndLater) {
            self.authenticationContext = [[LAContext alloc] init];
        }
    }
    returnself;
}
Next, we define a method that will return the availability of using local authentication:
- (BOOL)isPassByBiometricsAvailable {
    return [self.authenticationContext canEvaluatePolicy:LAPolicyDeviceOwnerAuthenticationWithBiometrics
                                                   error:NULL];
}
The method
canEvaluatePolicy:error:accepts the type of local authentication as a parameter . At the moment, only one type has been declared LAPolicyDeviceOwnerAuthenticationWithBiometricsthat speaks for itself. Using biometrics may not be available if the device does not physically support this feature, or if the user has not enabled this feature in the smartphone settings. The request to perform a user fingerprint scan is described as follows:
- (void)passByBiometricsWithReason:(NSString *)reason
                       succesBlock:(void(^)())successBlock
                      failureBlock:(void(^)(NSError *error))failureBlock {
    [self.authenticationContext evaluatePolicy:LAPolicyDeviceOwnerAuthenticationWithBiometrics localizedReason:reason reply:^(BOOL success, NSError *error) {
        dispatch_async(dispatch_get_main_queue(), ^{
            if (success) {
                successBlock();
            } else {
                failureBlock(error);
            }
        });
    }];
}
As parameters, the method
evaluatePolicy:localizedReason:reply:accepts the type of local authentication described above, a message that should briefly describe the reason for the request and a block that will be executed asynchronously after the completion of the whole procedure. Please note that the execution of the block
replyon the main thread is not guaranteed (in fact, it is not called on the main thread), so a call has been added dispatch_async. It could have been left as is, but most developers assume that the block that is passed to the method called on the main thread will also be called on the main thread, and do not put an additional check. It happened so historically. When calling the method described above, the system displays a dialog:
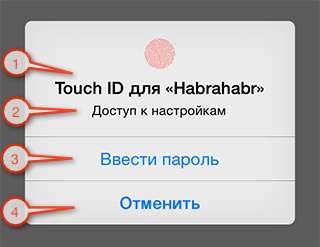
- The title uses the name of the application (
CFBundleDisplayName); - The string specified as a parameter
localizedReason; - Not everything is so simple with this field. When you click it, a dialog for entering a password does not appear, as you might think, but instead, a block
replywith an error is called. The error code is documented:LAErrorUserFallback
That is, it was conceived. As user Flanker_4 explained , the system thus prompts the application to independently perform alternative authentication: entering the application password. That is, the implementation of the dialogue and logic for entering and verifying the password lies with the developer;
Authentication was canceled because the user tapped the fallback button (Enter Password). - Button to cancel the request. As a result, the block
replywith the corresponding error isLAErrorUserCancelcalled.
If the scan was successful, a block
replywith a positive result is called. It should be noted that the dialog for scanning is not displayed every time the method is called
evaluatePolicy:localizedReason:reply:. That is, the success of the last scan has some lifetime. Retrying authentication within a few minutes will result in an instant call of the block replywith a positive result. If you use the wrong finger and try to scan it 5 times in a row, the system will prompt you to enter the password specified in the smartphone settings:
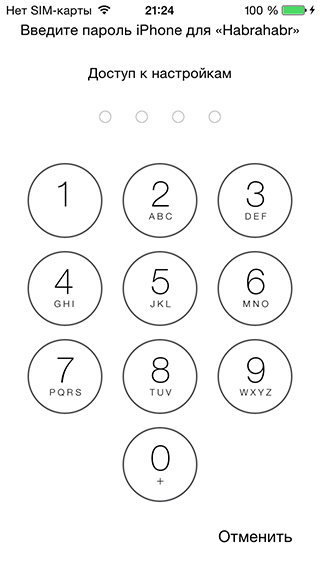
For clarity, I’ll clarify that it is impossible to turn on the scanner in the smartphone settings without creating a password.
After the user enters the correct password, he will again be offered a fingerprint scan. But, as a simplix user noted , if you know the device password, then the scanner can be disabled in the global device settings. In fact, re-displaying the dialog for scanning does not make sense.
On this interaction with
LocalAuthenticationcompleted. Let's move on to the implementation of the interface of our facade.
A method for finding out the availability of authentication. The result is determined by the availability of the API and the scanner:
- (BOOL)isAuthenticationAvailable {
    returnself.isIOS8AndLater && self.isPassByBiometricsAvailable;
}
A method to determine whether authentication is enabled for a particular operation:
- (BOOL)isAuthenticationEnabledForFeature:(NSString *)featureName {
    returnself.isAuthenticationAvailable && [self loadIsAuthenticationEnabledForFeature:featureName];
}
An example of an operation may be access to settings, execution of a money transaction, etc.
Inclusion status is stored in NSUserDefaults. The implementation of the method will be presented below
loadIsAuthenticationEnabledForFeature:. Method to enable authentication for a specific operation:
- (void)enableAuthenticationForFeature:(NSString *)featureName
                           succesBlock:(void(^)())successBlock
                          failureBlock:(void(^)(NSError *error))failureBlock {
    if (self.isAuthenticationAvailable) {
        if ([self isAuthenticationEnabledForFeature:featureName]) {
            successBlock();
        } else {
            [self saveIsAuthenticationEnabled:YES forFeature:featureName];
            successBlock();
        }
    } else {
        failureBlock(self.authenticationUnavailabilityError);
    }
}
The method is necessary so that the user of the application can independently determine the operations for which additional verification is required.
The enable state is saved in
NSUserDefaults. The implementation of the method will be presented below saveIsAuthenticationEnabled:forFeature. Authentication disable method for a specific operation:
- (void)disableAuthenticationForFeature:(NSString *)featureName
                             withReason:(NSString *)reason
                            succesBlock:(void(^)())successBlock
                           failureBlock:(void(^)(NSError *error))failureBlock {
    if (self.isAuthenticationAvailable) {
        if ([self isAuthenticationEnabledForFeature:featureName]) {
            [self passByBiometricsWithReason:reason succesBlock:^{
                [self saveIsAuthenticationEnabled:NO forFeature:featureName];
                successBlock();
            } failureBlock:failureBlock];
        } else {
            successBlock();
        }
    } else {
        failureBlock(self.authenticationUnavailabilityError);
    }
}
As you can see, to turn off you need to make sure that we are dealing with the owner of the smartphone, and not an attacker.
User authentication request method for accessing an operation:
- (void)authenticateForAccessToFeature:(NSString *)featureName
                            withReason:(NSString *)reason
                           succesBlock:(void(^)())successBlock
                          failureBlock:(void(^)(NSError *error))failureBlock {
    if (self.isAuthenticationAvailable) {
        if ([self isAuthenticationEnabledForFeature:featureName]) {
            [self passByBiometricsWithReason:reason
                              succesBlock:successBlock
                             failureBlock:failureBlock];
        } else {
            successBlock();
        }
    } else {
        failureBlock(self.authenticationUnavailabilityError);
    }
}
Methods for saving and retrieving information about the need for user authentication to access the operation (not available from the class interface):
- (void)saveIsAuthenticationEnabled:(BOOL)isAuthenticationEnabled forFeature:(NSString *)featureName {
    NSUserDefaults *userDefaults = [NSUserDefaults standardUserDefaults];
    NSMutableDictionary *featuresDictionary = nil;
    NSDictionary *currentDictionary = [userDefaults valueForKey:kFeaturesDictionaryKey];
    if (currentDictionary == nil) {
        featuresDictionary = [NSMutableDictionary dictionary];
    } else {
        featuresDictionary = [NSMutableDictionary dictionaryWithDictionary:currentDictionary];
    }
    [featuresDictionary setValue:@(isAuthenticationEnabled) forKey:featureName];
    [userDefaults setValue:featuresDictionary forKey:kFeaturesDictionaryKey];
    [userDefaults synchronize];
}
- (BOOL)loadIsAuthenticationEnabledForFeature:(NSString *)featureName {
    NSUserDefaults *userDefaults = [NSUserDefaults standardUserDefaults];
    NSDictionary *featuresDictionary = [userDefaults valueForKey:kFeaturesDictionaryKey];
    return [[featuresDictionary valueForKey:featureName] boolValue];
}
As storage is used
NSUserDefaults. All data is stored in a separate dictionary to reduce the likelihood of conflicts in the names of keys. This completes the main implementation of the facade.
Ending
And finally, for those who have mastered reading to the end, a few interesting facts about the scanner in the iPhone 5s:
- The probability of a false pass, i.e. the fact that the fingerprint of a random person will be recognized as yours is 1 in 50,000;
- The system allows you to perform 5 scan attempts before a user password is requested. Thus, a brute-force attack cannot be carried out, and the probability that a scanner can be hacked by an attacker is ≈0.0001;
- The scanner captures a raster image with a size of 88x88 pixels and a density of 500 ppi. The resulting raster image is converted into a vector and is subjected to additional analysis;
- The received fingerprint data is stored in encrypted form in a special area (Secure Enclave) on the A7 processor. Data is encrypted with a private key, which is generated and written to Secure Enclave during the production of the processor in the factory. Apple claims that neither the encrypted data nor the private key leaves the mobile device and is unknown to third parties, including Apple itself.
Source of interesting facts: iOS Security The
full version of the source code is available on GitHub: BiometricAuthenticationFacade