 September 3, 2014 at 11:21
Minimalistic issue tracker on Django
- Tutorial
This article describes how to solve a simple but interesting task using the Django framework in a short time: creating a bug tracking system (ticket system) for your project. Our system will be integrated with Django user authentication system and administrative interface. Despite its primitiveness, such an application, with some improvement, may well be useful for a single developer or a small group.
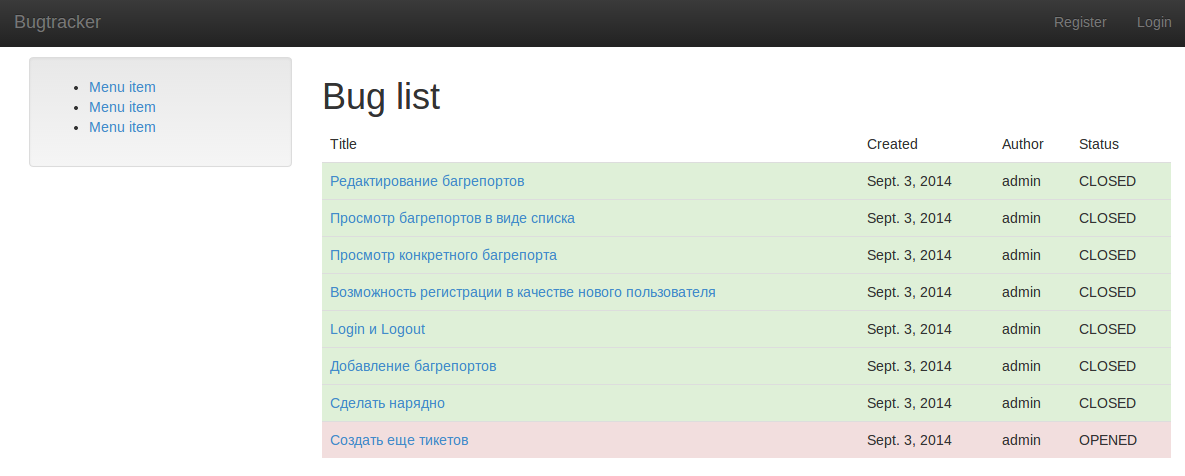
I will describe the actions in the linux environment using Django version 1.6, so it must be borne in mind that for other operating systems and framework versions, something may work differently (but without significant changes). The level of the article is designed for beginners, but I will not focus on preparing the working environment and chewing on very elementary things, and if you do not understand what to do at first, I recommend reading this excellent article and going through the Django tutorial .
So, what tasks should our application perform:
In order to comply with the concept of minimalism, a bugreport (or ticket) will contain a name (title), description (description), date and time of creation (created), author (author), and the status is open / closed.
The process of working on the application will be divided into several stages, and to simplify the movement from one stage to another, I created a repository on GitHub with all source codes and commits at each stage. Of course, you can simply make a copy-paste of the code from the article, but I propose to do otherwise:
You will receive the complete code for the finished project in your work environment. Can run
The beauty of git is that you can easily roll back to any stage of project development, and for your convenience, I have tagged these stages. So, we execute the command:
to the project folder and create the bugtracker application
We add our application to project / settings.py (adding
Immediately configure the directories for templates and statics: Add this urlpattern to project / urls.py - , after which we will describe all the other urls we need exactly in bugtracker \ urls. py, which we will create here so far almost empty, otherwise django will throw an error:
Then create a model for the bug report in the bugtracker / models.py file:
Let’s take a closer look: title is the name of the ticket, for example, “Ashtray does not take off” , text - description and steps for reproducing the bug, created - time and date of the ticket creation, will be automatically filled in thanks
Let's edit bugtracker / admin.py so that it is possible to manage tickets from the admin panel:
And run
As a result of this, the necessary tables will be created in the database and a login, e-mail and password will be requested to create an administrator user.
Attention, hereinafter, with the git checkout command from the git repository db.sqlite3, and the administrator has a username: admin, password: 123 (one, two, three)
Once you create it, you can run:
And go to the address http://127.0.0.1:8000/admin , and after entering the login and password, create, edit and delete tickets.
We carry out:
After that, the admin panel will become much more convenient. You can mark the item "Editing bug reports" as completed.
The next thing we will do is add the ability to view the list of tickets without going into the administrative interface. To do this, we need to create a basic html-template and a template of the actual ticket list. The basic template will be in the templates / base.html file:
As you can see, it is very simple and contains two blocks, for the title and content.
Create a list template in the file templates / list.html
All this will be substituted into the base template instead
Теперь напишем class-based view для этой функции в файле bugtracker/views.py, он очень прост:
Здесь определена модель для отображения в виде списка, и шаблон для отображения.
Осталось только, создать новый паттерн для URL "/bugs/" в файле bugtracker/urls.py: добавив
Заходим на http://127.0.0.1:8000/bugs/ и видим страшноватую таблицу со списком всех наших тикетов. Так как дизайн мы прикрутим потом, можем смело поставить статус «Closed» для этого этапа в админке.
Выполняем:
Add the ability to view each tag individually, using DetailView, we act according to the old scheme.
Create a template templates / detail.html:
Create a view in bugtracker / views.py:
and in bugtracker / urls.py:
add urlpattens
In addition, we add a link to such a URL for each ticket in the templates / list.html template, for example, you can do this:
thanks to the url 'detail', our urls will be generated automatically, and even if the url structure changes, the template will not “break” We
check by going to http://127.0.0.1:8000/bugs/ and then clicking on any of the links. If everything works, we note in the admin panel that the ticket is closed.
It’s more correct, of course, to take the work with users into a separate application and use, for example, django-registration for convenient work with activating, changing and recovering passwords, etc., but since we are learning, we will not use batteries, so as not to multiply entities beyond necessary.
When registering users, we will use the built-in django functions for working with forms, for this we will create the templates / register.html template:
If the user is not logged in, then we display the form, which is transferred to the template from the following view (bugtracker / views.py):
success_url - this is where the user will be directed to upon successful registration, url will be cured from urlpatterns using reverse_lazy ('index'), that is, in our case "/ bugs /"
We supplement the base template with a link to the registration form, which will only be displayed if the user is not logged in:
Do not forget to add RegisterView import to bugtracker / urls.py and urlpattern -
Now you can check the health and go to the next step.
Everything is simple here, we will use the built-in dzhangovskie shortcuts. There is no need for a logout template, since there is nothing to display in this function, we will simply be transferred to the main page. Therefore, we create a template only for login (templates / login.html):
In bugtracker / urls.py, write the following:
and
And we’ll redo the templates / base.html like this:
What would we redirect us to the main page in settings.py after login?
Let's play a lot, creating new users, logging in and logging out under them.
The templates / add.html template is very similar to the one we created for RegisterView, just the opposite - the functionality is available to an authorized user:
Add a link to add somewhere in the base template:
View will be such
That is, only the title and text fields will be visible to the user, and thanks to the redefinition of the form_valid method, the index of the current user will be substituted in the user field.
We write the pattern for url 'add /' in bugtracker / urls.py, not forgetting to import BugCreateView:
Let's try to add new tickets, and move on to the next step.
All this more or less satisfactorily works, but it looks scary. In my opinion, the easiest and most convenient way to improve our interface, accessible even to a layman (like me), is to use twitter bootstrap. To do this, download the appropriate library and unpack it into the static folder. After that, we will begin the layout of the templates. Bootstrap has a bunch of examples, so there shouldn’t be any special difficulties. Since it does not make sense to bring the sheets of the resulting HTML here, and the nuances of the layout for bootstrap are beyond the scope of this article (and my knowledge), just look at the source in the repository , or execute
It is worth noting that the third version of bootstrap requires adding class = "form-control" to the input in forms. The easiest method I know to do in django templates (without using additional batteries) is the custom filter that is described here . I would be grateful if more experienced readers of my article share their experiences in the comments.
In just a couple of hours, or even less, you and I have created a fully functional application that, with further improvement, customization and development, can serve well in some other projects, and maybe even as a standalone service. Here are a few of my very feasible ideas for improving it:
I look forward to your comments, ideas and suggestions in the comments. Thanks!
UPD: While I was preparing the article, django 1.7 was released, which introduced migration support, which was previously done with the help of south. The syncdb command is now deprecated, therefore, after changing the models, do:
./manage.py makemigrations <application name>
./manage.py migrate
To view the SQL query for the corresponding migration, execute
./manage.py sqlmigrate <application name> <migration number>
I will describe the actions in the linux environment using Django version 1.6, so it must be borne in mind that for other operating systems and framework versions, something may work differently (but without significant changes). The level of the article is designed for beginners, but I will not focus on preparing the working environment and chewing on very elementary things, and if you do not understand what to do at first, I recommend reading this excellent article and going through the Django tutorial .
So, what tasks should our application perform:
- Editing bug reports (available for administrators, through the standard Django admin panel)
- View bug reports as a list and individually (available to all visitors)
- Ability to register as a new user
- Accordingly, login and logout via the web interface
- Adding bug reports via the web interface (available only for logged in users)
In order to comply with the concept of minimalism, a bugreport (or ticket) will contain a name (title), description (description), date and time of creation (created), author (author), and the status is open / closed.
The process of working on the application will be divided into several stages, and to simplify the movement from one stage to another, I created a repository on GitHub with all source codes and commits at each stage. Of course, you can simply make a copy-paste of the code from the article, but I propose to do otherwise:
- Prepare your working environment, install django
- If you don’t have an account on GitHub yet, create one
- You make a fork (fork) my repository
- In the working folder (in the shell), run the git clone command
- Next, at the beginning of each step, I will specify the git checkout -f command
You will receive the complete code for the finished project in your work environment. Can run
cd django-tutorial-bugreport
./manage.py runserver
Stage number 0 - creating an application
The beauty of git is that you can easily roll back to any stage of project development, and for your convenience, I have tagged these stages. So, we execute the command:
git checkout -f part-0
to the project folder and create the bugtracker application
./manage.py startapp bugtracker
We add our application to project / settings.py (adding
'bugtracker'to the tuple INSTALLED_APPS) Immediately configure the directories for templates and statics: Add this urlpattern to project / urls.py - , after which we will describe all the other urls we need exactly in bugtracker \ urls. py, which we will create here so far almost empty, otherwise django will throw an error:
TEMPLATE_DIRS = (os.path.join(BASE_DIR, 'templates/'),)

STATICFILES_DIRS = (os.path.join(BASE_DIR, 'static/'),)
url(r'^bugs/', include('bugtracker.urls'))# coding: utf-8
from django.conf.urls import patterns, include, url
urlpatterns = patterns('',
)
Then create a model for the bug report in the bugtracker / models.py file:
# coding: utf-8
from django.db import models
from django.contrib.auth.models import User
class Ticket(models.Model):
    title = models.CharField(max_length=128)
    text = models.TextField()
    created = models.DateTimeField(auto_now=True)
    closed = models.BooleanField(default=False)
    user = models.ForeignKey(User,)
    def __unicode__(self):
        return self.title
Let’s take a closer look: title is the name of the ticket, for example, “Ashtray does not take off” , text - description and steps for reproducing the bug, created - time and date of the ticket creation, will be automatically filled in thanks
auto_now=True, closed - the simplest way to describe the status of the ticket, is it closed or open, by default (when creating) closed = False, that is, the ticket is not closed, user is the user who reported the bug. The model returns title as a unicode representation. Let's edit bugtracker / admin.py so that it is possible to manage tickets from the admin panel:
# coding: utf-8
from django.contrib import admin
from .models import Ticket
admin.site.register(Ticket)
And run
./manage.py syncdb
As a result of this, the necessary tables will be created in the database and a login, e-mail and password will be requested to create an administrator user.
Attention, hereinafter, with the git checkout command from the git repository db.sqlite3, and the administrator has a username: admin, password: 123 (one, two, three)
Once you create it, you can run:
./manage.py runserver
And go to the address http://127.0.0.1:8000/admin , and after entering the login and password, create, edit and delete tickets.
Stage # 1 - list of tickets
We carry out:
git checkout -f part-1
class TicketAdmin(admin.ModelAdmin):
    list_display = ('closed', 'title', 'text', 'created', 'user')
    list_filter = ['created', 'closed']
    search_fields = ['title', 'text']
admin.site.register(Ticket, TicketAdmin)
After that, the admin panel will become much more convenient. You can mark the item "Editing bug reports" as completed.
The next thing we will do is add the ability to view the list of tickets without going into the administrative interface. To do this, we need to create a basic html-template and a template of the actual ticket list. The basic template will be in the templates / base.html file:
Bugtracker - {% block title_block %}{% endblock %}


        {% block content_block %}
        {% endblock %}
As you can see, it is very simple and contains two blocks, for the title and content.
Create a list template in the file templates / list.html
{% extends 'base.html' %}
{% block title_block %}Main{% endblock %}
{% block content_block %}
Bug list
{% for ticket in object_list %}
{% empty %}
{% endfor %}
Title Created Author Status {{ ticket.title }} {{ ticket.created|date }} {{ ticket.user }} {{ ticket.closed|yesno:"CLOSED, OPENED" }} No tickets yet.
{% endblock %}
All this will be substituted into the base template instead
{% block content_block %}
{% endblock %}
No tickets yet.
Теперь напишем class-based view для этой функции в файле bugtracker/views.py, он очень прост:
from django.views.generic import ListView
from .models import Ticket
class BugListView(ListView):
    model = Ticket
    template_name = 'list.html'
Здесь определена модель для отображения в виде списка, и шаблон для отображения.
Осталось только, создать новый паттерн для URL "/bugs/" в файле bugtracker/urls.py: добавив
from .views import BugListViewurl(r'^$', BugListView.as_view(), name='index'),"/bugs" находятся в bugtracker/urls.py, соответственно регэксп паттерна для URL "/bugs/" будет выглядеть именно так: r'^$'.Заходим на http://127.0.0.1:8000/bugs/ и видим страшноватую таблицу со списком всех наших тикетов. Так как дизайн мы прикрутим потом, можем смело поставить статус «Closed» для этого этапа в админке.
Этап №2 — детали тикета
Выполняем:
git checkout -f part-2
Add the ability to view each tag individually, using DetailView, we act according to the old scheme.
Create a template templates / detail.html:
{% extends 'base.html' %}
{% block title_block %}{{ object.title }}{% endblock %}
{% block content_block %}
{{ object.closed|yesno:"CLOSED, OPENED" }} - {{ object.title }}
{{ object.user }} - {{ object.created|date }}
{{ object.text }}
{% endblock %}
Create a view in bugtracker / views.py:
from django.views.generic import DetailView
class BugDetailView(DetailView):
    model = Ticket
    template_name = 'detail.html'
and in bugtracker / urls.py:
from .views import BugDetailView
add urlpattens
url(r'^(?P[0-9]+)/$', BugDetailView.as_view(), name='detail'),
In addition, we add a link to such a URL for each ticket in the templates / list.html template, for example, you can do this:
{{ ticket.title }}thanks to the url 'detail', our urls will be generated automatically, and even if the url structure changes, the template will not “break” We
check by going to http://127.0.0.1:8000/bugs/ and then clicking on any of the links. If everything works, we note in the admin panel that the ticket is closed.
Stage number 3 - user registration
git checkout -f part-3
It’s more correct, of course, to take the work with users into a separate application and use, for example, django-registration for convenient work with activating, changing and recovering passwords, etc., but since we are learning, we will not use batteries, so as not to multiply entities beyond necessary.
When registering users, we will use the built-in django functions for working with forms, for this we will create the templates / register.html template:
{% extends 'base.html' %}
{% block title_block %}Registration{% endblock %}
{% block content_block %}
{% if user.is_authenticated %}
Back to main page
{% else %}
{% endif %}
{% endblock %}
If the user is not logged in, then we display the form, which is transferred to the template from the following view (bugtracker / views.py):
from django.views.generic import CreateView
from django.core.urlresolvers import reverse_lazy
from django.contrib.auth.forms import UserCreationForm
class RegisterView(CreateView):
    form_class = UserCreationForm
    template_name = 'register.html'
    success_url = reverse_lazy('index')
success_url - this is where the user will be directed to upon successful registration, url will be cured from urlpatterns using reverse_lazy ('index'), that is, in our case "/ bugs /"
We supplement the base template with a link to the registration form, which will only be displayed if the user is not logged in:
{% if user.is_authenticated %}
        Welcome, {{ user.username }}!
{% else %}
        Register
{% endif %}
Do not forget to add RegisterView import to bugtracker / urls.py and urlpattern -
url(r'^register/$', RegisterView.as_view(), name='register'),Now you can check the health and go to the next step.
Stage 4 - login and logout
git checkout -f part-4
Everything is simple here, we will use the built-in dzhangovskie shortcuts. There is no need for a logout template, since there is nothing to display in this function, we will simply be transferred to the main page. Therefore, we create a template only for login (templates / login.html):
{% extends 'base.html' %}
{% block title_block %}Login{% endblock %}
{% block content_block %}
{% endblock %}
In bugtracker / urls.py, write the following:
from django.core.urlresolvers import reverse_lazy
and
    url(r'^login/$', 'django.contrib.auth.views.login',
          {"template_name" : "login.html"}, name="login"),
    url(r'^logout/$', 'django.contrib.auth.views.logout',
          {"next_page" : reverse_lazy('login')}, name="logout"),
And we’ll redo the templates / base.html like this:
        {% if user.is_authenticated %}
            Welcome, {{ user.username }}
             | Logout
        {% else %}
            Register
             | Login
        {% endif %}
What would we redirect us to the main page in settings.py after login?
from django.core.urlresolvers import reverse_lazy
LOGIN_REDIRECT_URL = reverse_lazy('index')
Let's play a lot, creating new users, logging in and logging out under them.
Stage 5 - adding a new ticket
git checkout -f part-5
The templates / add.html template is very similar to the one we created for RegisterView, just the opposite - the functionality is available to an authorized user:
{% extends 'base.html' %}
{% block title_block %}Add ticket{% endblock %}
{% block content_block %}
{% if user.is_authenticated %}
Back to main page
{% else %}
You should be logged in to add tickets!
{% endif %}
{% endblock %}
Add a link to add somewhere in the base template:
Add ticketView will be such
class BugCreateView(CreateView):
    model = Ticket
    template_name = 'add.html'
    fields = ['title', 'text']
    success_url = reverse_lazy('index')
    def form_valid(self, form):
        form.instance.user = self.request.user
        return super(BugCreateView, self).form_valid(form)
That is, only the title and text fields will be visible to the user, and thanks to the redefinition of the form_valid method, the index of the current user will be substituted in the user field.
We write the pattern for url 'add /' in bugtracker / urls.py, not forgetting to import BugCreateView:
url(r'^add/$', BugCreateView.as_view(), name='add'),
Let's try to add new tickets, and move on to the next step.
Stage number 6 - do it smartly
git checkout -f part-6
All this more or less satisfactorily works, but it looks scary. In my opinion, the easiest and most convenient way to improve our interface, accessible even to a layman (like me), is to use twitter bootstrap. To do this, download the appropriate library and unpack it into the static folder. After that, we will begin the layout of the templates. Bootstrap has a bunch of examples, so there shouldn’t be any special difficulties. Since it does not make sense to bring the sheets of the resulting HTML here, and the nuances of the layout for bootstrap are beyond the scope of this article (and my knowledge), just look at the source in the repository , or execute
git checkout -f finalto get the final version of the code.It is worth noting that the third version of bootstrap requires adding class = "form-control" to the input in forms. The easiest method I know to do in django templates (without using additional batteries) is the custom filter that is described here . I would be grateful if more experienced readers of my article share their experiences in the comments.
Total
In just a couple of hours, or even less, you and I have created a fully functional application that, with further improvement, customization and development, can serve well in some other projects, and maybe even as a standalone service. Here are a few of my very feasible ideas for improving it:
- HTTP API (immediately there is the possibility of interacting with almost anything - programs, console scripts, other web services, etc.
- More statuses for tickets
- Pagination in the list output template
- The ability to entrust the execution of a ticket to another user and control the status
- Upload files and images
- Easy setup and customization of additional fields for tickets
- Plugin system
I look forward to your comments, ideas and suggestions in the comments. Thanks!
UPD: While I was preparing the article, django 1.7 was released, which introduced migration support, which was previously done with the help of south. The syncdb command is now deprecated, therefore, after changing the models, do:
./manage.py makemigrations <application name>
./manage.py migrate
To view the SQL query for the corresponding migration, execute
./manage.py sqlmigrate <application name> <migration number>









