Hallway mirror upgrades
The idea of modernizing the mirror came to me 2 years ago. And for its implementation, a mirror was bought in the Ikea store. Also for this mirror was bought a photo frame with a weather station. As always, lack of time, laziness and fear did not allow me to realize my idea to a victorious end. And now my idea has finally come true.
The mirror consists of 3 layers:
1 - glass;
2 - a reflective layer (amalgam);
3 - a protective layer;
I was lucky, I also had the 4th layer, a protective film.
The presence of a film in the mirror saved me from making an oracle stencil. The stencil was cut directly on the mirror, using an office knife and a ruler:

For etching the protective layer in the nearest pharmacy, a drug for external use of DIMEXID, a concentration of 99%, was purchased.
We remove the cut-out rectangular piece of film, fill in with DIMEXID instead, you can use a brush to spread over the entire surface:

Wait about 30 minutes until the protective layer softens and then remove it with the hard green side of the kitchen sponge, which is intended for washing dishes. The protective layer of the mirror can be different and it is possible that it will soften much earlier. Fill DIMEXID again for 5min and remove all residues until the amalgam is clean.

Amalgam is quickly and easily removed by iodine, it dissolves and melts right before your eyes. It took me no more than 2 minutes to remove it.

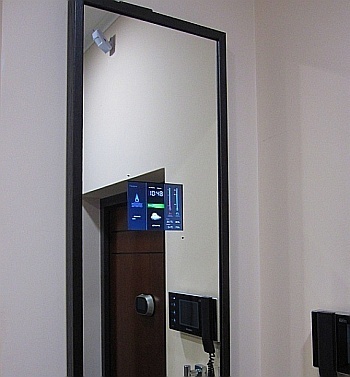
For accurate image positioning, glue the weather station in two places on double-sided tape. After proper positioning, glue with hot glue in a circle:

The result of my work, look at the video:
If you notice, two small holes are noticeable in the video. One for the IR receiver - since the weather station is equipped with a control panel. The second for the light sensor. At night, the photo frame itself turns off.
PS
In the next article I will tell you how I built a TV into the wall