Mega-Flask Tutorial, Part 8: Subscribers, Contacts and Friends
- From the sandbox
- Tutorial
This is the eighth article in a series where I describe my experience writing a Python web application using the Flask microframework.
The purpose of this guide is to develop a fairly functional microblogging application, which I decided to call microblog for a complete lack of originality.
Our small microblog is slowly growing, and today we will cover the topics that are necessary for a complete application.
Today we will work a little with our database. Each user of our application should be able to choose the users that he wants to track, and our database should also store data about who is tracking whom. All social applications have these features in different variations. Some call it Contacts, others Links, Friends, Friends or Subscribers. Some sites use a similar idea for a list of Allowed and Ignored users. We will call them Subscribers, but we will not implement them by holding on to the name.
Before we start writing code, let's think about the functionality that we want to get from this feature. Let's start with the most obvious. We want our users to conveniently maintain lists of subscriptions to other users. On the other hand, we want to know the list of subscribers of each user. We also want to be able to find out if the user has subscribers or if he has subscribed to other users. Users will click on the “Subscribe” link in the profile of any other user to start tracking him. In the same way, clicking on the unsubscribe link will unsubscribe from the user. The last requirement is the ability of the user to request from the database all the posts of the monitored users.
So, if you thought it would be quick and easy, think again!
We said that we want to have lists of subscribers and subscriptions for all users. Unfortunately, relational databases are not of type @@ list @@, all we have is tables with records and relations between records. We already have a table in our database that represents users, it remains to come up with dependency relationships that simulate subscriber / subscription relationships. This is a good moment to parse three types of relationships in relational databases:
We have already seen the one-to-many relationship in a previous article on the database:
Two entities connected by such relationships are this
It is clear that the field
Many-to-many relationships are a bit more complicated. For example, consider the database in which
For this type of relationship, we should be able to query the database and get a list of teachers who teach the student and a list of students in the teacher's class. It turns out that it is rather more difficult to imagine in the database, such a relationship cannot be modeled by adding foreign keys to existing tables.
Implementing a many-to-many relationship requires the use of an auxiliary table called a pivot table. Here, for example, will look like a database for students and teachers:

Although this may seem difficult, a pivot table can answer many of our questions, such as:
One-to-one relationships are a special case of one-to-many relationships. The view is very similar, but contains a ban on adding more than one link, so as not to become one-to-many. Although there are cases in which this type of relationship is useful, this does not happen as often as in the case of the other two types, since in a situation where two tables are connected with a one-to-one relationship, it may make sense to combine the tables into one.
From the above relationships, we can easily determine if a many-to-many data model is suitable for us, because the user can follow many other users and the user can have many subscribers. But there is a feature. We want to represent users subscribed to other users, but we only have one user table. So what should we use as a second entity in a many-to-many relationship?
Of course, the second entity in the relationship will be the same user table. Relationships in which instances of an entity are associated with other instances of the same entity are called self-referencing relationships, and this is exactly what we need.
This is a diagram of our many-to-many relationships:
Table
Changes in our model will not be very big. We will start by adding the table @@ followers @@ (file @@ app / models.py @@):
This is a live translation of table links from our diagram. Please note that we did not declare this table as a model, as we did for
Next, we describe many-to-many relationships in a table
Relationship configuration is nontrivial and requires some explanation. We use a function
Do not despair if it is hard to understand. We will see how to use these queries, and then everything will become clearer. Since we did the database updates, now we can create a new migration:
This completes the database changes. It remains just a little poke.
To support code reuse, we implement the subscription \ subscribers functionality inside the model
Below is the code for adding and removing subscribers, defined as model methods
Thanks to the power of SQL Alchemy, which does a lot of work, these methods are surprisingly simple. We just add or remove elements, and SQLAlchemy does the rest. Methods
The method
Let's write a test for our code (file
After adding this test to the test framework, we can start the test suite with the command:
And if everything works, all tests will be successfully passed.
Our current database model supports most of the requirements that we listed at the beginning. What we lack is, in fact, the most difficult to implement. The main page of the site will show messages written by all people that are followed by our logged in user, so we need a request that returns all these messages.
The most obvious solution is a query that will give a list of tracked people that we can already make. Then, for each of these users, we will execute the request in order to receive its messages. When we have all the messages, we can combine them into a single list and sort them by time. It sounds good? Not really.
This approach has a couple of problems. What happens if a user tracks a thousand people? We will have to perform a thousand queries to the database only to collect messages. And now we have thousands of lists in memory that we need to sort and combine. On our main page, page numbering is implemented, so we won’t show all available messages, but only the first 50, and links to which you can see the next 50. If we are going to show messages sorted by date, how do we know which of them are the last 50 messages all users, unless we first receive all the messages and sort them.
This is actually a terrible solution that scales very poorly. Although this method of collecting and sorting somehow works, it is not effective enough. This is exactly the job in which relational databases succeed. The database contains indexes that allow it to perform queries and sortings much more efficiently than we can do it for our part.
We must come up with a query that expresses what we want to receive, and the database will figure out how to more effectively extract the information we need.
To dispel the mystery, here is a request that will do what we need. Unfortunately, this is another overloaded single-line, which we will add to the user model (file
Let's try to decrypt this request step by step. There are 3 parts: join, filter, and order_by.
To understand what the join operation does, let's look at an example. Suppose we have a table
Other fields of the table are not displayed, so as not to complicate the example.
Let's assume that our pivot table says that the user “john” is subscribed to “susan” and “david”, the user “susan” is subscribed to “mary” and “mary” is subscribed to “david”. Then the pivot table will look something like this:
In conclusion, our table
Here, some fields are also removed so as not to complicate the example.
The following is part of our request with join isolated from the rest:
The operation
In this example, we want the
To perform this merge, we take each record from the table
The result of performing join on our example in this temporary table:
Notice how the message with user_id = 1 was deleted from join because there are no entries in the subscribers table that followed_id = 1 exists. Also note that the message with user_id = 4 appears twice because the subscribers table has two occurrences with followed_id = 4.
The join operation gave us a list of messages from people that someone is following, without specifying who the subscriber is. We are interested in a subset of this list, in which only those messages that are tracked by one specific user. So we will filter this table by subscriber. The filter request part will be this:
Remember that the request is executed in the context of our target user, therefore the self.id method of the User class in this context returns the id of the user of interest to us. Using this filter, we tell the database that we want to leave only those records from the table created using join in which our user is listed as a subscriber. Continuing our example, if we request a user with id = 1, then we will come to another temporary table:
And these are exactly the posts that we need!
Remember that the query was executed on the Post class, so even if we end up in a temporary table that is not related to any model, the result will be included in this temporary table, without additional columns added by the join operation.
The last step in the process is to sort the results according to our criteria. The part of the request that it does looks like this:
Here we say that the results should be sorted by field
There is only one minor detail that can improve our request. When users read the posts they are subscribed to, they may want to see their own posts in the feed, and it would be nice to include them in the query result.
There is an easy way to do this, which does not require any changes! We just just make sure that each user is added to the database as his own subscriber and this little problem will no longer bother us. To conclude our long discussion of queries, let's write a unit test for our query (tests.py file):
This test has a lot of preset code, but the code for the test itself is quite short. First, we check that the number of tracked posts returned for each user is equal to the expected. Then, for each user, we check that the correct posts were returned and they arrived in the correct order (note that we inserted messages with timestamps guaranteeing always the same order).
Note the use of the followed_post () method. This method returns a query object, not a result. Lazy = “dynamic” also works in the DB relationship.
It is always a good idea to return an object instead of a result, because it gives the caller the opportunity to supplement the query before execution.
There are several methods in the query object that cause the query to execute. We saw that count () executes the query and returns the number of results, discarding the data itself. We also used first () to return the first result in the list and discard the rest. In the test, we used the all () method to get an array with all the results.
We have now implemented all the necessary subscription functions, but there are several ways to improve our design and make it more flexible. All the social networks we love to hate so much support these ways of connecting users, but they have more options for managing information. For example, there is no way to block subscribers. This will add another layer of complexity to our requests, as we now must not only select users, but also weed out the posts of those users who blocked us. How to implement this?
A simple way is another self-referencing table with a many-to-many relationship for recording who is blocking someone, and another join + filter in the query, which returns tracked posts. Another popular feature of social networks is the ability to group subscribers into lists, so that later they can share their information with each group. It also requires additional connections and adds complexity to the queries.
We will not have these functions in the microblog, but if it causes enough interest, I will be happy to write an article on this topic. Let me know in the comments!
We are well advanced today. But although we solved the problems with setting up the database and queries, we did not include new functionality in our application. Fortunately for us, there is no problem with this. We just need to fix the presentation functions and templates to call new methods in the User model, when necessary. So let's do it.
We make ourselves our subscriber.
We decided to mark all users subscribed to themselves so that they could see their posts in the feed.
We are going to do this at the point where users are assigned the first account settings in the after_login handler for OpenID (file 'app / views.py'):
Next, we will define the subscription and unsubscribe presentation functions (app / views.py file):
This should be understandable, but it is worth paying attention to checks in which we try to prevent an error and try to provide a message to the user when the problem still occurs. Now we have presentation functions, so we can connect them. Links to subscribe or unsubscribe will be available on each user's profile page (file app / templates / user.html):
In the line in which there was an “Edit” link, we now show the number of subscribers that the user has and one of three possible links:
Now you can launch the application, create several users by logging in from various OpenID accounts and play with new features.
All that remains is to show the posts of tracked users on the main page, but we still do not have an important part of the puzzle, so we will have to wait until the next chapter.
We have implemented a large piece of our application today.
The topic of database connections and queries is quite complex, so if you have any questions, you can send your questions in the comments below.
In the next article, we will look at the wonderful world of page numbering, and we will finally receive posts from the database.
For lazy copy pasteors, below is a link to the updated sources of our microblog:
Download microblog-0.8.zip .
As always, the archive does not contain a flask database or virtual environment. Previous articles explain how to deploy them.
Thanks again for reading my tutorial. See you next time!
Miguel
The purpose of this guide is to develop a fairly functional microblogging application, which I decided to call microblog for a complete lack of originality.
Table of contents
Part 1: Hello World!
Part 2: Templates
Part 3: Forms
Part 4: Database
Part 5: User login
Part 6: Profile page and avatars
Part 7: Unit testing
Part 8: Subscribers, contacts and friends (this article)
Part 9: Pagination
Part 10: Full-text search
Part 11: Email support
Part 12: Reconstruction
Part 13: Date and time
Part 14: I18n and L10n
Part 15: Ajax
Part 16: Debugging, testing and profiling
Part 17: Deployment on Linux (and even on Raspberry Pi! )
Part 18: Deployment on Heroku Cloud
Brief repetition
Our small microblog is slowly growing, and today we will cover the topics that are necessary for a complete application.
Today we will work a little with our database. Each user of our application should be able to choose the users that he wants to track, and our database should also store data about who is tracking whom. All social applications have these features in different variations. Some call it Contacts, others Links, Friends, Friends or Subscribers. Some sites use a similar idea for a list of Allowed and Ignored users. We will call them Subscribers, but we will not implement them by holding on to the name.
Subscribers Feature Design
Before we start writing code, let's think about the functionality that we want to get from this feature. Let's start with the most obvious. We want our users to conveniently maintain lists of subscriptions to other users. On the other hand, we want to know the list of subscribers of each user. We also want to be able to find out if the user has subscribers or if he has subscribed to other users. Users will click on the “Subscribe” link in the profile of any other user to start tracking him. In the same way, clicking on the unsubscribe link will unsubscribe from the user. The last requirement is the ability of the user to request from the database all the posts of the monitored users.
So, if you thought it would be quick and easy, think again!
Communications inside the database
We said that we want to have lists of subscribers and subscriptions for all users. Unfortunately, relational databases are not of type @@ list @@, all we have is tables with records and relations between records. We already have a table in our database that represents users, it remains to come up with dependency relationships that simulate subscriber / subscription relationships. This is a good moment to parse three types of relationships in relational databases:
One to many
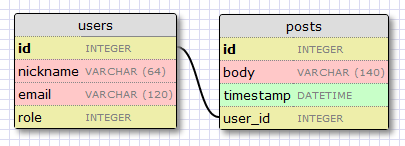
We have already seen the one-to-many relationship in a previous article on the database:
Two entities connected by such relationships are this
usersand posts. We say that a user can have many posts, and a post has only one user. These relations are used in a database with a foreign key (FK) on the "many" side. In the above example, the foreign key is the field user_idadded to the table posts. This field associates each post with a post about the author in the user table. It is clear that the field
user_idprovides direct access to the author of this post, but what about feedback? For the link to be useful, we must be able to get a list of posts written by the user. It turns out the fields user_idin the tableposts enough to answer our question, since databases have indexes that allow you to make queries such as "get all messages where user_id is X".Many-to-many
Many-to-many relationships are a bit more complicated. For example, consider the database in which
studentsand are stored teachers. We can say that a student can have many teachers, and a teacher can have many students. This is like two partially overlapping one-to-many relationships. For this type of relationship, we should be able to query the database and get a list of teachers who teach the student and a list of students in the teacher's class. It turns out that it is rather more difficult to imagine in the database, such a relationship cannot be modeled by adding foreign keys to existing tables.
Implementing a many-to-many relationship requires the use of an auxiliary table called a pivot table. Here, for example, will look like a database for students and teachers:
Although this may seem difficult, a pivot table can answer many of our questions, such as:
- Who is student S learning from?
- Who does teacher T teach?
- How many students have teacher T?
- How many teachers does student S have?
- Teacher T teaches student S?
- Student S attends teacher class T?
One to one
One-to-one relationships are a special case of one-to-many relationships. The view is very similar, but contains a ban on adding more than one link, so as not to become one-to-many. Although there are cases in which this type of relationship is useful, this does not happen as often as in the case of the other two types, since in a situation where two tables are connected with a one-to-one relationship, it may make sense to combine the tables into one.
Subscriber / subscription view
From the above relationships, we can easily determine if a many-to-many data model is suitable for us, because the user can follow many other users and the user can have many subscribers. But there is a feature. We want to represent users subscribed to other users, but we only have one user table. So what should we use as a second entity in a many-to-many relationship?
Of course, the second entity in the relationship will be the same user table. Relationships in which instances of an entity are associated with other instances of the same entity are called self-referencing relationships, and this is exactly what we need.
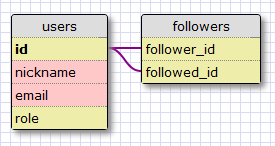
This is a diagram of our many-to-many relationships:
Table
followersThis is a pivot table. Both foreign keys point to the table user, because we linked the table with ourselves. Each entry in this table represents one relationship between the subscribed user and the one to whom he is subscribed. As in the example of students and teachers, such a configuration as this allows our database to answer all questions regarding subscribers and their subscriptions that we need. It's pretty simple.DB model
Changes in our model will not be very big. We will start by adding the table @@ followers @@ (file @@ app / models.py @@):
followers = db.Table('followers',
    db.Column('follower_id', db.Integer, db.ForeignKey('user.id')),
    db.Column('followed_id', db.Integer, db.ForeignKey('user.id'))
)
This is a live translation of table links from our diagram. Please note that we did not declare this table as a model, as we did for
usersand posts. Since this is a helper table that has no data other than foreign keys, we will use the low-level flask-sqlalchemy API to create a table without creating its model. Next, we describe many-to-many relationships in a table
users(file app/models.py)class User(db.Model):
id = db.Column(db.Integer, primary_key = True)
nickname = db.Column(db.String(64), unique = True)
email = db.Column(db.String(120), index = True, unique = True)
role = db.Column(db.SmallInteger, default = ROLE_USER)
posts = db.relationship('Post', backref = 'author', lazy = 'dynamic')
about_me = db.Column(db.String(140))
last_seen = db.Column(db.DateTime)
followed = db.relationship('User',
secondary = followers,
primaryjoin = (followers.c.follower_id == id),
secondaryjoin = (followers.c.followed_id == id),
backref = db.backref('followers', lazy = 'dynamic'),
lazy = 'dynamic')
Relationship configuration is nontrivial and requires some explanation. We use a function
db.relationshipto determine the relationship between tables, as we did in the previous article. We will associate the instance Userwith another instance User, and for agreement we say that in a pair of related users, the left user is subscribed to the right user. As you can see from the description of the relationship, we named the left side followed, because when we request the relationship of the left side, we will get a list of subscribers. Let's look at all the arguments db.relationshipone at a time:'User'the right side of the entity in the relationship (the left side is the parent class). When we define self-referencing relationships, we use the same class on both sides.secondarypoints to a pivot table used in these relationships.primaryjoindescribes the relationship of the left side of an entity with a pivot table. Note that the table isfollowersnot a model, so a little strange syntax is used to get to the field name.secondaryjoindescribes the relationship of the right side with the pivot table.backrefdescribes how these relationships will be available on the right side of the entity. We said that for a given user, the queryfollowedreturned all the users on the right side who are associated with the user on the left. The back link is calledfollowersand it will return all users on the left, which are associated with the user on the right. An additional argumentlazyindicates how this request is executed. This mode indicates not to execute the request until explicitly requested. This is useful for improving performance, and also because we can receive this request and modify it before execution. We will discuss this in more detail later.- the parameter is a
lazybit like the parameter with the same name inbackref, but this one refers to the request, not the feedback.
Do not despair if it is hard to understand. We will see how to use these queries, and then everything will become clearer. Since we did the database updates, now we can create a new migration:
./db_migrate.py
This completes the database changes. It remains just a little poke.
Adding and removing subscribers
To support code reuse, we implement the subscription \ subscribers functionality inside the model
Userand will not put it into the view. Thus, we can use this function for the current application (refer from the view) and use it in testing. In principle, it is always better to move the application logic from view to model, this greatly simplifies testing. You should keep the submissions as simple as possible because they are harder to test in automatic mode. Below is the code for adding and removing subscribers, defined as model methods
User(file app/models.py):class User(db.Model):
#...
def follow(self, user):
if not self.is_following(user):
self.followed.append(user)
return self
def unfollow(self, user):
if self.is_following(user):
self.followed.remove(user)
return self
def is_following(self, user):
return self.followed.filter(followers.c.followed_id == user.id).count() > 0
Thanks to the power of SQL Alchemy, which does a lot of work, these methods are surprisingly simple. We just add or remove elements, and SQLAlchemy does the rest. Methods
followand are unfollowdefined so that they return an object when everything went well, and None when the operation could not be completed. When an object is returned, it must be added to the database and committed. The method
is_followingdoes quite a lot, despite one line of code. We accept a request that returns all pairs (follower, followed)with user participation and filter them by column followed. A filter()modified request is returned that has not yet been completed. So we will callcount()to this request and now this request will be executed and will return the number of records found. If we get at least one, then we will know that there are connections. If we do not get anything, then we will know that there are no connections.Testing
Let's write a test for our code (file
tests.py):class TestCase(unittest.TestCase):
#...
def test_follow(self):
u1 = User(nickname = 'john', email = 'john@example.com')
u2 = User(nickname = 'susan', email = 'susan@example.com')
db.session.add(u1)
db.session.add(u2)
db.session.commit()
assert u1.unfollow(u2) == None
u = u1.follow(u2)
db.session.add(u)
db.session.commit()
assert u1.follow(u2) == None
assert u1.is_following(u2)
assert u1.followed.count() == 1
assert u1.followed.first().nickname == 'susan'
assert u2.followers.count() == 1
assert u2.followers.first().nickname == 'john'
u = u1.unfollow(u2)
assert u != None
db.session.add(u)
db.session.commit()
assert u1.is_following(u2) == False
assert u1.followed.count() == 0
assert u2.followers.count() == 0
After adding this test to the test framework, we can start the test suite with the command:
./tests.py
And if everything works, all tests will be successfully passed.
Database Queries
Our current database model supports most of the requirements that we listed at the beginning. What we lack is, in fact, the most difficult to implement. The main page of the site will show messages written by all people that are followed by our logged in user, so we need a request that returns all these messages.
The most obvious solution is a query that will give a list of tracked people that we can already make. Then, for each of these users, we will execute the request in order to receive its messages. When we have all the messages, we can combine them into a single list and sort them by time. It sounds good? Not really.
This approach has a couple of problems. What happens if a user tracks a thousand people? We will have to perform a thousand queries to the database only to collect messages. And now we have thousands of lists in memory that we need to sort and combine. On our main page, page numbering is implemented, so we won’t show all available messages, but only the first 50, and links to which you can see the next 50. If we are going to show messages sorted by date, how do we know which of them are the last 50 messages all users, unless we first receive all the messages and sort them.
This is actually a terrible solution that scales very poorly. Although this method of collecting and sorting somehow works, it is not effective enough. This is exactly the job in which relational databases succeed. The database contains indexes that allow it to perform queries and sortings much more efficiently than we can do it for our part.
We must come up with a query that expresses what we want to receive, and the database will figure out how to more effectively extract the information we need.
To dispel the mystery, here is a request that will do what we need. Unfortunately, this is another overloaded single-line, which we will add to the user model (file
app.models.py):class User(db.Model):
#...
def followed_posts(self):
return Post.query.join(followers, (followers.c.followed_id == Post.user_id)).filter(followers.c.follower_id == self.id).order_by(Post.timestamp.desc())
Let's try to decrypt this request step by step. There are 3 parts: join, filter, and order_by.
Joins
To understand what the join operation does, let's look at an example. Suppose we have a table
Userwith the following contents:| User | |
|---|---|
| id | nickname |
| 1 | john |
| 2 | susan |
| 3 | mary |
| 4 | david |
Other fields of the table are not displayed, so as not to complicate the example.
Let's assume that our pivot table says that the user “john” is subscribed to “susan” and “david”, the user “susan” is subscribed to “mary” and “mary” is subscribed to “david”. Then the pivot table will look something like this:
| followers | |
|---|---|
| follower_id | followed_id |
| 1 | 2 |
| 1 | 4 |
| 2 | 3 |
| 3 | 4 |
In conclusion, our table
Postcontains one post from each user:| Post | ||
|---|---|---|
| id | text | user_id |
| 1 | post from susan | 2 |
| 2 | post from mary | 3 |
| 3 | post from david | 4 |
| 4 | post from john | 1 |
Here, some fields are also removed so as not to complicate the example.
The following is part of our request with join isolated from the rest:
Post.query.join(followers,
    (followers.c.followed_id == Post.user_id))
The operation
joinis called on the table Post. There are two arguments, the first one is another table, in our case followers. The second argument indicates which fields to join the table. The operation join will make a temporary table with data from Postand followersmerged according to the specified condition. In this example, we want the
followed_idtable fields to followersmatch the user_idtable field Post. To perform this merge, we take each record from the table
Post(left part of join) and attach the fields from the record in the table followers(right part of join) that match the condition. If the record does not meet the condition, then it does not fall into the table. The result of performing join on our example in this temporary table:
| Post | followers | |||
|---|---|---|---|---|
| id | text | user_id | follower_id | followed_id |
| 1 | post from susan | 2 | 1 | 2 |
| 2 | post from mary | 3 | 2 | 3 |
| 3 | post from david | 4 | 1 | 4 |
| 3 | post from david | 4 | 3 | 4 |
Notice how the message with user_id = 1 was deleted from join because there are no entries in the subscribers table that followed_id = 1 exists. Also note that the message with user_id = 4 appears twice because the subscribers table has two occurrences with followed_id = 4.
Filters
The join operation gave us a list of messages from people that someone is following, without specifying who the subscriber is. We are interested in a subset of this list, in which only those messages that are tracked by one specific user. So we will filter this table by subscriber. The filter request part will be this:
filter(followers.c.follower_id == self.id)
Remember that the request is executed in the context of our target user, therefore the self.id method of the User class in this context returns the id of the user of interest to us. Using this filter, we tell the database that we want to leave only those records from the table created using join in which our user is listed as a subscriber. Continuing our example, if we request a user with id = 1, then we will come to another temporary table:
| Post | followers | |||
|---|---|---|---|---|
| id | text | user_id | follower_id | followed_id |
| 1 | post from susan | 2 | 1 | 2 |
| 3 | post from david | 4 | 1 | 4 |
And these are exactly the posts that we need!
Remember that the query was executed on the Post class, so even if we end up in a temporary table that is not related to any model, the result will be included in this temporary table, without additional columns added by the join operation.
Sorting
The last step in the process is to sort the results according to our criteria. The part of the request that it does looks like this:
order_by(Post.timestamp.desc())
Here we say that the results should be sorted by field
timestampin descending order, so the very last post will be the first. There is only one minor detail that can improve our request. When users read the posts they are subscribed to, they may want to see their own posts in the feed, and it would be nice to include them in the query result.
There is an easy way to do this, which does not require any changes! We just just make sure that each user is added to the database as his own subscriber and this little problem will no longer bother us. To conclude our long discussion of queries, let's write a unit test for our query (tests.py file):
#...
from datetime import datetime, timedelta
from app.models import User, Post
#...
class TestCase(unittest.TestCase):
    #...
    def test_follow_posts(self):
        # make four users
        u1 = User(nickname = 'john', email = 'john@example.com')
        u2 = User(nickname = 'susan', email = 'susan@example.com')
        u3 = User(nickname = 'mary', email = 'mary@example.com')
        u4 = User(nickname = 'david', email = 'david@example.com')
        db.session.add(u1)
        db.session.add(u2)
        db.session.add(u3)
        db.session.add(u4)
        # make four posts
        utcnow = datetime.utcnow()
        p1 = Post(body = "post from john", author = u1, timestamp = utcnow + timedelta(seconds = 1))
        p2 = Post(body = "post from susan", author = u2, timestamp = utcnow + timedelta(seconds = 2))
        p3 = Post(body = "post from mary", author = u3, timestamp = utcnow + timedelta(seconds = 3))
        p4 = Post(body = "post from david", author = u4, timestamp = utcnow + timedelta(seconds = 4))
        db.session.add(p1)
        db.session.add(p2)
        db.session.add(p3)
        db.session.add(p4)
        db.session.commit()
        # setup the followers
        u1.follow(u1) # john follows himself
        u1.follow(u2) # john follows susan
        u1.follow(u4) # john follows david
        u2.follow(u2) # susan follows herself
        u2.follow(u3) # susan follows mary
        u3.follow(u3) # mary follows herself
        u3.follow(u4) # mary follows david
        u4.follow(u4) # david follows himself
        db.session.add(u1)
        db.session.add(u2)
        db.session.add(u3)
        db.session.add(u4)
        db.session.commit()
        # check the followed posts of each user
        f1 = u1.followed_posts().all()
        f2 = u2.followed_posts().all()
        f3 = u3.followed_posts().all()
        f4 = u4.followed_posts().all()
        assert len(f1) == 3
        assert len(f2) == 2
        assert len(f3) == 2
        assert len(f4) == 1
        assert f1 == [p4, p2, p1]
        assert f2 == [p3, p2]
        assert f3 == [p4, p3]
        assert f4 == [p4]
This test has a lot of preset code, but the code for the test itself is quite short. First, we check that the number of tracked posts returned for each user is equal to the expected. Then, for each user, we check that the correct posts were returned and they arrived in the correct order (note that we inserted messages with timestamps guaranteeing always the same order).
Note the use of the followed_post () method. This method returns a query object, not a result. Lazy = “dynamic” also works in the DB relationship.
It is always a good idea to return an object instead of a result, because it gives the caller the opportunity to supplement the query before execution.
There are several methods in the query object that cause the query to execute. We saw that count () executes the query and returns the number of results, discarding the data itself. We also used first () to return the first result in the list and discard the rest. In the test, we used the all () method to get an array with all the results.
Possible improvements
We have now implemented all the necessary subscription functions, but there are several ways to improve our design and make it more flexible. All the social networks we love to hate so much support these ways of connecting users, but they have more options for managing information. For example, there is no way to block subscribers. This will add another layer of complexity to our requests, as we now must not only select users, but also weed out the posts of those users who blocked us. How to implement this?
A simple way is another self-referencing table with a many-to-many relationship for recording who is blocking someone, and another join + filter in the query, which returns tracked posts. Another popular feature of social networks is the ability to group subscribers into lists, so that later they can share their information with each group. It also requires additional connections and adds complexity to the queries.
We will not have these functions in the microblog, but if it causes enough interest, I will be happy to write an article on this topic. Let me know in the comments!
Putting things in order
We are well advanced today. But although we solved the problems with setting up the database and queries, we did not include new functionality in our application. Fortunately for us, there is no problem with this. We just need to fix the presentation functions and templates to call new methods in the User model, when necessary. So let's do it.
We make ourselves our subscriber.
We decided to mark all users subscribed to themselves so that they could see their posts in the feed.
We are going to do this at the point where users are assigned the first account settings in the after_login handler for OpenID (file 'app / views.py'):
@oid.after_login
def after_login(resp):
    if resp.email is None or resp.email == "":
        flash('Invalid login. Please try again.')
        return redirect(url_for('login'))
    user = User.query.filter_by(email = resp.email).first()
    if user is None:
        nickname = resp.nickname
        if nickname is None or nickname == "":
            nickname = resp.email.split('@')[0]
        nickname = User.make_unique_nickname(nickname)
        user = User(nickname = nickname, email = resp.email, role = ROLE_USER)
        db.session.add(user)
        db.session.commit()
        # make the user follow him/herself
        db.session.add(user.follow(user))
        db.session.commit()
    remember_me = False
    if 'remember_me' in session:
        remember_me = session['remember_me']
        session.pop('remember_me', None)
    login_user(user, remember = remember_me)
    return redirect(request.args.get('next') or url_for('index'))
Links subscribe and unsubscribe
Next, we will define the subscription and unsubscribe presentation functions (app / views.py file):
@app.route('/follow/')
@login_required
def follow(nickname):
    user = User.query.filter_by(nickname = nickname).first()
    if user == None:
        flash('User ' + nickname + ' not found.')
        return redirect(url_for('index'))
    if user == g.user:
        flash('You can\'t follow yourself!')
        return redirect(url_for('user', nickname = nickname))
    u = g.user.follow(user)
    if u is None:
        flash('Cannot follow ' + nickname + '.')
        return redirect(url_for('user', nickname = nickname))
    db.session.add(u)
    db.session.commit()
    flash('You are now following ' + nickname + '!')
    return redirect(url_for('user', nickname = nickname))
@app.route('/unfollow/')
@login_required
def unfollow(nickname):
    user = User.query.filter_by(nickname = nickname).first()
    if user == None:
        flash('User ' + nickname + ' not found.')
        return redirect(url_for('index'))
    if user == g.user:
        flash('You can\'t unfollow yourself!')
        return redirect(url_for('user', nickname = nickname))
    u = g.user.unfollow(user)
    if u is None:
        flash('Cannot unfollow ' + nickname + '.')
        return redirect(url_for('user', nickname = nickname))
    db.session.add(u)
    db.session.commit()
    flash('You have stopped following ' + nickname + '.')
    return redirect(url_for('user', nickname = nickname))
This should be understandable, but it is worth paying attention to checks in which we try to prevent an error and try to provide a message to the user when the problem still occurs. Now we have presentation functions, so we can connect them. Links to subscribe or unsubscribe will be available on each user's profile page (file app / templates / user.html):
{% extends "base.html" %}
{% block content %}
![]()
User: {{user.nickname}}
{% if user.about_me %}{{user.about_me}}
{% endif %}
{% if user.last_seen %}Last seen on: {{user.last_seen}}
{% endif %}
{{user.followers.count()}} followers |
{% if user.id == g.user.id %}
Edit your profile
{% elif not g.user.is_following(user) %}
Follow
{% else %}
Unfollow
{% endif %}
{% for post in posts %}
{% include 'post.html' %}
{% endfor %}
{% endblock %}
In the line in which there was an “Edit” link, we now show the number of subscribers that the user has and one of three possible links:
- if the profile belongs to the logged in user, then the “Edit” button will be visible
- otherwise, if you are not subscribed to the user "Subscribe"
- otherwise, unsubscribe link
Now you can launch the application, create several users by logging in from various OpenID accounts and play with new features.
All that remains is to show the posts of tracked users on the main page, but we still do not have an important part of the puzzle, so we will have to wait until the next chapter.
Final words
We have implemented a large piece of our application today.
The topic of database connections and queries is quite complex, so if you have any questions, you can send your questions in the comments below.
In the next article, we will look at the wonderful world of page numbering, and we will finally receive posts from the database.
For lazy copy pasteors, below is a link to the updated sources of our microblog:
Download microblog-0.8.zip .
As always, the archive does not contain a flask database or virtual environment. Previous articles explain how to deploy them.
Thanks again for reading my tutorial. See you next time!
Miguel