We are writing our IDE with a built-in interface designer in PHP and ExtJS
This article discusses the concepts of creating an IDE and an interface designer using ExtJS and PHP. On the one hand, creating such editors is a rather rare task, on the other hand, concepts and techniques can be used to create various visual configurators.
How to write your IDE with a built-in interface designer, how to do it quickly and with minimal effort? This is exactly the kind of question that arose once in a project using a bunch of ExtJS and PHP. Last-minute terms, a growing line of tasks. The list of tasks is replenished daily with a huge number of input forms, tables and reports, all this must be processed, filtered and displayed for the user.
The project used ORM, which clearly hinted at the possibility of automatically generating similar interfaces, but, having many similarities, each form and report were unique, which required quick and easy configuration.
A quick search revealed Ext Designer (Sencha Architect) - an interesting and useful tool (Ext MVC did not exist yet). Ext Designer did not help to solve the tasks, but about everything in more detail.
At the same time, the PHP-Ext project was noticed - an interesting wrapper for ExtJS written in PHP. It could be used to generate this endless stream of interfaces, but I wanted more: a mixture of Ext Designer and PHP wrappers over ExtJS, so that you could still learn how to “peek” into the database and build forms based on tables. Better yet, based on the structure of ORM objects, because there are all the names of the fields, their types and validators.
The search for such a tool was not successful.

What the IDE will consist of:
1 wrapper for ExtJS, which “knows how” to generate component code;
2 project file with a simple API to add ExtJS wrapper elements;
3 code collector that arranges elements and caches the result;
4 interface designer to simplify project settings, code editor;
5 “goodies” in the form of ready-made components for automating routine tasks:
5.1 non-obvious features of inheritance in ExtJs for beginners;
5.2 redefinition of editors;
5.3 generating a url for Ajax requests in two clicks;
5.4 import of the structure from the database, automatic creation of forms;
5.5 connection of external files and projects;
5.6 localization of interfaces;
5.7 event and method editors;
6 backend of the designer who translates front-end requests to the team API work with the project;
8 project generator.
For this task, you will have to write your own wrapper for ExtJS, adapted to the needs of the idea. Since the volume of the library is large enough, we will save time by separating the sets of properties of the library components from the description of their behavior. Not all ExtJs objects will be mirrored in PHP code. We describe the classes of a limited number of objects such as Grid, Store, Window, etc. All other objects may not physically exist in the code, but be created on the basis of a set of properties described in the hierarchy.
Thus, in a couple of days, the hierarchy of properties of ExtJS components was recreated, while version 3 (several dozens of classes). Then, as necessary, it was possible to describe the behavior of the necessary components, the main ones were generated at the json-config level.
We get the hierarchy of the following form (a piece of the chart, times Zend_Framework 1):
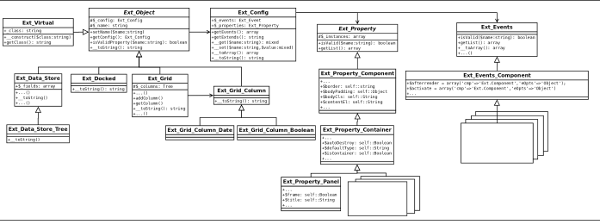
Ext_Object and its descendants are responsible for the behavior of the component;
Ext_Config is responsible for storing, validating and serializing properties;
Ext_Property and its descendants are responsible for describing the characteristics of a particular ExtJS component (classes with public properties, to some extent repeating the hierarchy of the ExtJs library).
Ext_Virtual is a class. Objects of this class are created by the factory in the event that there is no direct descendant of Ext_Object that describes the behavior of the component. It is created based on the description of Ext_Property_xxx properties. It differs in that it accepts the name of the class to emulate, using the name it represents to the library components.
Ext_Object implements the __toString method, which returns the component's ExtJS code. If necessary, this method can be overridden in the heirs. If the objects are nested inside each other, at the moment of rooting to the string of the root object, the whole chain will easily unpack (turn into a string of Js-code).
As practice has shown, this solution avoided a headache.
The interface on ExtJS consists of components arranged in a chain and located in the Layout.
It is necessary to somehow store the connection settings of the project components. You can use XML or some other similar format as a configuration file.
In this case, each time you load the project, you will have to analyze the configuration and initialize the objects, which can take a long time. Need a simple, fast and easy format.
What if we declare the Designer_Project class, which would represent the project itself and have a simple API for adding elements, and store the elements themselves in a tree structure (inside would be an object working with a tree structure).
At that time, the Tree class was already written., which quite quickly worked with tree structures, easily managed a hierarchy of up to 25,000 - 30,000 nested elements in less than a second.
The object of such a project can be serialized and saved to disk. Moreover, from a serialized string, you can take a hash and rebuild the interface code only if there are changes. Reinitializing the interface could use the file cache without loading the project for validation.
The main problem of Ext Designer at that time was that every time you change the code, you need to rebuild the application and publish scripts.
Structure Designer_Project (project file):
- system description of containers (which classes can be moved, which classes can contain nested elements, etc.);
- settings for the current project (name, namespace, connected files, etc.);
- API (a set of methods for working with the project);
- Tree (tree of elements, project structure).
It is noteworthy that component classes can expand, and the list of properties can increase. All this in most cases does not cause compatibility problems with the old format.
So the project file appeared. Along the way, several auxiliary classes were written, for example, the Designer_Storage adapter (suddenly we change our minds about storing projects in files). Several performance tests were carried out, the results were optimistic, the idea worked smartly. It is important to note that the project tree knows only about the structure of the nesting of elements, but the objects themselves are not actually in each other. Designer / Project.php
Since the Designer_Project class is a container with a simple API and does not know at all what to do with its contents, you will need an auxiliary mechanism that can correctly position the code of elements in the desired sequence - this is the class Designer_Project_Code. Perhaps the most difficult component in the number of different conditions and branches. Receiving the project object as input, it must return the JS code for the interface. Recursively passing through the project tree, it receives the component code and arranges the elements in the desired sequence. It is important to note that the wrapper for ExtJS directly issues the component code, the collector himself arranges this code in the correct sequence. He needs to determine which components should be declared first, get their code and insert links into dependent components.
The code turned out to be quite complicated and confusing, refactored many times, with the advent of new features it became even more confusing.

Over time, he acquired a tolerant look and structure. Designer / Project / Code.php
For JS objects, which are extensions of the basic ExtJS components, a trick was used to simplify the layout of nested elements. The childObjects property was created, which is a list of all nested elements, so it is very easy to access and link to them in items.
The working principle of Designer_Project_Code in a recursive traversal of the project structure, the search for related components and the correct location of the code of finite elements relative to each other.
Paul done. A simplified analogue of the PHP-EXT wrapper has been created. It can fold into a project and works much faster. Functionality is limited, but no one bothers to develop it.
The time has come for the most interesting thing - creating an interface designer. Conceptually, it should be:
- a panel with a toolbar that would contain a list of components that can be placed in the project (buttons, forms, windows, panels);
- the main form, which would display the results of the rendering of the project;
- hierarchy of components (used TreePanel);
- property editor (Property Grid).
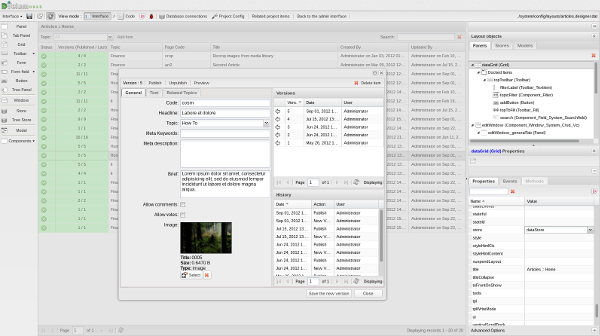
At the moment, the designer has the following appearance (very different from the first):
1. project settings panel (loading, saving, switching the designer / code editor mode, etc.);
2. A toolbar with a list of components that can be added to the project;
3. a panel that displays the project structure supports Drag & Drop movement of elements; when selecting an element, an individual property settings panel is loaded for it;
4. panel for setting component properties (contains additional panels for editing events and methods).
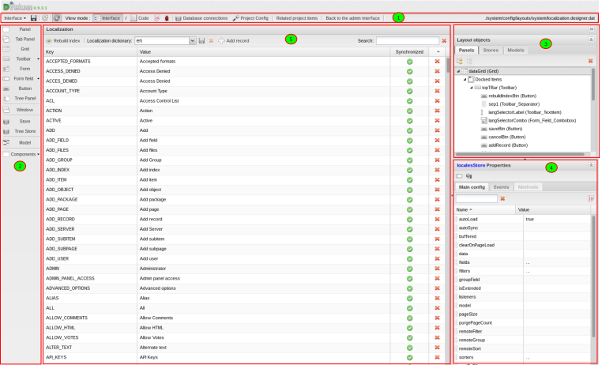
5. the central panel (displays the result of the rendering of the project, in this screenshot - the localization editor). When a project is loaded, the server saves a copy of its object in the session; it performs all manipulations with it. Thus, if the interface fell, you can reload the window, the changes will not be lost. The “Save” button flushes the project to disk.
After making changes, the interface sends a request to the server, the desired controller accepts the request, makes changes to the Designer_Project. After successfully applying the changes, the designer requests a rebuild of JS.
The main panel of the designer, which is responsible for the arrangement of elements in the project, is a tree with drag & drop support:
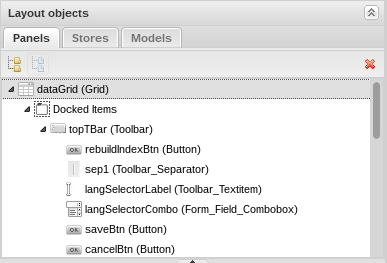
The tree requests a list of elements from the server, which, in turn, extracts the structure from the project using the API. While dragging an item, a request is sent to the server with an instruction which component to move. The Designer_Project API contains a method for moving items in a tree. When you click on a tree node (selecting the desired object), the itemSelected event is triggered, the properties panel of this component is displayed.
The interaction of the editor components occurs at the event level, the individual parts and components often do not have an idea of what is outside. Each element has a defined set of generated events, which the parent component usually subscribes to.
An extended Property Grid component was used as a property editor, supplemented by methods of communicating with the server (it requests a list of fields, sends a change in properties, and triggers events).
In our case, this component was called designer.properties.Panel
One property panel is indispensable; in some cases, the ability to additionally configure properties, which are editors and windows, is required. If you need to expand the list of settings for this type of object, an individual editor is assigned, inherited from designer.properties.Panel .
The initial capabilities of the designer failed to solve all the problems, so the “actionJs” file was attached to the project (a file with JavaScript code, it is used for what cannot be done using standard tools, it is connected after the JS project). Codemirror.net is
used as a code editor .
The first versions of the designer could easily and quickly build an interface, everything else fell on the shoulders of the developer. In later versions, events appeared in the designer, the ability to expand objects, add methods, etc.
How to display the result? You can render projects directly in the DOM of the open page, it is very fast, the rebuild lags are almost invisible, after throwing an element through the tree, it takes a split second before the interface is rebuilt. This solution has one serious problem, if something goes wrong in the project being developed (a property is set incorrectly or something else), JS errors will cause the entire designer to crash. It is better to transfer the developed interface to iframe, although it will slow down the response, but the collapse of the project code will not lead to a global collapse. Iframe itself can be put in the central panel, if necessary, request an update to the content.
It would be nice if the elements could be thrown onto the form and moved / moved right inside the project being developed, as in all “adult” designers, but for a simple reason this question cannot be solved. I had to give up this venture for a while, the deadlines were running out.
Later, a mechanism appeared for the interaction of the main interface of the designer and the project itself. You can move, stretch the columns of the tables, resize windows, all this is saved. The principle of operation is quite simple - event handlers are added to the interface being developed during the development mode, which form a team for the designer and help to interact with the designer’s controllers, the external interface of the designer expects a command and reacts when it appears. For example, when moving table columns, a request is sent to the serverside API and the main designer interface is notified.
Before touching on the topic of finalizing components, I would like to draw attention to the inheritance features that are not obvious to a beginner.
Object {a = 100, b = 2, c = 3}
Object {a = 100, b = 2, c = 3}
[1, 2, 3, 100]
[1, 2, 3, 100]
These features are important to remember because it will save you a lot of nerves. This is not the only pitfall, be careful.
We redefine the editors of the basic properties, for example, we replace the store editor from the text field with a drop-down list of all the storages created in the project (they are requested from the server, the Designer_Project API is given), as well as with other similar properties (layout, align, and many others).

Url in the system is dynamic, for example, the address of the panel may change, the controller will switch. To do this, tokens were invented that replaced the real path, processed at the stage of code assembly.
To simplify the assignment of urls (ajax requests, proxy url), a component has been written that analyzes the file and code structure. Reflection allows you to receive and analyze a list of available actions for controllers, now they do not need to be written with your hands, just poke with the mouse.
How it works: the file system is scanned, the desired class is selected, a list of methods is requested, a comment on the method is used as a description for the interface. The desired url is automatically registered in the property as a template.

A similar approach can be used to assign icons.

How else to make life easier for the programmer? Of course, importing fields into forms, storages, tables based on the structure of the database or ORM.
Select the table / object from which we want to import the fields. Based on its structure and data types, the system automatically substitutes the necessary values for us in the cells and fills the hierarchy of forms.
For example, Ext.form.field.Number is substituted for int, Ext.form.field.Text is used for varchar, etc.
Along the way, fieldLabel is added if it is a form field or a date format, if it is a storage field and other properties.
Now the tedious procedure for describing elements takes a couple of clicks.
Why not give the opportunity to connect external JS files and other projects to the project. We can create a project in which we will describe a specific component - the editor, later we will connect it where it is needed. The main thing is to separate the project namespaces so that the code generator has each project in its own namespace, this is not particularly difficult.
All that was required was to add support for adding a list of files and projects to Designer_Project api, and assigning namespaces. Designer_Project_Code was trained in a couple of hours to decompose code inside namespaces and render projects recursively.
Gradually, the designer began to replenish with ready-made components such as editing windows, filters, fields for links to objects, lists of objects and much more.
For a long time, the task of localizing the interface remained unsolved. It was not clear how to approach her decision. The whole project was built on simple solutions, I did not want to fence the garden, and there wasn’t much time for it. At one point it was found.
The platform itself used localization files, which were regenerated upon a change in the localization management interface. As a result, a certain JS object of the form existed on the page:
The idea is simple - to allow the developer to enter Js-code as the value of string properties. To do this, the token “[js:]” was invented (during code generation, properties with such token were issued as js-code).
It was:

It became possible:

Given that the localization management interface was already ready, it was a pleasure to work with it. The implementation of the solution took 20 minutes on its strength. Now you can localize the project without changing the contents of the file.
The next breakthrough was the addition of the ability to expand objects, now you can add methods and events. The implementation of events is very similar to the implementation of properties. Similarly, the methods were implemented. At this point, the system appeared to be divided into standard events described in the Ext wrapper and events created by the user (methods could be created only by the user for “extended” (isExtended attribute) objects).
The designer began to generate a wave of clear, readable code.
After this, an obvious problem appears: events, methods and reactions are scattered across the elements, it is difficult to find where to edit them. We add to the designer separate tabs with lists of events and methods, grouped by objects. We ask Designer_Project for a list of objects, display them in the form of a grid with a grouping.
From the point of view of the backend, everything is quite simple, you can use any framework. Need a set of controllers and actions for manipulating the project. We launch the application, load the designer’s project, describe the list of methods that access the Designer_Project API and perform various manipulations with the project. Of the features - you need a controller that can display the assembled project in the interface and connect the necessary JS-files.
In our case, in addition, an action was created to build and minify the source code of the designer himself, this allowed to speed up the loading of the editor.
A generator is a template with a set of actions on a project file.
In a simplified form:
Having a similar project structure, writing an ORM project generator was not difficult. During the day, several templates for generating standard interfaces were created, now it took a couple of clicks to create a standard interface, the rest of the time was spent on custom design and refinement.
It took 3 weeks of vacation to implement the first version of the designer - a rather short period for such a global goal.

- standard interfaces were generated with one click, then further developed in the designer;
- significantly reduced the number of errors in the JS code;
- Young developers easier to delve into ExtJS and the development of a complex project;
- modifying the interface has become much easier and more interesting, the elements moved with one mouse movement, without fear of forgetting to grab a piece of code and miss connectivity with another element;
- The speed of product and prototype development has increased;
- Things like changing the name of a button or column no longer cause a butt when searching for a piece of code with initializing the desired item;
- An interesting experience was gained in developing our own development environment “on the knee”.
- PHP development has acquired a completely new convenient form;
- managed to learn a lot of the intricacies of ExtJS, which did not have to deal with until this moment.
Over the years of working with ExtJS, I'm tired of writing the same thing. Initialize the components, configure them, being afraid to skip the comma or link something. This task, as it turned out, is easily automated, in the free time you can do more interesting things.
Since the tool turned out to be very useful, there was a desire to share it with the community, to contribute to OpenSource. The designer and several other developments have been redesigned, assembled into one DVelum platform, the development of which has been ongoing for several years. The results can be found on the official website dvelum.net

How to write your IDE with a built-in interface designer, how to do it quickly and with minimal effort? This is exactly the kind of question that arose once in a project using a bunch of ExtJS and PHP. Last-minute terms, a growing line of tasks. The list of tasks is replenished daily with a huge number of input forms, tables and reports, all this must be processed, filtered and displayed for the user.
The project used ORM, which clearly hinted at the possibility of automatically generating similar interfaces, but, having many similarities, each form and report were unique, which required quick and easy configuration.
A quick search revealed Ext Designer (Sencha Architect) - an interesting and useful tool (Ext MVC did not exist yet). Ext Designer did not help to solve the tasks, but about everything in more detail.
At the same time, the PHP-Ext project was noticed - an interesting wrapper for ExtJS written in PHP. It could be used to generate this endless stream of interfaces, but I wanted more: a mixture of Ext Designer and PHP wrappers over ExtJS, so that you could still learn how to “peek” into the database and build forms based on tables. Better yet, based on the structure of ORM objects, because there are all the names of the fields, their types and validators.
The search for such a tool was not successful.
What the IDE will consist of:
1 wrapper for ExtJS, which “knows how” to generate component code;
2 project file with a simple API to add ExtJS wrapper elements;
3 code collector that arranges elements and caches the result;
4 interface designer to simplify project settings, code editor;
5 “goodies” in the form of ready-made components for automating routine tasks:
5.1 non-obvious features of inheritance in ExtJs for beginners;
5.2 redefinition of editors;
5.3 generating a url for Ajax requests in two clicks;
5.4 import of the structure from the database, automatic creation of forms;
5.5 connection of external files and projects;
5.6 localization of interfaces;
5.7 event and method editors;
6 backend of the designer who translates front-end requests to the team API work with the project;
8 project generator.
1 Wrap
For this task, you will have to write your own wrapper for ExtJS, adapted to the needs of the idea. Since the volume of the library is large enough, we will save time by separating the sets of properties of the library components from the description of their behavior. Not all ExtJs objects will be mirrored in PHP code. We describe the classes of a limited number of objects such as Grid, Store, Window, etc. All other objects may not physically exist in the code, but be created on the basis of a set of properties described in the hierarchy.
Thus, in a couple of days, the hierarchy of properties of ExtJS components was recreated, while version 3 (several dozens of classes). Then, as necessary, it was possible to describe the behavior of the necessary components, the main ones were generated at the json-config level.
We get the hierarchy of the following form (a piece of the chart, times Zend_Framework 1):

Ext_Object and its descendants are responsible for the behavior of the component;
Ext_Config is responsible for storing, validating and serializing properties;
Ext_Property and its descendants are responsible for describing the characteristics of a particular ExtJS component (classes with public properties, to some extent repeating the hierarchy of the ExtJs library).
Ext_Virtual is a class. Objects of this class are created by the factory in the event that there is no direct descendant of Ext_Object that describes the behavior of the component. It is created based on the description of Ext_Property_xxx properties. It differs in that it accepts the name of the class to emulate, using the name it represents to the library components.
Ext_Object implements the __toString method, which returns the component's ExtJS code. If necessary, this method can be overridden in the heirs. If the objects are nested inside each other, at the moment of rooting to the string of the root object, the whole chain will easily unpack (turn into a string of Js-code).
As practice has shown, this solution avoided a headache.
2 Project File
The interface on ExtJS consists of components arranged in a chain and located in the Layout.
It is necessary to somehow store the connection settings of the project components. You can use XML or some other similar format as a configuration file.
In this case, each time you load the project, you will have to analyze the configuration and initialize the objects, which can take a long time. Need a simple, fast and easy format.
What if we declare the Designer_Project class, which would represent the project itself and have a simple API for adding elements, and store the elements themselves in a tree structure (inside would be an object working with a tree structure).
At that time, the Tree class was already written., which quite quickly worked with tree structures, easily managed a hierarchy of up to 25,000 - 30,000 nested elements in less than a second.
The object of such a project can be serialized and saved to disk. Moreover, from a serialized string, you can take a hash and rebuild the interface code only if there are changes. Reinitializing the interface could use the file cache without loading the project for validation.
The main problem of Ext Designer at that time was that every time you change the code, you need to rebuild the application and publish scripts.
Structure Designer_Project (project file):
- system description of containers (which classes can be moved, which classes can contain nested elements, etc.);
- settings for the current project (name, namespace, connected files, etc.);
- API (a set of methods for working with the project);
- Tree (tree of elements, project structure).
It is noteworthy that component classes can expand, and the list of properties can increase. All this in most cases does not cause compatibility problems with the old format.
So the project file appeared. Along the way, several auxiliary classes were written, for example, the Designer_Storage adapter (suddenly we change our minds about storing projects in files). Several performance tests were carried out, the results were optimistic, the idea worked smartly. It is important to note that the project tree knows only about the structure of the nesting of elements, but the objects themselves are not actually in each other. Designer / Project.php
3 Code Collector
Since the Designer_Project class is a container with a simple API and does not know at all what to do with its contents, you will need an auxiliary mechanism that can correctly position the code of elements in the desired sequence - this is the class Designer_Project_Code. Perhaps the most difficult component in the number of different conditions and branches. Receiving the project object as input, it must return the JS code for the interface. Recursively passing through the project tree, it receives the component code and arranges the elements in the desired sequence. It is important to note that the wrapper for ExtJS directly issues the component code, the collector himself arranges this code in the correct sequence. He needs to determine which components should be declared first, get their code and insert links into dependent components.
The code turned out to be quite complicated and confusing, refactored many times, with the advent of new features it became even more confusing.
Over time, he acquired a tolerant look and structure. Designer / Project / Code.php
For JS objects, which are extensions of the basic ExtJS components, a trick was used to simplify the layout of nested elements. The childObjects property was created, which is a list of all nested elements, so it is very easy to access and link to them in items.
The working principle of Designer_Project_Code in a recursive traversal of the project structure, the search for related components and the correct location of the code of finite elements relative to each other.
Paul done. A simplified analogue of the PHP-EXT wrapper has been created. It can fold into a project and works much faster. Functionality is limited, but no one bothers to develop it.
4 Designer
The time has come for the most interesting thing - creating an interface designer. Conceptually, it should be:
- a panel with a toolbar that would contain a list of components that can be placed in the project (buttons, forms, windows, panels);
- the main form, which would display the results of the rendering of the project;
- hierarchy of components (used TreePanel);
- property editor (Property Grid).
At the moment, the designer has the following appearance (very different from the first):

1. project settings panel (loading, saving, switching the designer / code editor mode, etc.);
2. A toolbar with a list of components that can be added to the project;
3. a panel that displays the project structure supports Drag & Drop movement of elements; when selecting an element, an individual property settings panel is loaded for it;
4. panel for setting component properties (contains additional panels for editing events and methods).
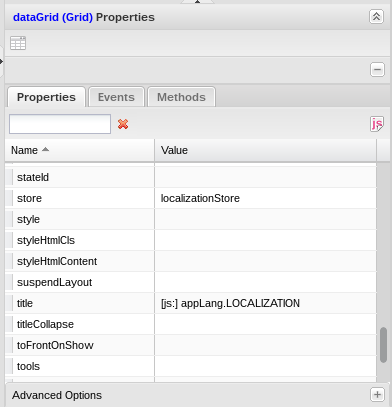
5. the central panel (displays the result of the rendering of the project, in this screenshot - the localization editor). When a project is loaded, the server saves a copy of its object in the session; it performs all manipulations with it. Thus, if the interface fell, you can reload the window, the changes will not be lost. The “Save” button flushes the project to disk.
After making changes, the interface sends a request to the server, the desired controller accepts the request, makes changes to the Designer_Project. After successfully applying the changes, the designer requests a rebuild of JS.
The main panel of the designer, which is responsible for the arrangement of elements in the project, is a tree with drag & drop support:
The tree requests a list of elements from the server, which, in turn, extracts the structure from the project using the API. While dragging an item, a request is sent to the server with an instruction which component to move. The Designer_Project API contains a method for moving items in a tree. When you click on a tree node (selecting the desired object), the itemSelected event is triggered, the properties panel of this component is displayed.
The interaction of the editor components occurs at the event level, the individual parts and components often do not have an idea of what is outside. Each element has a defined set of generated events, which the parent component usually subscribes to.
An extended Property Grid component was used as a property editor, supplemented by methods of communicating with the server (it requests a list of fields, sends a change in properties, and triggers events).
In our case, this component was called designer.properties.Panel
One property panel is indispensable; in some cases, the ability to additionally configure properties, which are editors and windows, is required. If you need to expand the list of settings for this type of object, an individual editor is assigned, inherited from designer.properties.Panel .
The initial capabilities of the designer failed to solve all the problems, so the “actionJs” file was attached to the project (a file with JavaScript code, it is used for what cannot be done using standard tools, it is connected after the JS project). Codemirror.net is
used as a code editor .
The first versions of the designer could easily and quickly build an interface, everything else fell on the shoulders of the developer. In later versions, events appeared in the designer, the ability to expand objects, add methods, etc.
How to display the result? You can render projects directly in the DOM of the open page, it is very fast, the rebuild lags are almost invisible, after throwing an element through the tree, it takes a split second before the interface is rebuilt. This solution has one serious problem, if something goes wrong in the project being developed (a property is set incorrectly or something else), JS errors will cause the entire designer to crash. It is better to transfer the developed interface to iframe, although it will slow down the response, but the collapse of the project code will not lead to a global collapse. Iframe itself can be put in the central panel, if necessary, request an update to the content.
It would be nice if the elements could be thrown onto the form and moved / moved right inside the project being developed, as in all “adult” designers, but for a simple reason this question cannot be solved. I had to give up this venture for a while, the deadlines were running out.
Later, a mechanism appeared for the interaction of the main interface of the designer and the project itself. You can move, stretch the columns of the tables, resize windows, all this is saved. The principle of operation is quite simple - event handlers are added to the interface being developed during the development mode, which form a team for the designer and help to interact with the designer’s controllers, the external interface of the designer expects a command and reacts when it appears. For example, when moving table columns, a request is sent to the serverside API and the main designer interface is notified.
5 Buns in the form of ready-made components, automation of routine tasks
5.1 Non-obvious features of inheritance in ExtJs for beginners.
Before touching on the topic of finalizing components, I would like to draw attention to the inheritance features that are not obvious to a beginner.
Ext.define('mypanel',{
    extend:'Ext.Panel',
    someProperty:{
        a:1,b:2,c:3
    },
    someProperty2:[1,2,3]
});
Ext.define('mypanel2',{
    extend:'mypanel'
});
var a = Ext.create('mypanel');
var b = Ext.create('mypanel2');
b.someProperty.a = 100;
b.someProperty2.push(100);
console.log(a.someProperty);
console.log(b.someProperty);
console.log(a.someProperty2);
console.log(b.someProperty2);
Object {a = 100, b = 2, c = 3}
Object {a = 100, b = 2, c = 3}
[1, 2, 3, 100]
[1, 2, 3, 100]
These features are important to remember because it will save you a lot of nerves. This is not the only pitfall, be careful.
5.2 Editors
We redefine the editors of the basic properties, for example, we replace the store editor from the text field with a drop-down list of all the storages created in the project (they are requested from the server, the Designer_Project API is given), as well as with other similar properties (layout, align, and many others).
5.3 Generating a url for Ajax requests in two clicks
Url in the system is dynamic, for example, the address of the panel may change, the controller will switch. To do this, tokens were invented that replaced the real path, processed at the stage of code assembly.
To simplify the assignment of urls (ajax requests, proxy url), a component has been written that analyzes the file and code structure. Reflection allows you to receive and analyze a list of available actions for controllers, now they do not need to be written with your hands, just poke with the mouse.
How it works: the file system is scanned, the desired class is selected, a list of methods is requested, a comment on the method is used as a description for the interface. The desired url is automatically registered in the property as a template.
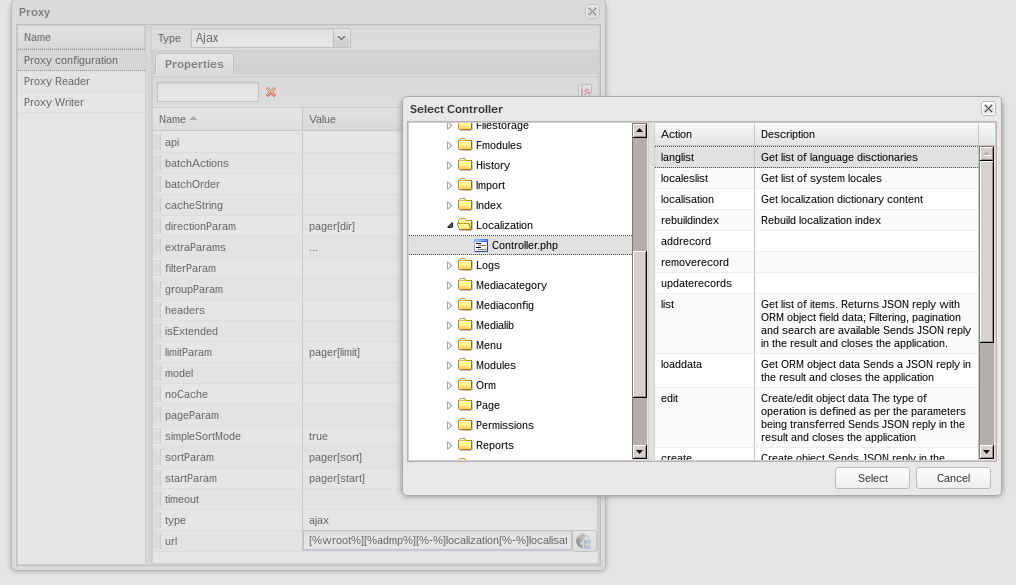
A similar approach can be used to assign icons.

5.4 Importing a structure from a database, automatic creation of forms
How else to make life easier for the programmer? Of course, importing fields into forms, storages, tables based on the structure of the database or ORM.
Select the table / object from which we want to import the fields. Based on its structure and data types, the system automatically substitutes the necessary values for us in the cells and fills the hierarchy of forms.
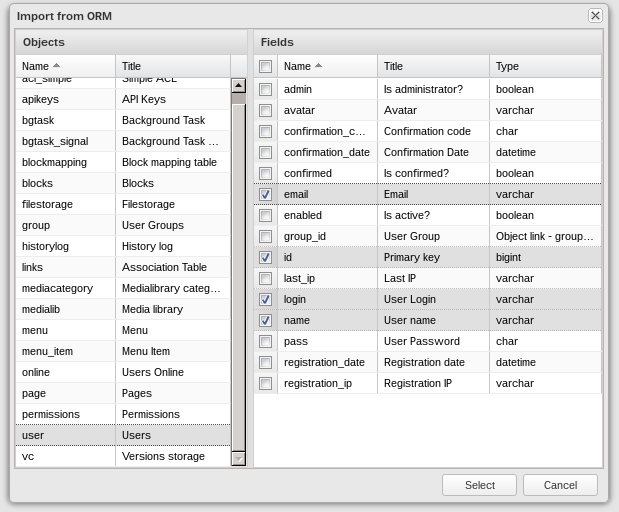 | 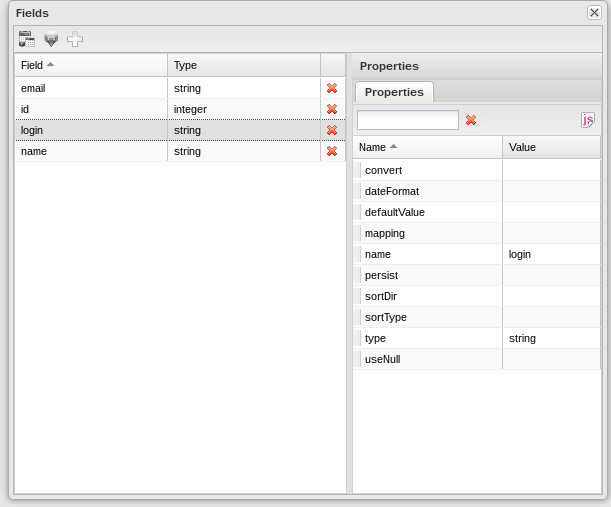 |
For example, Ext.form.field.Number is substituted for int, Ext.form.field.Text is used for varchar, etc.
Along the way, fieldLabel is added if it is a form field or a date format, if it is a storage field and other properties.
Now the tedious procedure for describing elements takes a couple of clicks.
5.5 Connecting external files and projects
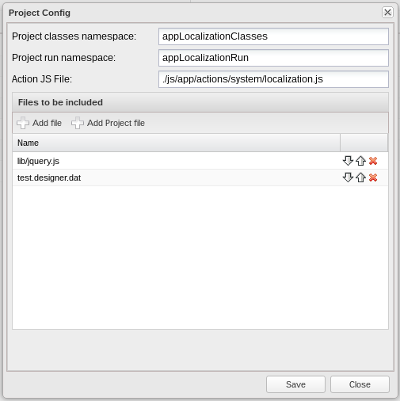
Why not give the opportunity to connect external JS files and other projects to the project. We can create a project in which we will describe a specific component - the editor, later we will connect it where it is needed. The main thing is to separate the project namespaces so that the code generator has each project in its own namespace, this is not particularly difficult.
All that was required was to add support for adding a list of files and projects to Designer_Project api, and assigning namespaces. Designer_Project_Code was trained in a couple of hours to decompose code inside namespaces and render projects recursively.
Gradually, the designer began to replenish with ready-made components such as editing windows, filters, fields for links to objects, lists of objects and much more.
5.6 Localization of interfaces
For a long time, the task of localizing the interface remained unsolved. It was not clear how to approach her decision. The whole project was built on simple solutions, I did not want to fence the garden, and there wasn’t much time for it. At one point it was found.
The platform itself used localization files, which were regenerated upon a change in the localization management interface. As a result, a certain JS object of the form existed on the page:
appLang = {
   yes:”Да”,
   no:”Нет”,
   cancel: ‘Отмена’,
     ...
};
The idea is simple - to allow the developer to enter Js-code as the value of string properties. To do this, the token “[js:]” was invented (during code generation, properties with such token were issued as js-code).
It was:
It became possible:
Given that the localization management interface was already ready, it was a pleasure to work with it. The implementation of the solution took 20 minutes on its strength. Now you can localize the project without changing the contents of the file.
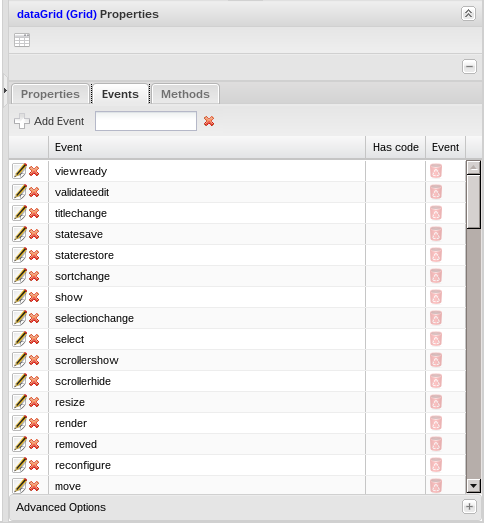
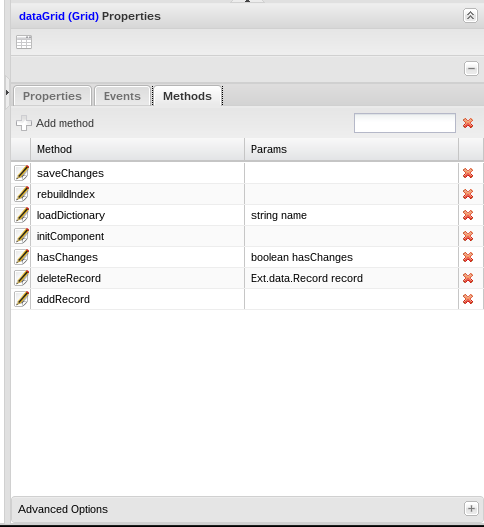
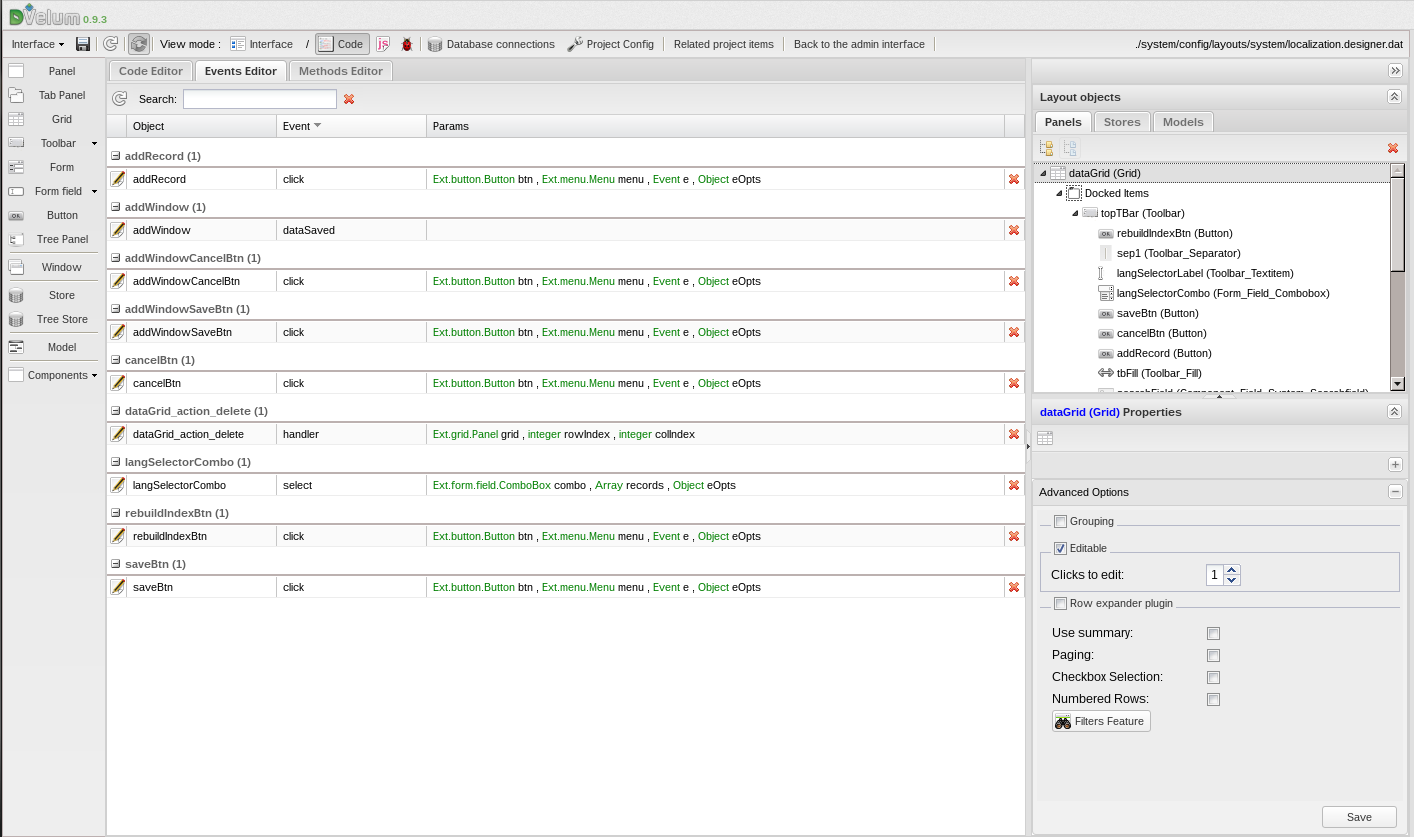
5.7 Event and Method Editors
The next breakthrough was the addition of the ability to expand objects, now you can add methods and events. The implementation of events is very similar to the implementation of properties. Similarly, the methods were implemented. At this point, the system appeared to be divided into standard events described in the Ext wrapper and events created by the user (methods could be created only by the user for “extended” (isExtended attribute) objects).
 |  |
 | 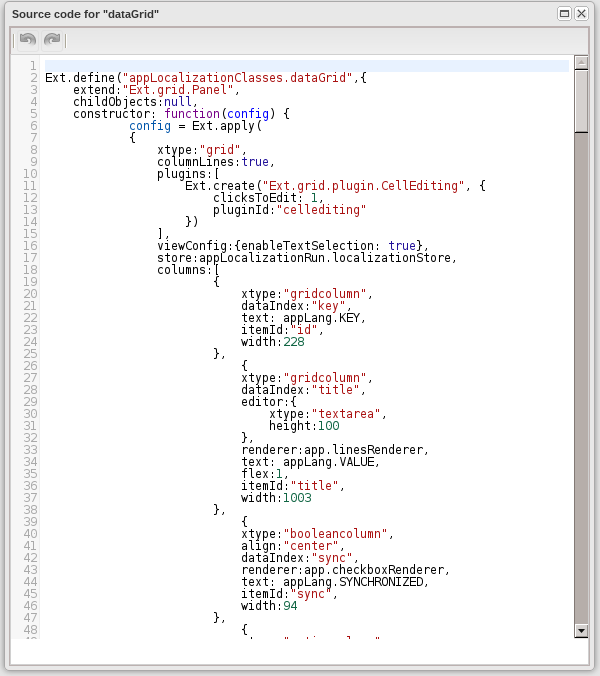 |
The designer began to generate a wave of clear, readable code.
After this, an obvious problem appears: events, methods and reactions are scattered across the elements, it is difficult to find where to edit them. We add to the designer separate tabs with lists of events and methods, grouped by objects. We ask Designer_Project for a list of objects, display them in the form of a grid with a grouping.
 |  |
6 backend
From the point of view of the backend, everything is quite simple, you can use any framework. Need a set of controllers and actions for manipulating the project. We launch the application, load the designer’s project, describe the list of methods that access the Designer_Project API and perform various manipulations with the project. Of the features - you need a controller that can display the assembled project in the interface and connect the necessary JS-files.
In our case, in addition, an action was created to build and minify the source code of the designer himself, this allowed to speed up the loading of the editor.
7 Project Generator
A generator is a template with a set of actions on a project file.
In a simplified form:
// создать новый проект
$project = new Designer_Project();
// создать объект обертки Ext_Panel реализующий обертку для Ext.panel.Panel
$panel = Ext_Factory::object('Panel',array(
           'width'=>100,
           'height'=>200,
           'title'=>'My Panel',
           'layout'=>'fit'
));
// назначить уникальный идентификатор
$panel->setName('myPanel');
// добавили панель в проект
$project->addObject(0, $panel);
// инициализировать хранилище
$designerStorage = Designer_Factory::getStorage($config);
// сохранить проект
$designerStorage->save($projectFile , $project);
Having a similar project structure, writing an ORM project generator was not difficult. During the day, several templates for generating standard interfaces were created, now it took a couple of clicks to create a standard interface, the rest of the time was spent on custom design and refinement.
It took 3 weeks of vacation to implement the first version of the designer - a rather short period for such a global goal.
Profit received:
- standard interfaces were generated with one click, then further developed in the designer;
- significantly reduced the number of errors in the JS code;
- Young developers easier to delve into ExtJS and the development of a complex project;
- modifying the interface has become much easier and more interesting, the elements moved with one mouse movement, without fear of forgetting to grab a piece of code and miss connectivity with another element;
- The speed of product and prototype development has increased;
- Things like changing the name of a button or column no longer cause a butt when searching for a piece of code with initializing the desired item;
- An interesting experience was gained in developing our own development environment “on the knee”.
- PHP development has acquired a completely new convenient form;
- managed to learn a lot of the intricacies of ExtJS, which did not have to deal with until this moment.
Why was this all necessary?
Over the years of working with ExtJS, I'm tired of writing the same thing. Initialize the components, configure them, being afraid to skip the comma or link something. This task, as it turned out, is easily automated, in the free time you can do more interesting things.
Since the tool turned out to be very useful, there was a desire to share it with the community, to contribute to OpenSource. The designer and several other developments have been redesigned, assembled into one DVelum platform, the development of which has been ongoing for several years. The results can be found on the official website dvelum.net