We write the first application for Samsung Smart Watch and OS Tizen
- Tutorial
Hi Habr! In a recent publication, the first impressions of the Samsung Galaxy Watch smart watches running Tizen OS were described . The next step was interesting to find out how to develop your own applications for this system, both on the emulator and on real watches.
The process as a whole turned out to be simple (especially when you program more than one year), even though it has its own subtleties. Who is interested in the continuation, the details under the cut.
Caution traffic, many screenshots.
The first step is simple and obvious. Go to the Samsung website and download Tizen Studio , choose the version depending on the operating system. At the time of publication, the current version is 2.5, and we will use it.
After installation, the Package Manager is launched, with which you need to install the required packages for development. We choose 3.0 Wearable .

As can be seen from the screenshot, version 4.0 is available only in the form of a Preview, but we will not use the new features anyway, so 3.0 will be enough. In addition, you need to go to the Extention SDK section, and select Samsung Certificate Extention there. This is important because Without certificate management, it will not be possible to download the application to the clock. By default, this component is not selected, and it took at least half an hour to figure out why an incorrect certificate error is issued.
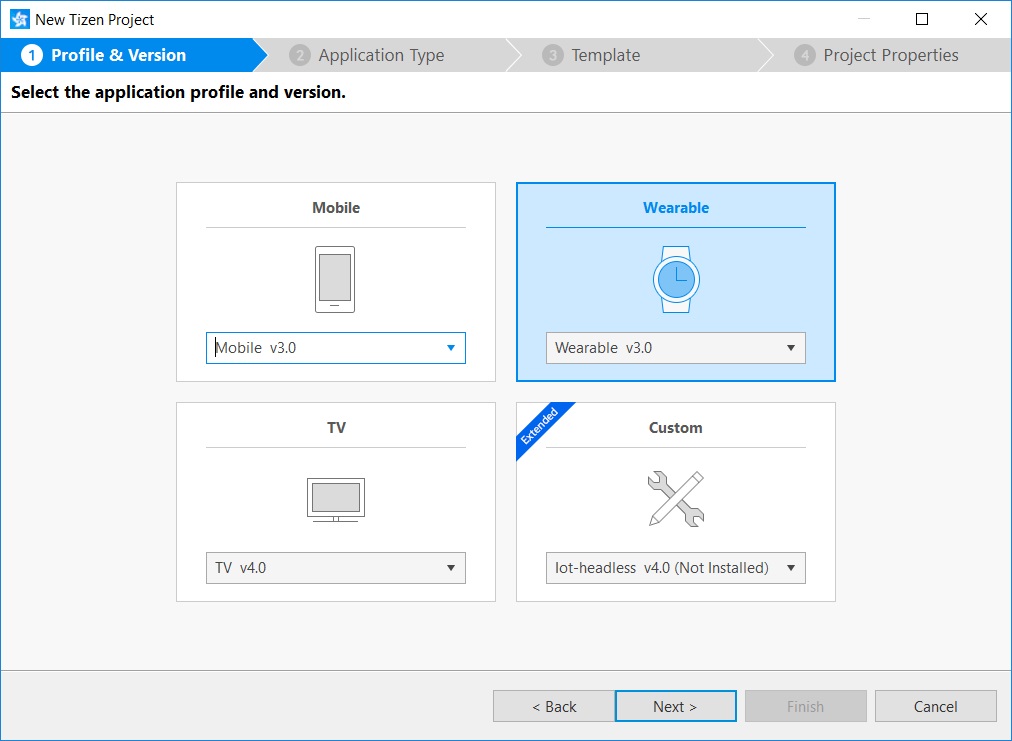
We have already installed an IDEand almost become real mobile programmers. Now we can create a new project. Launch Tizen Studio and select File -> New Tizen Project . A window appears where you can select a Template (template of a new project) or Samples (predefined examples). We select Template, and in the window of the required platform we select Wearable 3.0.
The next item offers to choose what to write on - native or web application, C ++ or HTML5.

Of course, only hardcore, choose C ++. The next step is to select the type of application, which is quite a lot. Choose Basic UI .

The remaining items are not so interesting, you need to select the application name, icon, etc. I chose the simple name test1, the icon was left by default. Finally, the wizard creates an application consisting of a file test1.c and a file tizen-manifest.xml, which stores the main settings of the application.
By the way, the development environment itself is based on Eclipse, and it looks like this.

Now the application can be run on the clock emulator. Select Tools - Emulator Manager from the menu. A window appears where you can select and run an emulator.

When the emulator is running, run the application from Tizen Studio. It is unlikely that it will fall into the Top-100, but given that we have not written any code, and so good:

Let's see what Tizen Studio generated for us.
The appdata structure stores pointers to the main controls used in the program. In the main function, the system function ui_app_main is called, which is initialized by all the main callback functions of the program life cycle (app_create, app_pause, app_terminate, etc.).
You can read more about the life cycle of the Tizen program here .
Finally, we reach the function, where the UI we need is created:
Without really going into details, you can see that the elm_win application window is being created here, which is mandatory for the Tizen application. Inside the window, a Conformant object is created that controls the creation of variable-size content (the size may change, for example, when the keyboard is extended). In our application, we could probably do without it, because We do not use the keyboard, but since there is, let it be. Finally, the last step creates a label object . Pointers to all objects are stored in the appdata structure, which we discussed above. Finally, the last function evas_object_show shows the created window on the clock screen.
This could be the end, but it's interesting to write something of your own. Let's display a button, when clicked, the text of the label will change.
The elm_object_content_set function used in the example displays only one control. But we need to add a few, so let's use the Box component , which in turn will be inserted into the Naviframe container .
Remove the creation of the Label from the above code and replace it with the code:
As you can see, we create 2 label and button controls. A nice bonus from the system - when setting the label text, you can use HTML formatting tags. For the button, we also create a btn_clicked_cb handler:
As a handler parameter, we pass a pointer to appdata, where all controls are stored. By the way, new controls should also be added there:
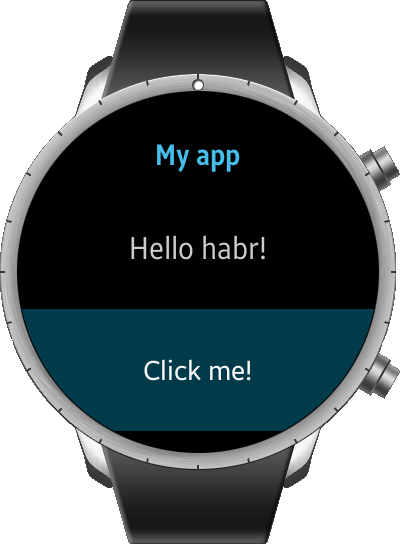
Now that's it, launch the application, and see our window with the label and button created.

We press the button, and the label text is replaced with “Hello habr!”, As described in the handler (we don’t put the text into resources here so as not to complicate the program, in real code, of course, don’t).
So far, our application works only on the emulator, it is interesting to run it on a real clock. The process is not entirely trivial, although there is nothing fundamentally difficult here either.
- Turn on the clock the ability to "debug" and restart the clock.
- Activate on the clock mode permanent connection to WiFi.
- When the clock is connected to WiFi, launch the Device Manager, and select the Remote Device Manager there . In the window that opens, click the Scan button, and if the previous steps were done correctly, we will see the IP address of our watch.

Press Connection → ON, and if everything was done correctly, a confirmation message will appear on the clock, and the connection will be established. Actually, to connect to the clock, they do not even have to be removed from your hand.
When everything is ready, go to Tizen Studio, and in the drop-down list we can choose where to run the application - on the clock, or in the simulator. We select hours, we start ... and we receive an error, it seems "error message ::: Non trusted certificate is used . Register valid certificate: <- 32> ".
Alas, in the modern world it is impossible to simply take and run the application on your own device - nothing works without digital signatures and certificates (and it’s still good, if in the case of Apple you don’t have to pay $ 99 a year for having such a certificate, such a requirement they canceled only recently).
But however, everything is easily solved here, if someone has not forgotten, it was not for nothing that in the first step we installed the Samsung Certificate Extention component. We launch Tools - Certificate Manager, and we select creation of the certificate.

In this window, select "Samsung certificate". Next, we fill in all the fields and confirm the login to the Samsung account to create a certificate (thank God, without validating the sms and specifying the bank card credentials).
Finally, when the process is complete, click Run again in Tizen Studio, and the application runs on the clock as planned.

Fumbling with the certificate and connection takes some time, but this is done only once, then compilation of the program is started as usual, by simply pressing Run.
This is not to say that the process is completely intuitive. But especially for those who are familiar with developing for iOS or Android, there is nothing critically complex here, the general idea is about the same.
It is quite good documentation is on here , anyone can learn it in more detail.
Another interesting fact is that apart from the clock there are other devices with Tizen OS, for example, TVs.
All interested I wish successful experiments.
The process as a whole turned out to be simple (especially when you program more than one year), even though it has its own subtleties. Who is interested in the continuation, the details under the cut.
Caution traffic, many screenshots.
Step 1. Install IDE and components
The first step is simple and obvious. Go to the Samsung website and download Tizen Studio , choose the version depending on the operating system. At the time of publication, the current version is 2.5, and we will use it.
After installation, the Package Manager is launched, with which you need to install the required packages for development. We choose 3.0 Wearable .
As can be seen from the screenshot, version 4.0 is available only in the form of a Preview, but we will not use the new features anyway, so 3.0 will be enough. In addition, you need to go to the Extention SDK section, and select Samsung Certificate Extention there. This is important because Without certificate management, it will not be possible to download the application to the clock. By default, this component is not selected, and it took at least half an hour to figure out why an incorrect certificate error is issued.
Step 2. Creating a project
We have already installed an IDE
The next item offers to choose what to write on - native or web application, C ++ or HTML5.
Of course, only hardcore, choose C ++. The next step is to select the type of application, which is quite a lot. Choose Basic UI .
The remaining items are not so interesting, you need to select the application name, icon, etc. I chose the simple name test1, the icon was left by default. Finally, the wizard creates an application consisting of a file test1.c and a file tizen-manifest.xml, which stores the main settings of the application.
By the way, the development environment itself is based on Eclipse, and it looks like this.
Now the application can be run on the clock emulator. Select Tools - Emulator Manager from the menu. A window appears where you can select and run an emulator.
When the emulator is running, run the application from Tizen Studio. It is unlikely that it will fall into the Top-100, but given that we have not written any code, and so good:
Step 3. Disassemble the code
Let's see what Tizen Studio generated for us.
The appdata structure stores pointers to the main controls used in the program. In the main function, the system function ui_app_main is called, which is initialized by all the main callback functions of the program life cycle (app_create, app_pause, app_terminate, etc.).
typedefstructappdata {
	Evas_Object *win;
	Evas_Object *conform;
	Evas_Object *label;
} appdata_s;
staticboolapp_create(void *data){
	appdata_s *ad = data;
	create_base_gui(ad);
	returntrue;
}
staticvoidapp_pause(void *data){
}
...
intmain(int argc, char *argv[]){
	appdata_s ad = {0,};
	int ret = 0;
	ui_app_lifecycle_callback_s event_callback = {0,};
	app_event_handler_h handlers[5] = {NULL, };
	event_callback.create = app_create;
	event_callback.terminate = app_terminate;
	event_callback.pause = app_pause;
	event_callback.resume = app_resume;
	event_callback.app_control = app_control;
	ui_app_add_event_handler(&handlers[APP_EVENT_LOW_BATTERY], APP_EVENT_LOW_BATTERY, ui_app_low_battery, &ad);
	ui_app_add_event_handler(&handlers[APP_EVENT_LOW_MEMORY], APP_EVENT_LOW_MEMORY, ui_app_low_memory, &ad);
	...
	ret = ui_app_main(argc, argv, &event_callback, &ad);
	if (ret != APP_ERROR_NONE) {
		dlog_print(DLOG_ERROR, LOG_TAG, "app_main() is failed. err = %d", ret);
	}
	return ret;
}
You can read more about the life cycle of the Tizen program here .
Finally, we reach the function, where the UI we need is created:
staticvoidcreate_base_gui(appdata_s *ad){
	/* Window *//* Create and initialize elm_win.
	   elm_win is mandatory to manipulate window. */
	ad->win = elm_win_util_standard_add(PACKAGE, PACKAGE);
	elm_win_autodel_set(ad->win, EINA_TRUE);
	if (elm_win_wm_rotation_supported_get(ad->win)) {
		int rots[4] = { 0, 90, 180, 270 };
		elm_win_wm_rotation_available_rotations_set(ad->win, (constint *)(&rots), 4);
	}
	/* Conformant *//* Create and initialize elm_conformant.
	   elm_conformant is mandatory for base gui to have proper size
	   when indicator or virtual keypad is visible. */
	ad->conform = elm_conformant_add(ad->win);
	elm_win_indicator_mode_set(ad->win, ELM_WIN_INDICATOR_SHOW);
	elm_win_indicator_opacity_set(ad->win, ELM_WIN_INDICATOR_OPAQUE);
	evas_object_size_hint_weight_set(ad->conform, EVAS_HINT_EXPAND, EVAS_HINT_EXPAND);
	elm_win_resize_object_add(ad->win, ad->conform);
	evas_object_show(ad->conform);
	/* Label *//* Create an actual view of the base gui.
	   Modify this part to change the view. */
	ad->label = elm_label_add(ad->conform);
	elm_object_text_set(ad->label, "<align=center>Hello Tizen</align>");
	evas_object_size_hint_weight_set(ad->label, EVAS_HINT_EXPAND, EVAS_HINT_EXPAND);
	elm_object_content_set(ad->conform, ad->label);
	/* Show window after base gui is set up */
	evas_object_show(ad->win);
}
Without really going into details, you can see that the elm_win application window is being created here, which is mandatory for the Tizen application. Inside the window, a Conformant object is created that controls the creation of variable-size content (the size may change, for example, when the keyboard is extended). In our application, we could probably do without it, because We do not use the keyboard, but since there is, let it be. Finally, the last step creates a label object . Pointers to all objects are stored in the appdata structure, which we discussed above. Finally, the last function evas_object_show shows the created window on the clock screen.
This could be the end, but it's interesting to write something of your own. Let's display a button, when clicked, the text of the label will change.
The elm_object_content_set function used in the example displays only one control. But we need to add a few, so let's use the Box component , which in turn will be inserted into the Naviframe container .
Remove the creation of the Label from the above code and replace it with the code:
// Naviframe
    ad->nf = elm_naviframe_add(ad->conform);
    evas_object_show(ad->nf);
    elm_naviframe_prev_btn_auto_pushed_set(ad->nf, EINA_TRUE);
    elm_object_content_set(ad->conform, ad->nf);
    // Box
    ad->box = elm_box_add(ad->nf);
    evas_object_show(ad->box);
    elm_naviframe_item_push(ad->nf, "My app", NULL, NULL, ad->box, NULL);
    // Label
    ad->label = elm_label_add(ad->box);
    elm_object_text_set(ad->label, "<align=center>Hello <b>Tizen</b></align>");
    evas_object_size_hint_weight_set(ad->label, EVAS_HINT_EXPAND, EVAS_HINT_EXPAND);
    evas_object_show(ad->label);
    elm_box_pack_end(ad->box, ad->label);
    // Button
    ad->btn = elm_button_add(ad->box);
    elm_object_text_set(ad->btn, "Click me!");
    evas_object_smart_callback_add(ad->btn, "clicked", btn_clicked_cb, ad);
    evas_object_size_hint_weight_set(ad->btn, EVAS_HINT_EXPAND, EVAS_HINT_EXPAND);
    evas_object_size_hint_align_set(ad->btn, EVAS_HINT_FILL, 0.5);
    evas_object_show(ad->btn);
    elm_box_pack_end(ad->box, ad->btn);
As you can see, we create 2 label and button controls. A nice bonus from the system - when setting the label text, you can use HTML formatting tags. For the button, we also create a btn_clicked_cb handler:
staticvoidbtn_clicked_cb(void *data, Evas_Object *obj, void *event_info){
	appdata_s *ad = (appdata_s*)data;
	elm_object_text_set(ad->label, "Hello habr!");
}
As a handler parameter, we pass a pointer to appdata, where all controls are stored. By the way, new controls should also be added there:
typedefstructappdata {
	Evas_Object *win;
	Evas_Object *nf, *conform, *box;
	Evas_Object *label;
	Evas_Object *btn;
} appdata_s;
Now that's it, launch the application, and see our window with the label and button created.
We press the button, and the label text is replaced with “Hello habr!”, As described in the handler (we don’t put the text into resources here so as not to complicate the program, in real code, of course, don’t).
Step 4. Run the application on the clock
So far, our application works only on the emulator, it is interesting to run it on a real clock. The process is not entirely trivial, although there is nothing fundamentally difficult here either.
- Turn on the clock the ability to "debug" and restart the clock.
- Activate on the clock mode permanent connection to WiFi.
- When the clock is connected to WiFi, launch the Device Manager, and select the Remote Device Manager there . In the window that opens, click the Scan button, and if the previous steps were done correctly, we will see the IP address of our watch.
Press Connection → ON, and if everything was done correctly, a confirmation message will appear on the clock, and the connection will be established. Actually, to connect to the clock, they do not even have to be removed from your hand.
When everything is ready, go to Tizen Studio, and in the drop-down list we can choose where to run the application - on the clock, or in the simulator. We select hours, we start ... and we receive an error, it seems "error message ::: Non trusted certificate is used . Register valid certificate: <- 32> ".
Alas, in the modern world it is impossible to simply take and run the application on your own device - nothing works without digital signatures and certificates (and it’s still good, if in the case of Apple you don’t have to pay $ 99 a year for having such a certificate, such a requirement they canceled only recently).
But however, everything is easily solved here, if someone has not forgotten, it was not for nothing that in the first step we installed the Samsung Certificate Extention component. We launch Tools - Certificate Manager, and we select creation of the certificate.
In this window, select "Samsung certificate". Next, we fill in all the fields and confirm the login to the Samsung account to create a certificate (thank God, without validating the sms and specifying the bank card credentials).
Finally, when the process is complete, click Run again in Tizen Studio, and the application runs on the clock as planned.
Fumbling with the certificate and connection takes some time, but this is done only once, then compilation of the program is started as usual, by simply pressing Run.
Conclusion
This is not to say that the process is completely intuitive. But especially for those who are familiar with developing for iOS or Android, there is nothing critically complex here, the general idea is about the same.
It is quite good documentation is on here , anyone can learn it in more detail.
Another interesting fact is that apart from the clock there are other devices with Tizen OS, for example, TVs.
All interested I wish successful experiments.