May 5, 2014 at 04:36
Configure LDAP authentication in Microsoft Active Directory-based InterSystems Caché
- Tutorial
On the one hand, setting up LDAP authentication in Caché is not very complicated - the documentation describes this process in six ways. On the other hand, if the LDAP server is based on Microsoft Active Directory, then there are some not obvious points that need to be configured on the LDAP server side. Also, for those who do not often deal with such settings, there is a chance to get confused in the Caché security settings. In this article, we will describe step-by-step the process of setting up LDAP authentication, as well as methods for diagnosing problems in case something fails.
1. Create a user in ActiveDirectory, through which Caché will connect and look for information in the LDAP database. This user must be strictly at the root of domain
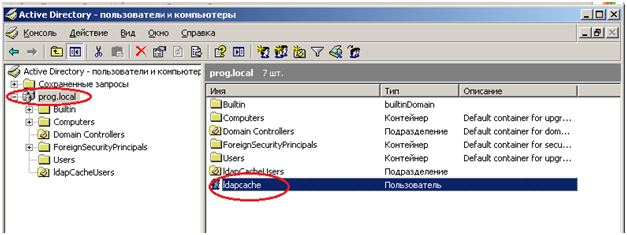
2. For users who will be connected to Caché, we will create a separate division. We will call it “IdapCacheUsers”
3. We register users there
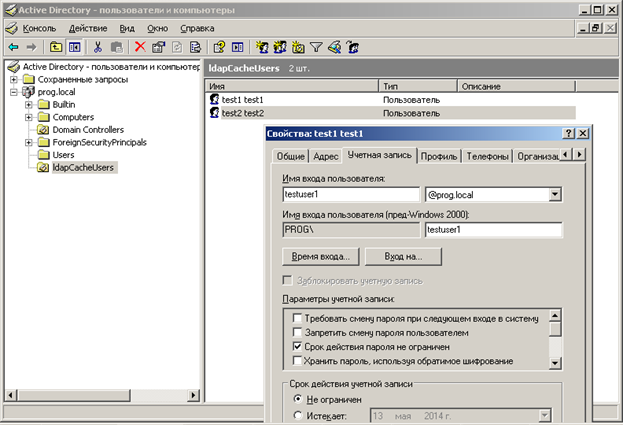
4. We test the availability of the LDAP database using the ldapAdmin program. You can download ee here .
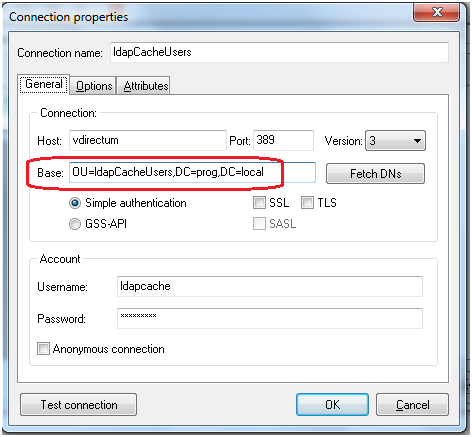
5. Configure the connection to the LDAP server:
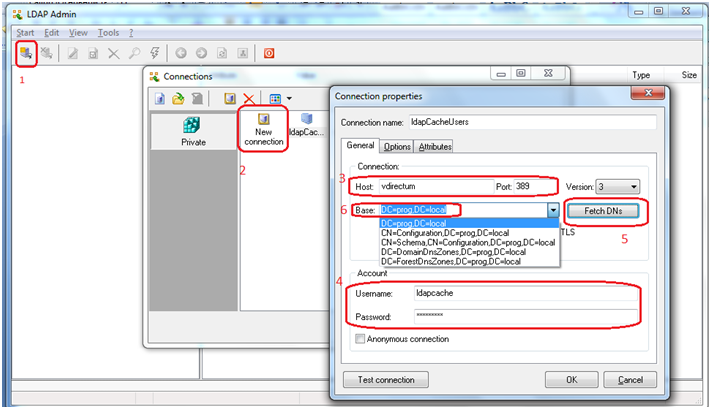
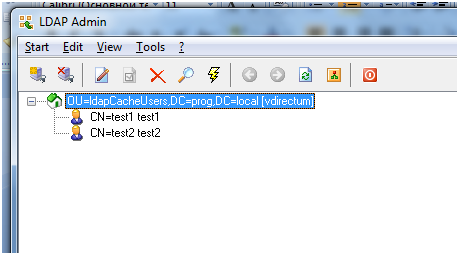
6. Connect. We looked that everything works:
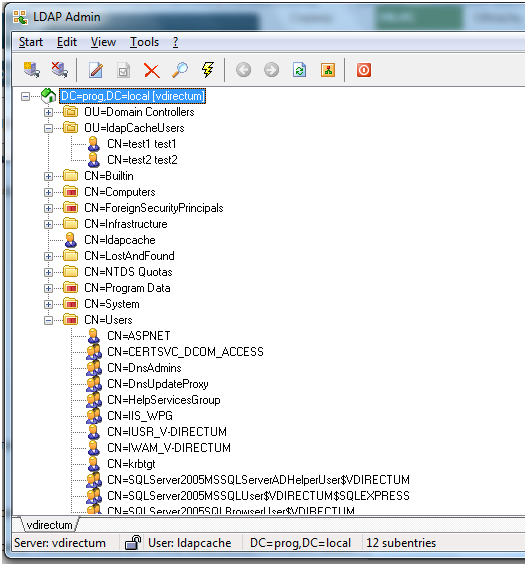
7. Since the users who will connect to Caché are in the “ldapCacheUsers” division, we restrict the search to this division only
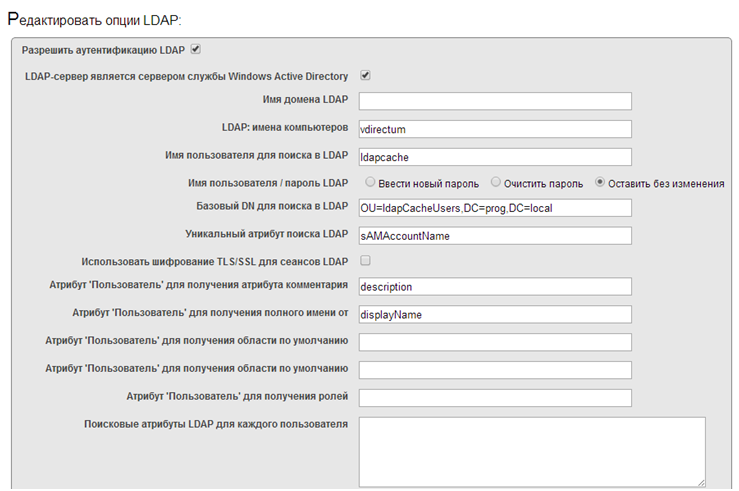
8. The LDAP server is ready, now go to the settings on the Caché side. Go to the management portal -> System Administration -> Security -> System Security -> LDAP Options. Fields “User attribute to retrieve default namespace”, “User attribute to retrieve default routine” and “User attribute to retrieve roles” »We clear, because these attributes are not yet in the LDAP database.
9. We enable LDAP authentication in the System Administration -> Security -> System Security -> Authentication / CSP Session Settings section
. 10. We enable LDAP authentication in services. The% Service_CSP service is responsible for connecting web applications, the% Service_Console service is responsible for connecting through the terminal.
11. Configuring LDAP authentication in web applications

12. For now, in order to verify that the connection is working, configure so that new users in Caché have full rights. To do this, user _PUBLIC needs to add the% All role. In the future, we will finalize this point .......

13. We are trying to open the configured web application, it should open.
14. The terminal also opens

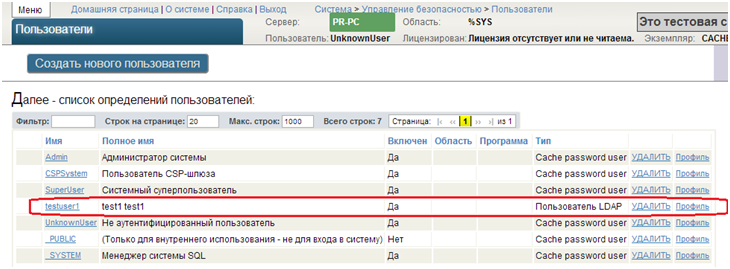
15. When connected, LDAP users will appear in Caché users
16. True, with this configuration, all new users get full access to the system. To eliminate this gap, you need to add an attribute in the LDAP database where we will store the name of the role that will be assigned to the user when connected to Caché. First, you need to make a backup copy of the domain controller so that if the configuration fails, it does not break the entire network.
17. To modify the ActiveDirectory schema, on the server where ActiveDirectory is located, install the ActiveDirectory Schema snap-in (it is not installed by default). The instruction is here.
18. Create an attribute called intersystems-Roles, OID 1.2.840.113556.1.8000.2448.2.3, a case-sensitive string, a multi-valued attribute.
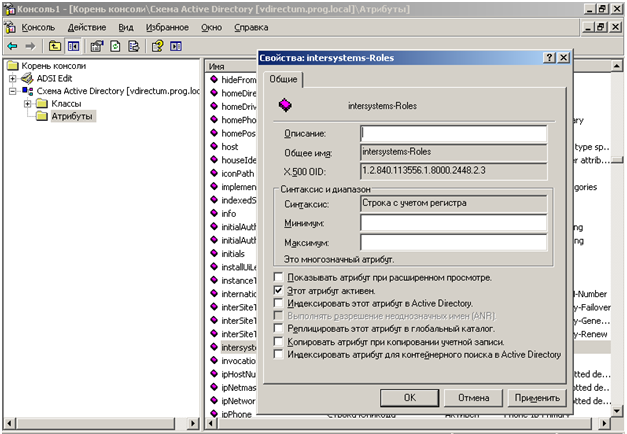
19. Next, add this attribute to the user class

20. Next, we will make the column “Role in InterSystems Cache” appear in the unit when viewing the list of users. To do this, click Start-> Run and enter adsiedit.msc. Connecting to the Configuration naming context
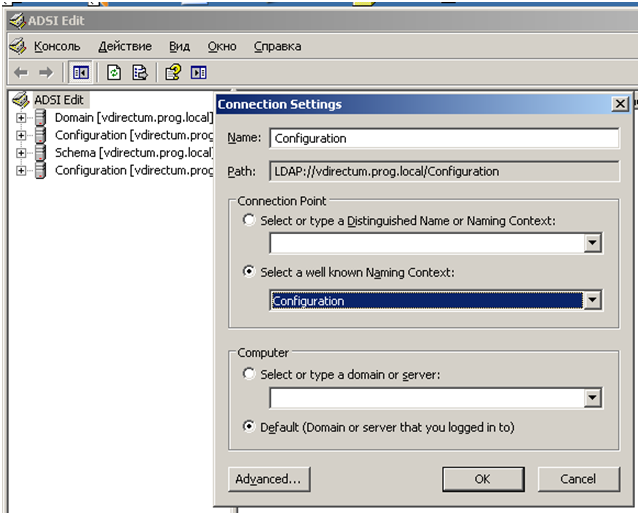
21. Go to the container CN = 409, CN = DisplaySpecifiers, CN = Configuration and select the type of container, when viewed, additional user attributes will be displayed. Let's choose the display at the organizational unit level (OU), for which we need the organisationalUnit-Display container. We find the extraColumns attribute in the properties and enter the value “intersystems-Roles, Role in IntersystemsCache, 1,200,0”. The principle of filling is as follows: The name of the attribute, the name of the column in which the attribute will be displayed, whether it will be selected by default, the column width in pixels, the reserved value. Another remark CN = 409 denotes a language code: in the branch CN = 409 for the English version, CN = 419 for the Russian version of the console.
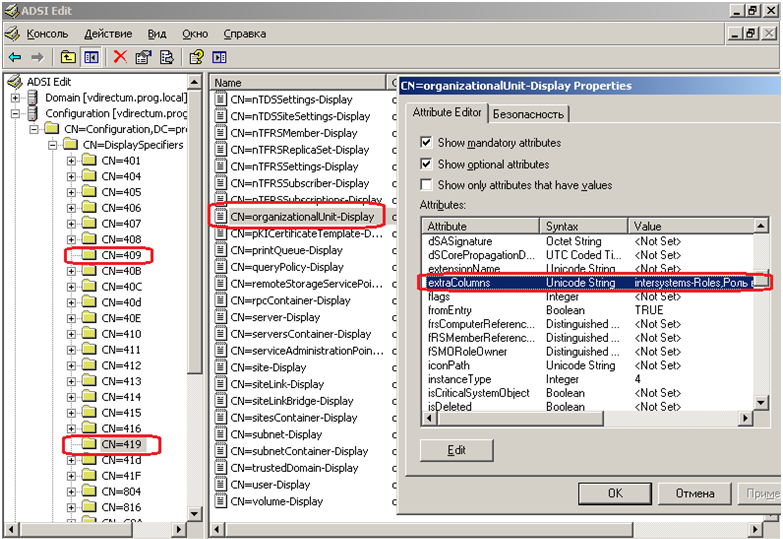
22. Now you can fill in the role name, which will be assigned to the user when connected to Caché. If Active Directory is based on Windows Server 2003, then there are no regular tools for editing this field. You can use the ldapAdmin program (see paragraph 4) to edit the value in this attribute. If Windows is a more recent version, then the attribute can be edited in the "Advanced Features" mode - the user will have an additional tab for editing attributes.

23. After that, in the Caché management portal, in the LDAP options, specify the name of this attribute.
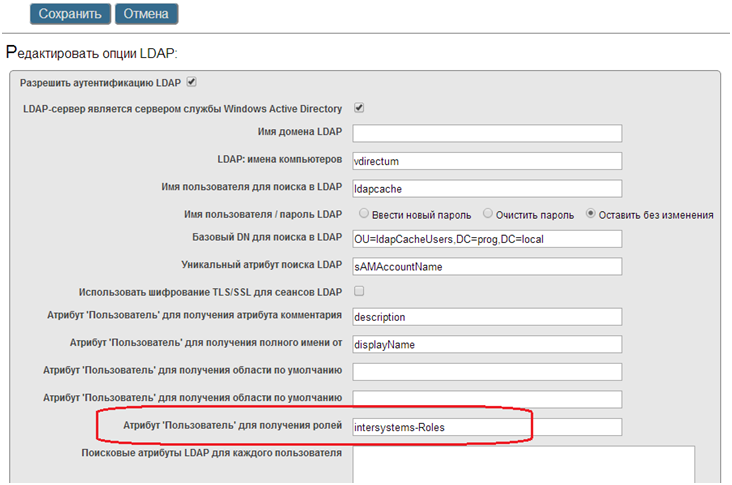
24. We create the ldapRole role with the necessary privileges
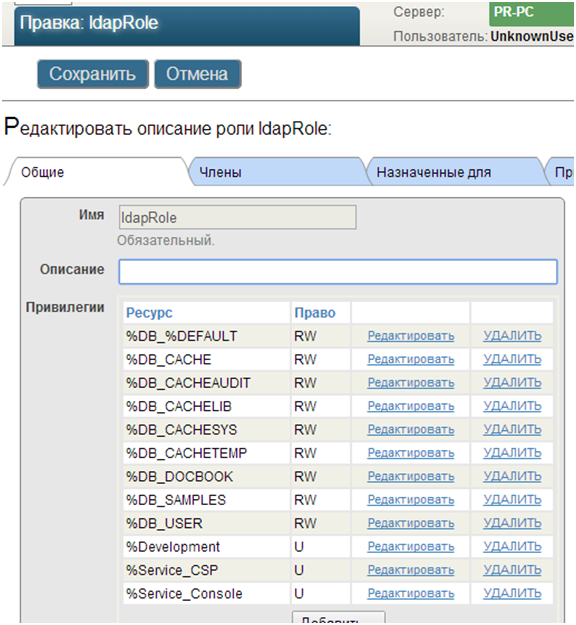
25. We remove the% ALL role from the user _PUBLIC
26. Everything is ready, we are trying to connect to the system.
27. If it doesn’t work, turn on and configure the audit
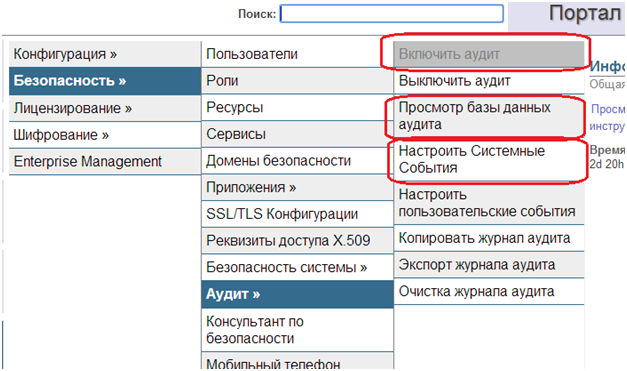
28. Audit settings
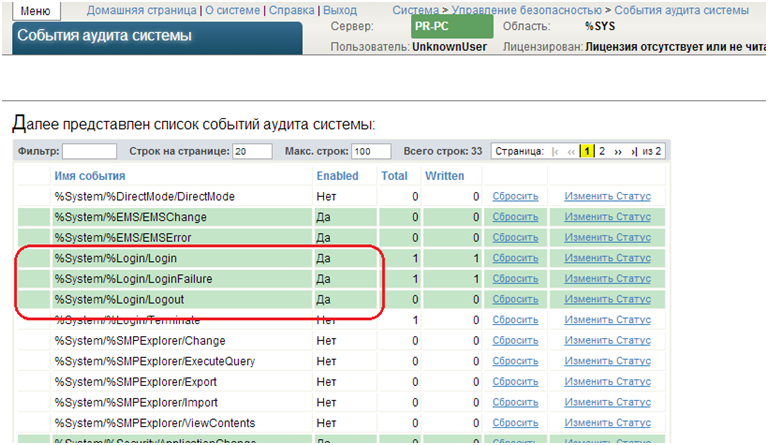
29. View the audit database.

In practice, it often happens that working in an application does not require setting up different roles for different users. If it is enough that when entering, for example, a web application, a specific set of roles is assigned to all users, then items 16 through 23 can be omitted. It is enough to add these roles and remove all types of authentication except LDAP in the settings of the web application on the Application Roles tab. In this case, only the user who is registered on the LDAP server can get into the web application, and when the user logs in, Caché automatically assigns him the roles that are required to work in this application.
Configure LDAP Server
1. Create a user in ActiveDirectory, through which Caché will connect and look for information in the LDAP database. This user must be strictly at the root of domain
2. For users who will be connected to Caché, we will create a separate division. We will call it “IdapCacheUsers”
3. We register users there
4. We test the availability of the LDAP database using the ldapAdmin program. You can download ee here .
5. Configure the connection to the LDAP server:
6. Connect. We looked that everything works:
7. Since the users who will connect to Caché are in the “ldapCacheUsers” division, we restrict the search to this division only
Caché Side Setting
8. The LDAP server is ready, now go to the settings on the Caché side. Go to the management portal -> System Administration -> Security -> System Security -> LDAP Options. Fields “User attribute to retrieve default namespace”, “User attribute to retrieve default routine” and “User attribute to retrieve roles” »We clear, because these attributes are not yet in the LDAP database.
Comment about the translation
True, in this place the Russian translation is not entirely successful, it would be more correct to translate it like this: “User attribute for receiving the default domain”, “User attribute for receiving the default program” and “User attribute for receiving roles”.
9. We enable LDAP authentication in the System Administration -> Security -> System Security -> Authentication / CSP Session Settings section
. 10. We enable LDAP authentication in services. The% Service_CSP service is responsible for connecting web applications, the% Service_Console service is responsible for connecting through the terminal.
11. Configuring LDAP authentication in web applications
12. For now, in order to verify that the connection is working, configure so that new users in Caché have full rights. To do this, user _PUBLIC needs to add the% All role. In the future, we will finalize this point .......
13. We are trying to open the configured web application, it should open.
14. The terminal also opens
15. When connected, LDAP users will appear in Caché users
16. True, with this configuration, all new users get full access to the system. To eliminate this gap, you need to add an attribute in the LDAP database where we will store the name of the role that will be assigned to the user when connected to Caché. First, you need to make a backup copy of the domain controller so that if the configuration fails, it does not break the entire network.
17. To modify the ActiveDirectory schema, on the server where ActiveDirectory is located, install the ActiveDirectory Schema snap-in (it is not installed by default). The instruction is here.
18. Create an attribute called intersystems-Roles, OID 1.2.840.113556.1.8000.2448.2.3, a case-sensitive string, a multi-valued attribute.
19. Next, add this attribute to the user class
20. Next, we will make the column “Role in InterSystems Cache” appear in the unit when viewing the list of users. To do this, click Start-> Run and enter adsiedit.msc. Connecting to the Configuration naming context
21. Go to the container CN = 409, CN = DisplaySpecifiers, CN = Configuration and select the type of container, when viewed, additional user attributes will be displayed. Let's choose the display at the organizational unit level (OU), for which we need the organisationalUnit-Display container. We find the extraColumns attribute in the properties and enter the value “intersystems-Roles, Role in IntersystemsCache, 1,200,0”. The principle of filling is as follows: The name of the attribute, the name of the column in which the attribute will be displayed, whether it will be selected by default, the column width in pixels, the reserved value. Another remark CN = 409 denotes a language code: in the branch CN = 409 for the English version, CN = 419 for the Russian version of the console.
22. Now you can fill in the role name, which will be assigned to the user when connected to Caché. If Active Directory is based on Windows Server 2003, then there are no regular tools for editing this field. You can use the ldapAdmin program (see paragraph 4) to edit the value in this attribute. If Windows is a more recent version, then the attribute can be edited in the "Advanced Features" mode - the user will have an additional tab for editing attributes.
23. After that, in the Caché management portal, in the LDAP options, specify the name of this attribute.
24. We create the ldapRole role with the necessary privileges
25. We remove the% ALL role from the user _PUBLIC
26. Everything is ready, we are trying to connect to the system.
27. If it doesn’t work, turn on and configure the audit
28. Audit settings
29. View the audit database.
Conclusion
In practice, it often happens that working in an application does not require setting up different roles for different users. If it is enough that when entering, for example, a web application, a specific set of roles is assigned to all users, then items 16 through 23 can be omitted. It is enough to add these roles and remove all types of authentication except LDAP in the settings of the web application on the Application Roles tab. In this case, only the user who is registered on the LDAP server can get into the web application, and when the user logs in, Caché automatically assigns him the roles that are required to work in this application.