Light Music Processing + Arduino + RGB
Introduction
New Year holidays have long passed, it is time to prepare for the upcoming 2015 NG.
That is why I hasten to share the idea and implementation of light music (garlands) on Arduin and trimming RGB tape.
The idea, as always, came on time 8 hours before NG. While decorating the apartment, I realized that I couldn’t decorate my room with the remnants of burnt garlands!
And the ritual soldering of the grandfather-fatherly and Chinese garlands has already gotten. I wanted something new!
purpose
Connect an RGB tape to Arduino, and make it dance to your music from your computer.
Result
What do you need?
- Power supply 12V (power proportional to the length of your tape, I have P = 7.2W / m * 1.2m);
- Slice of RGB LED strip and wire 4 wires;
- Arduino UNO;
- ULN2003A (or other suitable transistor assemblies);
Tasks
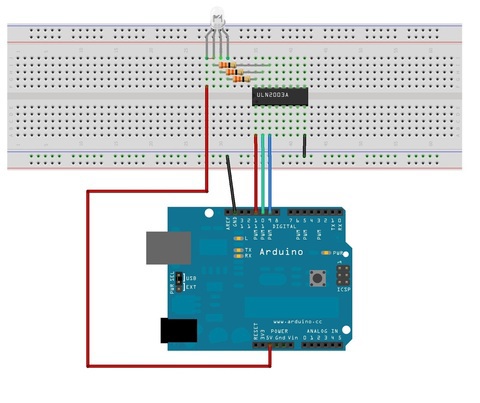
1. Since the tape is 12V, we connect it to the pins of the Arduins (5V) through the Darlington transistor assembly ULN2003A (What happened, it was!).
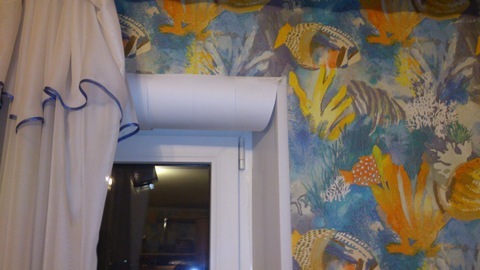
2. Glue the tape in a prominent place and decorate it. Plain paper does wonders with light! I'm not talking about various types of plastic and glass.
3. Fill the sketch into Arduin (see below) on SerialPort processing
4. We display the light music on SerialPort, in my case I used the Minim Processsing library . One could sit over Winamp / AIMP, but time was running out!
5. Set up the music so that no one is sick. Or vice versa, if the music is appropriate!
6. Dance, meditate, meet NG!
Progress
1. The scheme is extremely simple, but you never know.
2. Scotch and paper did their job! The light has become smooth and pleasant, the design is simple and straightforward, even the crookedly pasted A4 sheets look great in work!
3. The software part (there is a whole cosmos for imagination)
Arduina sketches and test sketches can be downloaded below.
Processing with "minim" library:
import ddf.minim.*;
import ddf.minim.analysis.*;
import processing.serial.*;
Serial port;
Minim minim;
AudioPlayer song;
BeatDetect beat;
BeatListener bl;
float kickSize, snareSize, hatSize;
class BeatListener implements AudioListener
{
  private BeatDetect beat;
  private AudioPlayer source;
  BeatListener(BeatDetect beat, AudioPlayer source)
  {
    this.source = source;
    this.source.addListener(this);
    this.beat = beat;
  }
  void samples(float[] samps)
  {
    beat.detect(source.mix);
  }
  void samples(float[] sampsL, float[] sampsR)
  {
    beat.detect(source.mix);
  }
}
void setup()
{
  size(512, 200, P3D);
  minim = new Minim(this);
    println("Available serial ports:");
  println(Serial.list());
  // check on the output monitor wich port is available on your machine
  port = new Serial(this, Serial.list()[0], 9600);
  song = minim.loadFile("1.mp3", 2048); //Имя файла, который лежит рядом со скетчем! Также тут можно вставлять потоковые интернет радиостанции в формате *.mp3
  song.play();
  // a beat detection object that is FREQ_ENERGY mode that
  // expects buffers the length of song's buffer size
  // and samples captured at songs's sample rate
  beat = new BeatDetect(song.bufferSize(), song.sampleRate());
  // set the sensitivity to 300 milliseconds
  // After a beat has been detected, the algorithm will wait for 300 milliseconds
  // before allowing another beat to be reported. You can use this to dampen the
  // algorithm if it is giving too many false-positives. The default value is 10,
  // which is essentially no damping. If you try to set the sensitivity to a negative value,
  // an error will be reported and it will be set to 10 instead.
  beat.setSensitivity(300);
  kickSize = snareSize = hatSize = 0;
  // make a new beat listener, so that we won't miss any buffers for the analysis
  bl = new BeatListener(beat, song);
  textFont(createFont("Helvetica", 16));
  textAlign(CENTER);
}
boolean k1,k2,k3;
void draw()
{  float s=10;
  background(0);
  fill(255);
  if ( beat.isKick())  k1 = true;
  if ( beat.isSnare()) k2 = true;
  if ( beat.isHat())   k3 = true;
//  textSize(kickSize/8);
//  text("KICK", width/4, height/2);
//  textSize(snareSize/8);
//  text("SNARE", width/2, height/2);
//  textSize(hatSize/8);
//  text("HAT", 3*width/4, height/2);
  port.write('R');
  port.write((int)kickSize);
  port.write('G');
  port.write((int)snareSize);
  port.write('B');
  port.write((int)hatSize);
  if (k1)  kickSize = constrain(kickSize+5, 20, 255);
  else  kickSize = constrain(kickSize -5, 20, 255);
  if (kickSize==255) k1=false;
  if (k2) snareSize = constrain(snareSize+15, 40, 255);
  else snareSize = constrain(snareSize-15, 40, 255);
  if (snareSize==255) k2=false;
 if (k3)  hatSize = constrain(hatSize+s, 20, 255);
  else  hatSize = constrain(hatSize-s, 20, 255);
  if (hatSize==255) k3=false;
}
Conclusion
So here we are making a simple atmosphere of celebration and fun. I got it from improvised materials! For the target purchase, it would all take $ 50
Download files:
*** CLICK HERE *** In the archive there is a sketch for Arduina, a test sketch for RGB, and the program itself. The minim library weighs a lot and has not fit in there, download and install it yourself.Thanks for reading!