March 1, 2014 at 20:45
Dragon for MSI
Order
Back in 2006, I took my first steps in modding, in no less distant 2009, I went to a professional level. Behind the back are thousands of dust-bladed cutting discs, liters of paint spent, lots of completed projects. Do you wonder what’s next?
What are the prospects for modding, what to do when the most interesting work gradually turns into a routine?
It was with such thoughts that I automatically clicked on the inscription "Inbox" in Google Mail.
1 new letter.
The title of the letter MSI Dragon PC eloquently hinted that it would definitely not be bored in the near future.
Project
It seems to be working, modding every day. Someone has a phone, someone has a laptop, someone has a case and seems to have seen everything and there’s nothing to be surprised at.
When you receive an order from a large company, you again become a yellow-handed youngster and you cannot fall asleep from excitement for at least one night. Damn pleasant feeling when you are on the verge of something complex, new, but so coveted.
When the euphoria passed, the understanding returned that it was necessary to do something that would surpass everything I had done before.
On October 28, 2013, a countdown began on a project codenamed "MSI Dragon PC." The case should be made in the theme of their series of gaming components and manufactured with the expectation of participation in various events. The next three weeks we tried to coordinate the design.
I usually spend 1 night on developing one design for the case. Worked - showed, threw it, went on and so on in a circle. MSI wanted the case in the style of their new series of gaming components, but, frankly, it seemed to me that it was corny to integrate all the components into a dragon, but from me, in fact, they asked for just that. Soon a compromise was found - in the design, I decided to embroider, in addition to the dragon, their brand shield and, in addition to the shield, the sword. Unfortunately, when I came up with this, I was already mentally squeezed out and, in truth, was ready to abandon the project, because I didn’t see ways to solve the dilemma - how to do it is not corny and effective. In addition, I can not stand working on the images of living creatures, I am more inclined towards technology and various mechanisms ...
To work out my last proposal for MSI, I spent exactly as much time as the average person manages to eat a standard hot dog.
I called MSI and literally described on my fingers what I plan to do. I had absolutely no hope for anything, it was all the same to me.
MSI gave the go-ahead.
In my workshop there are a lot of tools and machines necessary for the work, the absence of some expensive units is compensated by savvy and contacts in the right places. We don’t have one thing - a 3D modeler who understands at least something in modding.
I see all the projects in my head, but what the customer sees is not what I see. And MSI needs to show something.
We went a simple grandfather way - made a cardboard layout.


The layout was also approved, and we set to work. Well, how
did you get started ... Without an accurate 3D model of the case, without initial drawings, and without a fully developed concept, we realized that we could not meet the deadlines.
Under the terms of the agreement with MSI, we were supposed to publish the progress in the form of a detailed worklog on one of the Ukrainian Internet resources. I called the terms of work, relying only on my subjective feelings. I made a mistake. As it turns out later, he was not so weakly mistaken.
It was originally planned to finish the corps in two weeks + -. That is how much time we spent only on thinking through the smallest details that will make the project interesting, memorable and just cool. During the first two weeks, of course, we did something, but not much, because it was not completely clear from what it is better to make this or that detail.
The fact is that two years earlier MSI already ordered a case in the subject of their products from one Kiev modder, but they were disappointed with the result. Because the case, to put it mildly, was non-transportable - its weight was about 180 kg and weakly reflected the essence of the concept.
Our task was not to screw up with weight and design. All that is possible must be made of lightweight materials. Well, the design should just scream about the company that ordered it. To be remembered, imprinted in memory.
The result of thinking was the following concept of design and functionality:
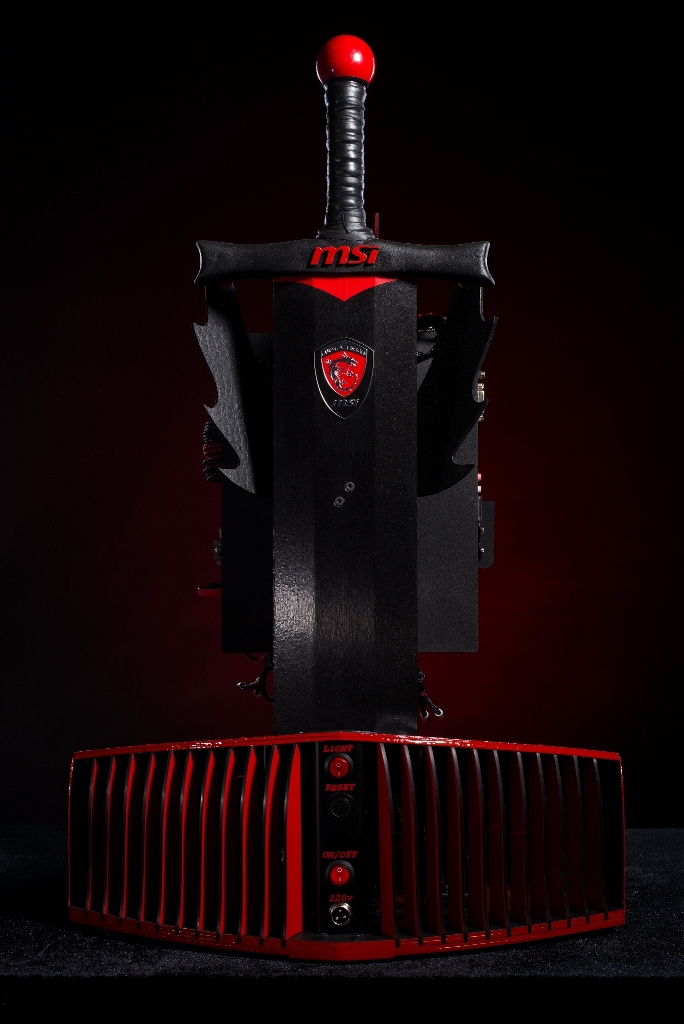
- The case will be made in the form of an open stand. The base of the case is a shield (one of the symbols of the gaming line of components), a sword is thrust vertically into the shield. The dragon hovers over the shield, holding the motherboard with the video card in its clutches.
- The highlight of the case is its inclusion system. Putting a simple button in such a case is simply stupid and boring. I thought that in any exhibition building there should be a “trick” that will simply attract people at the exhibition, thanks to which everyone will want to take a picture with the building. There must be some “dialogue”, a certain relationship between iron and man. I came up with a ring. The usual ring. For the theme of swords, dragons and shields - this is it. The user, putting on the ring, as if endowed with magical power to "revive" the computer.
The computer will turn on only by touching a hand with a ring on the handle of the sword!


Everyone at the exhibition will want to take a picture, clutching the handle of the sword. And this, in turn, thousands of likes on Instagram, Facebook and generally everywhere. Advertising, in general, will be good.
Initially, we wanted to make a shield and a dragon from aluminum. Some parts are 3mm and others are 6mm.
The prices for the material were simply impressive, but the quality of aluminum was “below the plinth”, the number of deep scratches simply could not be counted. We also refused to work with aluminum because the enterprise with which we usually cooperate in the field of waterjet cutting was closed, and a number of competing enterprises could not fulfill our order for cutting for various reasons.
And the weight of aluminum needed for the body would be impressive. Therefore, we reoriented to a more accessible, better and lighter material - sheet acrylic.
Drawings, laser cut acrylic. Another problem got out, for a case of such dimensions, acrylic is too flexible, even two parts of 3 mm folded together bent.
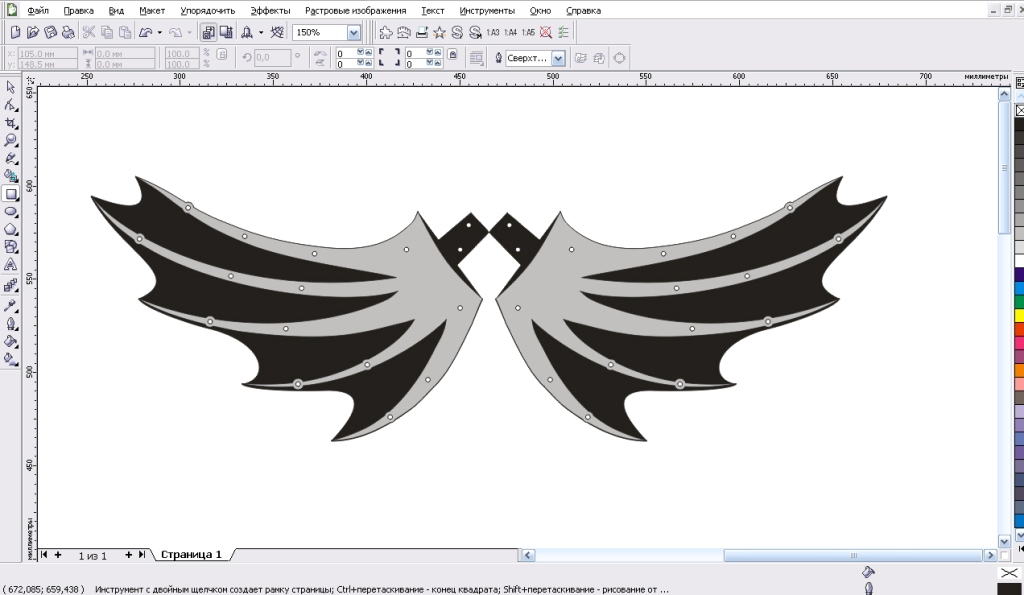
The elements of reinforcing the structure in key places — aluminum plates — were quickly invented, they will fit into the design and solve the stiffness problems of some parts.

The story about the corps will not be complete, if you do not mention the main fail - money.
The amount that I called MSI for fulfilling this order was not large, and in truth, it was designed to pay 14 working days + materials. At the beginning of the project, I received an advance payment for materials.
As a result, I made a mistake with the timing and with the materials.
The prices for materials were not pleasing, especially taking into account the fact that we reworked a number of key and not very cheap parts for various reasons, 2-3 times. Constantly needed to buy something else. There was an option to simplify the design and construction in order to save money, but I did not consider it. If you do, then so as not to regret what has been done!
Money didn’t go very quickly, which led to a delay of time, because the money for the project had to be earned by doing other projects, but in the initial plan it wasn’t taken into account ...
Therefore, the scheme of work on the MSI Dragon PC project looked like this - take another project, we do, we get money, from them we subtract wages, taxes, rent, all that remains is go to the "MSI Dragon PC".
It was sad - not the right word.
I could not immediately ask for the rest of the money or change the amount agreed upon initially. These were their conditions.
Modding
Work on the body went slowly, but surely.
Each decision was considered twice.
Work on the shield
Making a shield of acrylic was not easy for us. It was extremely difficult to make racks that should support the top of the shield. Acrylic has the property of bending, so what seems to be very simple and obvious in practice simply does not work. All racks were made and adjusted to the geometry of the shield manually.

Inside the shield, we installed a modified Seasonic power supply and ssd kingston. With the seemingly gigantic dimensions of the shield, putting something besides a sword, ssd and a power supply into it is very difficult.

However, there was another 120mm fan, it captures the cold air from under the bottom and blows through the entire shield. In the back of the shield, we have blinds.


Hand sanded and fitted in place. The sides of the shield were made of 1 mm acrylic, which was bent in the shape of the shield and glued in this position, on the outside the sides were covered with vinyl film for polished black aluminum.

The overlay on the top of the shield, on which the Gaming G Series inscription is located, was also covered with polished aluminum film.

On the bottom of the shield are legs made of brushed black aluminum.

It is also worth mentioning the heat dissipating plate inside the shield, it is necessary to protect the acrylic from excessive heating by the power supply, which will stand inside the shield. It is made of brushed aluminum, the ends are painted red.

An image of a dragon was also applied to the shield. Details were cut from 0.5mm stainless steel, but did not fit the design, they did not look on the red shield. Therefore, the details of the dragon were pulled into a black film under the skin of a reptile. On the reverse side they applied the thinnest transparent double-sided adhesive tape 3M and glued it to the shield in turn.


Work on the sword
We decided to make a sword from two aluminum profiles of the square section fastened together. But the two profiles are not very similar to a sword.


The solution to this problem took more than one day and not one week. We tried everything - aluminum profiles of a triangular section, composite, and other crazy options were considered ... We stopped at the most modder, but quite affordable and easy to process MDF.
Historically, my workshop is surrounded by furniture factories. On one of them we were kindly helped out by making, according to my drawings, two side plates for the sword.

Pads had the only difficulty in manufacturing - cutting angle, it should be exactly 39.5 degrees. Otherwise, the profile of the sword does not match the cut in acrylic. We were lucky - everything was made correctly and approached the place.
One admirer of the work of my workshop and mine personally, from the city of Kiev, once brought us fifty kg of various pieces of iron, pipes, corners, parts from servers. It is nice and helpful. A number of these parts were not only useful, but also indispensable for the manufacture of this case. For which many thanks to him! In particular, in the heap of metal, wonderful reinforced and welded corners were found that securely secured the sword inside the shield, and a p-shaped profile was used for the rear control panel, as well as dragon fasteners to the sword.


The sword, like a number of other details, was covered with black vinyl foil over brushed aluminum.
A sword guard was made of pine slats.
To complete the work on the sword, only the handle was missing. That was the problem.
Because to turn on the computer, the user must touch the hilt of the sword in a certain place, we were faced with the task of forcing to grasp the handle from a certain side and in a certain place. It is not simple. And the handle must be strong, so that at the exhibition it would not be broken off by those wishing to hold it with their hand.
In the process of finding the crank, I started a real crisis.
When I can’t think of something or find something, I go to a construction supermarket.
So I did this time.
I walked, wandered, found nothing. Already on the way to the exit, passing through the ranks of garden tools, I came across a garden rake. Yuhu! This is it.

The perfect sword handle.
The handle was fixed on the guard and covered with a self-vulcanizing insulating tape, a lovely imitation of leather on the handle!
A red ball was fixed on top of the handle, which will visually complement the sword and become the logical conclusion of the handle.
In the hilt of the sword we have reed switches. The approach of the magnetic ring will close them and the computer will turn on.


Work on the frame
The frame of the dragon had to be voluminous, so that occasions could be passed through it, and at the same time powerful, to support the weight of components and its own. From 3mm black acrylic we cut the frame parts - 4 identical plates, two for each half of the frame. After we reliably pulled together the halves of the frame with screws, and the halves were combined into a single unit by the racks - the frame acquired the desired appearance and enviable rigidity. The frame is tightly connected to the sword with four screws. Inside the frame is equipped with rings through which wires are passed.

Initially, there were thoughts of making an aluminum frame, but mainly because of the large weight, we abandoned this idea.
Ring
A ring for such a project cannot just go and buy. It needs to be done!
In our workshop there is no foundry, so I had to turn to the side. Rings, we were cast in three different designs. Two dropped out, only one remained.

We cleaned the rings with acid, polished metal flows after casting, and polished with GOI paste.

Then the rings were “boiled” in avopast and only after that they were painted with red powder and a “stone” was inserted. The “stone” in black is a piece of acrylic, manually adjusted and processed “under brushed aluminum”.
Each type of rings was originally 4, to the final stage we brought only 2 (one main, one spare).

Work on decorative elements
Scaffolds with scales should be screwed onto the frame on the sides. The manufacture of this scale is another story. In total, about 1,500 flakes were made, of which we selected about 250 pieces, and they were fixed on the sides of the dragon. 6 hours of labor on each side.


Scale design is also a non-trivial problem. What should the scales of a mythical living creature look like? There was no answer.
12 years ago I was fond of creating ornaments. Dug out his old sketches. Of these, they chose scales. There were only three criteria - the ornament should consist of only one repeating element, the distribution along the plane should not be boring, preferably with a shift, and the element should resemble a scale.
Paws are one of the last, but also the most difficult task.
Initially, I expected to make paws that could really hold the pallet with the motherboard and video card, but in the process of working on the paws I was convinced that this was not feasible, more precisely, we would not get elegant paws - these would be thick paws!
An urgent search for a solution to the problem was started. I would like to say that we had many options for choice, but no. There was only one option - hidden fasteners for the pallet, which will transfer the weight to the frame.

The option to put the dragon with its paws on the shield was not even considered, because this would spoil the whole idea, our dragon should "soar" over the shield at all costs!
As a result, the paws were made of a copper core, the core was dressed in a black braid, the braid was given an interesting, leathery shape.


From the very beginning I imagined the claws exactly how they turned out, I knew how to make them. But repeatability became an unexpected problem. You know, turning 12 identical claws with a grinder weighing 3 kg is not easy.

To power the video card, we need a wiring harness, its delivery to the destination from the very beginning did not present a problem - after all, the dragon needs a tail. The tail will consist of stylized vertebrae through which we pass wires.


We made the 15 centimeters of the tail closest to the video card movable so that, if necessary, the video card can be easily removed.
The dragon's head seemed to me only in the form of a pseudo-volumetric. We drove it out of a flat acrylic blank, then on the outside we covered it with reptile vinyl film under the skin, and inside it was painted red.

The eyes for the dragon's head were also made by hand. Only 4 hours of hard grinding and polishing and 1 eye is ready.


The inscriptions on the shield are made of acrylic with stainless steel overlays. Thus, we were able to achieve the effect of end lighting letters.


The MSI inscription on both sides of the sword logically complemented the design and does not stand out from the general view, the letters are made of acrylic and painted red manually.
The power cable in the custom case must also be unique. To make the power cable, we took a chrome chain and weaved 3 wires in it, pre-braided in a red and black braid, so we could achieve the color unity of the 3 main colors - red, black and chrome.

The power connector that connects to the chassis is a modified three-pin microphone connector. For this design, to come up with something better is simply impossible!
I can’t separately mention the processor cooler, which we modified specially for the design of this case.
Initially, it was a copper, red-and-red. He would ruin everything. We already have experience in painting processor heatsinks, and this time we will again use this method. We will also replace the sticker on the fan with a one we made specially for this project.


Wires
There were a lot of them. Lots of. The first difficulty that confronted us was to stretch the wires through the sword. Places in it, well, how to say, calculated. A couple more additional veins will not fit. We amputated the wires of the power unit and increased something about 50 centimeters into the cut.
The tourniquet turned out rather big.
Then all the wires were pulled into a braid.


Pulling the wiring took a lot of time. For example, to pull wires through the tail takes about 5 hours of pure time.
Materials
The main material for the manufacture of the body is acrylic, a complex, brittle, but cool material. When creating some parts, we also used aluminum and stainless steel.
The metal parts of the project were painted using the powder method. The colors are red (RAL 3000) and black smooth mat.

Acrylic parts were painted to give them a less glossy (plastic) appearance using liquid rubber (PlastiDip). In my opinion, this paint is not only similar to rubber, but also to skin, which is why we applied it in our work.
Individual parts were manually tinted with acrylic enamel.

A number of parts were covered with vinyl films of Dutch, Japanese and French production.
Summary
Through all the work on our body went through a thick streak of failure. At first, I doubted whether it was worth starting the work, then I doubted that we would be able to finish what we started.
The result of 2.5 months of hard work. The fruit of my sick fantasies. Hard experience.
The case was not made by me alone. Therefore, it will be appropriate not only to mention, but also to express tremendous gratitude to colleagues and simply volunteer assistants, without whom the corps would not have been completed.
Ilya Ilyin iilin worked with me to create this building. Ponomareva Marina, Dmitry Shevchenko, Alexey Nichvolovdov
provided all possible assistance . Thanks you. Thank you very much! Thanks to our photographer - Evgeny Naryshkin
for patience and individual approach!
Final photos


Demo video
Msi
I want to thank MSI for choosing my workshop. Thanks for this opportunity. Thanks for this experience.
PS
You can learn more about creating the corps from the worklog at mod.dn.ua/index.php/blog