Break me completely (ZeroNights 2013)
- From the sandbox
- Tutorial
Hello to all the Khabrovsk citizens! My name is Darwin and today I will tell you about how I solved the crack with ZeroNights 2013 and Kaspersky Lab for the r0 Crew forum and its semi-private Kiev meeting.
Some information about the crack:
Instruments:
Let's get down to the solution ...
Hacking an application always starts with launching and superficial research of its behavior. Let's run our crack and see how it reacts to data entry:
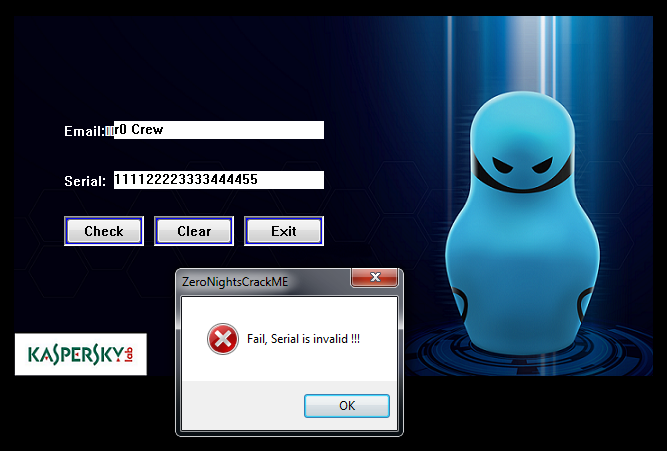
Fig. 1
As you might expect, we are informed about the incorrectly entered serial code.
Now let's open it in IDA Pro, search through the lines and try to find the place where this plate is displayed.
We go to the tab “Strings windows” (if you don’t have one, then open it) and look for the line “Fail, Serial is invalid !!!”:

Fig. 2
Under the line that interests us, we see another no less interesting. Click on any of the lines and go to the linking code. As a result, we get here:
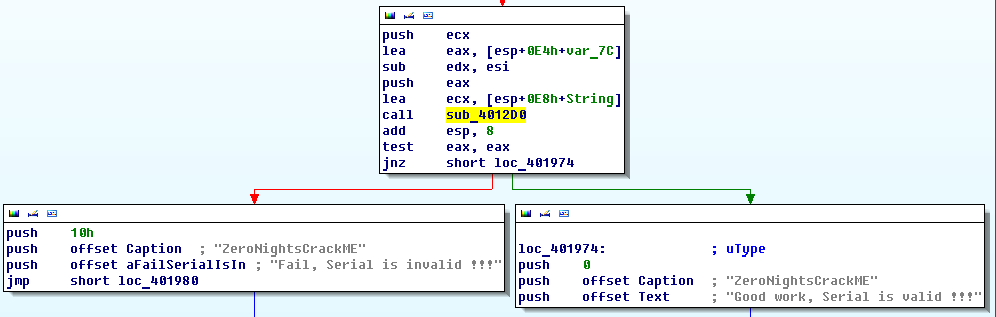
Fig. 3
From what it becomes clear - the check occurs in the function sub_4012D0. If you scroll a little up (literally half the screen), then we will see another interesting point:
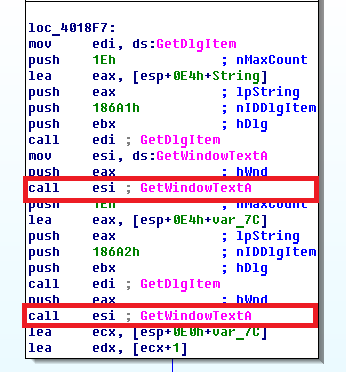
Fig. 4
Here we see two calls to the GetWindowTextA function . Considering the previous figure, it becomes obvious that both functions are used to receive data from the fields of the Email / Serial form .
Based on the data obtained, there are two scenarios for further development:
When I decided with a crack, I chose the second path, and not only because it was faster (IMHO), but also because I wanted to cheat and spy on a valid pair. In some cases, this works, but where it works, they usually ask to restore the algorithm itself, and not just provide one valid pair. Looking ahead, I’ll say that under the supervision of a valid pair (quite expected) I broke off =)
But let's go in order ...
Since we decided to go from the end, the first thing to do is to determine what affects the result of the success or failure of the introduced serial?
To give an answer to this question, let's first look at the lines of code immediately following the call to sub_4012D0. Based on Fig. Figure 3 shows that the EAX register is being checked. If it is zero, then go to “Fail”, if not then to “Good”.
Okay, then to call a positive result, the sub_4012D0 function in the EAX register must return a non-zero result.
Knowing this, let's go into the sub_4012D0 function itself, find its end and try to determine what affects the setting in EAX of a non-zero value. No sooner said than:
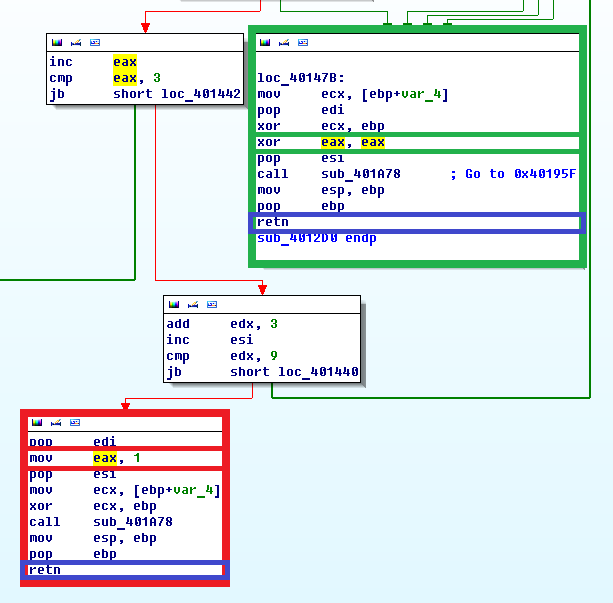
Fig. 5
Ida does not make it clear that a function has at least two outputs (highlighted in blue). Moreover, the output located in the green frame resets to zeroEAX register, and the output in the red frame, on the contrary, sets to one.
Decide on this, now let's figure out which code precedes the block in the red frame? To do this, use Olka (OllyDbg). Why is Olya, firstly: because she gives a clearer idea (specifically in our task) than Ida (various breaks and cross-references distract her), and secondly: we will gradually proceed to debugging with the quacks.
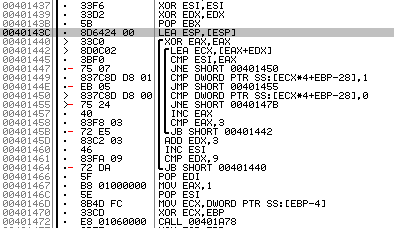
Fig. 6
Note:Before opening OllyDbg, it is advisable to disable ASLR, the security mechanism that is responsible for randomizing the address space. This is done in the registry, in the branch: "HKLM \ SYSTEM \ CurrentControlSet \ Control \ Session Manager \ Memory Management", create a key "MoveImages" (DWORD) with a value of "0", and then restart the OS. If this is not done, after each restart of the application, the addresses will change ...
So, in Fig. Figure 6 shows that setting the register EAX = 1 is preceded by a certain double loop (addresses 0x401440-0x401464). This is our first key element and the starting point for solving the cracks.
If you put the crack on the address 0x401440 and go through the first check:
Note:It is worth saying that if you use a line other than “111122223333444455” in the input field, you will have to face two more problems. The first is the length , and the second is the valid characters that can be used in the serial code. I will leave the definition of the code responsible for these restrictions to you.

Fig. 7
You will see that in line 0x401449 the unit is checked with some value that is located at the address (in my case) 0x18FB28. Further, if successfully pass the whole cycle (or manipulating branching values of the required address; otherwise you zafeylili of course), you will find that there are all 9-Th cells (each 4 bytes):

Fig. 8
I gave these 9 elements the name “Validation Table”. If you, like me, customized the values of the elements (during their verification in a cycle), you and I should have got the following result:
Fig. 9
That is, in the end (in abbreviated form) we should get something like: 100010001. Let's
continue the definition of key elements and try to determine:
Who writes at addresses 0x18FB28-0x18FB48?
To detect this code, do the following:
If everything is done correctly, you will find yourself here:

Fig. 10
Here, the red frame marks the calculation and saving of the first element of the "Validation Table", the blue frame marks the continuation of the calculations of the remaining eight elements.
The code itself occupies the address region 0x4011D4 - 0x4012BB and is a loop with three iterations. At each iteration, the values of the three table elements are calculated and stored. The representation of this code in Python is as follows:
What do first_serial and second_serial mean will become clear a bit later. Now we will continue to analyze Fig. 10.
What we have:

Fig. 11

Fig. 12
Having carefully studied the code, it turns out that:
Having this data, let's try to determine what arrays are at the addresses 0x657020 and 0x18fadc. The most attentive probably already noticed that if you add 9 + 9 = 18. The size of the serial is also equal to 18. Therefore, we can assume that this is it. But it clearly does not correspond to the one we introduced initially. Although the most attentive people could additionally notice that the elements from the 0x657020 array, although vaguely, somehow resemble the first half of the sequence of elements from the serial number that we introduced (111122223).
Looking ahead, I’ll say that the entered serial code is converted into an internal representation, so that it is a little more difficult to determine at a glance or by searching for a dump.
We continue our analysis and try to determine what is still contained in the 0x657020 array?
For this:
If everything is done correctly, we will be here:
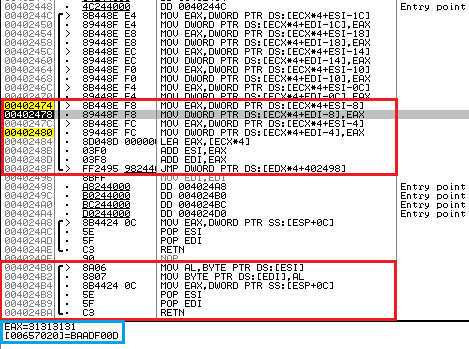
Fig. 13
Having traced the code highlighted in red, we find out the following:
Our suspicions about the 0x657020 array are beginning to slowly confirm. Regarding the address 0x18FBC4 (which stores the entire serial number that we entered), you should have met him at the very beginning, here:

Fig. 14
Here, a red frame highlights information regarding the serial, blue, the place where the e-mail is saved.
However, let's get back to our serial, otherwise we were a little distracted. After we traced the instructions from Fig. 13, at 0x657020, we have half of our serial number stored:

Fig. 15
But, as we know, slightly different bytes should be stored here. So, most likely, some manipulations will be carried out over this half of the serial. To find which ones, press F9 again. Then we will be here:

Fig. 16
Here, the red frame marks the calculation and saving of the new value for the first element of the 0x657020 array, the blue frame marks the continuation of the calculations of the remaining eight elements.
The code itself occupies the address region 0x401070 - 0x401165. The same calculations are performed for each element. The equivalent code for these calculations in Python is presented below:
If you look closely at Fig. 16, notice some address 0x40CB28. We will return to its contents a little later.
After performing all the transformations, we get a result very similar to the one we had in Fig. 11.

Fig. 17
If you compare Fig. 11 s Fig. 17, then notice that the bytes are a bit mixed ... For clarity, I’ll duplicate the eleventh figure below:

Fig. 18
To find the code that deals with byte mixing, press F9 again.
After which we get to the already familiar to us from Fig. 13th place:

Fig. 19
After analyzing the code, it will become clear that new values are taken from the address 0x656EC8:

Fig. 20
The code responsible for populating the 0x656EC8 array is shown below. As I found him, I think you will figure it out for yourself. The article is still not rubber ...

Fig. 21
What is going on here?
The EBX register contains the address 0x657020 from which the elements are directly copied to the 0x656EC8 array. Looking at the copy, you can notice that some elements are mixed.
0x657020: 0, 1, 2, 3, 4, 5, 6, 7, 8
0x656EC8: 0, 1, 2, 4, 5, 3, 8, 6, 7
Now that we have answered our question “What is hidden behind the address 0x657020? ”, You can continue the study and answer other questions:
Analysis of the data hiding behind the 0x18FADC array will be left for independent development. You need to act by analogy with the 0x657020 array. I can only say that the 0x18FADC array stores the second half of the serial code.
Here we will analyze what the address 0x40СB28 is. To do this, we carry out the following manipulations:
If everything is done correctly, we will find ourselves here:

Fig. 22
The code in the red frame creates an ASCII table, which is stored at 0x40СB28. In the blue frame, based on your email, the created table is converted. The end result of this transformation I called the “Table of substitutions”.
The representation of this code in Python is as follows:
I am glad to congratulate you, reaching this point, we revealed all the unknown moments and found all the key elements necessary to create our own valid mail / serial pair.
Compose a serial code so that after passing all the transformations we get the required “Validation Table” (100010001).
I must admit, I had to downplay a bit ... Instead of manipulating “zeros” and “ones” (I got to this a few hours later), I began to select the password according to the internal representation of the serial code, i.e. I tried to find the zeros and ones I needed using values such as, for example, 0xс0, 0x28, ..., 0xff (that is, the first 16 characters of the “Replacement Table”). Which of course was a mistake. I must say that I was looking for a difficult task that simply did not exist. Plus, I also threw out some very important bytes, which constantly interfered with me (when dividing by any number they gave "zero") ... In general, a long story to tell ...
Initially, I tried to determine the dependence of the effects of one byte on another, which eventually led me to similar tables (initial version, later it was painted in all the colors of the rainbow, unfortunately I deleted it, but this one remained):

Fig. 23
Then, at the end of the evening (right after dinner), I had a few common thoughts that eventually led me to use “zeros” and “ones” rather than the raw bytes “0xc0, 0x28, ... , 0xff. " As soon as this idea came to my mind, I immediately remembered those ill-fated bytes that constantly annoyed me and interfered with me (those that, when interacting with any number, gave "zero"). Realizing this, I instantly found myself at the computer and literally in 1-2 minutes I collected a valid pair for myself.
During my unsuccessful attempts, I wrote several functions that allowed me to quickly test various theories about what the bytes I need should be. Thanks to them, I was able to make a valid pair in 1-2 two minutes and I used them to write my keygen. It is worth saying that I did not try to somehow optimize or shorten the code, so it turned out to be rather cumbersome (and to be honest, on the second day, after writing it, I did not immediately understand what I put in there). Therefore, if that does not swear much.
The following link can be found three keygens Pashkin 'a, BoRoV ' a and my beloved Darwin 'a (I liked BoRoV keygen most of all).
Archive passwords:
That's all, thank you all for your attention.
*** The
continuation of the article can be found here .
Some information about the crack:
- File: ZeroNightsCrackME.exe
- Platform: Windows 7 (64 bit)
- Packer: None
- Anti-debugging: Not stumbled
- Solution: Mail / Serial Valid Pair
Instruments:
- OllyDbg SnD 2.2
- IDA Pro 6.1
- Some gray matter
Let's get down to the solution ...
Analysis
Hacking an application always starts with launching and superficial research of its behavior. Let's run our crack and see how it reacts to data entry:
Fig. 1
As you might expect, we are informed about the incorrectly entered serial code.
Now let's open it in IDA Pro, search through the lines and try to find the place where this plate is displayed.
We go to the tab “Strings windows” (if you don’t have one, then open it) and look for the line “Fail, Serial is invalid !!!”:
Fig. 2
Under the line that interests us, we see another no less interesting. Click on any of the lines and go to the linking code. As a result, we get here:
Fig. 3
From what it becomes clear - the check occurs in the function sub_4012D0. If you scroll a little up (literally half the screen), then we will see another interesting point:
Fig. 4
Here we see two calls to the GetWindowTextA function . Considering the previous figure, it becomes obvious that both functions are used to receive data from the fields of the Email / Serial form .
Based on the data obtained, there are two scenarios for further development:
- Start from the beginning. Put the breaks on the GetWindowTextA functions and then monitor the data changes. The method is long and you can get lost.
- Start from the end. Find the code that affects the result (in our case, the output of the success / failure window) and untwist it in the opposite direction. The method is fast, hardcore and interesting.
When I decided with a crack, I chose the second path, and not only because it was faster (IMHO), but also because I wanted to cheat and spy on a valid pair. In some cases, this works, but where it works, they usually ask to restore the algorithm itself, and not just provide one valid pair. Looking ahead, I’ll say that under the supervision of a valid pair (quite expected) I broke off =)
But let's go in order ...
Looking for key details
Since we decided to go from the end, the first thing to do is to determine what affects the result of the success or failure of the introduced serial?
Validation table
To give an answer to this question, let's first look at the lines of code immediately following the call to sub_4012D0. Based on Fig. Figure 3 shows that the EAX register is being checked. If it is zero, then go to “Fail”, if not then to “Good”.
Okay, then to call a positive result, the sub_4012D0 function in the EAX register must return a non-zero result.
Knowing this, let's go into the sub_4012D0 function itself, find its end and try to determine what affects the setting in EAX of a non-zero value. No sooner said than:
Fig. 5
Ida does not make it clear that a function has at least two outputs (highlighted in blue). Moreover, the output located in the green frame resets to zeroEAX register, and the output in the red frame, on the contrary, sets to one.
Decide on this, now let's figure out which code precedes the block in the red frame? To do this, use Olka (OllyDbg). Why is Olya, firstly: because she gives a clearer idea (specifically in our task) than Ida (various breaks and cross-references distract her), and secondly: we will gradually proceed to debugging with the quacks.
Fig. 6
Note:Before opening OllyDbg, it is advisable to disable ASLR, the security mechanism that is responsible for randomizing the address space. This is done in the registry, in the branch: "HKLM \ SYSTEM \ CurrentControlSet \ Control \ Session Manager \ Memory Management", create a key "MoveImages" (DWORD) with a value of "0", and then restart the OS. If this is not done, after each restart of the application, the addresses will change ...
So, in Fig. Figure 6 shows that setting the register EAX = 1 is preceded by a certain double loop (addresses 0x401440-0x401464). This is our first key element and the starting point for solving the cracks.
If you put the crack on the address 0x401440 and go through the first check:
Note:It is worth saying that if you use a line other than “111122223333444455” in the input field, you will have to face two more problems. The first is the length , and the second is the valid characters that can be used in the serial code. I will leave the definition of the code responsible for these restrictions to you.
Fig. 7
You will see that in line 0x401449 the unit is checked with some value that is located at the address (in my case) 0x18FB28. Further, if successfully pass the whole cycle (or manipulating branching values of the required address; otherwise you zafeylili of course), you will find that there are all 9-Th cells (each 4 bytes):
Fig. 8
I gave these 9 elements the name “Validation Table”. If you, like me, customized the values of the elements (during their verification in a cycle), you and I should have got the following result:
Fig. 9
That is, in the end (in abbreviated form) we should get something like: 100010001. Let's
continue the definition of key elements and try to determine:
Who writes at addresses 0x18FB28-0x18FB48?
The code responsible for filling out the "Validation Tables"
To detect this code, do the following:
- Continue with the crack (press F9 in Olka);
- We put the breakpoint on the call sub_4012D0 (or it should already be there);
- We switch to the cracks and in the pop-up window (talking about success or failure), click "OK" (thereby continuing to work with the cracks);
- Next, click on the “Check” button to start recalculating the serial, after which you should stop at the call sub_4012D0;
- Standing on a call sub_4012D0, put the breakpoint on the record at the address 0x18FB28;
- And press F9 again.
If everything is done correctly, you will find yourself here:
Fig. 10
Here, the red frame marks the calculation and saving of the first element of the "Validation Table", the blue frame marks the continuation of the calculations of the remaining eight elements.
The code itself occupies the address region 0x4011D4 - 0x4012BB and is a loop with three iterations. At each iteration, the values of the three table elements are calculated and stored. The representation of this code in Python is as follows:
for out_index in range(3):
    for inner_index in range(3):
        quotient, remainder = 0, 0
        for index in range(3):
            x, y = index + (out_index*3), index + (inner_index*3)
            byte = first_serial[x] * second_serial[y]
            quotient = int(byte / 7)
            remainder += byte % 7
            remainder = remainder % 7
        result_table.append(remainder)
What do first_serial and second_serial mean will become clear a bit later. Now we will continue to analyze Fig. 10.
What we have:
- Address 0x657020 (with obscure data);
- Address 0x18fadc (with obscure data);
- Address 0x18faec (with value 0x7);
- Address 0x18fae8 (with value 0x18fb30).
Fig. 11
Fig. 12
Having carefully studied the code, it turns out that:
- To the calculation of the vadidation table, the address 0x18fae8 has nothing to do with it;
- At addresses 0x657020 and 0x18fadc there are arrays with 9 elements. For the 0x657020 array, each element is 1 byte, and for the 0x18fadc array, four bytes;
- The value 0x7 from the address 0x18faec is quite actively used when calculating each of the elements of the validation table.
Having this data, let's try to determine what arrays are at the addresses 0x657020 and 0x18fadc. The most attentive probably already noticed that if you add 9 + 9 = 18. The size of the serial is also equal to 18. Therefore, we can assume that this is it. But it clearly does not correspond to the one we introduced initially. Although the most attentive people could additionally notice that the elements from the 0x657020 array, although vaguely, somehow resemble the first half of the sequence of elements from the serial number that we introduced (111122223).
Looking ahead, I’ll say that the entered serial code is converted into an internal representation, so that it is a little more difficult to determine at a glance or by searching for a dump.
What is hidden behind the address 0x657020?
We continue our analysis and try to determine what is still contained in the 0x657020 array?
For this:
- We remove all the breaks that were installed on the memory:
- Continue with the crack (press F9 in Olka);
- The call sub_4012D0 must have a break;
- We switch to the cracks and in the pop-up window (talking about success or failure), click "OK" (thereby continuing to work with the cracks);
- Next, click on the “Check” button to start recalculating the serial, after which you should stop at the call sub_4012D0;
- Standing on a call sub_4012D0, put the break on the record, at the address 0x657020;
- Then press F9 2 times (the first time you will find yourself somewhere in the library code, and the second in the right place).
If everything is done correctly, we will be here:
Fig. 13
Having traced the code highlighted in red, we find out the following:
- The first 9 bytes of our serial code (111122223) are recorded at 0x657020;
- The serial code is taken from the address 0x18FBC4 (in my case).
Our suspicions about the 0x657020 array are beginning to slowly confirm. Regarding the address 0x18FBC4 (which stores the entire serial number that we entered), you should have met him at the very beginning, here:
Fig. 14
Here, a red frame highlights information regarding the serial, blue, the place where the e-mail is saved.
However, let's get back to our serial, otherwise we were a little distracted. After we traced the instructions from Fig. 13, at 0x657020, we have half of our serial number stored:
Fig. 15
But, as we know, slightly different bytes should be stored here. So, most likely, some manipulations will be carried out over this half of the serial. To find which ones, press F9 again. Then we will be here:
Fig. 16
Here, the red frame marks the calculation and saving of the new value for the first element of the 0x657020 array, the blue frame marks the continuation of the calculations of the remaining eight elements.
The code itself occupies the address region 0x401070 - 0x401165. The same calculations are performed for each element. The equivalent code for these calculations in Python is presented below:
def find_index(byte):
    byte_1 = byte >> 4
    byte_2 = byte_1 << 3
    res = (byte - byte_2)
    res =  res & 0x0f
    return res
# Псевдокод для вычисления первого элемента массива 0x657020
# byte = 0x657020[0] = 0x31
# index = find_index(byte)
# 0x657020[0] = 0x40CB28[index]
If you look closely at Fig. 16, notice some address 0x40CB28. We will return to its contents a little later.
After performing all the transformations, we get a result very similar to the one we had in Fig. 11.
Fig. 17
If you compare Fig. 11 s Fig. 17, then notice that the bytes are a bit mixed ... For clarity, I’ll duplicate the eleventh figure below:
Fig. 18
To find the code that deals with byte mixing, press F9 again.
After which we get to the already familiar to us from Fig. 13th place:
Fig. 19
After analyzing the code, it will become clear that new values are taken from the address 0x656EC8:
Fig. 20
The code responsible for populating the 0x656EC8 array is shown below. As I found him, I think you will figure it out for yourself. The article is still not rubber ...
Fig. 21
What is going on here?
The EBX register contains the address 0x657020 from which the elements are directly copied to the 0x656EC8 array. Looking at the copy, you can notice that some elements are mixed.
0x657020: 0, 1, 2, 3, 4, 5, 6, 7, 8
0x656EC8: 0, 1, 2, 4, 5, 3, 8, 6, 7
Now that we have answered our question “What is hidden behind the address 0x657020? ”, You can continue the study and answer other questions:
- What is hidden behind the address 0x40CB28 (was just discovered during the analysis of the 0x657020 array);
- What is hidden behind the address 0x18FADC (an array that stores 9 elements of size 4 bytes each).
ASCII derived table
Analysis of the data hiding behind the 0x18FADC array will be left for independent development. You need to act by analogy with the 0x657020 array. I can only say that the 0x18FADC array stores the second half of the serial code.
Here we will analyze what the address 0x40СB28 is. To do this, we carry out the following manipulations:
- Turn off all the memory locks;
- Continue with the crack (press F9 in Olka);
- The call sub_4012D0 must have a break;
- We switch to the cracks and in the pop-up window (talking about success or failure), click "OK" (thereby continuing to work with the cracks);
- Next, click on the “Check” button to start recalculating the serial, after which you should stop at the call sub_4012D0;
- Standing on a call sub_4012D0, put the break on the record, at the address 0x40СB28;
- Next, click on F9.
If everything is done correctly, we will find ourselves here:
Fig. 22
The code in the red frame creates an ASCII table, which is stored at 0x40СB28. In the blue frame, based on your email, the created table is converted. The end result of this transformation I called the “Table of substitutions”.
The representation of this code in Python is as follows:
mail = "support@reverse4you.org"
def get_table(mail):
    ascii_table = []
    for index in range(256):
        ascii_table.append(index)
    mail = list(mail)
    len_mail = len(mail)
    index = 0
    accumulate_index = 0
    while(index < 256):
        mail_index = index % len_mail
        byte_ascii = ascii_table[index]
        byte_mail = ord(mail[mail_index])
        accumulate_index += byte_mail
        accumulate_index += byte_ascii
        accumulate_index = accumulate_index & 0xFF
        byte = ascii_table[accumulate_index]
        ascii_table[accumulate_index] = byte_ascii
        ascii_table[index] = byte
        index += 1
    return ascii_table
I am glad to congratulate you, reaching this point, we revealed all the unknown moments and found all the key elements necessary to create our own valid mail / serial pair.
Putting it all together
What we have?
- Valid range. The serial code must be equal to 18 characters, which in turn should consist of the characters [0-9], [az], [AZ];
- Conversion table. Used to convert the entered serial code to the internal representation;
- The algorithm for turning serial code into an internal representation;
- Algorithm for filling out the validation table;
- Validation table: 100010001.
What do you need?
Compose a serial code so that after passing all the transformations we get the required “Validation Table” (100010001).
How did i do
I must admit, I had to downplay a bit ... Instead of manipulating “zeros” and “ones” (I got to this a few hours later), I began to select the password according to the internal representation of the serial code, i.e. I tried to find the zeros and ones I needed using values such as, for example, 0xс0, 0x28, ..., 0xff (that is, the first 16 characters of the “Replacement Table”). Which of course was a mistake. I must say that I was looking for a difficult task that simply did not exist. Plus, I also threw out some very important bytes, which constantly interfered with me (when dividing by any number they gave "zero") ... In general, a long story to tell ...
Initially, I tried to determine the dependence of the effects of one byte on another, which eventually led me to similar tables (initial version, later it was painted in all the colors of the rainbow, unfortunately I deleted it, but this one remained):
Fig. 23
Then, at the end of the evening (right after dinner), I had a few common thoughts that eventually led me to use “zeros” and “ones” rather than the raw bytes “0xc0, 0x28, ... , 0xff. " As soon as this idea came to my mind, I immediately remembered those ill-fated bytes that constantly annoyed me and interfered with me (those that, when interacting with any number, gave "zero"). Realizing this, I instantly found myself at the computer and literally in 1-2 minutes I collected a valid pair for myself.
During my unsuccessful attempts, I wrote several functions that allowed me to quickly test various theories about what the bytes I need should be. Thanks to them, I was able to make a valid pair in 1-2 two minutes and I used them to write my keygen. It is worth saying that I did not try to somehow optimize or shorten the code, so it turned out to be rather cumbersome (and to be honest, on the second day, after writing it, I did not immediately understand what I put in there). Therefore, if that does not swear much.
The following link can be found three keygens Pashkin 'a, BoRoV ' a and my beloved Darwin 'a (I liked BoRoV keygen most of all).
Archive passwords:
- Pashkin: reverse4you.org_4_r00t
- Darwin: AggGgAgaGcGGggCGCG
- BoRoV: available in pure form without archive
That's all, thank you all for your attention.
*** The
continuation of the article can be found here .