Android Barcode Recognition
In this article, we will use ZXing (Zebra Crossing) to decrypt the barcode in our Android application.
Using ZXing, we don’t need to think about the fact that the user does not have a barcode scanner, since the classes provided by the library will take care of this. By integrating ZXing into our application, we can provide the user with a simpler ability to scan barcodes, this will also allow us to focus on developing the main part of the application.
In Eclipse, create a new Android project. Enter the name of the application, project, and package name.

Open the main template. Eclipse had to create a standard template. Inside it, replace the existing content with a button
After the button, add two text fields that will display the results of the scanned information.
Add text to the button. Open res / values / strings file
To scan, the user will have to click on the button. When the application receives the recognition result, it will display it in the text fields.
ZXing is an open source library that provides barcode recognition on Android. Some users already have the ZXing application installed, so just pass the code to it and wait for the results. In this application, we will consider a method that calls the corresponding function of another application. If this application is not available for the user, a proposal will be displayed to download it.
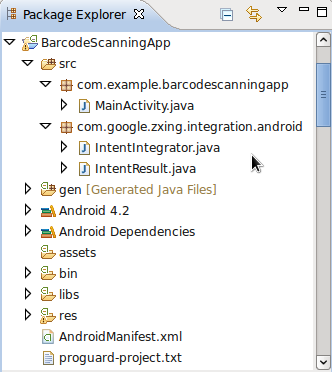
In Eclipse, add a new package to your project. To do this, right-click on the src folder and select "New" -> "Package", and then enter com.google.zxing.integration.android as the name of the package.

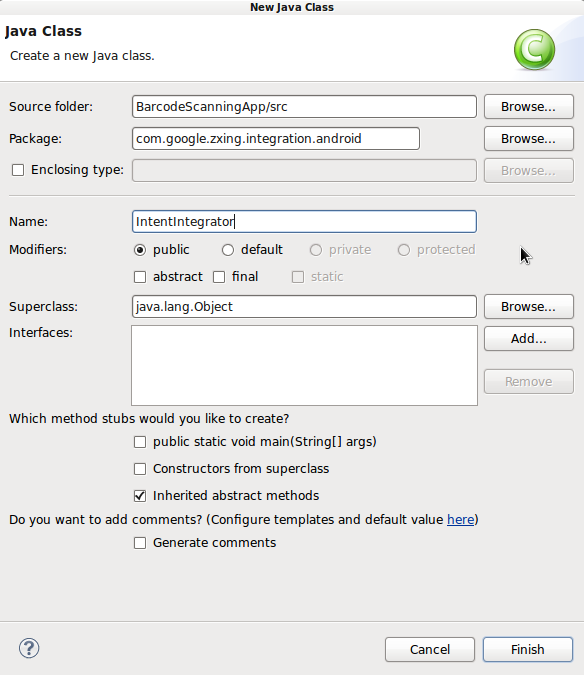
Eclipse offers several ways to import existing code into a project. In this article, the easiest method is to create two classes containing code from ZXing. Right-click on your project, select “New” -> “Class” and enter “IntentIntegrator” as the name of the class. Other parameters you can not change. Once you have created the class, do the same, but name the class “IntentResult”.
Copy the code from both classes of the library, and then paste it into the generated classes.
Now you can connect files to the main class
Let's go back for a moment and also connect the following files. Please note that Eclipse may already have connected them for you.
Examine the content of the two classes. After examining them, you will find that they do not read the code. These two classes are simply interfaces that provide access to the scanning functionality.
Let's implement the scan when the user clicks on our button. There is an onCreate method in the main application file, which should look something like this
Before this function, create the following variables that will store our button and two text fields created in the template
After existing code in onCreate add lines that will initialize variables
Now, add a click handler
Let's extend the class to declare the OnClickListener interface
Now, we can respond to the click of a button by starting the scanning process. Add onClick method
Checking if the scan button was pressed.
Inside the block with the condition, create an instance of the IntentIntegrator class, which we imported
Now, let's call the procedure that starts the scan
At the moment, recognition should begin, but only if the user has the necessary application installed. If not, you will be prompted to start the download. The scan result will be returned to the application.
The scanner will start when the button is pressed. Then the result of the scan will be returned to the onActivityResult method. Add it to our code.
Inside the function, we will try to process the result
Like any other data received from another application, it would not be bad to verify that the result is not empty. We will continue only if we have the right result
If we did not receive the scan result (for example, the user canceled the scan), then we simply display a message
Let's go back to the block with the condition, let's figure out what the library returned to us. The Intent Result object has a method that provides a scan result. Get the scan result as a string
Also, we get the form barcode
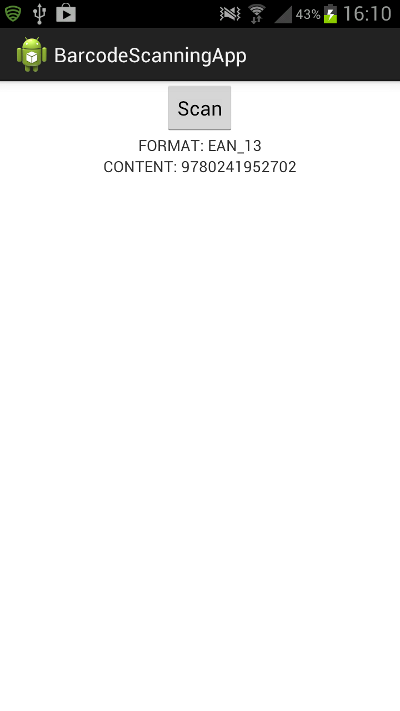
Now, our application has all the information necessary for displaying. In our article, we simply display it to the user.
Run our application on a real device instead of an emulator to see how the barcode recognition functionality works. Try scanning a barcode from a book or any other item.
Scan results
In this article, we learned how to scan barcode using ZXing. In your own applications, after extracting the information, most likely you will want to process it, for example, if the barcode contains a URL, then go to it, etc.
Using ZXing, we don’t need to think about the fact that the user does not have a barcode scanner, since the classes provided by the library will take care of this. By integrating ZXing into our application, we can provide the user with a simpler ability to scan barcodes, this will also allow us to focus on developing the main part of the application.
Create a new project
Step 1
In Eclipse, create a new Android project. Enter the name of the application, project, and package name.
Step 2
Open the main template. Eclipse had to create a standard template. Inside it, replace the existing content with a button
After the button, add two text fields that will display the results of the scanned information.
Add text to the button. Open res / values / strings file
Scan To scan, the user will have to click on the button. When the application receives the recognition result, it will display it in the text fields.
Integrate ZXing
Step 1
ZXing is an open source library that provides barcode recognition on Android. Some users already have the ZXing application installed, so just pass the code to it and wait for the results. In this application, we will consider a method that calls the corresponding function of another application. If this application is not available for the user, a proposal will be displayed to download it.
In Eclipse, add a new package to your project. To do this, right-click on the src folder and select "New" -> "Package", and then enter com.google.zxing.integration.android as the name of the package.
Step 2
Eclipse offers several ways to import existing code into a project. In this article, the easiest method is to create two classes containing code from ZXing. Right-click on your project, select “New” -> “Class” and enter “IntentIntegrator” as the name of the class. Other parameters you can not change. Once you have created the class, do the same, but name the class “IntentResult”.
Copy the code from both classes of the library, and then paste it into the generated classes.
Now you can connect files to the main class
import com.google.zxing.integration.android.IntentIntegrator;
import com.google.zxing.integration.android.IntentResult;
Let's go back for a moment and also connect the following files. Please note that Eclipse may already have connected them for you.
import android.os.Bundle;
import android.app.Activity;
import android.content.Intent;
import android.view.View;
import android.view.View.OnClickListener;
import android.widget.Button;
import android.widget.TextView;
import android.widget.Toast;
Examine the content of the two classes. After examining them, you will find that they do not read the code. These two classes are simply interfaces that provide access to the scanning functionality.
We scan
Step 1
Let's implement the scan when the user clicks on our button. There is an onCreate method in the main application file, which should look something like this
protected void onCreate(Bundle savedInstanceState) {
    super.onCreate(savedInstanceState);
    setContentView(R.layout.activity_main);
}
Before this function, create the following variables that will store our button and two text fields created in the template
private Button scanBtn;
private TextView formatTxt, contentTxt;
After existing code in onCreate add lines that will initialize variables
scanBtn = (Button)findViewById(R.id.scan_button);
formatTxt = (TextView)findViewById(R.id.scan_format);
contentTxt = (TextView)findViewById(R.id.scan_content);
Now, add a click handler
scanBtn.setOnClickListener(this);
Let's extend the class to declare the OnClickListener interface
public class MainActivity extends Activity implements OnClickListener
Step 2
Now, we can respond to the click of a button by starting the scanning process. Add onClick method
public void onClick(View v){
//respond to clicks
}
Checking if the scan button was pressed.
if(v.getId()==R.id.scan_button){
//scan
}
Inside the block with the condition, create an instance of the IntentIntegrator class, which we imported
IntentIntegrator scanIntegrator = new IntentIntegrator(this);
Now, let's call the procedure that starts the scan
scanIntegrator.initiateScan();
At the moment, recognition should begin, but only if the user has the necessary application installed. If not, you will be prompted to start the download. The scan result will be returned to the application.
Processing scan results
Step 1
The scanner will start when the button is pressed. Then the result of the scan will be returned to the onActivityResult method. Add it to our code.
public void onActivityResult(int requestCode, int resultCode, Intent intent) {
//retrieve scan result
}
Inside the function, we will try to process the result
IntentResult scanningResult = IntentIntegrator.parseActivityResult(requestCode, resultCode, intent);
Step 2
Like any other data received from another application, it would not be bad to verify that the result is not empty. We will continue only if we have the right result
if (scanningResult != null) {
//we have a result
}
If we did not receive the scan result (for example, the user canceled the scan), then we simply display a message
else{
    Toast toast = Toast.makeText(getApplicationContext(),
        "No scan data received!", Toast.LENGTH_SHORT);
    toast.show();
}
Let's go back to the block with the condition, let's figure out what the library returned to us. The Intent Result object has a method that provides a scan result. Get the scan result as a string
String scanContent = scanningResult.getContents();
Also, we get the form barcode
String scanFormat = scanningResult.getFormatName();
Step 3
Now, our application has all the information necessary for displaying. In our article, we simply display it to the user.
formatTxt.setText("FORMAT: " + scanFormat);
contentTxt.setText("CONTENT: " + scanContent);
Run our application on a real device instead of an emulator to see how the barcode recognition functionality works. Try scanning a barcode from a book or any other item.
Scan results
Conclusion
In this article, we learned how to scan barcode using ZXing. In your own applications, after extracting the information, most likely you will want to process it, for example, if the barcode contains a URL, then go to it, etc.