The Tale of the Present PRINTRBOTe (Part 1: Muse Isaakovna)
- Tutorial
There is no truth in the legs. /A. Maresyev /
Printrbots (hereinafter PB) are rare guests on Habré, and indeed, little is written about them in the press.
Although at home, the Brook Drumm business lives and thrives.
I believe that the printer repels European dealers, the more he attracted me, namely:
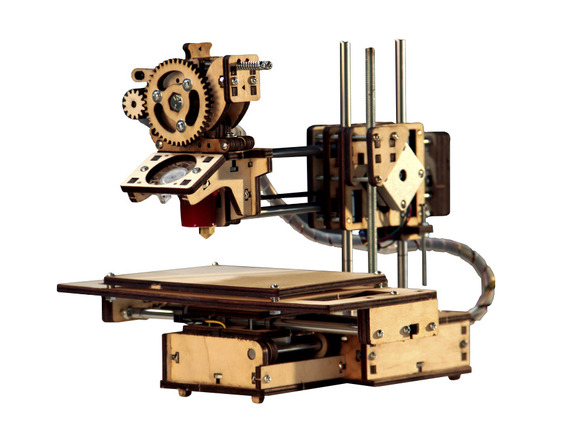
Next, we will talk about one of the PB representatives - Printrbot Jr , in the Kit version for assembly, along with an additional upgrade of the heated desktop - Heated Bed Upgrade , for printing with ABS plastic.
Now this printer has been purchased, assembled, calibrated and is working hard on my desk, printing toys for the New Year.
I want to describe the fate of this exhibit from the very sources, from the very idea to direct application, since this fate was not easy and was closely intertwined with mine, sometimes leading to complete psychological exhaustion, and then sharply stunning the Wow effect.
Initially, three parts were conceived: From the idea to the acquisition of Kit; Assembly and setup of the printer; From toys to practical applications. But in the process of writing, I decided to include everything in one article with an emphasis on assembly and configuration.
In the end, I recommend this material as an extremely useful addition to the original and only step-by-step assembly instructions , which is extremely superficial, ambiguous, and leaves much to be desired.
Looking ahead, I’ll say right away that this 3D printer was worth the torment), which distinguishes it from many of its brothers, and more about that in order.
The more articles there were about household-home 3D printers, the more I wanted to buy one. But the price is from 50-60 tr. in no way allowed the dream to come true, because the investment in the toy was clearly overpriced. Why a toy? Because even now, the practical application of the HOME 3D printer is very ambiguous. But more about that later. RepRap
Project, which Musa Isaakovna closely monitored, was and remains a panacea that allows any tech-savvy amateur to assemble their own 3D printer at a more or less reasonable price and quite acceptable quality. 0.1 mm printing accuracy provides almost any domestic need. But watching the development of the project all the time there was a feeling of some kind of damp construction ... until independent directions began to budge from the project. Moving away from the ideology of a true RepRap, which, if possible, prints most of the details for itself, new projects began to take the best practices of RepRap and discard imperfect self-printed designs that were replaced by similar ones, but from another material or fundamentally new.
So MakerBot appearedand many of his clones are in the box. The era of monetization of 3D printers and 3D home printing has begun. But the price for the final product was still too high, especially for a housewife and with a still not quite specific wording for home use. It was still necessary to simplify.
And so Cube appeared , and naturally its “followers” . And the cartridges came! The main source of income for printer manufacturers. To close the uncertainty with the use of began to create services-base 3D-models .
“And everything seems to be as usual, and it’s like living, don’t bother.” (C)
But the price ... 500-700 USD, it was still not what I would like to spend on a toy for the soul. And again, how to explain such a waste to his wife ...
Musa Isaakovna frowned unpleasantly, but continued to exactingly remind herself.
You may ask, why not build the original RepRap, if you really want to? I will answer again - for the shrewd design engineer, all RepRap models are literally teeming with controversial and not quite effective technical solutions. I emphasize - it is technical solutions, i.e. the design of the truss, drives, extruder, etc. Because I have no complaints about any particular electronic brain board and firmware, this is a controller for 4-5 step motors, three limit switches, 1-2 heaters and 1-2 thermistors, which understands G -code. This is approximately the same for everyone and is based on Arduino. And the software is able to withstand accuracy and 0.01 mm, but is the hardware capable? Is mechanics able to provide the given accuracy and smoothness of movements?
The classic RepRap is not exactly trouble, but due to the triangular-square truss of round axes in plastic brackets, even if it is reinforced with a U-shaped truss in the latest versions ... in general, it’s not aesthetically pleasing. Not a lunar rover. “Saw, Fedya, saw!” (C)
In the bottom line: RepRap is an excellent, but experimental laboratory; 3D printers a la MakerBot - still indecently expensive; UP! Plus and others like Cube with them - print thickly and tend to original cartridges! which my internal I don’t accept genetically, and even with several successful projects of mini-factories for the production of bar from recycled materials.
But then I flashed in the press Printrbot.
And flashed on Habré .
Here I want to immediately make a reservation that this is not PR or advertising. This is a story about a printer that is fundamentally different from everyone else. From here to him my trembling love and attention. And in the end, the printer still showed itself from the best side and lived up to its expectations, though it was seriously and mentally injured several times along the way. And this is a tribute to the talents of Brooke Drum, who has an outstanding appearance and determination, who turned his hobby into a successful business. Who formulated his concept of a home 3D printer, which coincides with the opinion of the author, and follows him relentlessly.

Brooke Drum with his offspring.
Plywood ... wood in 3D printing! It was steampunk, or woodpunk, I don’t know how best.
The living Soviet coat of arms is as quick as a blow with a hammer, and sharp as a sickle in the balls. (FROM)
After close examination, the following were noted:
But at that moment, Junior's Whale Kit was worth 399 USD on the manufacturer’s website. After the appearance of the Simple whale for 299 USD, the Junior kit was unfortunately discontinued.
Musa Isaakovna gazed steadily from the reflection of the monitor, straightened her cardigan, pressed her massive chest in Raikin's style and exhaled - We must take it!
I said - I'm listening! - and ran out on the Internet.
Writing “shoe polish” from the American “uncle” was not so simple. Rather, there were no problems with placing an order, even to a Moscow address, but with payment ...
Printrbot turned out to be a small company, frankly, home. And its no less small, unknown bank on the border of the USA and Canada flatly refused to accept payment from a citizen of the Russian Federation. He refused to accept a resident of the Russian Federation from a ruble account, from a currency account, and even from PayPal. The latter has led to some stupor, since when did PayPal become sensitive to citizenship ?! But the only attention to heart issues was Musa Isaakovna, and she was silent, and only demanding and intently let out mental vibes.
Further, I planned to devote a separate part of the article to the methodology of purchases from the states. But, having an acute desire to quickly proceed to the assembly, I will limit myself to a brief summary, especially on the very topic of such purchases, and there are so many in separate articles.
As a result, the following combination was played.
Registered account in Shipito .
Photos of the contents of the packages in advance, profile and in parts are paid in advance.
The address of the “transshipment point” in the USA in the duty free zone was selected: Tualatin, Oregon .
All possible supporting documents were sent to increase the status of the account, in order to avoid problems and delays in the payment and sending of parcels:
All this was enough to get the verification status of 70% and enter the green zone of trusted-trusted customers.
If you additionally send the form 1583 in the original and notarized, you will have 110% verification, yellow pants and three times Ku!
Further, on the PB website, the delivery address indicated the city of Tualatin, in the state of Oregon, and ... And the payment from the ruble card through PayPal went without hesitation.
A few days later, the parcel arrived in Tualatin, and a dozen pretty photos appeared in Shipito's personal account.
Some of them:
1

2
3
4
5
6
7
At the insistence of Shipito website, even before the parcel arrived to them, I pre-filled out the customs declaration, honestly indicating all the positions and prices, based on an invoice from the PB store. The parcel status was assigned, of course, Gift - a gift, that is, not for resale. The delivery address in Moscow was also entered in your personal account and selected for delivery by default.
On the recommendation of this article , the delivery method and insurance options were selected for it:
USPS Express Mail
Insurance: Delivery + Damage
As practice has shown, in no case do not save on delivery and insurance, within reasonable limits of course. With the chosen delivery method, the parcel was handed from hand to hand, at a pre-determined time interval, by a very, very neat courier EMS Post of Russia. The truth is not on time ...
As a result, I only had to confirm the quality of the photos and the composition of the contents, confirm the delivery method, transfer the necessary sum according to the calculation results to Shipito's account and my printer immediately went to the previously entered address.
To Moscow, comrades, to Moscow! (C)
Immediately after sending from Shipito, the parcel was assigned an ID-number tracker by which the fate of the dispatch could be tracked on the USPS website until it got to EMS.
A week later, the cargo already arrived in Russia, lay at customs for a couple of days, was missed and hid in EMS.
A month later, a very polite operator called me and agreed on the time and place of delivery of the precious cargo. And, as I wrote earlier, the cargo was delivered intact, “on time” and transferred from hand to hand with a dazzling smile.
Muse Isaakovna rejoiced.
About a month passed from the moment of receiving the parcel before I started assembling the dream machine.
During this time, Musa Isaakovna managed to gain a few extra pounds, come out wide and noticeably round, and I managed to purchase some additional tools for assembly, such as a ratchet clamp, mallet, PVA glue, and a wood burner.
And now the hour X has come. The instructions from the site were printed, the box was opened and the process began.
As I said earlier, this material is a useful addition to the basic printer assembly guide.
And there is.
And before the next follower begins to independently assemble the wonderful Printrbot Jr, I will give some background information, which is extremely useful to find out without fail before the start of the assembly, in order to accurately understand and realize what exactly you got in the treasured box. This will help protect against a lot of annoying mistakes that the author tragically survived.
To understand the essence of the problem, you need to turn to the device of the laser cutting machine.
In essence, this is the same coordinate printer, but instead of an extruder, a laser cutter. More precisely, the CO2 laser lamp is somewhere motionless in the protective casing, and the laser beam itself is focused by the lens and transmitted to the surface to be processed by a system of movable mirrors.
Schematic diagram of a laser cutting machine. Schematic diagram of a
laser installation for cutting sheet wood materials.
Thus, if you look closely at the scheme, you can pay attention that the section of the workpiece in its section has a conical shape. Those. the edges of the parts are not perpendicular to the surfaces, but are inclined and form a trapezoid. To make it clearer, imagine a circular vertical hole in a plywood sheet cut by a laser around the perimeter. So, the diameter of the hole on the top side of the sheet will be slightly larger than on the bottom. The material (wood) burns out from top to bottom, and above it burns out more, because in the upper layers the laser beam dwells more in time and transfers more heat to the surrounding material.
Consequently, all printer parts have an irregular shape in cross section, which must be taken into account when assembling “sandwiches”, i.e. when pieces of plywood lie on top of each other, especially with through holes.
Tips for the studio (C)
Be prepared that it is the parts for your printer that have been cut on the worst Chinese machine and that no sizes will correspond to those stated in principle. To achieve such a result is relatively easy even on a good machine. It is enough to simply cut the contour of the part first, and only then, in the loose part, cut out the grooves and holes. Plywood, this is such a material that "floats" when cutting due to internal stresses in layers glued perpendicular to each other. Therefore, if you first cut through the contour, then the part will shift slightly, having lost contact with the billet mother. A similar effect is observed even if the perimeter is not cut out completely, leaving small adhesions with an external contour.
The exact part will be obtained only if all the holes and grooves were first cut in the workpiece, and only then the workpiece was cut into final parts. PB - this is not the case, reconcile yourself and stock up with a sharp knife, file and sandpaper.
Examples of blanks PB
1
2

3
And the amount of waste after processing the first half of the parts
Now directly on the assembly of "sandwiches".
Sandwiches in their bulk should be collected mirror-like. Those. Larger diameters with larger ones, smaller with smaller ones.
If identical symmetrical parts are located at different ends of the printer or axes, then it is also mirrored. Otherwise, you lose alignment.
The exception is the same, but not mirror-made parts (I came across a couple of these at the base of the printer). Those. those parts that are identical and installed symmetrically on the printer, for example, the base box walls, but on the workpiece they were not mirrored and sawn up ... not upside down ... well, you understand - in this case the parts should be placed just in series, otherwise , again, the alignment is broken and the “box” will become a curve and the following parts will no longer exactly fall into each other’s grooves. You will be tormented, but they still will not get. And the box you can’t take apart - it is glued. You all carefully taped? Here. In this case, only cutting the excess parts will save.
Parts with holes should be worn on the axles with exceptionally smaller diameters. Moreover, if you are dressing a sandwich, then you should prepare it with larger diameters to larger, respectively. This will give greater rigidity.
All holes are recommended to be preliminarily walked with a drill of the corresponding diameter, manually, one or two turns, no more! The fact is that after laser cutting, the edges of the parts and holes are covered with a carbon layer, which is an excellent protection of wood in the case of rubbing parts (extruder gears). Therefore, to remove this layer is categorically not recommended, even despite dirty hands. In addition to light plywood, the black contour gives aesthetic beauty.
On the other hand, the carbon layer slightly changes the size of the part, which in the case of holes reduces the diameter. You can of course take into account the dimensional error during the cutting process, but the coal layer is not eternal and easily crumbles. As a result, again, lose in size, the axis will begin to stagger. It is best to walk a couple of times with a drill and push it onto the axle in interference. And do not forget to drip glue.
The information that the holes and parts have different diameters and sizes on the outside and inside, in the instructions pops up exactly closer to the end of the second third, when you have already assembled most of the printer incorrectly.
Another point. American products have half inch sizes. In my particular case, all the screws and nuts, including the threads on the rails, were inches. The holes were metric, under 8mm.
The bolted heads, in half the cases were cross-shaped, and in half the inner sprocket was very small. It is better to get a set of small stars in advance.
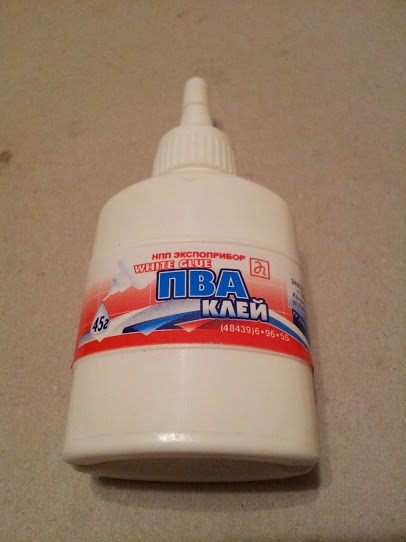
Very useful tip: glue everything that can be glued. PVA for in this case fits perfectly. He perfectly glues plywood, fills the voids and even manages to lie on the greasy, oiled axes, forming a hard crust and preventing backlash and loosening.
PVA glue is really perfectly diluted with oil, it does not spoil it. This effect is used by artists when PVA is added to oil paints for better adhesion and adhesion.
Edging with a sharp knife, if necessary, is preferable to a sandpaper or file. Less dirt.
Before processing wooden parts, it is recommended to paint everything at once with wood impregnation. This will give a unique color to your printer and bind the carbon layer on the edges. Plywood will not dry out during operation and will no longer get dirty. Impregnated edges will be less prone to chips, especially on the teeth of gears.
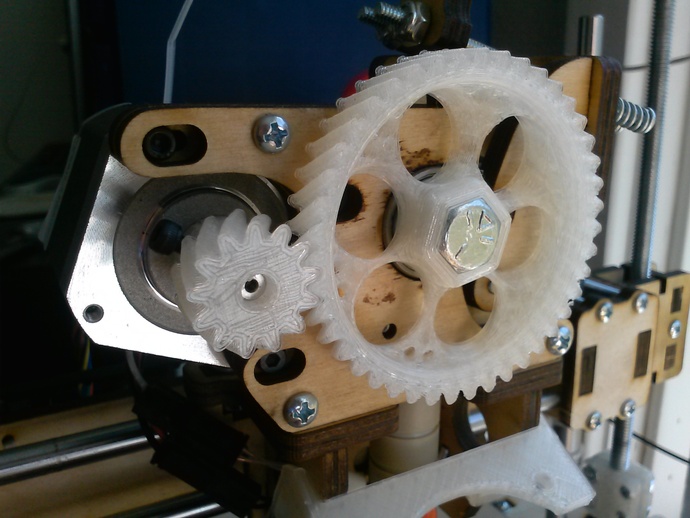
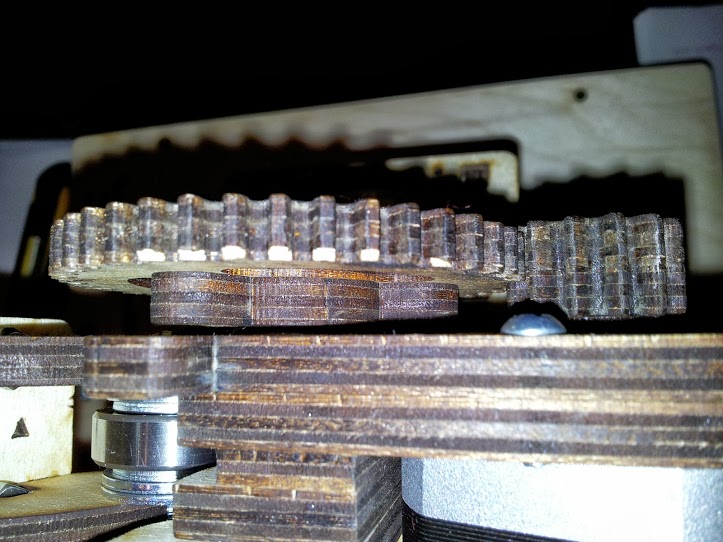
I got the first version of the PB Jr v1. This version uses two wooden gears in the extruder.
One on the motor shaft, glued in four parts.

Inside two smooth rings on the leg, a nut is pressed in, into which a locking screw will be screwed through a hole in the right side.

The second, large, is assembled in two parts and sits on the shaft of the ribbed bolt, which extends the bar.
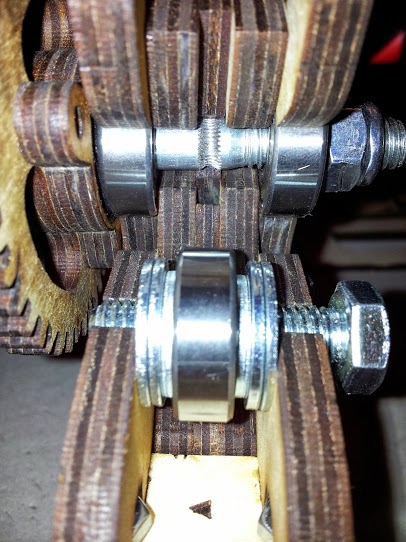
In order to prevent the large gear from rubbing the inner side against the bearing, it is recommended to make a shallow, 1 mm groove under the diameter of the outer ring of the bearing.

For these purposes, a home burner is ideal, for one and childhood remember, and show the child.
As a result, the load on the gear pair will significantly decrease, which will significantly increase the resource of the extruder and especially the gears themselves.

In the future, when mastering high-resolution printing, I recommend not putting off printing several sets of plastic gears yourself, it is possible from PLA. They will last longer and improve print accuracy.
You can choose a model to taste here , but I recommend it with oblique teeth.
If you can’t refuse the captivating beauty of the wooden gear mechanism, which happened to the author, I recommend immediately treating the gears with WD oil immediately after installation and repeating this procedure periodically. Do not worry, the plywood will not stick out, but it will swell just enough to exclude the slightest backlash in the pair. In addition, the oil edges of the large gear will be much less likely to chip.
With the big gear there is another nuance. In earlier models, it was glued from two parts of plywood, and the thickness was the same as the small gear. In later models, the large gear became single and, due to the increased load on the tooth area, began to wear out faster, not greased teeth simply chipped before our eyes.
And one more nuance. A large single gear is positioned relatively small not in the middle, but with an offset to the outer edge of the small gear. In this case, in no case glue the small gear with small diameters inward, only outward! This will transfer the maximum load on the tooth of the large gear from the outer edge closer to the middle.
Dear Reader!
Starting from the gears, I smoothly moved from the prologue directly to the assembly of the printer parts. However, the volume of photographic materials and text advises me to interrupt so that this reading does not cause you to prematurely reject it.
In the next article, and this will be a continuation of the second part, I will try to complete the assembly of the printer, carry out calibration and begin practical use.
FOREWORD
Printrbots (hereinafter PB) are rare guests on Habré, and indeed, little is written about them in the press.
Although at home, the Brook Drumm business lives and thrives.
I believe that the printer repels European dealers, the more he attracted me, namely:
- Plywood design is stylish. Laser cutting plywood is not only stylish, but also high-tech.
- There is no casing box. I see the printer, its parts, its organs, its movements, and unlike RepRap Prusa Mendel - I like what I see.
Next, we will talk about one of the PB representatives - Printrbot Jr , in the Kit version for assembly, along with an additional upgrade of the heated desktop - Heated Bed Upgrade , for printing with ABS plastic.
Now this printer has been purchased, assembled, calibrated and is working hard on my desk, printing toys for the New Year.
I want to describe the fate of this exhibit from the very sources, from the very idea to direct application, since this fate was not easy and was closely intertwined with mine, sometimes leading to complete psychological exhaustion, and then sharply stunning the Wow effect.
Initially, three parts were conceived: From the idea to the acquisition of Kit; Assembly and setup of the printer; From toys to practical applications. But in the process of writing, I decided to include everything in one article with an emphasis on assembly and configuration.
In the end, I recommend this material as an extremely useful addition to the original and only step-by-step assembly instructions , which is extremely superficial, ambiguous, and leaves much to be desired.
Looking ahead, I’ll say right away that this 3D printer was worth the torment), which distinguishes it from many of its brothers, and more about that in order.
Part 1
Muse Isaakovna
The more articles there were about household-home 3D printers, the more I wanted to buy one. But the price is from 50-60 tr. in no way allowed the dream to come true, because the investment in the toy was clearly overpriced. Why a toy? Because even now, the practical application of the HOME 3D printer is very ambiguous. But more about that later. RepRap
Project, which Musa Isaakovna closely monitored, was and remains a panacea that allows any tech-savvy amateur to assemble their own 3D printer at a more or less reasonable price and quite acceptable quality. 0.1 mm printing accuracy provides almost any domestic need. But watching the development of the project all the time there was a feeling of some kind of damp construction ... until independent directions began to budge from the project. Moving away from the ideology of a true RepRap, which, if possible, prints most of the details for itself, new projects began to take the best practices of RepRap and discard imperfect self-printed designs that were replaced by similar ones, but from another material or fundamentally new.
So MakerBot appearedand many of his clones are in the box. The era of monetization of 3D printers and 3D home printing has begun. But the price for the final product was still too high, especially for a housewife and with a still not quite specific wording for home use. It was still necessary to simplify.
And so Cube appeared , and naturally its “followers” . And the cartridges came! The main source of income for printer manufacturers. To close the uncertainty with the use of began to create services-base 3D-models .
“And everything seems to be as usual, and it’s like living, don’t bother.” (C)
But the price ... 500-700 USD, it was still not what I would like to spend on a toy for the soul. And again, how to explain such a waste to his wife ...
Musa Isaakovna frowned unpleasantly, but continued to exactingly remind herself.
You may ask, why not build the original RepRap, if you really want to? I will answer again - for the shrewd design engineer, all RepRap models are literally teeming with controversial and not quite effective technical solutions. I emphasize - it is technical solutions, i.e. the design of the truss, drives, extruder, etc. Because I have no complaints about any particular electronic brain board and firmware, this is a controller for 4-5 step motors, three limit switches, 1-2 heaters and 1-2 thermistors, which understands G -code. This is approximately the same for everyone and is based on Arduino. And the software is able to withstand accuracy and 0.01 mm, but is the hardware capable? Is mechanics able to provide the given accuracy and smoothness of movements?
The classic RepRap is not exactly trouble, but due to the triangular-square truss of round axes in plastic brackets, even if it is reinforced with a U-shaped truss in the latest versions ... in general, it’s not aesthetically pleasing. Not a lunar rover. “Saw, Fedya, saw!” (C)
In the bottom line: RepRap is an excellent, but experimental laboratory; 3D printers a la MakerBot - still indecently expensive; UP! Plus and others like Cube with them - print thickly and tend to original cartridges! which my internal I don’t accept genetically, and even with several successful projects of mini-factories for the production of bar from recycled materials.
But then I flashed in the press Printrbot.
And flashed on Habré .
Here I want to immediately make a reservation that this is not PR or advertising. This is a story about a printer that is fundamentally different from everyone else. From here to him my trembling love and attention. And in the end, the printer still showed itself from the best side and lived up to its expectations, though it was seriously and mentally injured several times along the way. And this is a tribute to the talents of Brooke Drum, who has an outstanding appearance and determination, who turned his hobby into a successful business. Who formulated his concept of a home 3D printer, which coincides with the opinion of the author, and follows him relentlessly.
Brooke Drum with his offspring.
Plywood ... wood in 3D printing! It was steampunk, or woodpunk, I don’t know how best.
The living Soviet coat of arms is as quick as a blow with a hammer, and sharp as a sickle in the balls. (FROM)
After close examination, the following were noted:
- The original design of the Z-axis with one motor (at Junior and Simple).
- Original design made of plywood laser cutting.
- The original design as a whole is rigid, devoid of visible imperfections (with the exception of wood, to which precise rigidity is not peculiar, but more on that later).
- Availability of kits for self-assembly.
- Claimed accuracy 0.1 mm.
- Original Ceramic Hot End (Ubis Ceramic Hot End) , developed by a specialist in printers, an engineer from HP - Carl Ubis (Carl Ubis).
- Price!
But at that moment, Junior's Whale Kit was worth 399 USD on the manufacturer’s website. After the appearance of the Simple whale for 299 USD, the Junior kit was unfortunately discontinued.
Musa Isaakovna gazed steadily from the reflection of the monitor, straightened her cardigan, pressed her massive chest in Raikin's style and exhaled - We must take it!
I said - I'm listening! - and ran out on the Internet.
This is my uncle sent ... He lives with a watchman in a shoe polish factory ... He has this shoe polish - well, heaps! .. So he sends it, umm ... to anybody ...
Writing “shoe polish” from the American “uncle” was not so simple. Rather, there were no problems with placing an order, even to a Moscow address, but with payment ...
Printrbot turned out to be a small company, frankly, home. And its no less small, unknown bank on the border of the USA and Canada flatly refused to accept payment from a citizen of the Russian Federation. He refused to accept a resident of the Russian Federation from a ruble account, from a currency account, and even from PayPal. The latter has led to some stupor, since when did PayPal become sensitive to citizenship ?! But the only attention to heart issues was Musa Isaakovna, and she was silent, and only demanding and intently let out mental vibes.
Further, I planned to devote a separate part of the article to the methodology of purchases from the states. But, having an acute desire to quickly proceed to the assembly, I will limit myself to a brief summary, especially on the very topic of such purchases, and there are so many in separate articles.
As a result, the following combination was played.
Registered account in Shipito .
Photos of the contents of the packages in advance, profile and in parts are paid in advance.
The address of the “transshipment point” in the USA in the duty free zone was selected: Tualatin, Oregon .
All possible supporting documents were sent to increase the status of the account, in order to avoid problems and delays in the payment and sending of parcels:
- passport scan;
- scan of a driver’s license;
- utility bill scan;
- Scan form 1583 with your signature.
All this was enough to get the verification status of 70% and enter the green zone of trusted-trusted customers.
If you additionally send the form 1583 in the original and notarized, you will have 110% verification, yellow pants and three times Ku!
Further, on the PB website, the delivery address indicated the city of Tualatin, in the state of Oregon, and ... And the payment from the ruble card through PayPal went without hesitation.
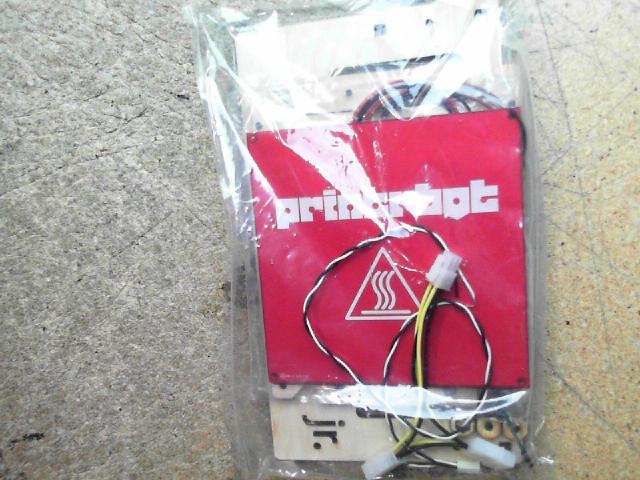
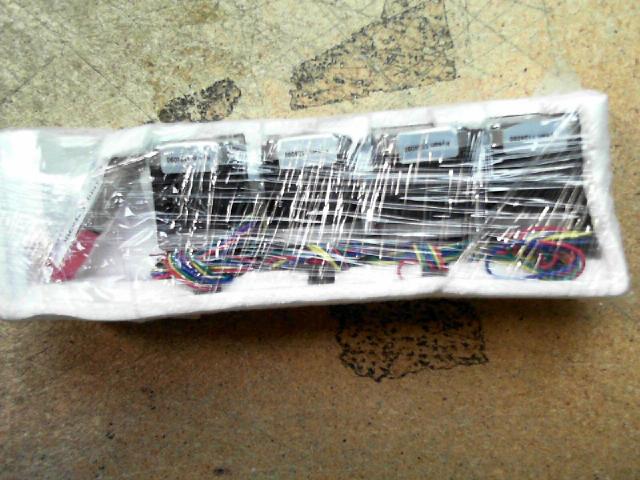
A few days later, the parcel arrived in Tualatin, and a dozen pretty photos appeared in Shipito's personal account.
Some of them:
1
2
3
4
5
6
7
At the insistence of Shipito website, even before the parcel arrived to them, I pre-filled out the customs declaration, honestly indicating all the positions and prices, based on an invoice from the PB store. The parcel status was assigned, of course, Gift - a gift, that is, not for resale. The delivery address in Moscow was also entered in your personal account and selected for delivery by default.
On the recommendation of this article , the delivery method and insurance options were selected for it:
USPS Express Mail
Insurance: Delivery + Damage
As practice has shown, in no case do not save on delivery and insurance, within reasonable limits of course. With the chosen delivery method, the parcel was handed from hand to hand, at a pre-determined time interval, by a very, very neat courier EMS Post of Russia. The truth is not on time ...
As a result, I only had to confirm the quality of the photos and the composition of the contents, confirm the delivery method, transfer the necessary sum according to the calculation results to Shipito's account and my printer immediately went to the previously entered address.
To Moscow, comrades, to Moscow! (C)
Immediately after sending from Shipito, the parcel was assigned an ID-number tracker by which the fate of the dispatch could be tracked on the USPS website until it got to EMS.
A week later, the cargo already arrived in Russia, lay at customs for a couple of days, was missed and hid in EMS.
A month later, a very polite operator called me and agreed on the time and place of delivery of the precious cargo. And, as I wrote earlier, the cargo was delivered intact, “on time” and transferred from hand to hand with a dazzling smile.
Muse Isaakovna rejoiced.
Part 2
Technology for assembling and testing booster blocks of heavy carrier rockets
About a month passed from the moment of receiving the parcel before I started assembling the dream machine.
During this time, Musa Isaakovna managed to gain a few extra pounds, come out wide and noticeably round, and I managed to purchase some additional tools for assembly, such as a ratchet clamp, mallet, PVA glue, and a wood burner.
And now the hour X has come. The instructions from the site were printed, the box was opened and the process began.
As I said earlier, this material is a useful addition to the basic printer assembly guide.
And there is.
And before the next follower begins to independently assemble the wonderful Printrbot Jr, I will give some background information, which is extremely useful to find out without fail before the start of the assembly, in order to accurately understand and realize what exactly you got in the treasured box. This will help protect against a lot of annoying mistakes that the author tragically survived.
So, let's start with laser cutting plywood.
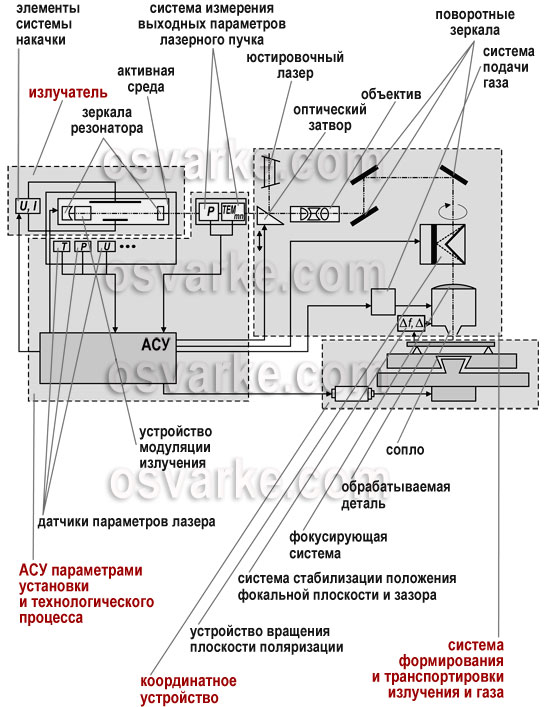
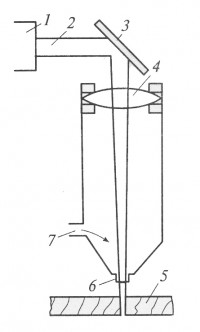
To understand the essence of the problem, you need to turn to the device of the laser cutting machine.
In essence, this is the same coordinate printer, but instead of an extruder, a laser cutter. More precisely, the CO2 laser lamp is somewhere motionless in the protective casing, and the laser beam itself is focused by the lens and transmitted to the surface to be processed by a system of movable mirrors.
Schematic diagram of a laser cutting machine. Schematic diagram of a
laser installation for cutting sheet wood materials.
- gas laser (active substance CO2);
- beam of rays;
- mirror system;
- lens system;
- harvesting;
- nozzle;
- inert gas fitting.
Thus, if you look closely at the scheme, you can pay attention that the section of the workpiece in its section has a conical shape. Those. the edges of the parts are not perpendicular to the surfaces, but are inclined and form a trapezoid. To make it clearer, imagine a circular vertical hole in a plywood sheet cut by a laser around the perimeter. So, the diameter of the hole on the top side of the sheet will be slightly larger than on the bottom. The material (wood) burns out from top to bottom, and above it burns out more, because in the upper layers the laser beam dwells more in time and transfers more heat to the surrounding material.
Consequently, all printer parts have an irregular shape in cross section, which must be taken into account when assembling “sandwiches”, i.e. when pieces of plywood lie on top of each other, especially with through holes.
Tips for the studio (C)
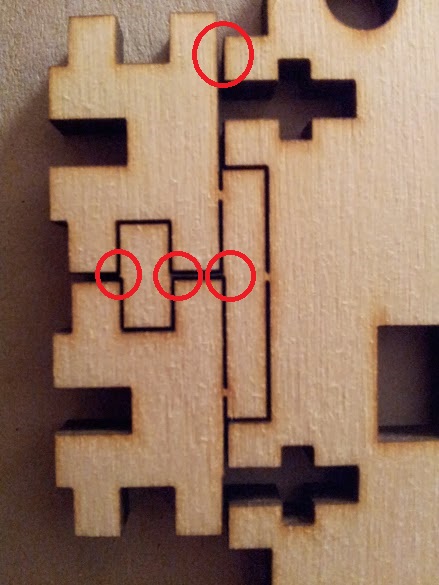
Be prepared that it is the parts for your printer that have been cut on the worst Chinese machine and that no sizes will correspond to those stated in principle. To achieve such a result is relatively easy even on a good machine. It is enough to simply cut the contour of the part first, and only then, in the loose part, cut out the grooves and holes. Plywood, this is such a material that "floats" when cutting due to internal stresses in layers glued perpendicular to each other. Therefore, if you first cut through the contour, then the part will shift slightly, having lost contact with the billet mother. A similar effect is observed even if the perimeter is not cut out completely, leaving small adhesions with an external contour.
The exact part will be obtained only if all the holes and grooves were first cut in the workpiece, and only then the workpiece was cut into final parts. PB - this is not the case, reconcile yourself and stock up with a sharp knife, file and sandpaper.
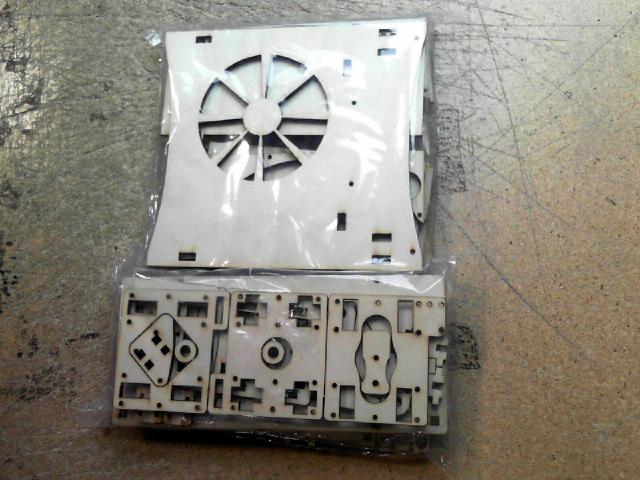
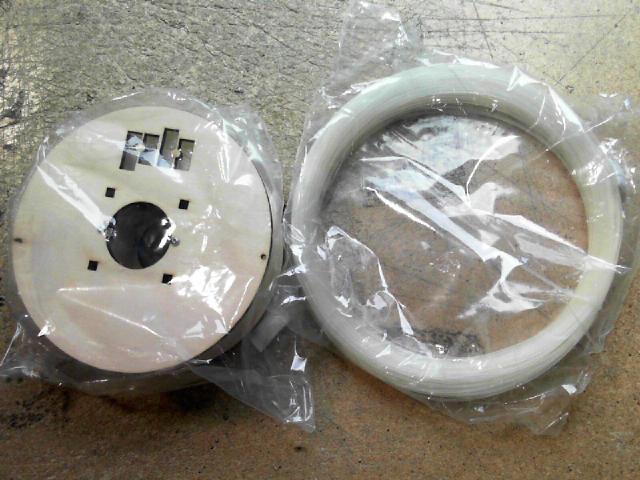
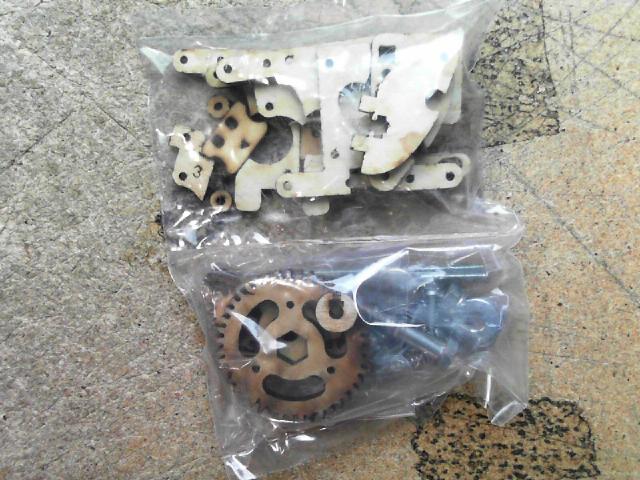
Examples of blanks PB
1
2
3
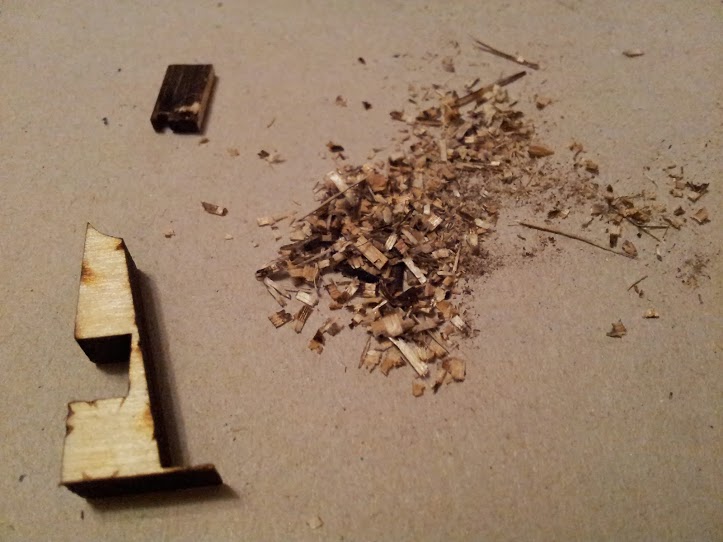
And the amount of waste after processing the first half of the parts
Now directly on the assembly of "sandwiches".
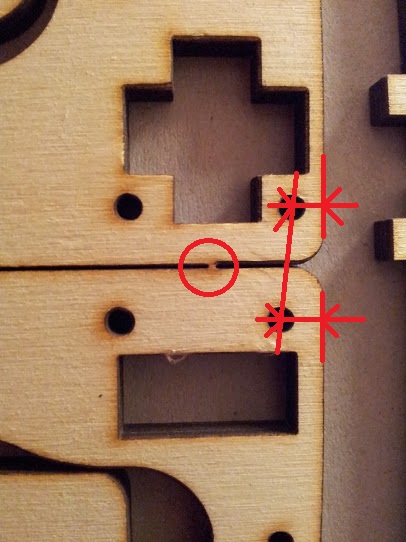
Sandwiches in their bulk should be collected mirror-like. Those. Larger diameters with larger ones, smaller with smaller ones.
If identical symmetrical parts are located at different ends of the printer or axes, then it is also mirrored. Otherwise, you lose alignment.
The exception is the same, but not mirror-made parts (I came across a couple of these at the base of the printer). Those. those parts that are identical and installed symmetrically on the printer, for example, the base box walls, but on the workpiece they were not mirrored and sawn up ... not upside down ... well, you understand - in this case the parts should be placed just in series, otherwise , again, the alignment is broken and the “box” will become a curve and the following parts will no longer exactly fall into each other’s grooves. You will be tormented, but they still will not get. And the box you can’t take apart - it is glued. You all carefully taped? Here. In this case, only cutting the excess parts will save.
Parts with holes should be worn on the axles with exceptionally smaller diameters. Moreover, if you are dressing a sandwich, then you should prepare it with larger diameters to larger, respectively. This will give greater rigidity.
All holes are recommended to be preliminarily walked with a drill of the corresponding diameter, manually, one or two turns, no more! The fact is that after laser cutting, the edges of the parts and holes are covered with a carbon layer, which is an excellent protection of wood in the case of rubbing parts (extruder gears). Therefore, to remove this layer is categorically not recommended, even despite dirty hands. In addition to light plywood, the black contour gives aesthetic beauty.
On the other hand, the carbon layer slightly changes the size of the part, which in the case of holes reduces the diameter. You can of course take into account the dimensional error during the cutting process, but the coal layer is not eternal and easily crumbles. As a result, again, lose in size, the axis will begin to stagger. It is best to walk a couple of times with a drill and push it onto the axle in interference. And do not forget to drip glue.
By the way
The information that the holes and parts have different diameters and sizes on the outside and inside, in the instructions pops up exactly closer to the end of the second third, when you have already assembled most of the printer incorrectly.
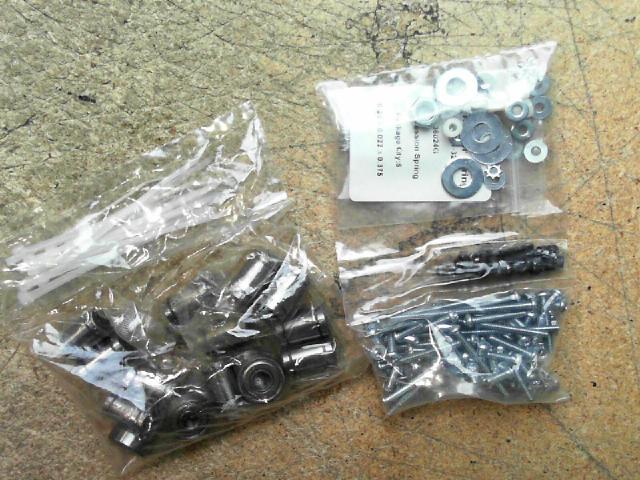
Another point. American products have half inch sizes. In my particular case, all the screws and nuts, including the threads on the rails, were inches. The holes were metric, under 8mm.
The bolted heads, in half the cases were cross-shaped, and in half the inner sprocket was very small. It is better to get a set of small stars in advance.
Very useful tip: glue everything that can be glued. PVA for in this case fits perfectly. He perfectly glues plywood, fills the voids and even manages to lie on the greasy, oiled axes, forming a hard crust and preventing backlash and loosening.
By the way
PVA glue is really perfectly diluted with oil, it does not spoil it. This effect is used by artists when PVA is added to oil paints for better adhesion and adhesion.
Edging with a sharp knife, if necessary, is preferable to a sandpaper or file. Less dirt.
Before processing wooden parts, it is recommended to paint everything at once with wood impregnation. This will give a unique color to your printer and bind the carbon layer on the edges. Plywood will not dry out during operation and will no longer get dirty. Impregnated edges will be less prone to chips, especially on the teeth of gears.
About gears
I got the first version of the PB Jr v1. This version uses two wooden gears in the extruder.
One on the motor shaft, glued in four parts.
Inside two smooth rings on the leg, a nut is pressed in, into which a locking screw will be screwed through a hole in the right side.
The second, large, is assembled in two parts and sits on the shaft of the ribbed bolt, which extends the bar.
In order to prevent the large gear from rubbing the inner side against the bearing, it is recommended to make a shallow, 1 mm groove under the diameter of the outer ring of the bearing.
For these purposes, a home burner is ideal, for one and childhood remember, and show the child.
As a result, the load on the gear pair will significantly decrease, which will significantly increase the resource of the extruder and especially the gears themselves.
In the future, when mastering high-resolution printing, I recommend not putting off printing several sets of plastic gears yourself, it is possible from PLA. They will last longer and improve print accuracy.
You can choose a model to taste here , but I recommend it with oblique teeth.
If you can’t refuse the captivating beauty of the wooden gear mechanism, which happened to the author, I recommend immediately treating the gears with WD oil immediately after installation and repeating this procedure periodically. Do not worry, the plywood will not stick out, but it will swell just enough to exclude the slightest backlash in the pair. In addition, the oil edges of the large gear will be much less likely to chip.
With the big gear there is another nuance. In earlier models, it was glued from two parts of plywood, and the thickness was the same as the small gear. In later models, the large gear became single and, due to the increased load on the tooth area, began to wear out faster, not greased teeth simply chipped before our eyes.
And one more nuance. A large single gear is positioned relatively small not in the middle, but with an offset to the outer edge of the small gear. In this case, in no case glue the small gear with small diameters inward, only outward! This will transfer the maximum load on the tooth of the large gear from the outer edge closer to the middle.
Break
Dear Reader!
Starting from the gears, I smoothly moved from the prologue directly to the assembly of the printer parts. However, the volume of photographic materials and text advises me to interrupt so that this reading does not cause you to prematurely reject it.
In the next article, and this will be a continuation of the second part, I will try to complete the assembly of the printer, carry out calibration and begin practical use.