DIY bioprinter
- Transfer
- Tutorial

From a translator: This guide will help you create a bio-printer from improvised materials (not to be confused with a 3D bio-printer !!! , more on that next time).
Bioprinting is the printing of biological materials. Think of it as 3D printing, but with compressed ingredients! Much work has been done by research laboratories and large companies, such as Organovo, which deal with the printing of human tissues and organs, in order to test drugs, and transplant organs to people.
All this sounds incredibly complicated, but the fact is that the basic technologies are widely available - all this is based on inkjet and / or 3D printing! So we are at BioCurious We decided to play with this technology ourselves - and the BioPrinter Community project was born!

Step 1: Parsing an Old Inkjet Printer
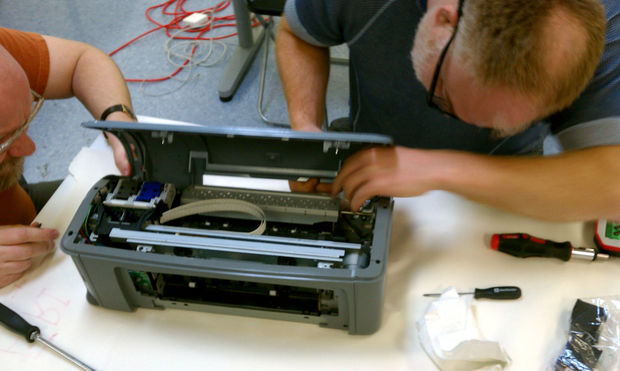
We take an old inkjet printer, in our case HP 5150, but almost any one will do. You can simply tear off all the plastic covers, but make sure that the reset button on the front panel is still working.
It has a small high-speed switch that monitors whether the lid is open. After removing the cover, you need to lock this switch in the on position. manually, using a toothpick or gluing a small piece of plastic, in general, turn on the fantasy.
Also inside there is a high-speed paper feed mechanism switch that determines if paper is loaded. You need to do the same with him.
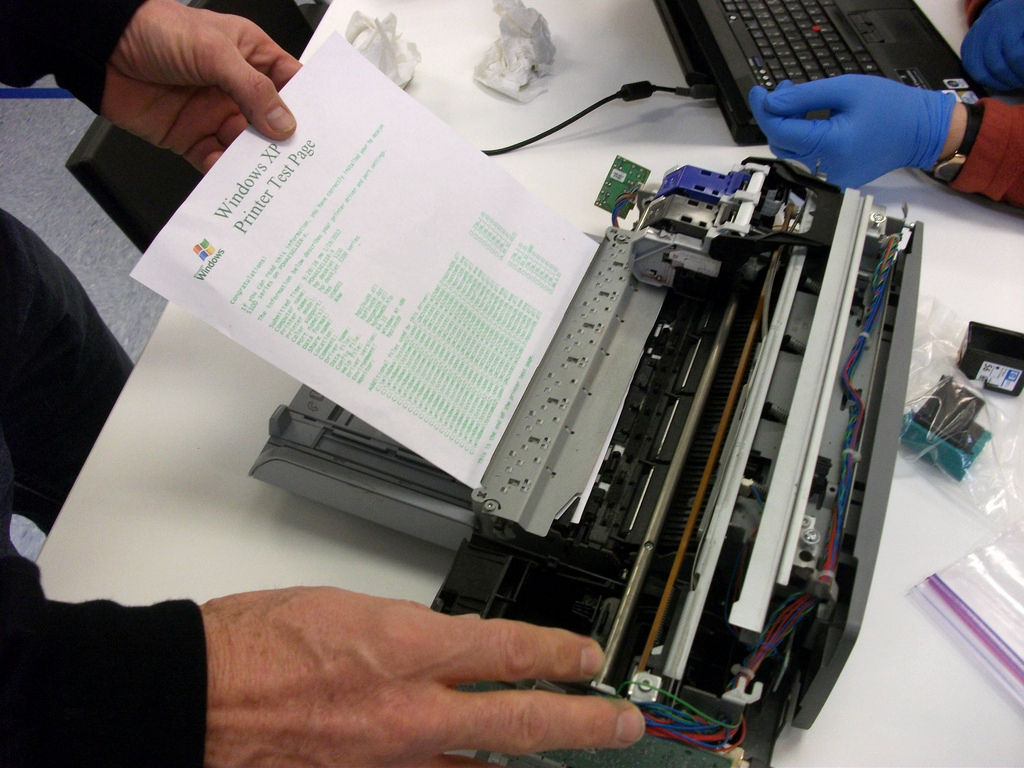
To make sure everything is done correctly, print a couple of sheets. It’s interesting to see how a disassembled printer prints.
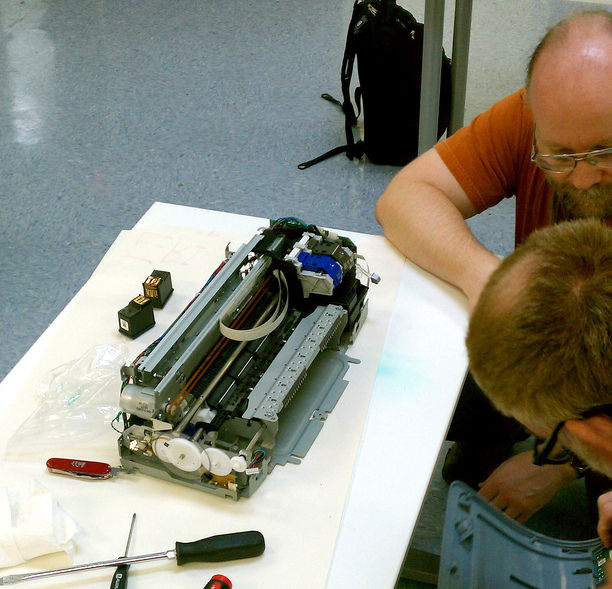
The next task is to open the cartridge to replace the ink with something more organic. It is better to take a new cartridge, whose nozzles are not clogged yet, but you can try the old one, just turn on the head cleaning mode before use if the printer software allows it.
After removing all the stickers, you will see that most cartridges have a glued cover with a small ventilation hole for air supply during ink leakage. The cover must be removed with a knife or a special tool, just keep in mind that in the future the cartridge will need to be reinserted into the printer.
As soon as you open the cartridge, you will see that the entire tank is occupied by a small sponge that holds the ink in place. Color cartridges have separate ink compartments with their sponges (usually cyan-magenta-yellow, not red-green-blue, since printing colors on white paper is a process of subtracting color). You can squeeze out the remaining ink and save it for later experiments (e.g. paper chromatography). Then rinse, rinse, and rinse the cartridge again with distilled and deionized water so as not to clog the print head with mineral residue. No matter how well you wash it, it is unlikely that you can wash everything, so fill it with a cartridge of distilled water and print something, then again and again until the smallest ink particles stop coming out.
Now you need something to fill our cartridge. It all depends on your imagination. We decided to start with something simple, and not jump right into the print of living cells. We decided to print something using an arabinose solution on filtered paper.
We decided to print using a solution of arabinose on filter paper. Then we cut it out and put it on an agarose plate, with a grown film from Escherichia coli, which provoked the transfer of pGLO plasmids. This plasmid contains green fluorescent protein (GFP), under the control of an arabinosensitive accelerator.
As a result, where we printed arabinose on filter paper, we saw under ultraviolet radiation the green light emitted by E. coli! Please note that the beauty of this experiment lies in its simplicity (approx. translator: yes, yes, yes ... we could have come up with something more interesting ): we just had to print with a simple solution of sugar, and not with large living cells, and on paper, so we don’t even have to change the technology of working with paper. You can also try printing with antibiotics or even proteins, such as enzymes or growth factors.
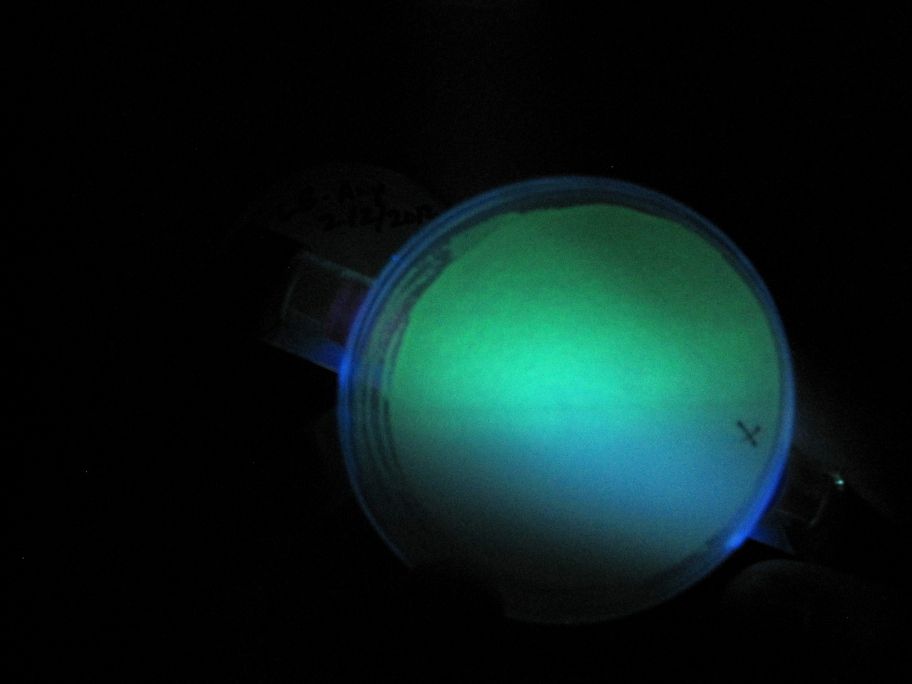
In the first photo, we printed half the page with arabinose ( Note by the translator: I need to take a closer look, sympathize with color blind people. ).
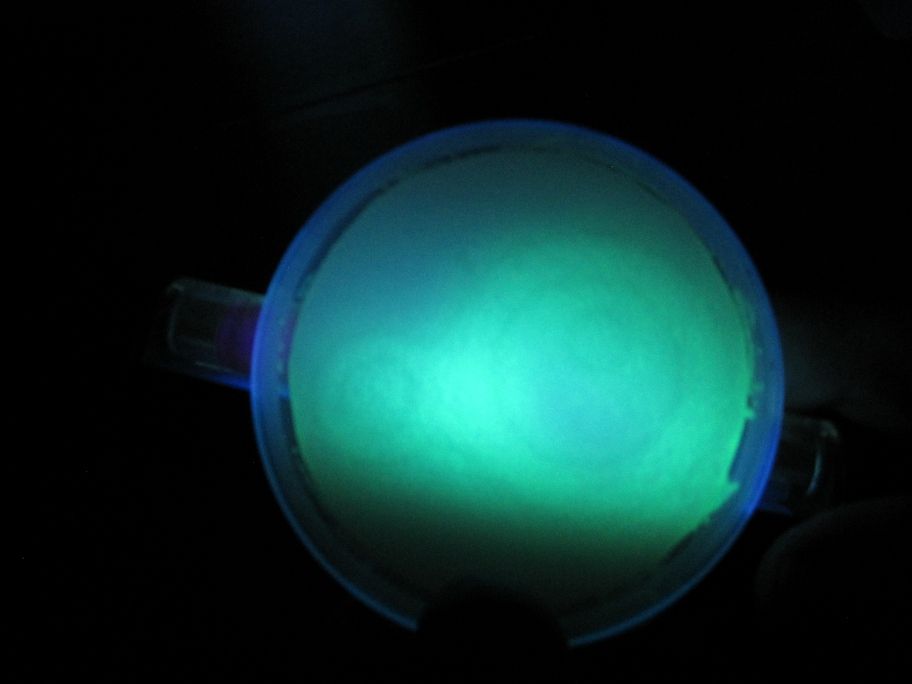
And in this photo we printed the eyeball logo. Unfortunately, the sharpness of the image is poor.
Step 2: Problem - Existing Printers Are Too High Resolution
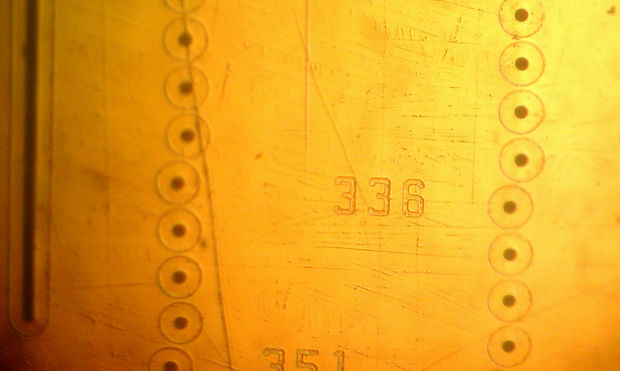
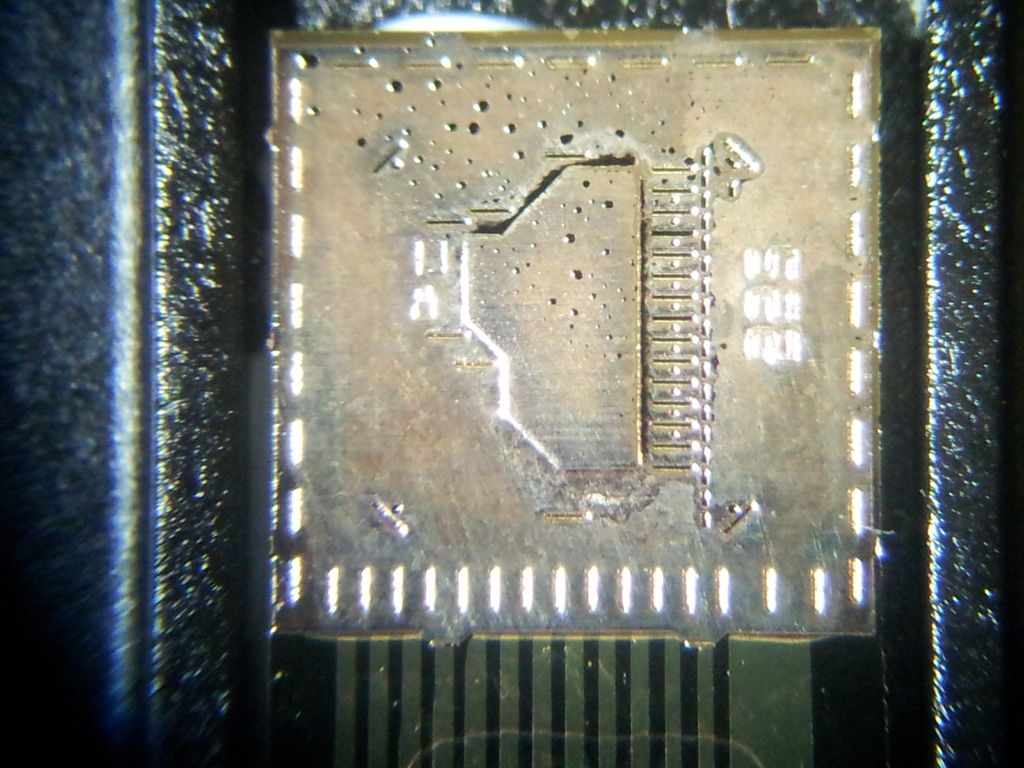
We spent a lot of time looking at the inkjet printheads under the microscope. The silver strip at the bottom of the cartridge is called a nozzle plate. These are just stainless steel tapes. In this cartridge, the nozzles are arranged in four rows, of which you can see two in the first image above. The nozzles are actually numbered from 1 to 416. 416 nozzles in the print head that is approximately 1/3 inch out to 1200 dpi.
Now, 1/1200 per inch means an interval of 21 microns. In addition, the nozzles themselves are actually about 23 microns in diameter. This is about the size of a eukaryotic cell - Ouch! We should still be able to print much smaller E.coli cells (~ 1 μm in diameter) from this printhead, and possibly yeast cells (~ 10 μm in diameter).
But wait - that’s not all!
When you remove the metal plate of the nozzle, you actually get the capabilities of the print head - a miracle of engineering silicon, which includes both bulk, microscopic heaters that evaporate part of the ink in a thermal inkjet printer, and a bunch of built-in electronics. A great target for advanced microscopes!

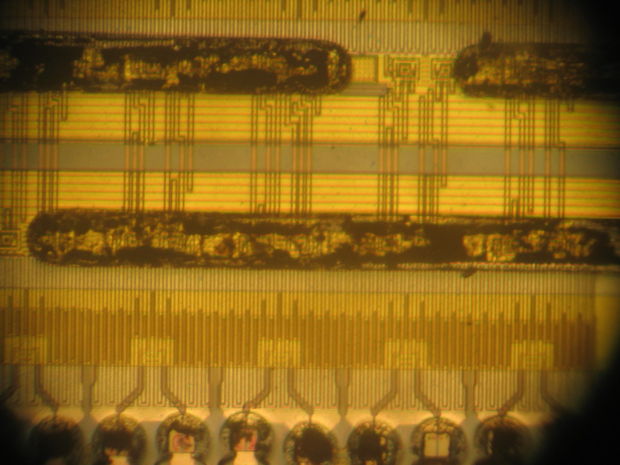
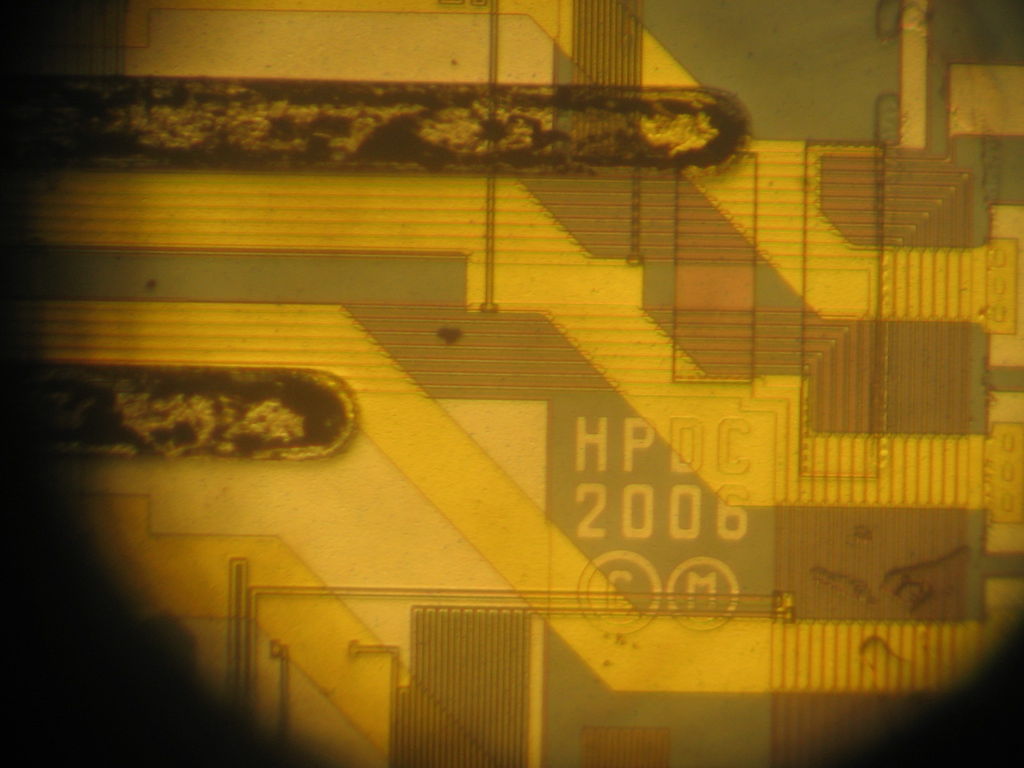
The last image excites us much more. There seems to be a filter integrated into silicon located between the ink tank and the print head! According to the microscope image, we evaluate the holes in the filter, about 3 microns in size, which may not be enough even for E. coli cells!
In addition, using a commercial printer I have to change the entire path of paper movement, in addition, existing drivers provide limited options for controlling the print head, unless of course the drivers are adapted for Linux.
So let's create our own printing platform, over which we will have full control.
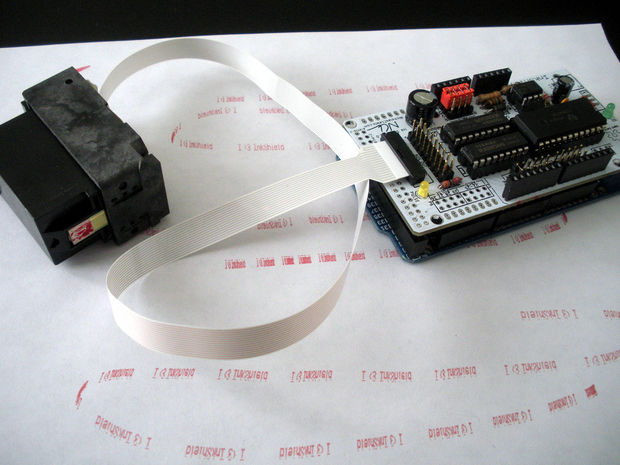
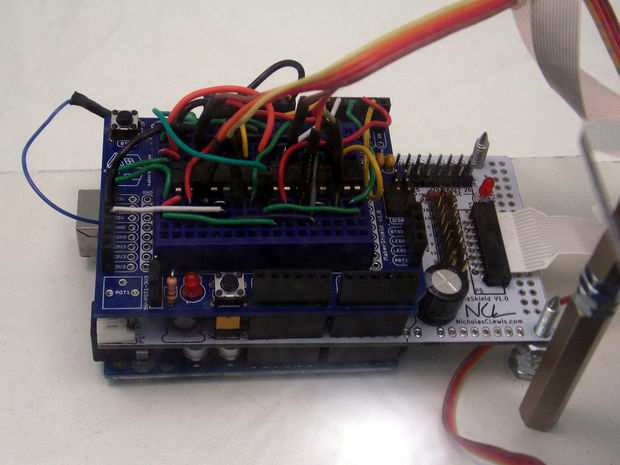
Step 3: Use the InkShield Printhead
So, it seems like we won’t be able to print anything more than yeast cells using the latest generation of inkjet printers. And we are not able to print even yeast or E.coli cells with an inkjet cartridge on this printer!
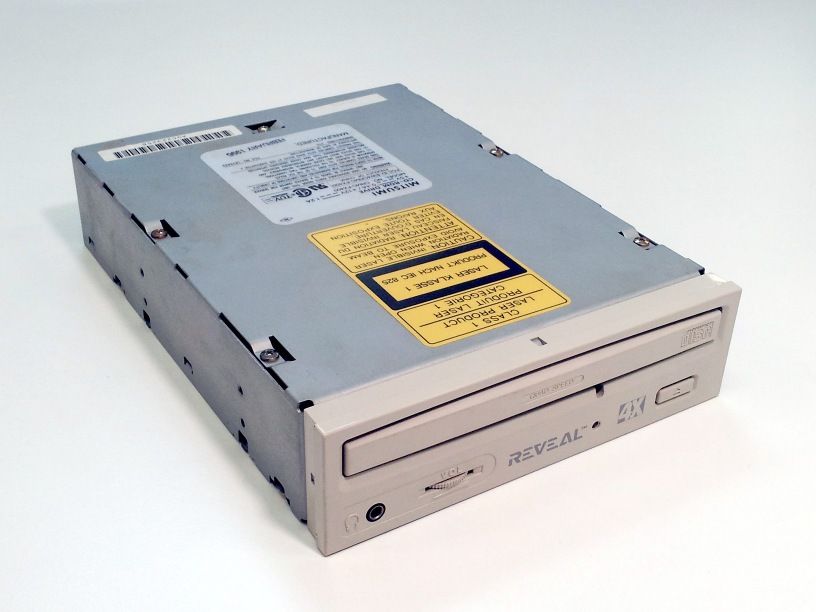
Another way is to use ancient HP printers with a resolution of 300 dpi, and nozzles supposedly about 80 microns in size or so, which should be enough to print human cells. For example, the HP DeskJet 500, which reached us from the 90s. Good luck finding this antiques.
Right now, the Parallax Inkjet Development Kit and HP 51604A cartridge allow you to print at 96 dpi, the problem is that they were discontinued a few years ago.
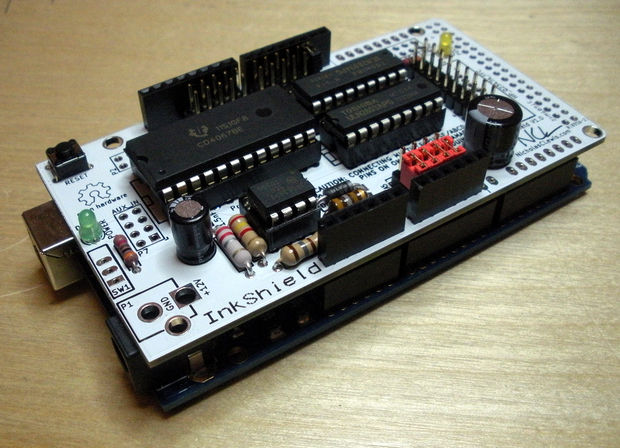
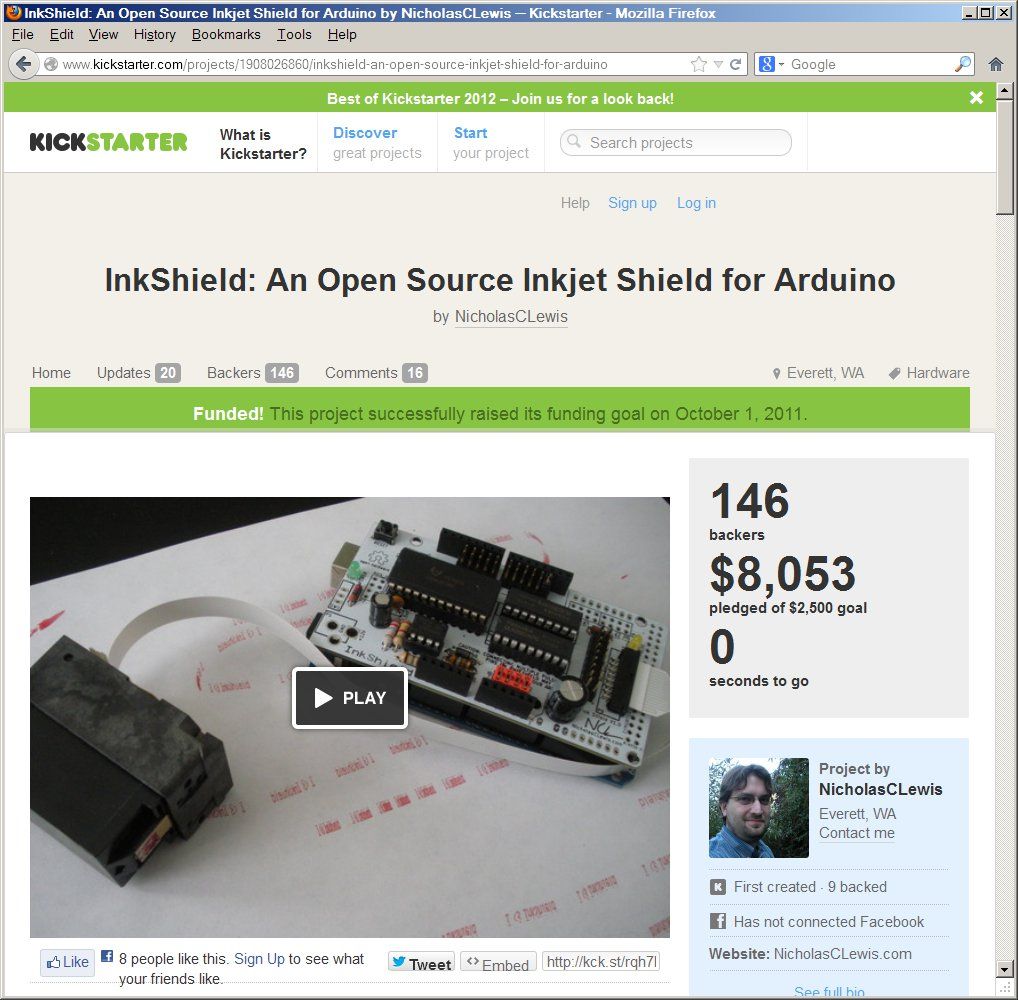
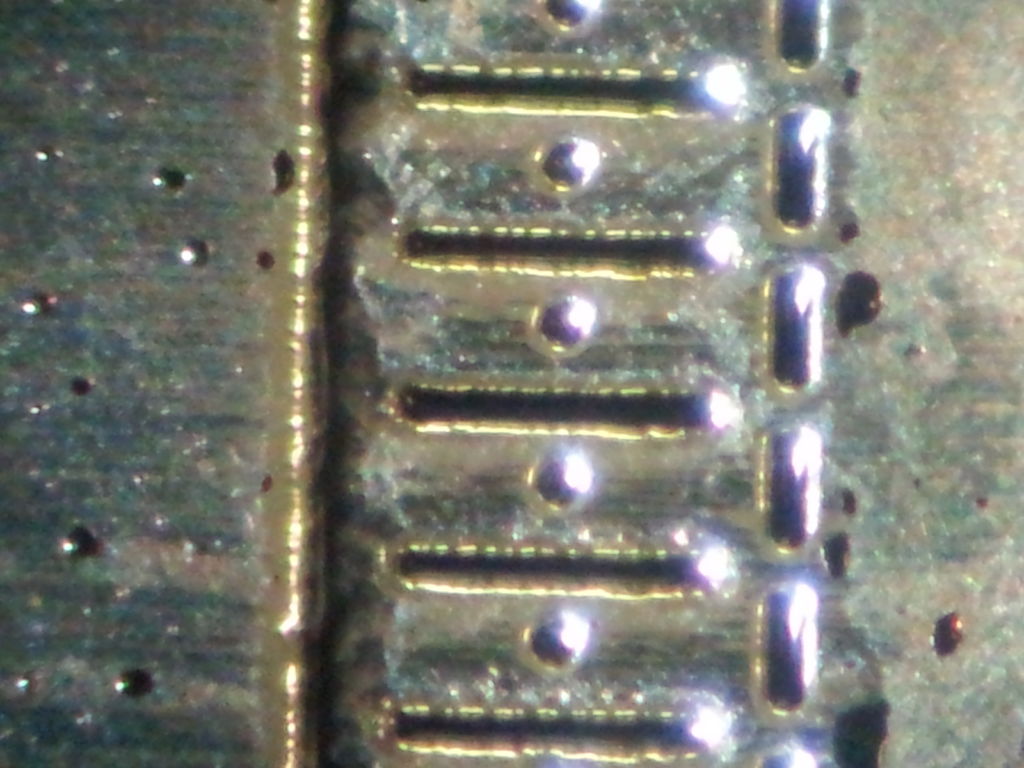
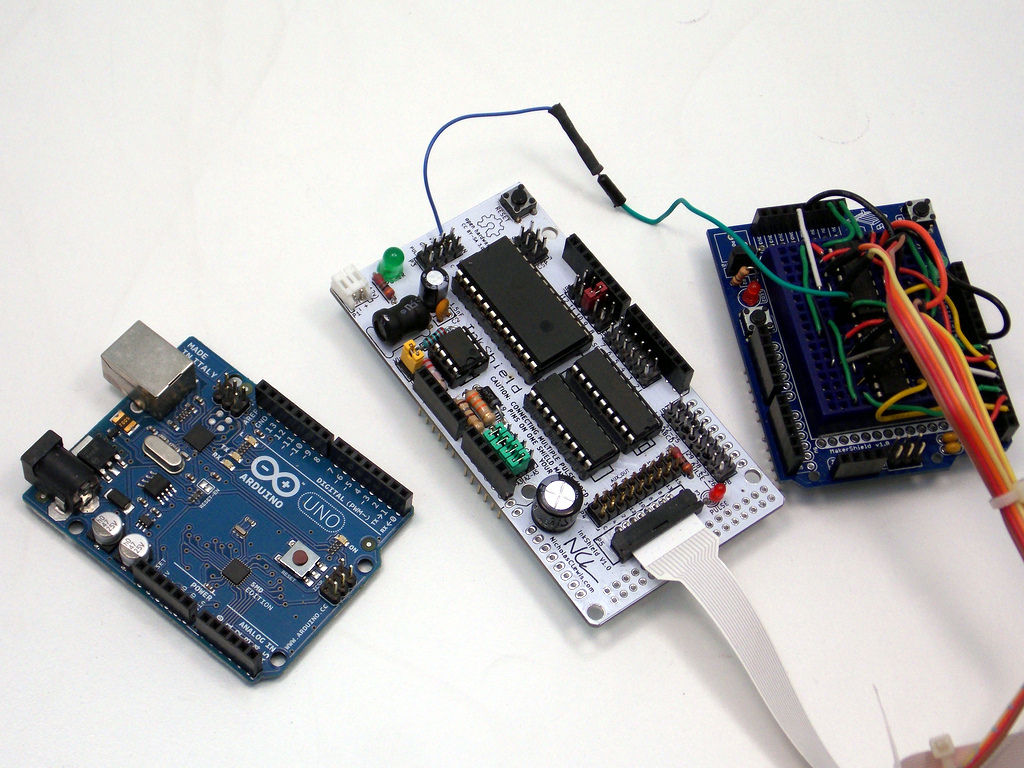
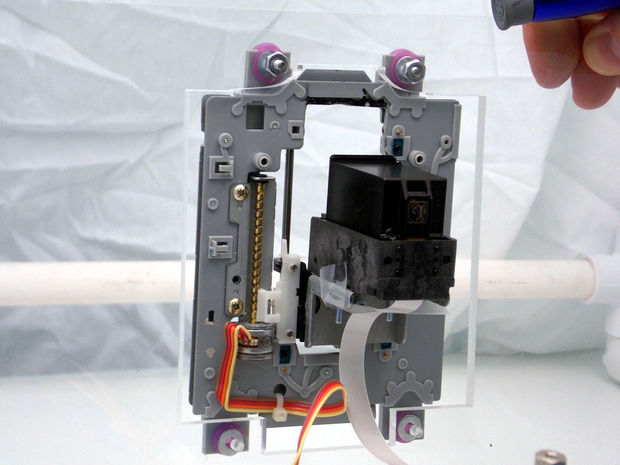
Luckily for us, Nicholas Lewis acknowledged the need for a DIY inkjet printing platform, and launched the Inkshield: An Open Source Inkjet Shield for Arduino campaign on Kickstarter . InkShield is built around an HP C6602 ink cartridge, with 12 nozzles and 96 dpi, designed to print labels on things like cables. 96 dpi equals a step of 265 microns. As you can see in the last image, the actual nozzle diameter is only about 1/3 of the distance between the points, or about 85 microns - just perfect for our purposes!
InkShield is designed to control the Arduino, but needs a higher voltage than the 5V Arduino it receives from USB. Therefore, you must provide 9-12V power through a dedicated power connector on InkShield or through a power connector on Arduino.
Step 4: Version 2: Hackteriabot!
For our second bio-printing platform, we built an XY platform from a pair of old CD drives inspired by the beautiful DIY laser cutter / microfluido platform from our friends from Hackteria:
hackteria.org/wiki/index.php/HackteriaLab_2011_Commons#Micro_Manipulator
hackteria.org/wiki /index.php/DIY_Micro_Dispensing_and_Bio_Printing
hackteria.org/wiki/index.php/DIY_Micro_Laser_Cutter
hackteria.org/wiki/index.php/DIY_Microfluidics#Advanced_DIY_Microfluidics
hackteria.org/?p=1186
diybio.org/2012/06/12/gaudilabalgaepicker
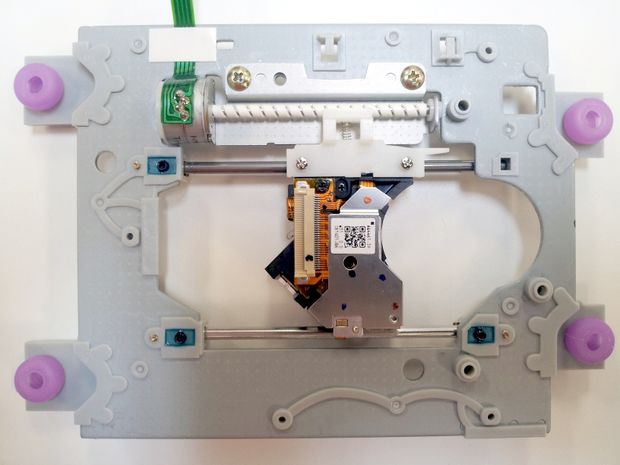
Arranging moving mechanisms moving the head in a CD / DVD drive, at an angle of 90 we get an XY platform with a very small construction area, but with very high accuracy positioning
Using the laser head positioning from the CD drive mechanism to build a high precision XY platform is not a new idea: builders.reprap.org/2010/08/selective-laser-sintering-part-8.html
Step 5: Build the XY Platform from Used Ear Cd Drives
First, we collect a stack of old drives. Open the tray with a paper clip. You may have to go through several drives before you find a stepper motor. At least half of those we dismantled had a DC motor. If someone knows how to distinguish them by sight, then let us know.
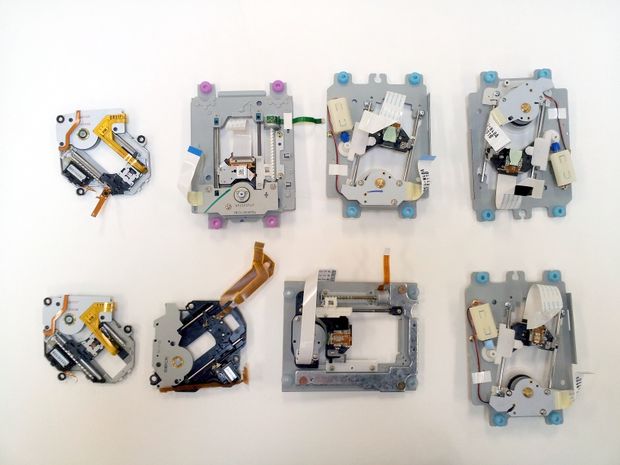
They are easy to distinguish from each other by disassembling the drive: DC have two wires, and Stepper 4 and a short cable.
Unlike direct current, stepper motors are designed to move a certain number of steps, where each step is part of a full turn. This makes it convenient for high-precision positioning, without the need for a feedback system that checks the position of the head. For example, 3D printers typically use stepper motors to position the print head.

After checking some serial numbers online, we came across a well-documented bipolar stepper motor labeled PL15S-020. The remaining engines found are very similar to him, so they probably have the same parameters.
Technical data: robocup.idi.ntnu.no/wiki/images/c/c6/PL15S020.pdf
This stepper motor takes 20 steps per revolution (not many, but enough), and the lead screw has a pitch of 3 mm per revolution. Thus, each step is equal to 150 microns moving the laser head - not bad!
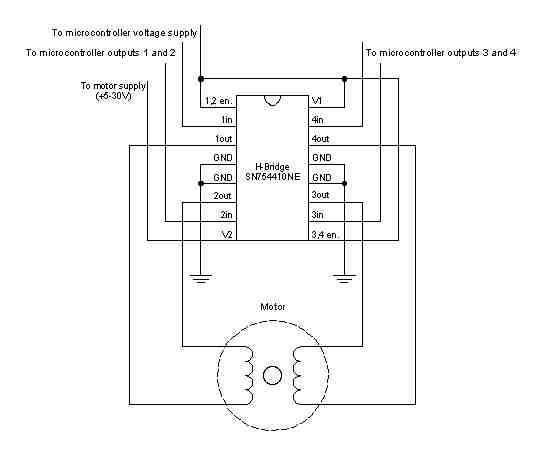
On the Arduino.cc website we found circuits for bipolar stepper motors, as well as sample code for their control. We ordered several SN754410NE H-bridges to implement the circuit shown in the last picture.
Old CD / DVD drives have many other interesting accessories! Including the tray of the opening / closing mechanism, comprising a low-speed DC motor, the spindle motor that rotates the CD, typically has a high-performance brushless DC motor, which can be used in toy planes and helicopters. Plus, a bunch of switches, potentiometers, damn lasers, and even solenoids! In general, remove everything !!!
Step 6: Put It All Together
Materials:
- Two mechanisms for moving the laser head with stepper motors (preferably the same) from old drives. Cost: a few dollars apiece.
- One InkShield kit, with cartridge and cartridge holder. Cost: $ 57
- Optional: Optional HP C6602 Ink Cartridge. Cost: $ 17
- Arduino Uno. Cost: $ 30
- Two SN754410NE H-Bridge Motor. Cost: $ 5
- Arduino prototyping kit and / or tiny breadboard. Cost: $ 4-21
- Wires, screws, racks, housings. Cost: from free to $ $ $, depending on the imagination.
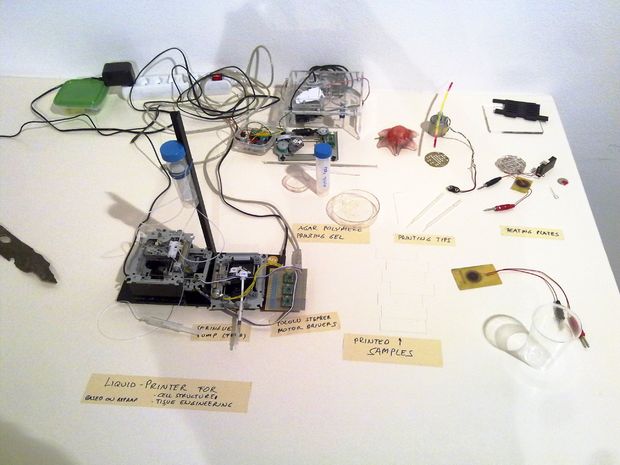
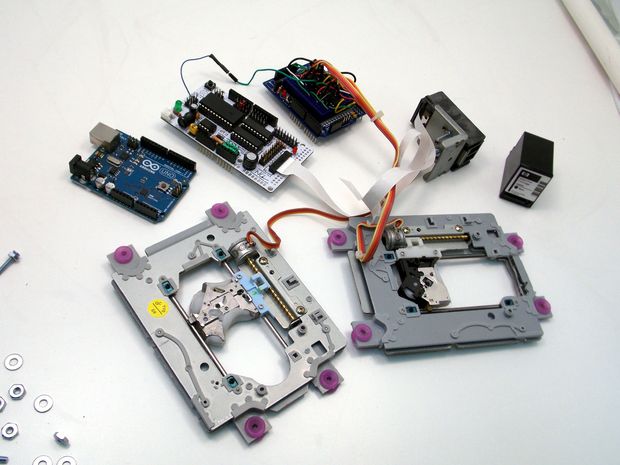
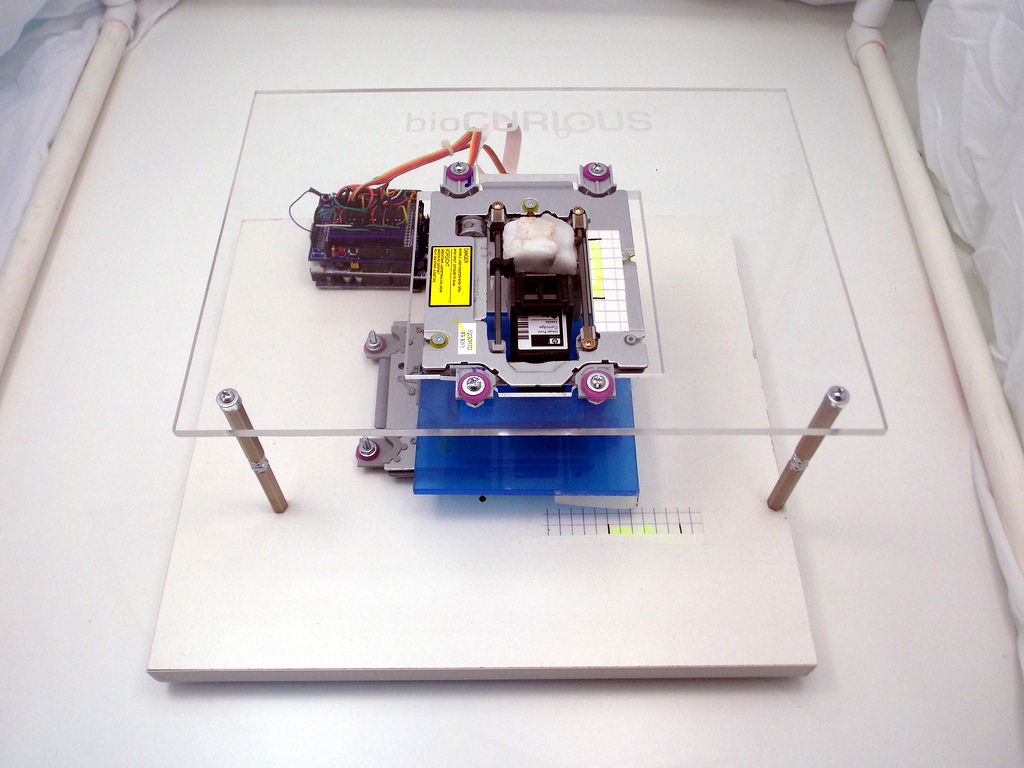
Total production costs amounted to about $ 150, including the cost of delivery and processing of parts. The photo above shows two different models. The second version has a top plate made of high-quality acrylic and a large internal space.
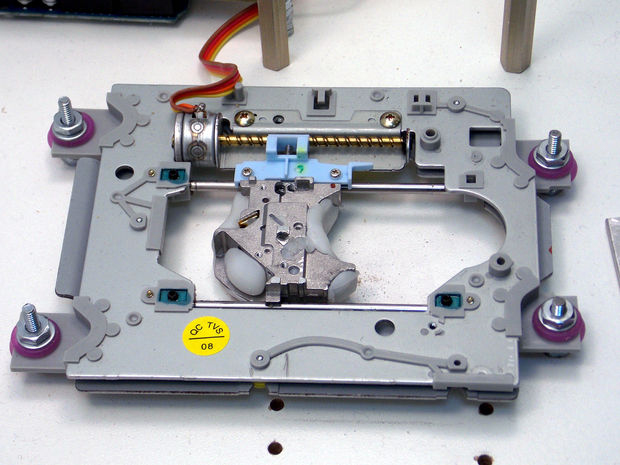
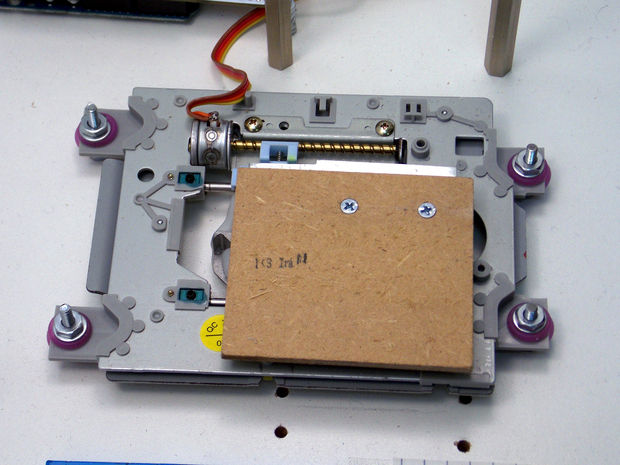

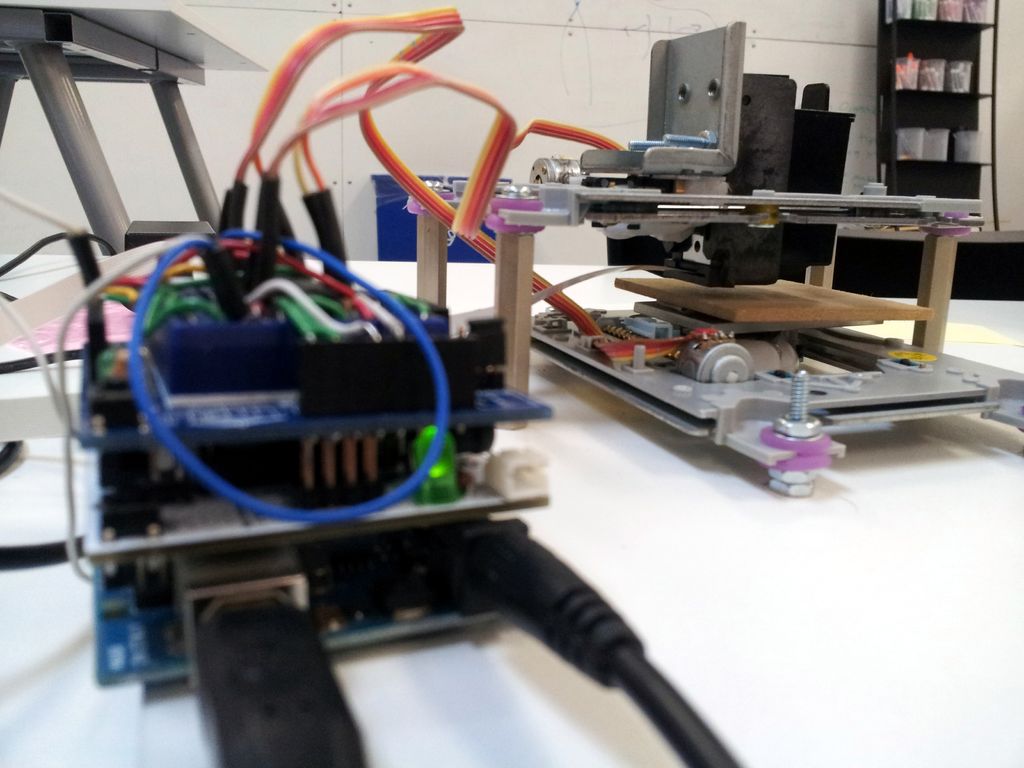

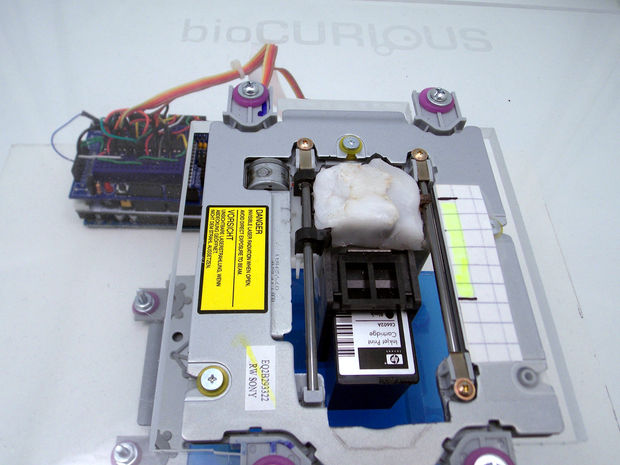
The mechanism for moving the CD drive, located below, moves the blue plate on which you are printing something (for example, an agarose plate). The top drive mechanism, mounted at right angles, moves the inkjet print head. We used Shapelock and some screws to attach the lower platform to the laser head, and mount the cartridge holder to the upper laser head. The electronics consists of an Arduino Uno at the bottom, a white InkShield (connected to the inkjet cartridge holder with a nice white ribbon cable), and a protoplat with stepper motors at the top.


Paper strips from checkered paper on the lower and upper platforms allow us to track the position along the X and Y axes. The total print area is about 1.5 inches in both directions, with a resolution of 150 microns in one step. It should be noted that the resolution of the stepper motors is similar to the resolution of the print head: 96 dpi 265 microns step, but the dots of the printed print head are clearly separated - more like 150-200 microns.
Step 7: Success
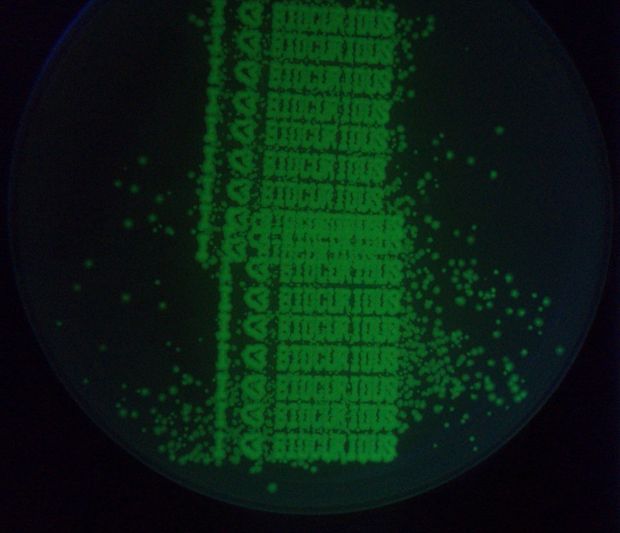
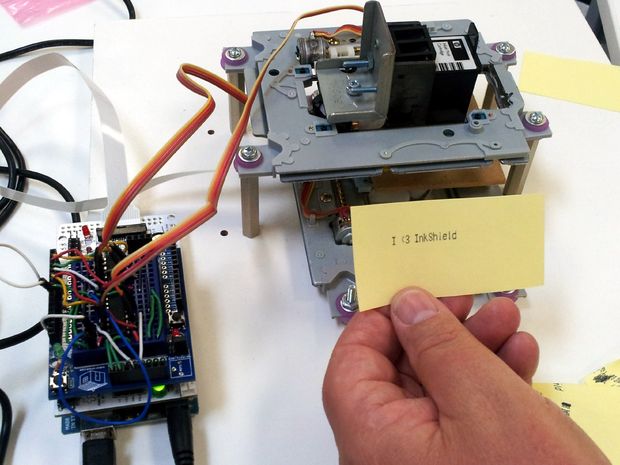
This is our first truly working Bioprinter . We refilled the E. coli + pGLO liquid culture cartridge. Lightly modified the “I <3 InkShield” DEMO Arduino that came with InkShield and printed a couple of lines of “I <3 InkShield” again and again on an agar plate. The agar was filled almost to the top to minimize print distance.
As you can see, E. coli live cell printing works great! We probably let the bacteria colonies grow longer than necessary, so the letters blur a bit. We got a spray of small colonies at the corners of the cage - probably due to some spray from the inkjet head. We can improve quality by adjusting the viscosity or density of the culture cells loaded in the cartridge.
But overall, not bad for the first time!
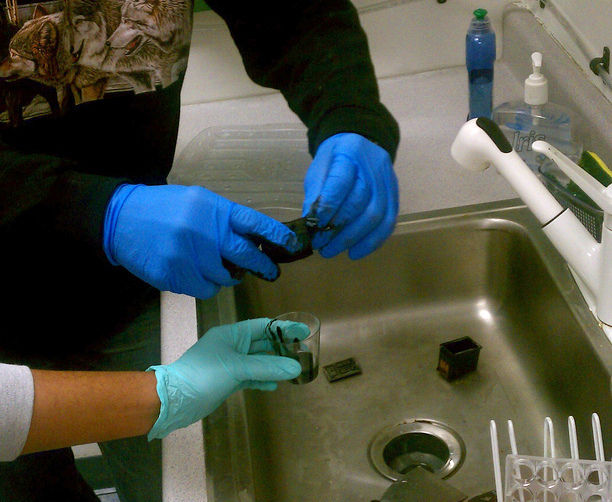
After printing, we sanitized the surface and the inside of the cartridge with bleach, and then passed a little bleach through the head. Then they washed everything with distilled water.
It would probably be a good idea to invest in an ultrasonic jewelry cleaner that can destroy organic matter in the most inaccessible places.
Step 8: Lesson Learned and Future Plans
We turned to this project with almost zero experience with Bioprinting, stepper motors, inkjet cartridges, and even Arduino programming! Therefore, of course, not all of our actions were optimal. Here are some things that we could do differently next time:
- By studying the operation of stepper motors, we got really valuable experience, but we could save a lot of time and effort by adapting some of the RAMPS (RepRap Arduino MEGA Pololu Shield) technologies that were already well developed precisely for this purpose in the 3D printing community. In particular, the Pololu stepper motor already had built-in microstepping capabilities.
- Building your own XY platform is great! But we use these stepper motors for what they were never intended for, which is beginning to manifest itself. We are already getting some problems with the sometimes missing lower stage, apparently due to the frequent manual discharges that wear out the plastic parts. It was easy enough to buy new stepper motors to hold them, add a few microswitches for end stops, and a position reset function code in the software.
- As soon as you start searching for new stepper motors and RAMPS electronics, the question arises, why not start right away with 3D printers instead? If we are tired of our current version of the bioprinter, then, probably, because of the chosen direction. The cost is likely to increase by an order of magnitude, and so, though ...
- The presence of one printhead has its limitations. If we really wanted to do some tissue engineering, we would like to be able to print several types of cells. We could potentially put two ink cartridges to each other. Big Boys solution in this area is to use syringe pumps. Imagine having several syringe pumps near the printer, each of which feeds its print material through a thin tube, and the needles are mounted on the print head. Keep for updates…
Now the elephant is in the china shop ... What the hell are you doing with your own bioprinter ?! I do not think that BioCurious will ever compete with companies such as Organovo in terms of printing human tissues or organs. On the one hand, the content of animal cells takes much more effort. Plant cells are much easier to work with! I don't want everything to go to waste, so stay tuned for some of our next tutorials!
Meanwhile, here are a few ideas:
- Printing gradients of nutrients and / or antibiotics onto a layer of cells to study combinatorial interactions - or even to select different isolates from a sample from the environment.
- Printing patterns of growth factors on a layer of eukaryotic cells to study cell differentiation.
- Printing of two or more types of microorganisms at different distances from each other to investigate metabolic interactions.
- Setting up the computational task as a 2D model of the construction of a microorganism on an agar plate.
- Study of reaction-diffusion systems.
- Printing of 3D structures using reprinting of layers. Now you can consider making everything higher in 3D!
- Print cells into a solution of sodium alginate, on a surface saturated with calcium chloride, to create 3D gel structures (similar to the spherification process in molecular gastronomy)
- Any other ideas? Leave them in the comments!
Step 9: Added: So what do you want to do for real science?
The bioprinter shown here is obviously just a prototype. But since we had very serious requests for using this in academic laboratories, here are some recommendations:
- The Dolphin Dean team at Clemson University works on Bioprinting using a modified HP DeskJet 500. Definitely watch their video on JoVE on Creating Transient Cell Membrane Pores Using a Standard Inkjet Printer! A lot of information on how to deal with inkjet printers used as laboratory equipment, how to clean cartridges, prepare appropriate cell suspensions, and some intriguing non-3D printing applications.
“We have not yet received satisfactory evidence that HP C6602 cartridges can print eukaryotic cells.” We believe that this is most likely due to clogging of the print head with cell decay products. We will keep you informed about the use of ultrasonic cleaning systems ...
- Printing may take several minutes, so keep the printer in a hood to avoid contamination.
- Wrap the electronics in cling film or build a housing to keep it dry and clean. Everything else can be wiped with bleach after use.
D'haeseleer, P. (2013, January 22).