We write a plug-in for XBMC with its own interface: part III - API and micro-framework
- Tutorial
Introduction
This is part III of a series of articles on writing plugins for XBMC with its own interface. In the previous parts ( part I and part II ), I talked about the basic principles of creating the XBMC plugin interface and gave some simple examples. In this part, I want to talk very briefly about the various APIs for interacting with XBMC, to demonstrate the micro-framework I wrote that simplifies the layout of the interface.
Update as of November 3, 2014: while writing the first two parts, I promised to write the third part of the article soon. But, unfortunately, life makes its own adjustments, and the writing of the 3rd part had to be postponed until better times. Now I will try to fulfill the promise, although not fully: the story about the micro-framework will be somewhat simplified.
API
A story about writing plugins for XBMC would not be complete without at least a brief talk about the various APIs that enable plug-ins to interact with XBMC. So far, the articles have dealt with APIs for creating an interface, but plugins need to perform other tasks: obtaining information about media files, controlling playback, etc. There are 4 main APIs for performing these tasks in XBMC: Python API, built-in functions (built-ins), JSON-RPC protocol and Infolabels. Next, we will talk very briefly about each of them.
Python API
A set of 5 Python modules: xbmc, xbmcgui, xbmcplugin, xbmcaddon, xbmcvfs for interacting with XBMC. Modules are written in C ++ using the Python-C API (SWIG). Below is a brief overview:
xbmc - general interaction with XBMC;
xbmcgui - interaction with the GUI;
xbmcplugin - organization of content source plugins;
xbmcaddon - access to various plug-in parameters (settings, language files, etc.);
xbmcvfs - work with the file system.
Built-in functions
A set of commands for managing XBMC. To call the built-in functions, it is not necessary to write program code: they can, for example, be attached to a button on the remote control or keyboard by editing the corresponding configuration file. A list of built-in functions can be found here .
To call built-in functions from Python scripts, there is the xbmc.executebuiltin () function.
JSON-RPC Protocol
Protocol for local and remote control of XBMC based on JSON-RPC. Provides extensive interoperability with XBMC, including two-way communication. Read more about the JSON-RPC protocol in XBMC here .
For local management and exchange of information via the JSON-RPC protocol, the xbmc.executeJSONRPC () function is used. In addition, the json module is included with the Python standard library to simplify processing of JSON strings.
Remote interaction with XBMC on other computers can be done using the urllib2 module of the standard library.
Infolabels
API for receiving various information from XBMC. A list of all available Infolabels can be found here .
The function xbmc.getInfoLabel () is used to request information.
The capabilities of these APIs partially overlap, and the same operation can often be performed in different ways.
Note: up to version 11.0, XBMC also had a Web API that allowed you to control XBMC using commands in URL-encoded notations. However, starting with version 12.0, it has been removed due to redundancy, since JSON-RPC provides much more features.
PyXBMCt - microframework for simplifying plugin interface layout
As you can see from the previous parts of this series of articles, the API for creating the plugin interface based on the Window / WindowDialog classes and the descendants of the Control class is not very convenient: you have to operate with absolute coordinates, and the graphic design of the interface rests entirely with the developer.
The idea of creating a micro-framework that would simplify the creation of the plug-in interface (naturally, within the capabilities of the XBMC Python API) was born to me when I wrote my own plug-in for downloading subtitles. In XBMC prior to version 13.0, subtitle plug-ins were completely stand-alone scripts, and the creation of the interface was the responsibility of the developer. By the way, in version 13.0 the architecture of the subtitle plugins has been completely changed, and now they work similarly to content source plugins, and the XBMC base code is responsible for the interface (by the way, from the 14th version the media center will be called Kodi).
In order not to bother with the absolute coordinates of the interface elements, I wrote a wrapper around the Window / WindowDialog / Control classes, which implements a similarity of the Grid geometry manager, and decorated the whole thing with textures taken from the default XBMC skin - Confluence. It turned out pretty well, and I decided to make a full-fledged micro-framework based on this. PyQt was taken as a sample, so the framework was named PyXBMCt.
The framework offers 4 base converter classes and 9 ready-to-use widgets, or, as they are called in XBMC, controls. The Grid geometry manager is responsible for placing controls on the screen, and interactive controls are associated with functions / methods similar to the signal-slot mechanism in PyQt. Those familiar with PyQt / PySide should learn PyXBMCt in two ways.
For clarity, consider a very simple example.
Micro-framework PyXBMCt present in XBMC / Kodi official repository, so to use it, you need to add in the File addon.xml your plugin (for more details see the plugin architecture. Here ) the following line:
Now when you install your plugin from a repository or ZIP file, the micro-framework will automatically pull up from the official repository. In addition, in Kodi 14.0 “Helix” it is finally possible to install service plugins manually, and the PyXBMCt plugin can be installed in advance yourself.
As a simple example, naturally, take “Hello World”:
Hello world
# -*- coding: utf-8 -*-
# Импортируем модуль PyXBMCt.
import pyxbmct.addonwindow as pyxbmct
class MyWindow(pyxbmct.AddonDialogWindow):
    def __init__(self, title=''):
        # Вызываем конструктор базового класса.
        super(MyWindow, self).__init__(title)
        # Устанавливаем ширину и высоту окна, а также разрешение сетки (Grid):
        # 2 строки и 3 столбца.
        self.setGeometry(350, 150, 2, 3)
        # Создаем текстовую надпись.
        label = pyxbmct.Label('This is a PyXBMCt window.', alignment=pyxbmct.ALIGN_CENTER)
        # Помещаем надпись в сетку.
        self.placeControl(label, 0, 0, columnspan=3)
        # Создаем кнопку.
        button = pyxbmct.Button('Close')
        # Помещаем кнопку в сетку.
        self.placeControl(button, 1, 1)
        # Устанавливаем начальный фокус на кнопку.
        self.setFocus(button)
        # Связываем кнопку с методом.
        self.connect(button, self.close)
        # Связываем клавиатурное действие с методом.
        self.connect(pyxbmct.ACTION_NAV_BACK, self.close)
# Создаем экземпляр окна.
window = MyWindow('Hello, World!')
# Выводим созданное окно.
window.doModal()
# Принудительно удаляем экземпляр окна после использования.
del window
If everything is done correctly, such a window with a button will appear on the screen:
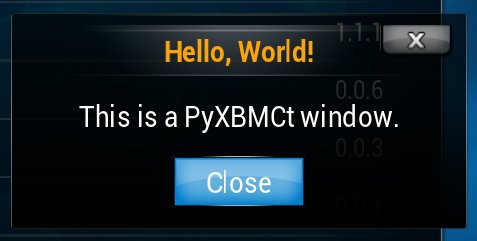
Now, a detailed analysis. To display line numbers, use a text editor with the appropriate function, for example Notepad ++. I think those who are familiar with PyQt / PySide or with other "adult" GUI frameworks will immediately understand what's what, so I skip the obvious things.
Line 13: the self.setGeometry () method sets the width and height of the window, as well as the resolution of the coordinate grid of the parent window in which the controls are placed. The principle is completely analogous to the QtGui.QGridLayout linker. By default, the window is placed in the center of the screen, but if desired, you can specify the exact coordinates of the window in the form of additional parameters for this method.
Line 17: the self.placeControl () method places the selected control in the grid. As in the real QtGui.QGridLayout, the control can occupy several rows and columns.
Attention! Any control instance methods (for example, setLabel () to change the text of the label) should be called only after this control has been added to the window using placeControl (). Otherwise, various glitches are possible, funny and not very.
Line 23: the setFocus () method sets the initial focus to the selected control. If you have any interactive controls, this method is required , otherwise you simply will not be able to control your plug-in from the keyboard / remote control.
If you have several interactive controls, you also need to configure the navigation rules between them (see previous parts).
Lines 25 and 27: the self.connect () method associates the control or numeric code of the keyboard event with the function / method. Naturally, a function reference is used here (without parentheses () ), and not a function call. You can also use lambda here - just like in real PyQt.
You can only link those controls that generate an event when they are activated: these are Button , RadioButton and List . Other controls do not generate events, and binding them is useless.
Numerical codes of events generated by the controls (keyboard, mouse, joystick, etc.) can be found here . PyXBMCt includes symbolic names for commonly used events.
Numeric codeACTION_PREVIOUS_MENU or 10 (the default is the ESC key on the keyboard) is always associated with the close () method that closes the window and cannot be reassigned. This is done so that the plugin window can always be closed.
Line 35: after use, the window instance is forcibly deleted (the destructor of the window instance and all objects associated with it are called). The point here is that the Garbage Collector for some reason does not delete the objects of the xbmcgui classes after the plug-in completes, which can lead to memory leaks. Therefore, open windows based on xbmcgui / PyXBMCt must be removed from memory forcibly.
A practical example of using PyXBMCt can be seen in my ex.ua.alternative pluginwhere the micro-framework is used to create the login window for the site:
Login window on ex.ua
You can learn more about PyXBMCt at the links below (English).
PyXBMCt QuickStart Guide .
Automatically generated documentation of PyXBMCt classes and methods .
PyXBMCt repository on Github .
Topic on the official forum XBMC (Kodi) .
A plugin demonstrating the capabilities of PyXBMCt (screenshot below the spoiler).
Screenshot PyXBMCt Demo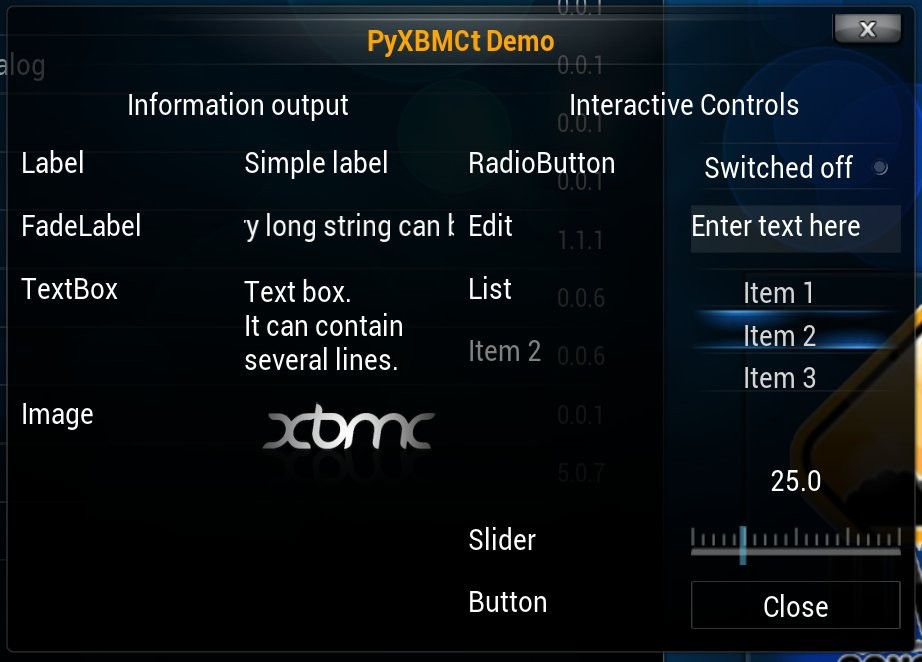
Of course, the plugin interface, created on the basis of PyXBMCt, is inferior in capabilities and "decorations" to the interface based on the XML skin. However, in many cases its capabilities are quite sufficient, and those who are familiar with the “desktop” GUI frameworks, in particular PyQt / PySide, can learn PyXBMCt very quickly.
Conclusion
This concludes the series of articles on writing plugins for XBMC (Kodi). Unfortunately, due to a number of circumstances, the third part comes out with a considerable delay, but, as they say, "better late than never."
PS Added info on InfoLabels.
Previous Articles
Detailed anatomy of a simple plugin for XBMC .
We are writing a plug-in for XBMC with its own interface: Part I - theory and the simplest example .
We are writing a plug-in for XBMC with its own interface: Part II - dialogs and decorations .