Kivy. Xamarin. React Native. Three frameworks - one experiment
Greetings to all! As soon as the smoke from the heated discussion in the comments to my Kivy article - a framework for cross-platform development №1 donkey, and among others a worthy comment came through , we ( Mirimon , SeOd ) thought that it would be interesting for us and the readers to compare Kivy, Xamarin.Forms and React Native, having written the same application on them, accompany it with the corresponding article on Habré, turnips on GitHub and tell honestly who faced what difficulties during implementation. Having gathered in the Telegram and having discussed the details, we set to work.
For this comparison, we decided to write a simple task scheduler with three screens. To make a certain cut of the state of these three platforms today on the example of something more voluminous than the example that we have chosen, in view of the employment of each in our projects / at work / at home, for too long. Despite the simplicity of our application, it will clearly show the principles of application development in each environment, work with data, UI, etc.
Three frameworks are one experiment. Xamarin.Forms. Part 2
Three frameworks - one experiment. React Native. Part 3
This article is the first in the cycle, so you want to start with the TK, which we threw for ourselves, so that the result is similar.
Option TK:
- Notes must be structured by project.
- Notes can be added by different people, so the author of the note should be listed.
- Notes within the project should be added / deleted / edited.
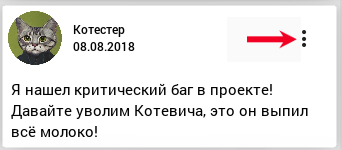
- Notes must be content-sized, but not more than 150 pixels.
- Deleting notes should be both through the context menu of the note itself, and through the swipe
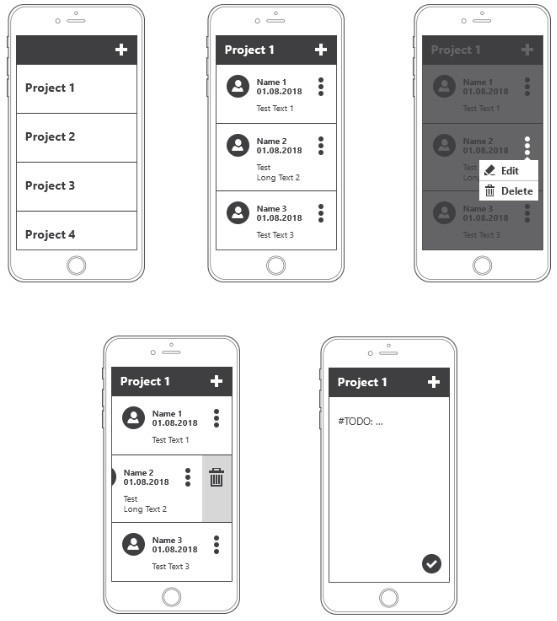
An approximate UI should look something like this:
Before starting, a little Kivy help:
Kivy — кросcплатформенный графический фреймворк, написанный на языке программирования Python/Cython, основанный на OpenGL ES 2, направленный на создание современных пользовательских интерфейсов, больше ориентированный на работу с сенсорными устройствами. Приложения на Kivy работают на таких платформах как Linux, OS X, Windows, Android, iOS и Rapberry Pi. В разработке вам доступен широкий спектр библиотек Python начиная от Requests и заканчивая NumPy и OpenCV. Kivy имеет доступ практически ко всем нативным мобильным API (GPS, Camera, Accelerometer, Google API, если речь идет об Android), посредством PyJNIus (Android) и PyOBJus (iOS), которые автоматически оборачивают код на Java/Objective-C в интерфейс Python.
Kivy быстр. Это относится как к разработке приложений, так и к скорости выполнения приложений. Все критически важные функции реализованы на уровне Cи. Также Kivy использует GPU везде, где это имеет смысл. GPU выполяет бОльшую часть работы, тем самым значительно увеличивая производительность.
Kivy очень гибкок. Это означает, что быстро развивающаяся разработка Kivy позволяет мгновенно адаптироваться к новым технологиям. Разработчики Kivy не раз добавляли поддержку новых внешних устройств и программных протоколов, иногда даже до их выпуска. Kivy можно использовать в сочетании с большим количеством различных сторонних решений. Например, в Windows Kivy поддерживает WM_TOUCH, что означает, что любое устройство с драйверами Windows 7 Pen & Touch будет работать с Kivy. В OS X вы можете использовать устройства Apple с поддержкой Multi-Touch, такие как трекпады и мыши. В Linux вы можете использовать входные события ввода HID. В дополнение к этому Kivy поддерживает TUIO (Tangible User Interface Objects) и ряд других источников ввода.
Вы можете написать простое приложение с несколькими строками кода. Программы с Kivy создаются с использованием языка программирования Python, который является невероятно универсальным и мощным, но простым в использовании. Кроме того, разработчики Kivy создали собственный язык разметки графических интерфейсов, для создания сложных пользовательских GUI. Этот язык позволяет быстро настраивать, подключать и упорядочивать элементы приложения.
И, да, Kivy абсолютно бесплатен. Вы можете использовать его везде! В коммерческом продукте либо в Open Source.
I will give all the application code and show in some detail how certain elements are implemented when developing for mobile platforms. As an IDE, I always use PyCharm , which perfectly supports the syntax Kv Language - a special DSL language in which the UI representation of your application is written. The application skeleton is created using the console tool CreatorKivyProject , which provides basic screens using the MVVM template.
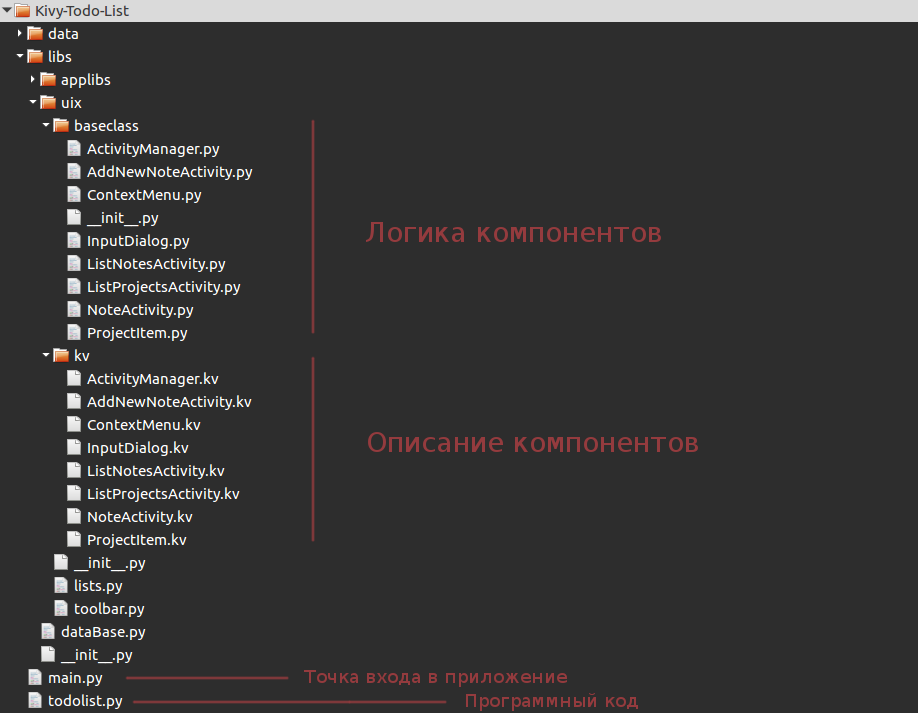
The baseclass folder contains the logic of the widgets and controllers implemented in the Python programming language, and kv contains the interface description files in the Kv Language language . The applibs directory is used for third-party libraries, the data folder contains media content, databases and other data. The main.py file is the entry point of the application. He doesn’t do anything except launching the UI renderer TodoList (). Run () , catching an error if it occurs and displaying a window for sending a report bug, created automatically by the CreatorKivyProject utility , is not related to writing our application, and therefore is not considered.
Filetodolist.py with the program code implements the TodoList class , which loads interface layouts, initializes their instances, monitors the hard keys of the device and returns our first screen, which are listed in the Activity Manager. After TodoList (). Run () , the build function is called and returns a widget that will be displayed on the screen.
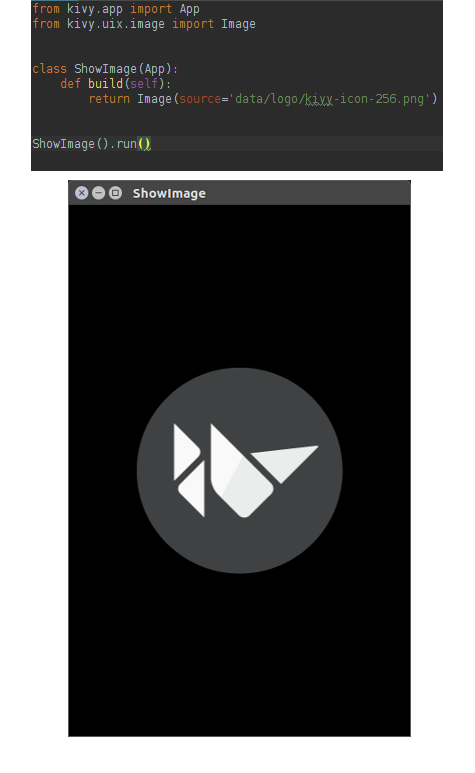
For example, a simple program code that displays one screen with an image will look like this:
And here is the diagram of our application class:

todolist.py:
# -*- coding: utf-8 -*-import os
from kivy.app import App
from kivy.lang import Builder
from kivy.core.window import Window
from kivy.factory import Factory
from libs.applibs.kivymd.theming import ThemeManager
from libs.dataBase import DataBase
classTodoList(App, DataBase):
    title = 'Todo List'
    icon = 'icon.png'
    theme_cls = ThemeManager()
    theme_cls.primary_palette = 'BlueGrey'def__init__(self, **kvargs):
        super(TodoList, self).__init__(**kvargs)
        Window.bind(on_keyboard=self.eventsProgram)
        Window.softinput_mode = 'below_target'
        self.Window = Window
        self.pathToBase = '%s/data/dataProjects.json' % self.directory
        self.nameAuthor = u'Иванов Юрий'defbuild(self):
        self.setDataProjects()
        self.loadAllKvFiles(os.path.join(self.directory, 'libs', 'uix', 'kv'))
        self.rootScreen = Factory.RootScreen()  # стартовый экран программы# Инстансы Activity.
        self.activityManager = self.rootScreen.ids.activityManager
        self.listProjectsActivity = self.rootScreen.ids.listProjectsActivity
        self.listNotesActivity = self.rootScreen.ids.listNotesActivity
        self.addNewNoteActivity = self.rootScreen.ids.addNewNoteActivity
        return self.rootScreen
    defloadAllKvFiles(self, directory_kv_files):for kv_file in os.listdir(directory_kv_files):
            kv_file = os.path.join(directory_kv_files, kv_file)
            if os.path.isfile(kv_file):
                Builder.load_file(kv_file)
    defon_start(self):
        self.listProjectsActivity.setListProjects(self)
    defeventsProgram(self, instance, keyboard, keycode, text, modifiers):if keyboard in (1001, 27):
            if self.activityManager.current == 'add new note activity':
                self.activityManager.backActivity(
                    'list notes activity', self.addNewNoteActivity.ids.floatingButton)
            if self.activityManager.current == 'list notes activity':
                self.activityManager.current = 'list project activity'returnTrue
Our application consists of only three Activities , which are switched by the screen manager ( ScreenMenager ), which we returned to the build function :
#:import ListProjectsActivity libs.uix.baseclass.ListProjectsActivity.ListProjectsActivity#:import ListNotesActivity libs.uix.baseclass.ListNotesActivity.ListNotesActivity#:import AddNewNoteActivity libs.uix.baseclass.AddNewNoteActivity.AddNewNoteActivity#:import ActivityManager libs.uix.baseclass.ActivityManager.ActivityManager
<RootScreen@BoxLayout>:
    orientation: 'vertical'
    spacing: dp(2)
    ActivityManager:
        id: activityManager
        ListProjectsActivity:
            id: listProjectsActivity
        ListNotesActivity:
            id: listNotesActivity
        AddNewNoteActivity:
            id: addNewNoteActivity
When the application starts, the Activity that is specified first in the ActivityManager will be installed. In our case, this is ListProjectsActivity . In the application for project and task lists, I used ScrollView . Although it was more correct - RecycleView . Because the first, if posts and projects will be over a hundred, will not cope. More precisely, it will be very long to render lists. RecycleView allows you to display lists of any length almost instantly. But since in any case with large lists, one would have to use either dynamic loading of data into the list, or pagination, and this was not discussed in the TOR, I used the ScrollView . The second reason is that I was too lazy to redo the lists underRecycleView (and it is completely different in use from ScrollView ), and there wasn’t much time, because the entire application was written in four hours in smoke breaks and coffee breaks.
The start screen with a list of projects (ListProjectsActivity.kv and ListProjectsActivity.py) looks like this:

Since the screen layout of the ListProjectsActivity is already shown in the screenshot, I’ll show you what its control class looks like:
# -*- coding: utf-8 -*-
from kivy.app import App
from kivy.uix.screenmanager import Screen as Activity
from libs.uix.baseclass.InputDialog import InputDialog
from . ProjectItem import ProjectItem
classListProjectsActivity(Activity):
    objApp = App.get_running_app()
    defsetListProjects(self, objApp):
        for nameProject in objApp.dataProjects.keys():
            self.ids.layoutContainer.add_widget(ProjectItem(projectName=nameProject))
    defcreateNewProject(self, projectName):
        if projectName andnot projectName.isspace():
            self.ids.layoutContainer.add_widget(ProjectItem(projectName=projectName))
            self.objApp.addProjectInBase(projectName)
    defdeleteProject(self, instance):
        for projectName inself.objApp.dataProjects:if instance.projectName == projectName:self.objApp.deleteProjectFromBase(projectName)
                breakdefshowDialogCreateProject(self, *args):
        InputDialog(
            title='Новый проект', hintText='Имя проекта',
            textButtonCancel='Отмена', textTuttonOk='Да',
            eventsCallback=self.createNewProject).show()
Call diology window:
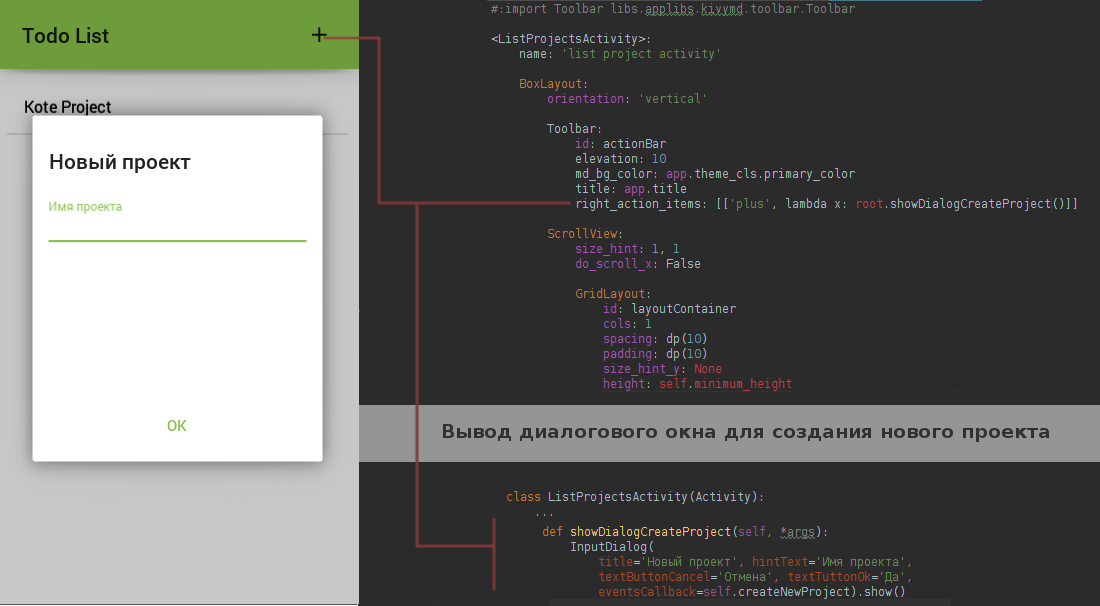
In operation, the window call and the creation of a new project will look like this:
 |  |
On the question of application data, I will not stop, because the data is a regular dictionary of the form
{"Name Project": [{"pathToAvatar": "", "nameDate": "", "nameAuthor": "", "textNote": ""}]}and which is stored in the data directory as a simple json file.
Let's see what is the item with the name of the project and how in Kivy to use deleting an item from the list by swipe? To do this, we must inherit the behavior of the widget in the list of class SwipeBehavior library SwipeToDelete :
ProjectItemActivity.py
from kivy.properties import StringProperty
from kivy.uix.boxlayout import BoxLayout
from libs.applibs.swipetodelete import SwipeBehavior
classProjectItemActivity(SwipeBehavior, BoxLayout):
    projectName = StringProperty()
    defon_touch_down(self, touch):if self.collide_point(touch.x, touch.y):
            self.move_to = self.x, self.y
            return super(ProjectItemActivity, self).on_touch_down(touch)
    defon_touch_move(self, touch):if self.collide_point(touch.x, touch.y):
            self.reduce_opacity()
            return super(ProjectItemActivity, self).on_touch_move(touch)
    defon_touch_up(self, touch):if self.collide_point(touch.x, touch.y):
            self.check_for_left()
            self.check_for_right()
            return super(ProjectItemActivity, self).on_touch_up(touch)
And the description of the project item in Kv markup:
ProjectItemActivity.kv
<ProjectItemActivity>:
    swipe_rectangle: self.x, self.y , self.width, self.heightswipe_timeout: 1000000
    swipe_distance: 1
    event_after_swipe: app.listActivity.deleteProjectOneLineListItem:
        text: root.projectNameon_press: app.listActivity.setNotesProject(root.projectName)
In general, every widget in Kivy has an on_touch method with which you can catch any events occurring on the screen. Here is a small part of the list of available events:
['double_tap_time', 'grab_state', 'is_double_tap', 'is_mouse_scrolling', 'is_touch', 'is_triple_tap', 'move', 'push', 'push_attrs', 'push_attrs_stack', 'scale_for_screen', 'time_end', 'time_start', 'time_update', 'triple_tap_time', 'ungrab', 'update_time_end']
 |  |  |  |
Implementation of the context menu for Android ...
There are no problems here either, it’s just a standard DropDown widget. Thanks to the fact that you can customize all the widgets and controllers in Kivy as much as your imagination allows you, I easily got a nice menu. Left base dropdown, right is mine:
 |  |
Context menu list layout:
ContextMenuAndroidActivity.kv
#:import MDSeparator libs.applibs.kivymd.card.MDSeparator
#:import MenuItem libs.applibs.animdropdown.MenuItem
<ContextMenuAndroidActivity>:
    MenuItem:
        text: 'Редактировать'menu: root
        on_press: root.tapOnItem(self.text)
    MDSeparator:
    MenuItem:
        text: 'Удалить'menu: root
        on_press: root.tapOnItem(self.text)
The program part of the context menu:
ContextMenuAndroidActivity.kv
from kivy.app import App
from kivy.clock import Clock
from libs.applibs.animdropdown import AnimMenuDropDown
classContextMenuAndroidActivity(AnimMenuDropDown):deftapOnItem(self, textItem):
        objApp = App.get_running_app()
        if textItem == 'Удалить':
            objApp.listActivity.deletePost()
        else:
            objApp.activityManager.current = 'add new note activity'
            Clock.schedule_once(objApp.addNewNoteActivity.editNote, .5)
Next, we import the MenuDropDown button from the animdropdown library , pass it the object of our context menu as a parameter, and after that we add this button to the screen we need. In our application, this is the button on the right in the note card:
Activity layout cards notes:

Base class NoteActivity :
from kivy.app import App
from kivy.properties import StringProperty
from kivy.uix.boxlayout import BoxLayout
from libs.applibs.animdropdown import MenuButton
from libs.applibs.swipetodelete import SwipeBehavior
from . ContextMenu import ContextMenu
classNoteActivity(SwipeBehavior, BoxLayout):
    nameDate = StringProperty()
    textNote = StringProperty()
    pathToAvatar = StringProperty()
    def__init__(self, **kwargs):
        super(NoteActivity, self).__init__(**kwargs)
        self.objApp = App.get_running_app()
        menuButton = MenuButton(
            dropdown_cls=ContextMenu, icon='dots-vertical', _on_dropdown_fnc=self.setCurrentPost)
        self.ids.titleBox.add_widget(menuButton)
    defsetCurrentPost(self, *args):
        self.objApp.listNotesActivity.checkCurentPost = self

Software implementation of ListNotesActivity :
# -*- coding: utf-8 -*-from kivy.app import App
from kivy.uix.screenmanager import Screen as Activity
from kivy.properties import ObjectProperty
from . NoteActivity import NoteActivity
classListNotesActivity(Activity):
    checkCurentPost = ObjectProperty()
    objApp = App.get_running_app()
    defclearList(self):if self.objApp.activityManager.current == 'list project activity':
            self.ids.layoutContainer.clear_widgets()
    defaddNewNote(self, objApp):
        objApp.activityManager.current = 'add new note activity'defsetDefaultcheckCurentPost(self):
        self.checkCurentPost = lambda x: NonedefsetNotesProject(self, nameProject):
        self.ids.toolBar.title = nameProject
        for dataProject in self.objApp.dataProjects[nameProject][1]:
            self.ids.layoutContainer.add_widget(NoteActivity(
                textNote=dataProject['textNote'],
                nameDate=dataProject['nameDate'],
                pathToAvatar=dataProject['pathToAvatar']))
    defdeletePost(self, instance=None):# Удаление свайпом.ifnot self.checkCurentPost:
            checkCurentPost = instance
        else:
            checkCurentPost = self.checkCurentPost
            self.ids.layoutContainer.remove_widget(self.checkCurentPost)
        nameProject = self.ids.toolBar.title
        self.objApp.deleteNoteFromBase(nameProject, checkCurentPost.textNote)
    defcheckScroll(self):if self.checkCurentPost and type(self.checkCurentPost) isnot NoteActivity:
            self.checkCurentPost(self)
How to manage Activity apps? In order to switch from one Activity to another, we must specify the name of the new Activity to the screen manager:
classListNotesActivity(Activity):
    ...
    defaddNewNote(self, *args):
        self.objApp.activityManager.current = 'add new note activity'
... where 'add new note activity' is the name of the Activity to add a new note.
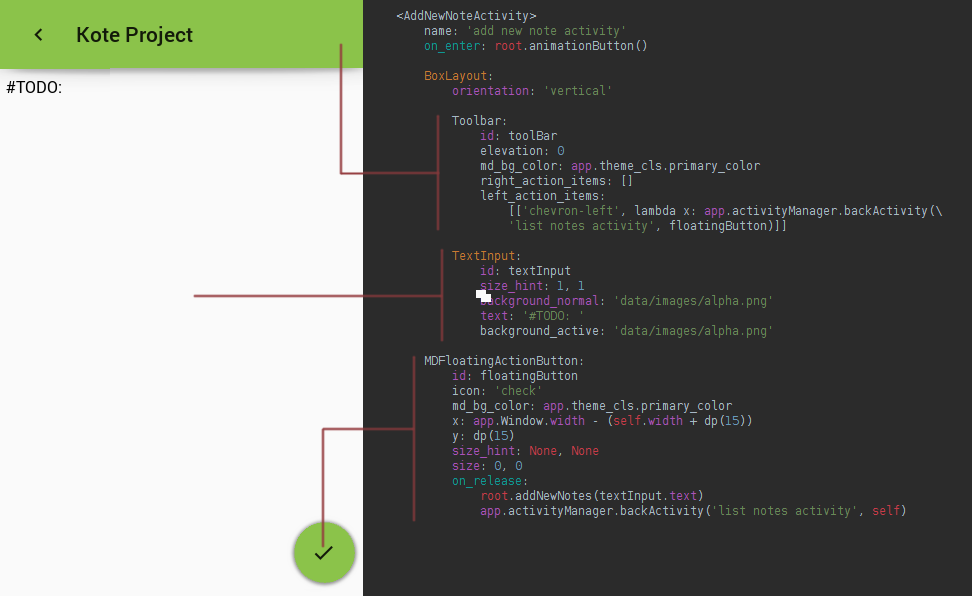
Screen and Layout Activity AddNewNoteActivity :
Base class:
from kivy.app import App
from kivy.animation import Animation
from kivy.uix.screenmanager import Screen as Activity
from kivy.metrics import dp
from libs.uix.baseclass.NoteActivity import NoteActivity
classAddNewNoteActivity(Activity):
    objApp = None
    edit = False
    oldTextNote = ''defanimationButton(self):
        self.objApp = App.get_running_app()
        self.ids.toolBar.title = self.objApp.listNotesActivity.ids.toolBar.title
        Animation(size=(dp(56), dp(56)), d=.5, t='in_out_cubic').start(self.ids.floatingButton)
    defaddNewNotes(self, textNote):if self.edit:
            nameProject = self.ids.toolBar.title
            self.objApp.addEditNoteInBase(nameProject, textNote, self.oldTextNote)
            self.objApp.activityManager.backActivity('list notes activity', self.ids.floatingButton)
            self.objApp.listNotesActivity.checkCurentPost.textNote = textNote
            self.edit = Falsereturn
        self.objApp.listNotesActivity.ids.layoutContainer.add_widget(
            NoteActivity(
                textNote=textNote, nameDate='%s\n%s' % (
                self.objApp.nameAuthor, self.objApp.getDate()),
                pathToAvatar='data/images/avatar.png'))
        self.objApp.addNoteInBase(self.ids.toolBar.title, textNote, 'data/images/avatar.png')
    defeditNote(self, interval):
        self.edit = True
        self.ids.textInput.text = self.objApp.listNotesActivity.checkCurentPost.textNote
        self.oldTextNote = self.ids.textInput.text
To animate the button, I used the on_enter event , which is called when the Activity is installed on the screen:
In the markup:
<AddNewNoteActivity>
    on_enter: root.animationButton()
In Python code:
classAddNewNoteActivity(Activity):defanimationButton(self):
        Animation(size=(dp(56), dp(56)), d=.5, t='in_out_cubic').start(self.ids.floatingButton)
Unlike Xamarin.Forms, the UI in Kivy will look the same everywhere. So, if you are writing an application for two platforms (Android and iOS), you should take this into account when marking the interface and specifying properties for widgets. Or do two markup for the two platforms (the logic remains unchanged). This is a plus, since the UI render and events do not depend on the platform features, you do not use native APIs to manage these actions, which allows your application to run smoothly on almost any platform. All graphics are rendered using native OpenGL and SDL2 calls on the GPU, which allows you to very quickly draw menus, buttons and other graphical user interface features including 2D and 3D graphics.
This application uses Android UI MaterialDesign. For example, my last project had an adaptive interface:


But a demonstration of the possibilities in the style of Material Design:
As I said before, Kivy does not use native APIs for rendering UI, so it allows you to emulate various models of devices and platforms using the screen module . It is enough to launch your project with the necessary parameters, so that the application's test window opens on your computer as if it were running on a real device. It sounds strange, but since Kivy abstracts from the platform in the UI drawing, it allows you to avoid using heavy and slow emulators for tests. This only applies to UI. For example, the test application described in this article was tested with the parameters -m screen: droid2, portrait, scale = .75 that one-to-one corresponds to my real device.
Full list of parameters of the screen module:
devices = {
    # device: (name, width, height, dpi, density)'onex': ('HTC One X', 1280, 720, 312, 2),
    'one': ('HTC One', 1920, 1080, 468, 3),
    'onesv': ('HTC One SV', 800, 480, 216, 1.5),
    's3': ('Galaxy SIII', 1280, 720, 306, 2),
    'note2': ('Galaxy Note II', 1280, 720, 267, 2),
    'droid2': ('Motorola Droid 2', 854, 480, 240, 1.5),
    'xoom': ('Motorola Xoom', 1280, 800, 149, 1),
    'ipad': ('iPad (1 and 2)', 1024, 768, 132, 1),
    'ipad3': ('iPad 3', 2048, 1536, 264, 2),
    'iphone4': ('iPhone 4', 960, 640, 326, 2),
    'iphone5': ('iPhone 5', 1136, 640, 326, 2),
    'xperiae': ('Xperia E', 480, 320, 166, 1),
    'nexus4': ('Nexus 4', 1280, 768, 320, 2),
    'nexus7': ('Nexus 7 (2012 version)', 1280, 800, 216, 1.325),
    'nexus7.2': ('Nexus 7 (2013 version)', 1920, 1200, 323, 2),
    # taken from design.google.com/devices# please consider using another data instead of# a dict for autocompletion to work# these are all in landscape'phone_android_one': ('Android One', 854, 480, 218, 1.5),
    'phone_htc_one_m8': ('HTC One M8', 1920, 1080, 432, 3.0),
    'phone_htc_one_m9': ('HTC One M9', 1920, 1080, 432, 3.0),
    'phone_iphone': ('iPhone', 480, 320, 168, 1.0),
    'phone_iphone_4': ('iPhone 4', 960, 640, 320, 2.0),
    'phone_iphone_5': ('iPhone 5', 1136, 640, 320, 2.0),
    'phone_iphone_6': ('iPhone 6', 1334, 750, 326, 2.0),
    'phone_iphone_6_plus': ('iPhone 6 Plus', 1920, 1080, 400, 3.0),
    'phone_lg_g2': ('LG G2', 1920, 1080, 432, 3.0),
    'phone_lg_g3': ('LG G3', 2560, 1440, 533, 3.0),
    'phone_moto_g': ('Moto G', 1280, 720, 327, 2.0),
    'phone_moto_x': ('Moto X', 1280, 720, 313, 2.0),
    'phone_moto_x_2nd_gen': ('Moto X 2nd Gen', 1920, 1080, 432, 3.0),
    'phone_nexus_4': ('Nexus 4', 1280, 768, 240, 2.0),
    'phone_nexus_5': ('Nexus 5', 1920, 1080, 450, 3.0),
    'phone_nexus_5x': ('Nexus 5X', 1920, 1080, 432, 2.6),
    'phone_nexus_6': ('Nexus 6', 2560, 1440, 496, 3.5),
    'phone_nexus_6p': ('Nexus 6P', 2560, 1440, 514, 3.5),
    'phone_samsung_galaxy_note_4': ('Samsung Galaxy Note 4',
                                    2560, 1440, 514, 3.0),
    'phone_samsung_galaxy_s5': ('Samsung Galaxy S5', 1920, 1080, 372, 3.0),
    'phone_samsung_galaxy_s6': ('Samsung Galaxy S6', 2560, 1440, 576, 4.0),
    'phone_sony_xperia_c4': ('Sony Xperia C4', 1920, 1080, 400, 2.0),
    'phone_sony_xperia_z_ultra': ('Sony Xperia Z Ultra', 1920, 1080, 348, 2.0),
    'phone_sony_xperia_z1_compact': ('Sony Xperia Z1 Compact',
                                     1280, 720, 342, 2.0),
    'phone_sony_xperia_z2z3': ('Sony Xperia Z2/Z3', 1920, 1080, 432, 3.0),
    'phone_sony_xperia_z3_compact': ('Sony Xperia Z3 Compact',
                                     1280, 720, 313, 2.0),
    'tablet_dell_venue_8': ('Dell Venue 8', 2560, 1600, 355, 2.0),
    'tablet_ipad': ('iPad', 1024, 768, 132, 1.0),
    'tablet_ipad_mini': ('iPad Mini', 1024, 768, 163, 1.0),
    'tablet_ipad_mini_retina': ('iPad Mini Retina', 2048, 1536, 326, 2.0),
    'tablet_ipad_pro': ('iPad Pro', 2732, 2048, 265, 2.0),
    'tablet_ipad_retina': ('iPad Retina', 2048, 1536, 264, 2.0),
    'tablet_nexus_10': ('Nexus 10', 2560, 1600, 297, 2.0),
    'tablet_nexus_7_12': ('Nexus 7 12', 1280, 800, 216, 1.3),
    'tablet_nexus_7_13': ('Nexus 7 13', 1920, 1200, 324, 2.0),
    'tablet_nexus_9': ('Nexus 9', 2048, 1536, 288, 2.0),
    'tablet_samsung_galaxy_tab_10': ('Samsung Galaxy Tab 10',
                                     1280, 800, 148, 1.0),
    'tablet_sony_xperia_z3_tablet': ('Sony Xperia Z3 Tablet',
                                     1920, 1200, 282, 2.0),
    'tablet_sony_xperia_z4_tablet': ('Sony Xperia Z4 Tablet',
                                     2560, 1600, 297, 2.0)TodoList()
        app.run()
}
What can be said in conclusion? Is Kivy good? Undoubtedly good! If you own a wonderful programming language Python, you can easily make applications for mobile (and not only) platforms with a no less remarkable Kivy framework.
Pros of application development using the Kivy framework:
- Since we are dealing with Python, application development speed is much faster than development speed in any other programming language or framework.
- Megatons of ready-made Python libraries that you can use in your projects: OpenCV, Django, Flask, NumPy, ffmpeg, sqlite3, lxml and thousands of others.
- Since Kivy uses OpenGL and GPU for drawing graphics, as well as its own widgets and controllers, the UI render speed is very high and you are completely relieved of the headache that is present in other frameworks that need to be used in the native part to implement certain parts of the interface.
- You use the native only where you need access to specific platform functions that simply cannot be in a truly cross-platform framework: for example, access to geolocation, access to the camera, BlueTooth technology ...
Implement access to the native Android API to get IMEI and device models using PyJnius:
def_get_model_android():from jnius import autoclass
    Build = autoclass('android.os.Build')
    return str(Build.DEVICE)
def_get_imei_android():from jnius import autoclass
    Service = autoclass('org.renpy.android.PythonActivity').mActivity
    Context = autoclass('android.content.Context')
    TelephonyManager = Service.getSystemService(Context.TELEPHONY_SERVICE)
    return str(TelephonyManager.getDeviceId())
For example, the implementation of a native getting IMEI device in Java:
import android.content.Context;
import android.telephony.TelephonyManager;
publicclassGetImeiAndroid{
    public String getImeiAndroid(){
        TelephonyManager  tm = (TelephonyManager)getSystemService(Context.TELEPHONY_SERVICE);
        String IMEINumber = tm.getDeviceId();
        return IMEINumber;
    }
}
- You can use third-party jar libraries in your projects when it comes to Android.
- You fully own all the events occurring on the screen: touch, multitouch, svayp, pushing and other events without leaving the native so it is an integral part of Kivy.
Kivy features in Touch devices:
Despite all the advantages, Kivy has several disadvantages:
- The speed of “cold start”, that is, the first launch of the application from the moment when all the libraries will be deployed, is quite long. The subsequent ones are ordinary, but longer than the native depends on the load of the processor of the mobile device.
- Work with lists. It is possible to display a list of 100,000 points in half a second (for example, user cards, a shop window, quotes), but with one condition - all cards must be of the same height. If you display a list, for example, quotes, with an unknown amount of text, but in its entirety, you cannot display more than ten items at a time, since it will take about 10-15 seconds. In this case, you will have to load 10-15 items each while scrolling through the list.
- It is impossible to display text whose size exceeds 6500 characters (3.5 pages of printed text) - we get a black screen. This is solved by splitting the text and then gluing it, which still seems to be a crutch. However, it is not clear to whom it may come to mind to display such amount of text at a time. Especially when it comes to mobile platforms.
→ More articles on Kivy
A virtual machine (the first message from ZenCODE) from Kivy developers is ready and configured to build projects for both Python branches.