Qmpot - programmable sound editor
- Tutorial
The first sound editor I saw in my life was the Phonograph (sndrec32.exe) in Windows 98. I played with it for a short time, recorded up to 1 minute of sound from the microphone (then the recording was interrupted) and listened to the result. And he also converted sounds from one quality to another.
The second sound editor I saw was Cool Edit Pro 2000 (now called Adobe Audition). But when I rummaged through it enough - I was upset, this thing is called the "sound editor", but it only edits the sound. It is impossible to write music from scratch in it. In its successor - Adobe Audition, however, later they added a system of tracks into which you can push the loops and make music from them.
Then I still saw Cakewalk Pro Audio(Cakewalk Sonar), Fruity Loops , Sound Forge , etc.
But from that year 1998-2000, I had a desire to create a sound and insert any notes into it in any places in time. And to do this both in a simple mode (“cram this note in there”), and in a more complex mode (“we will clamp this chord, play in this style, then another chord, play it in a different style”).
And a year ago, in December 2013, I started making this editor.
And he began to do it as part of the PaintCAD 4Windows project, which has long been able to make AVI films from drawn frames, but the resulting AVI is a silent movie, without sound. Therefore, the paintcade really needed the ability to create WAV files from scratch or edit others, collecting from them the voice acting for AVI. Well, where is the creation of sound files - there is also writing music nearby.
To get into Qmpot (read “kumpot”) - you need to run the paint path:

And then:
- either press Ctrl + Q ;
- either press 0 (zero) on the keyboard and select “Extra” - “Sound Editor Qmpot” in the menu :

Qmpot that opens will be empty.

And although:
- you can create a new sound in it (via "Create (Ctrl + N)"),
- you can load WAV files (via "Open (Ctrl + O)" ),
- you can climb the cursor (from the keyboard) through the sound, speeding up 10 times (if you hold Shift ) or 100 times (if you hold Ctrl + Shift ),
- you can scale the sound using Ctrl + Plus and Ctrl + Minus ,
- you can move the cursor to a specific or random place using the "Go (Ctrl + G)"
button - you can select a space (or the "Select (Space)" button ) sound fragments,
- can be enabled by Ctrl + I информацию об отсчетах под курсором (амплитуда и производная) и под границами выделения (разницы амплитуд и производных, для создания собственных loop-ов)
— можно вырезать, копировать, вставлять, удалять выделенное (Ctrl+X, Ctrl+C, Ctrl+V, Del)
— можно нажать «Команды (Ctrl+K)» и править вручную амплитуды отсчетов, менять границы выделения, изменять длину массива и звука, транспонировать звук
— можно нажать «Эффекты (Ctrl+E)» и применять к выделенному фрагменту звука различные эффекты (от простого изменения громкости до перемещения источника звука в пространстве относительно слушателя),
— можно сохранить отредактированный звук в WAV файл (через «Сохранить (Ctrl+S)»),
это все не главное.
Программирование музыки
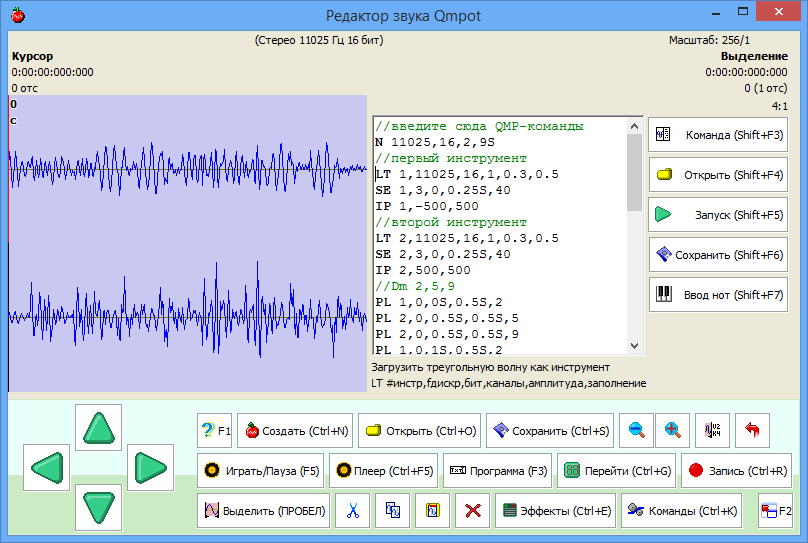
Главное начинается если нажать кнопку «Программа (F3)» и тогда откроется поле редактирования QMP программ (скриптов):

Комментарии в этом поле прописываются двойным слэшем в начале. Ими удобно помечать куплеты/припевы и др.части музыки.
Одна из команд уже введена в поле — это X. Поставьте на нее курсор и прочтите под текстовым полем программы «Завершить выполнение» и «X (без параметров)». Для любой команды под курсором здесь отображается ее назначение и синтаксис:

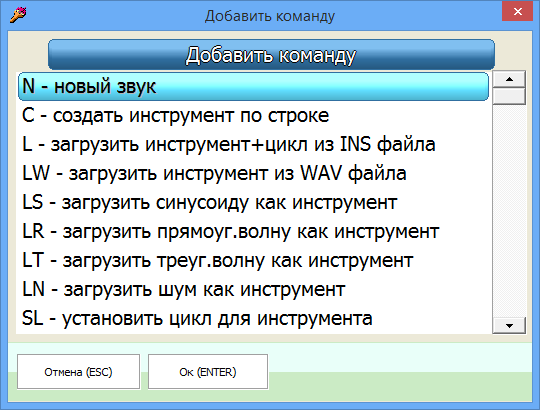
Поставьте курсор между комментарием и командой X. Нажмите кнопку «Команда (Shift+F3)» справа от поля ввода программы. Выберите «N — новый звук», а потом «Монозвук 16 бит». The line appears in the program:
N 11025,16,1,5S
it means "create a new empty sound with a sampling frequency of 11025 Hz, a bit depth of 16 bits, one channel and a length of 5 seconds."
The menu on the button "Command (Shift + F3)" allows you to insert any commands into the program, if you are too lazy to look for help, but you forgot the name of the command.
You can also see all the commands with examples and pictures if you press F1 in the paint path or kumpot and select the Extra help section - Qmpot Sound Editor - Command List .
Add the following command after command N:
LT 1,11025,16,1,0.5,0.5
it means “load a triangular / sawtooth wave into instrument number 1 with parameters a sampling frequency of 11025 Hz, a resolution of 16 bits, 1 channel, an amplitude of 50% of the maximum and a filling of 50%”.
"Filling" for a triangular wave is its "sawtoothness." Filling 50% (0.5) is a pure triangular waveform (picture in the middle): A

sinusoidal waveform sounds very soft, a triangular waveform is harder, a sawtooth waveform is even harder, and a rectangular waveform is the hardest. Any of these signals, as well as a noise signal can be downloaded as tools: LS - sine, LT - triangle / sawtooth, LR - rectangular, LN - noise.
Now we have 2 teams - a sound is created and a triangular wave is loaded as instrument number 1. Add the first note. To do this, after the LT command, insert the command:
PL 1,0,10,1S, 0
it means to record the note number 1 on both channels with the instrument (0 - both channels, 1 - left, 2 - right, because the sound is mono - at 0, all the same, only the sound will be recorded in the first channel), at a shift of 10 samples from the beginning of the sound, lasting 1 second, and with a note tone of 0 (Up to the 4th octave, C4).
A note tone is an offset in semitones relative to the original tone of an instrument. Here on this figure shows the top of a piano keyboard note numbers:

Ie if you want the note To - put 0, you want Re - put 2, you want Mi - put 3, you want Do one octave higher - put 12, etc.
Press the "Launch (Shift + F5)" buttonto the right of the program input field (or Shift + F5 on the keyboard). The program will be launched and will produce a “result”.

Click on the bottom of the “Play / Pause (F5)” panel (or just F5 on the keyboard) and listen to it (there will be 1 second with a note and 4 seconds of silence, because the five-second sound length in command N is set).
Let's write ditties in minor. These are the chords Dm, Am, E, Am. In accordance with the image of the piano keyboard at the top and the numbers of notes on it:
Dm are three notes D4, F4, A4, i.e. in note numbers it is 2.5.9.
Am is the notes A3, C4, E4, in the numbers it is -3,0,4.
E is E3, G # 3, B3, in numbers it's -8, -4, -1.
Change the length of the sound in the N command for 9 seconds (so that the ditties get in). And with the PL commands we fill these chords with these note numbers, make each note 0.5 seconds long:
- the first three notes from DM with an offset of 0 seconds and 1 second (twice),
- the second three notes from Am with an offset of 2 seconds and 3 seconds (twice),
- the third three notes from E with an offset of 4 seconds and 5 seconds (twice),
- the last three notes from Am with an offset of 6 seconds and 7 seconds (twice).
We get (copy this script and paste it into the program field instead of what it was):
//введите сюда QMP-команды
N 11025,16,1,9S
LT 1,11025,16,1,0.5,0.5
//Dm 2,5,9
PL 1,0,0S,0.5S,2
PL 1,0,0S,0.5S,5
PL 1,0,0S,0.5S,9
PL 1,0,1S,0.5S,2
PL 1,0,1S,0.5S,5
PL 1,0,1S,0.5S,9
//Am -3,0,4
PL 1,0,2S,0.5S,-3
PL 1,0,2S,0.5S,0
PL 1,0,2S,0.5S,4
PL 1,0,3S,0.5S,-3
PL 1,0,3S,0.5S,0
PL 1,0,3S,0.5S,4
//E -8,-4,-1
PL 1,0,4S,0.5S,-8
PL 1,0,4S,0.5S,-4
PL 1,0,4S,0.5S,-1
PL 1,0,5S,0.5S,-8
PL 1,0,5S,0.5S,-4
PL 1,0,5S,0.5S,-1
//Am -3,0,4
PL 1,0,6S,0.5S,-3
PL 1,0,6S,0.5S,0
PL 1,0,6S,0.5S,4
PL 1,0,7S,0.5S,-3
PL 1,0,7S,0.5S,0
PL 1,0,7S,0.5S,4
X
Press the “Launch (Shift + F5)” button to the right of the program input field (or Shift + F5 on the keyboard). And then F5 to listen.
You can call not three notes at once, but first one, and then the other two (we’ll move these two by half a second). We get (copy this script and paste it into the program field instead of what it was):
//введите сюда QMP-команды
N 11025,16,1,9S
LT 1,11025,16,1,0.5,0.5
//Dm 2,5,9
PL 1,0,0S,0.5S,2
PL 1,0,0.5S,0.5S,5
PL 1,0,0.5S,0.5S,9
PL 1,0,1S,0.5S,2
PL 1,0,1.5S,0.5S,5
PL 1,0,1.5S,0.5S,9
//Am -3,0,4
PL 1,0,2S,0.5S,-3
PL 1,0,2.5S,0.5S,0
PL 1,0,2.5S,0.5S,4
PL 1,0,3S,0.5S,-3
PL 1,0,3.5S,0.5S,0
PL 1,0,3.5S,0.5S,4
//E -8,-4,-1
PL 1,0,4S,0.5S,-8
PL 1,0,4.5S,0.5S,-4
PL 1,0,4.5S,0.5S,-1
PL 1,0,5S,0.5S,-8
PL 1,0,5.5S,0.5S,-4
PL 1,0,5.5S,0.5S,-1
//Am -3,0,4
PL 1,0,6S,0.5S,-3
PL 1,0,6.5S,0.5S,0
PL 1,0,6.5S,0.5S,4
PL 1,0,7S,0.5S,-3
PL 1,0,7.5S,0.5S,0
PL 1,0,7.5S,0.5S,4
X
Press the “Launch (Shift + F5)” button to the right of the program input field (or Shift + F5 on the keyboard). And then F5 to listen.
Add the echo effect to the sound of the instrument, for this, after the LT command, insert the command:
SE 1,3,0,0.25S, 40
it means that each note of instrument 1 will turn into 3 notes. The first note will be where the PL team put it. The second will be inserted with an offset of 0.25 seconds and an amplitude of 60% (100 minus 40). The third will be inserted with an offset of 0.25 + 0.25 seconds and an amplitude of 20% (100 minus 40 minus 40).
Due to the echo, the notes will overlap strongly, so in order to avoid reaching the limit in amplitude (and cut the sound to -128 to 127 for 8 bits, or from -32768 to 32767 for 16 bits), we also reduce the signal amplitude in the LT command from 0.5 to 0.3.
We get:
//введите сюда QMP-команды
N 11025,16,1,9S
LT 1,11025,16,1,0.3,0.5
SE 1,3,0,0.25S,40
//Dm 2,5,9
PL 1,0,0S,0.5S,2
PL 1,0,0.5S,0.5S,5
PL 1,0,0.5S,0.5S,9
PL 1,0,1S,0.5S,2
PL 1,0,1.5S,0.5S,5
PL 1,0,1.5S,0.5S,9
//Am -3,0,4
PL 1,0,2S,0.5S,-3
PL 1,0,2.5S,0.5S,0
PL 1,0,2.5S,0.5S,4
PL 1,0,3S,0.5S,-3
PL 1,0,3.5S,0.5S,0
PL 1,0,3.5S,0.5S,4
//E -8,-4,-1
PL 1,0,4S,0.5S,-8
PL 1,0,4.5S,0.5S,-4
PL 1,0,4.5S,0.5S,-1
PL 1,0,5S,0.5S,-8
PL 1,0,5.5S,0.5S,-4
PL 1,0,5.5S,0.5S,-1
//Am -3,0,4
PL 1,0,6S,0.5S,-3
PL 1,0,6.5S,0.5S,0
PL 1,0,6.5S,0.5S,4
PL 1,0,7S,0.5S,-3
PL 1,0,7.5S,0.5S,0
PL 1,0,7.5S,0.5S,4
X
Follow Shift + F5 and listen to the resulting F5.
Now let's make a stereo melody. To do this:
- write two channels in command N: N 11025,16,2,9S
- load the second instrument, exactly the same as the first, and set the same echo for both of them
- place the first instrument in front of 500 mm relative to the listener: IP 1 , -500,500
- arrange the second instrument in front of 500 mm relative to the listener: IP 2,500,500
- in each chord the first instrument will play the first note, and the other two instruments will play the second instrument
We get:
//введите сюда QMP-команды
N 11025,16,2,9S
//первый инструмент
LT 1,11025,16,1,0.3,0.5
SE 1,3,0,0.25S,40
IP 1,-500,500
//второй инструмент
LT 2,11025,16,1,0.3,0.5
SE 2,3,0,0.25S,40
IP 2,500,500
//Dm 2,5,9
PL 1,0,0S,0.5S,2
PL 2,0,0.5S,0.5S,5
PL 2,0,0.5S,0.5S,9
PL 1,0,1S,0.5S,2
PL 2,0,1.5S,0.5S,5
PL 2,0,1.5S,0.5S,9
//Am -3,0,4
PL 1,0,2S,0.5S,-3
PL 2,0,2.5S,0.5S,0
PL 2,0,2.5S,0.5S,4
PL 1,0,3S,0.5S,-3
PL 2,0,3.5S,0.5S,0
PL 2,0,3.5S,0.5S,4
//E -8,-4,-1
PL 1,0,4S,0.5S,-8
PL 2,0,4.5S,0.5S,-4
PL 2,0,4.5S,0.5S,-1
PL 1,0,5S,0.5S,-8
PL 2,0,5.5S,0.5S,-4
PL 2,0,5.5S,0.5S,-1
//Am -3,0,4
PL 1,0,6S,0.5S,-3
PL 2,0,6.5S,0.5S,0
PL 2,0,6.5S,0.5S,4
PL 1,0,7S,0.5S,-3
PL 2,0,7.5S,0.5S,0
PL 2,0,7.5S,0.5S,4
X
Simplify entering note numbers
When writing more melodies and more tricks, problems arise:
The first problem is that the script is growing. Comments help here, you can mark any parts of the program so as not to peer at the arguments of the teams, but immediately understand “here is the introduction”, “there is a loss”, etc.
The second problem is that note numbers are difficult to enter from memory.
To solve this problem, Qmpot added the system “Input notes” . It allows you to use a virtual piano, a virtual six-string guitar and a virtual grid of reels to create arrays of PL (or P) commands and drag them into a QMP program. Also allows you to play on a physical keyboard like a piano / drums and record played in the form of QMP-commands.
To start “Entering notes” - press the button to the right of the program field“Entering notes (Shift + F7)” or just Shift + F7 on the keyboard.
Music input: Piano
After starting “note input”, the piano is turned on by default.

You can climb the blue cursor over the keys and clamp them with a space (or with the button "Select (SPACE)" ).
The simplest use of the piano:
- hold down the chord notes with a space,
- an optional step: press "Sound (ENTER)" (or just Enter ) to listen in MIDI that everything is correctly clamped,
- press the "Add (CTRL + ENTER)" button (or just Ctrl + Enter ) and the notes appear in the form of commands on the right side of the program field:

Next, you can copy the received commands with the “Copy (Ctrl + C)” button and then exit on ESCfrom entering notes, paste them into your program wherever you need it.
The received notes are influenced by the parameters in the panel at the bottom of the window (you need to somehow control their offset, duration, etc.):
Number - the instrument number specified in the PL commands.
Offset - the offset in ms, prescribed in the PL commands. The offset can be quickly changed by pressing the buttons "-" (Ctrl + Minus) and "+" (Ctrl + Plus) on the sides of it. In this case, it changes by the value of "Step" .
Length - duration of notes in ms, prescribed in PL commands.
Thus, you can:
- set the offset to 0 ms if it is not zero (Ctrl + A),
- hold the first chord,
- press Ctrl + Enter,
- hold another chord,
- increase the offset (Ctrl + Plus),
- press Ctrl + Enter again,
- hold the third chord,
- increase the offset,
- press Ctrl + Enter again.
Etc. And when there are enough commands - copy them by Ctrl + C, close the Enter notes by Esc and paste the received commands into the program.
If you are too lazy to increase the offset each time, press the “Auto + (Ctrl + P)” button , and then after each addition of notes by Ctrl + Enter, the offset will increase by itself.
You can also set the “Shift” parameter - and not all notes with one offset will be inserted, but each with this shift relative to the previous one, as if the pianist does not immediately press all the keys, but with delays.
Game Styles and Command Test
There are two buttons above the program field in the “Entering notes”:

Using the “Test command (Ctrl + U)” button , without leaving the “Entering notes”, you can listen to the entered commands on a triangular wave for piano / guitar and on noise drums for a net of drums.
Using the “Game Style (Ctrl + B)” button , you can select certain game styles. For piano, these are piano styles, for guitar - guitar, and for drums - these are built-in rhythms (rock, hip-hop, etc.). You can also set your own style.
The current game style is displayed under the "Game Style" button. In piano, this is the default “Play Everything” style. It looks like an “A-1D."
Piano styles are encoded by commands and numbers written through a dash:
A - play all the notes held together;
Sets of numbers 1-9 - play the specified note from the chord (if three notes are held, then 1 will play the first note, 2 - the second, 3 - the third, 13 - the first and third at the same time, 4 - will not play, because only three clamped);
steps D - the delay between the previous notes and the next in shares of the “steps” of the “Step” parameter from the bottom of the window, the length of the previous notes is determined by the “Length” parameter from the bottom of the window;
stepsL - the delay between the previous notes and the next in shares of the “steps” of the “Step” parameter from the bottom of the window, while the length of the previous notes is equal to this delay (notes last until the next notes).
For example, the aforementioned “Play All” style is A-1D, where A is to lose everything, 1D is to wait for one “Step”.
And the “Pairs (1 step)” style is encoded as 2-0.25L-34-0.25L-1-0.25L-34-0.25L, which means:
2-0.25L: 2 a note pinned in the chord plays a quarter of the Step;
34-0.25L: 3 and 4 the note clamped in a chord is played a quarter of a Step;
1-0.25L: 1 note held in a chord is played a quarter of a Step;
34-0.25L: 3 and 4 A note held in a chord is played a quarter of a Step.
As a result, the whole Step is filled with notes.
Thus, choosing the “Couples (1 step)” style and holding a chord of 4 notes, you can use Ctrl + Enter to receive commands for the whole musical phrase 2-34-1-34 with time shifts, and not just a chord.
Entering notes with a playing style (general algorithm)
1) Using the “Number (Ctrl + I)” button , specify the number of the tool that will be used in QMP commands;
2) Using the “Clear (Ctrl + X)” button , clear the previous “note input” program (if it was entered before);
3) On the “Step (Ctrl + S)” button , specify the step length in ms;
4) Using the “Offset (Ctrl + A)” button , set the initial offset to 0 ms (or another, if you want to set notes not from the beginning of the melody);
5) Reset previously squeezed notes by pressing the “Reset Keys (Ctrl + K)” button and hold down the next 4-note chord by moving the cursor and pressing the “Select (Space)” button ;
6) By the button “Add (Ctrl + ENTER)”“Play” a clamped chord with the selected game style (game commands will be added to the QMP program in the text box on the right);
7) Increase the offset by one step with the "+" button (Ctrl + Plus) ;
8) If further you need to enter also other chords of the melody - go to step 5 to enter the next chord.
9) Press “Command Test (Ctrl + U)” to listen to the received melody on a triangular signal;
10) Press “Copy (Ctrl + C)” to copy the QMP commands, exit the “Input notes” via ESC , paste the commands into the QMP program in the main Qmpot window;
Tip:if you previously enable the mode using the “Auto + (Ctrl + P)” button, then you do not need to perform step 7, the offset will increase by the required number of steps after each addition of notes by the “Add (Ctrl + ENTER)” button.
Other styles can last more than one step, but more, for example, the preset style “Search (2 steps)” uses 8 iterations of 0.25 steps (that is, it takes 2 steps). Then, when manually changing the offset, it is necessary after “Add (Ctrl + ENTER)” to increase the offset by 2 steps (using the “+” button (Ctrl + Plus) ). In case of auto-increase of the offset ( “Auto + (Ctrl + P)” ), the required number of steps will be automatically added to the offset.
Also in the menu for choosing a game style by the button "Game Style (Ctrl + B)"You can manually enter your game styles. In the same menu, you can load / save in QPS (Qmpot Piano Style) files with the playing style and the current clamped chord on the piano.

Music input: Six-string guitar
To go to the guitar, press the “Tool (Ctrl + G)” button at the bottom of the panel .

Here, like the piano, you can run the cursor on the fretboard and clamp the strings. An unpressed string - does not participate in the chord, therefore, for example, for a simple A-minor Am you need to clamp everything as usual, and free strings - on the zero fret, and then by Ctrl + Enter the whole chord will be thrown into the program:

Here you can also play different styles: ordinary combat, tweaks, brute force.

Entering notes: Drum grid
To go to the guitar, press the "Tool (Ctrl + G)" button below again on the bottom of the panel .

The classic mesh used in Cakewalk, Fruity Loops and many more. Only vertically, not piano notes, but drum numbers.
And horizontally, the time within the selected size by the button "Size (Ctrl + E)" . For example, with a selected size of 8/4, the grid will look like the one shown in the screenshot above - 8 columns, divided into groups of 4 columns.
Put the notes on the reels like this:

Press “Sound (ENTER)” (or just Enter ) to listen to the rhythm in MIDI. He will be played twice in order to appreciate the connection of rhythm with himself.
Press "Add (CTRL + ENTER)"(or just Ctrl + Enter ) to throw rhythm notes into the program field. Pressing the “Test command (Ctrl + U)” button will play the rhythm from the program field on the noise drums.
To use rhythm commands received in this way in a QMP program, you must first load as many as nine instruments (9 different drums) in this QMP program.
Therefore, in the main Qmpot window in the menu by the button "Command (Shift + F3)" there is a call of "noise drums" - drums on noise signals. It is enough to select the number of the starting drum (if 1 - then they will occupy the instrument numbers from 1 to 9, if 20 - then from 20 to 28, etc.) and bit depth (8 or 16 bits) and they will be in your program. Here, for example, a program with the rhythm typed above and noise drums:
//введите сюда QMP-команды
N 11025,16,1,4S
//барабаны
//bass
LN 1,44100,16,1,0.5,0.001S
ST 1,-66
SF 1,0.001S,0.032S
//acoustic snare
LN 2,44100,16,1,0.5,0.008S
ST 2,-48
SF 2,0.001S,0.128S
//clap
LN 3,44100,16,1,0.5,0.004S
ST 3,-36
SF 3,0.001S,0.032S
//electric snare
LN 4,44100,16,1,0.5,0.008S
ST 4,-40
SF 4,0.001S,0.064S
//closed hi-hat
LN 5,44100,16,1,0.2,0.012S
SF 5,0.001S,0.011S
//open hi-hat
LN 6,44100,16,1,0.3,0.24S
SF 6,0.01S,0.23S
//tomtom
LN 7,44100,16,1,0.5,0.0015S
ST 7,-60
SF 7,0.001S,0.048S
//crash
LN 8,44100,16,1,0.5,0.24S
ST 8,-6
SF 8,0.01S,0.33S
//ride
LN 9,44100,16,1,0.3,0.30S
ST 9,-2
SF 9,0.03S,0.27S
//конец барабанов
P 1,0,0S,0
P 1,0,1S,0
P 2,0,0.5S,0
P 2,0,1.5S,0
P 5,0,0.25S,0
P 5,0,0.75S,0
P 5,0,1.25S,0
P 5,0,1.75S,0
P 6,0,1.75S,0
P 1,0,2S,0
P 1,0,3S,0
P 2,0,2.5S,0
P 2,0,3.5S,0
P 5,0,2.25S,0
P 5,0,2.75S,0
P 5,0,3.25S,0
P 5,0,3.75S,0
P 6,0,3.75S,0
X
In the "Game Style (Ctrl + B)" menu , you can select various preset rhythms.

The style line “123456789- (required delay) D” is set automatically depending on the current size selected by the “Size (Ctrl + E)” button .
Entering notes: playing on a PC keyboard
When the Piano or Six-String Guitar tools are included in the “Entering Notes”, you can play on the physical keyboard of a computer like on a piano keyboard.
The main part of the keyboard is two rows of keys:
Top row -WE-TYU-OP-] - black keys, notes Do #, Re #, Fa #, Salt #, A #, Do #, Re #, Fa #.
Bottom row ASDFGHJKL; ' - white keys, notes Do, Re, Mi, Fa, Salt, La, C, Do, Re, Mi, Fa.

This part of the keyboard plays notes, starting with the octave in which the cursor is currently located. Those. by moving the cursor on the piano's virtual keyboard to higher octaves in tone, you can get higher notes from the physical keyboard. On the fretboard, this system also works — on strings higher in sound and on distant frets — higher notes are played from the physical keyboard.
Sometimes it is convenient to play / record bass accompaniment with a melody, therefore:
- below the “bottom row” is a row of ZXC keys ... <>? - He plays the role of the white keys of the piano, but an octave below the main part of the keyboard.
- similarly above the "top row" there is a row of keys 123 ...) - =- He plays the role of black piano keys, but an octave below the main part of the keyboard.
Therefore, it is recommended that you play the melody on the ASDF ... and QWER ... keys, and the bass accompaniment on it on the ZXCV ... and 1234 ... For example, A is the note To, Z is the note To an octave lower.
With the current “Piano” instrument, all keys pressed on the physical keyboard are displayed on the virtual keyboard in the “Note entry” window.
Entering notes: recording a game on a PC keyboard
Using the “Record (Ctrl + R)” button , you can enable / disable the recording mode, then everything played will be added as QMP commands in the program field. In this case, the first note pressed will receive an offset of 0 seconds, the remaining notes will be recorded relative to the moment the first note is pressed.
To ensure that the recorded displacements and durations of notes are aligned in time - use quantization:
1) Set the desired tempo of the game using the “Tempo (Ctrl + T)” button , you can also set and turn on the metronome (MIDI or Video) to listen to the tempo of the game and even leave it turned on for the duration of the recording (warning: on weak computers, the MIDI sound of the metronome may go astray and lag, then use the video metronome and watch the balls appear on the screen);
2) Press the button“Quantum (Ctrl + F)” and enter, for example, 2. This means that the displacements and durations of the notes will be a multiple of 1/2 of the duration of the tempo beat. At a tempo of 120 beats per minute, 1 beat of the tempo is 0.5 seconds, and 1/2 of the duration of the beat of the tempo is 0.25 seconds, so all offsets and durations of the recorded notes will be a multiple of 0.25 seconds.
Important: modern features of the device physical keyboards do not allow to clamp a large number of keys at the same time. Therefore, be prepared to come to terms with the fact that when you play / record on a physical keyboard when you press more than 2 keys at the same time, some keystrokes can be skipped by the game / record system. This is normal. It all depends on your keyboard, ideally - just try not to press more than 2 keys at the same time, then everything will be fine.
Entering notes: playing and recording drums on a PC keyboard
When the Drum Grid tool is turned on in “Entering Notes”, you can play on the physical keyboard of the computer like on all 9 reels in the grid and record this game using the “Record (Ctrl + R)” button . Keys for playing / recording:
A number of keys ASDFGHJKL - reels from 1 to 9.
Conclusion
This manual article briefly describes the Qmpot sound editor. More precisely, only programming and the “Note Input” system are described.
In the help system (using the F1 button in the paint path or kumpot) in the "Extra" - "Qmpot Sound Editor" section you can find additional information that
is not described in the article: - about the basics of sound editing (what is the sampling frequency, bit depth, how is sound recorded to files etc.),
- about loading tools from INS + WAV files and just from WAV samples,
- about creating your own tools,
- about finding and setting a loop (loop, repeating part) in the tools you create,
- about extracting ready-made instruments from SF2 / DLS sound banks,
- on the application of effects in the Qmpot editor (filtering, noise reduction, sound reverse, moving the sound source relative to the listener taking into account the Doppler effect, etc.),
- on recording sound from the inputs of the sound card, from a web camera, etc. ,
- and much more.
In the Qmpot sound editor, using the methods described above, you can compose melodies, process sounds, and even make voice acting for movies and animations (AVI files) you create in the path.
WAV-voiceovers can be attached to the AVI-files by the menu Utilities paintkada. There you can extract the WAV sound from any AVI file:

Download PaintCAD 4Windows with Qmpot inside
you can follow the links (12.6 Mb):
RAR: blackstrip.ru/pcw.rar
ZIP:blackstrip.ru/pcw.zip
SFX-EXE: blackstrip.ru/pcw.exe
Bonus tune for Qmpot for those who have read the article to the end: blackstrip.ru/bonusmusic.txt (on noise drums and two triangular waves!).