 August 22, 2013 at 14:12
External components in 1C 8.2
- From the sandbox
- Tutorial
Introduction
This article gives an idea of the work of external components in the "1C: Enterprise" system.
The process of developing an external component for the "1C: Enterprise" system version 8.2 will be shown, running on a Windows operating system with a file version of work. This work option is used in most solutions designed for small businesses. VK will be implemented in the C ++ programming language.
External components "1C: Enterprise"
“1C: Enterprise” is an expandable system. To expand the functionality of the system, external components (VK) are used. From the developer's point of view, VC is an external object that has properties and methods, and can also generate events for processing by the 1C: Enterprise system.
External components can be used to solve a class of problems that are difficult or even impossible to implement using the programming language built into 1C: Enterprise. In particular, tasks that require low-level interaction with the operating system, for example, to work with specific equipment, can be attributed to this class.
The 1C: Enterprise system uses two technologies for creating external components:
- using native API
- using COM technology
Given the restrictions between the two above technologies, the difference is insignificant, so we will consider the development of VK using the Native API. If necessary, the implemented developments can be applied to develop a VK using COM technology, and also, with minor modifications, are used for use in the 1C: Enterprise system with other work options other than the file operation mode.
VK structure
The external component of the 1C: Enterprise system is presented as a DLL library. The library code describes the IComponentBase descendant class. In the created class, the methods responsible for the implementation of the functions of the external component must be defined. Overrideable methods will be described in more detail below in the course of presentation of the material.
Launch demo VK
Task:
- Build the external component supplied with the ITS subscription and designed to demonstrate the basic capabilities of the external component mechanism in 1C
- Connect the demo component to 1C configuration
- Ensure the correct functionality of the declared functions
Compilation
The demo VK is located on the ITS subscription disk in the directory “/ VNCOMP82 / example / NativeAPI”.
We will use Microsoft Visual Studio 2008 to build the demo VK. Other versions of this product do not support the Visual Studio project format used.
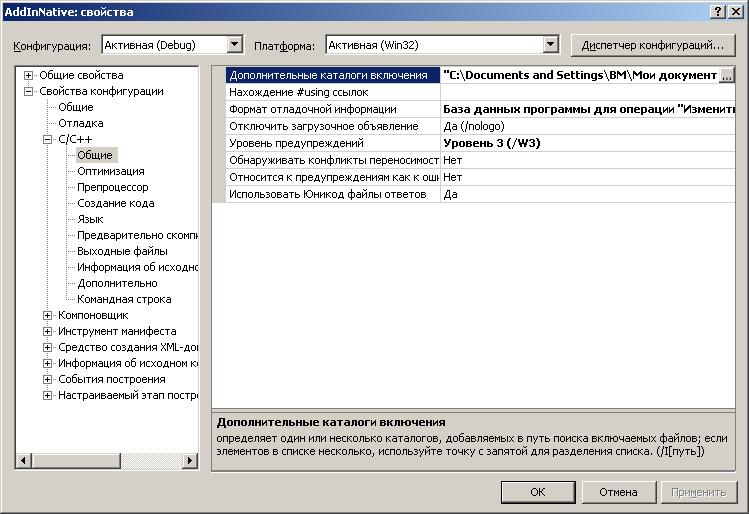
Open the AddInNative project. In the project settings, we connect the directory with the header files needed to build the project. By default, they are located on the ITS drive in the / VNCOMP82 / include directory .
The result of the assembly is the file /bind/AddInNative.dll . This is the compiled library for connecting to the 1C configuration.
VK connection to 1C configuration
Create an empty 1C configuration.
The following is the code for the managed application module.
перем ДемоКомп;
Процедура ПриНачалеРаботыСистемы()
	ПодключитьВнешнююКомпоненту("...\bind\AddInNative.dll", "DemoVK", ТипВнешнейКомпоненты.Native);
	ДемоКомп = Новый("AddIn.DemoVK.AddInNativeExtension");
КонецПроцедуры
If an error was not reported when starting the 1C configuration, then the VK was successfully connected.
As a result of the execution of the above code, the DemoComp object appears in the global visibility of the configuration , having the properties and methods that are defined in the code of the external component.
Demonstration of the embedded functionality
Check the performance of the demo VK. To do this, try to set and read some properties, call some VK methods, and also receive and process the VK message.
In the documentation supplied on the ITS disk the following functionality of the demo VK is stated:
- Component object state control
Methods: Enable , Disable
Properties: Enabled - Timer Management
Every second, the component sends a message to the 1C: Enterprise system with the Component , Timer parameters and the line of the system clock counter.
Methods: StartTimer , StopTimer
Properties: YesTimer - The ShowInStatusStroke method , which displays the text passed to the method as parameters in the status bar
- Method Download Picture . Loads an image from the specified file and transfers it to the 1C: Enterprise system in the form of binary data.
We will verify the operability of these functions. To do this, execute the following code:
перем ДемоКомп;
Процедура ПриНачалеРаботыСистемы()
	ПодключитьВнешнююКомпоненту(...);
	ДемоКомп = Новый("AddIn.DemoVK.AddInNativeExtension");
	ДемоКомп.Выключить();
	Сообщить(ДемоКомп.Включен);
	ДемоКомп.Включить();
	Сообщить(ДемоКомп.Включен);
	ДемоКомп.СтартТаймер();
КонецПроцедуры
Процедура ОбработкаВнешнегоСобытия(Источник, Событие, Данные)
	Сообщить(Источник + " " + Событие + " " + Данные);
КонецПроцедуры
The result of starting the configuration is shown in the image
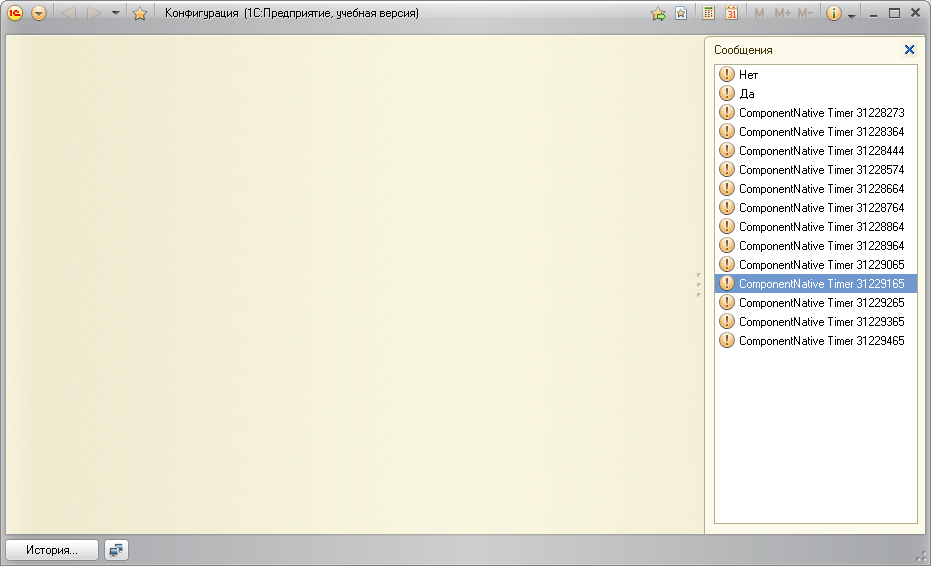
The Messages panel displays the results of calls to the DemoComp. Disable () and DemoComp . Enable () methods . The subsequent lines on the same panel contain the results of processing received messages from the VC - Source , Event and Data, respectively.
Arbitrary name of the external component
Task: Change the name of the external component to any.
The previous section used the AddInNativeExtension identifier , the meaning of which was not explained. In this case, AddInNativeExtension is the name of the extension.
In the VC code, the RegisterExtensionAs method is defined , which returns the name that is necessary for the subsequent registration of the VC in the system to the 1C: Enterprise system. It is recommended to specify an identifier that to some extent reveals the essence of the external component.
Here is the full code of the RegisterExtensionAs method with the changed extension name:
bool CAddInNative::RegisterExtensionAs(WCHAR_T** wsExtensionName)
{
    wchar_t *wsExtension = L"SomeName";
    int iActualSize = ::wcslen(wsExtension) + 1;
    WCHAR_T* dest = 0;
    if (m_iMemory)
    {
        if(m_iMemory->AllocMemory((void**)wsExtensionName, iActualSize * sizeof(WCHAR_T)))
            ::convToShortWchar(wsExtensionName, wsExtension, iActualSize);
        return true;
    }
    return false;
}
In the above example, the VK name is changed to SomeName . Then when connecting the VC, you must specify a new name:
ДемоКомп = Новый("AddIn.DemoVK.SomeName");
Extension of the list of properties of VK
Task:
- Explore the implementation of VK properties
- Add a string type property readable and writable
- Add a read-write property of the string type that stores the data type of the last property set. When setting a property value, no action is taken
- Make sure that the changes made are working.
To determine the properties of the component being created, the developer needs to implement the following methods in the AddInNative.cpp library code:
GetNProps
Returns the number of properties of this extension, 0 - if no properties
FindProp
Returns the serial number of the property, the name of which is passed in the parameters
GetPropName
Returns the name of the property by its serial number and by language identifier transmitted
GetPropVal
Returns the value of the sequence number
SetPropVal
Sets the value of the sequence number
IsPropReadable
RETURN AET flag reading capabilities flag properties indicated by the number
IsPropWritable
The flag returns the flag of the ability to write properties with the indicated serial number.
A full description of the methods, including a list of parameters, is described in detail in the documentation supplied on the ITS disk.
Consider the implementation of the above methods of the CAddInNative class .
In the demo VK, 2 properties are defined: Enabled and IsTimer ( IsEnabled and IsTimerPresent ).
Two arrays are defined in the global scope of the library code:
static wchar_t *g_PropNames[] = {L"IsEnabled", L"IsTimerPresent"};
static wchar_t *g_PropNamesRu[] = {L"Включен", L"ЕстьТаймер"};
which store Russian and English property names. The header file AddInNative.h defines the enumeration:
enum Props
    {
        ePropIsEnabled = 0,
        ePropIsTimerPresent,
        ePropLast      // Always last
    };
ePropIsEnabled and ePropIsTimerPresent , respectively, with values of 0 and 1 are used to replace property serial numbers with meaningful identifiers. An ePropLast with a value of 2 is used to get the number of properties (using the GetNProps method). These names are used only inside the component code and are not accessible from the outside.
The FindProp and GetPropName methods search the g_PropNames and g_PropNamesRu arrays .
To store the field values in the library module, the CAddInNative class defines properties that store the value of the component properties. The GetPropVal and SetPropVal methods respectively return and set the value of these properties.
MethodsIsPropReadable and IsPropWritable both return trure or false , depending on the passed serial number of the property in accordance with the application logic.
In order to add an arbitrary property, you must:
- Add the name of the property to be added to the g_PropNames and g_PropNamesRu arrays ( AddInNative.cpp file )
- The transfer of Props (file AddInNative.h ) before ePropLast add a name that uniquely identifies the addition of properties
- Organize memory for storing property values (create component module fields storing the corresponding values)
- Make changes to the GetPropVal and SetPropVal methods to interact with the memory allocated in the previous step
- In accordance with the application logic, make changes to the IsPropReadable and IsPropWritable methods
Paragraphs 1, 2, 5 do not need to be clarified. The details of the implementation of these steps can be found by studying the appendix to the article.
Let's name the test properties Test and Type Test, respectively. Then, as a result of paragraph 1, we have:
static wchar_t *g_PropNames[] = {L"IsEnabled", L"IsTimerPresent", L"Test", L"TestType"};
static wchar_t *g_PropNamesRu[] = {L"Включен", L"ЕстьТаймер", L"Тест", L"ПроверкаТипа"};
Enumeration Props will look like:
 enum Props
    {
        ePropIsEnabled = 0,
        ePropIsTimerPresent,
		ePropTest1,
		ePropTest2,
        ePropLast      // Always last
    };
To significantly simplify the code, we will use STL C ++. In particular, to work with WCHAR strings, we will connect the wstring library .
To save the value of the Test method , define a private field in the CAddInNative class in the scope:
string test1;
To transfer string parameters between 1C: Enterprise and the external components, the 1C: Enterprise memory manager is used. Consider his work in more detail. To allocate and free memory, respectively, the AllocMemory and FreeMemory functions defined in the ImemoryManager.h file are used . If necessary, pass the string parameter to the 1C: Enterprise system, the external component must allocate memory for it by calling the AllocMemory function . Her prototype is as follows:
virtual bool ADDIN_API AllocMemory (void** pMemory, unsigned long ulCountByte) = 0;
where pMemory is the address of the pointer where the address of the allocated memory will be placed,
ulCountByte is the size of the allocated memory.
An example of allocating memory for a string:
WCHAR_T *t1 = NULL, *test = L"TEST_STRING";
int iActualSize = wcslen(test1)+1;
m_iMemory->AllocMemory((void**)&t1, iActualSize * sizeof(WCHAR_T));
::convToShortWchar(&t1, test1, iActualSize);
For the convenience of working with string data types, we describe the wstring_to_p function . It receives a wstring string as a parameter. The result of the function is the filled tVariant structure . Function Code:
bool CAddInNative::wstring_to_p(std::wstring str, tVariant* val) {
	char* t1;
	TV_VT(val) = VTYPE_PWSTR;
	m_iMemory->AllocMemory((void**)&t1, (str.length()+1) * sizeof(WCHAR_T));
	memcpy(t1, str.c_str(), (str.length()+1) * sizeof(WCHAR_T));
	val -> pstrVal = t1;
	val -> strLen = str.length();
	return true;
}
Then the corresponding case section of the switch statement of the GetPropVal method takes the form:
case ePropTest1:
	wstring_to_p(test1, pvarPropVal);
	break;
SetPropVal Methods :
 case ePropTest1:
	if (TV_VT(varPropVal) != VTYPE_PWSTR)
		 return false;
	test1 = std::wstring((wchar_t*)(varPropVal -> pstrVal));
	break;
To implement the second property, define a field of the CaddInNative class
uint8_t last_type;
in which we will save the type of the last transmitted value. To do this, add the command to the CaddInNative :: SetPropVal method:
last_type = TV_VT(varPropVal);
Now, when we request to read the values of the second property, we will return the value last_type , which is required by the indicated task.
Check the operability of the changes made.
To do this, we bring the appearance of the 1C configuration to the form:
перем ДемоКомп;
Процедура ПриНачалеРаботыСистемы()
	ПодключитьВнешнююКомпоненту("...", "DemoVK", ТипВнешнейКомпоненты.Native);
	ДемоКомп = Новый("AddIn.DemoVK.SomeName");
	ДемоКомп.ПроверкаТипа = 1;
	Сообщить(Строка(ДемоКомп.ПроверкаТипа));
	ДемоКомп.Тест = "Вася";
	Сообщить(Строка(ДемоКомп.Тест));
	ДемоКомп.Тест = "Петя";
	Сообщить(Строка(ДемоКомп.Тест));
	Сообщить(Строка(ДемоКомп.ПроверкаТипа));
КонецПроцедуры
As a result of the run, we get the sequence of messages:
3ВасяПетя22The second and third messages are the result of reading the property set in the previous step. The first and second messages contain a code of the type of the last set property. 3 corresponds to an integer value, 22 to a string value. The correspondence of types and their codes is set in the types.h file , which is located on the ITS disk.
Extension of the list of methods
Task:
- Extend the functionality of the external component with the following functionality:
- Explore ways to implement external component methods
- Add the function method Funkts1 , which takes two lines as a parameter (“Parameter1” and “Parameter2”). As a result, a string of the form: “Check. Parameter1, Parameter2 »
- Make sure that the changes made are working.
To determine the methods of the component being created, the developer needs to implement the following methods in the code of the AddInNative library:
GetNMethods , FindMethod , GetMethodName
Designed to obtain the corresponding number of methods, search for the number and method name. Similar to corresponding methods for
GetNParams properties .
Returns the number of method parameters with the specified sequence number; if a method with this number is absent or has no parameters, returns 0
GetParamDefValue
Returns the default value of the specified parameter of the specified method
HasRetVal
Returns the flag of the presence of the method with the specified return sequence number: true for methods with the return value and false otherwise
CallAsProc
Executes the method with the specified sequence number. If the method returns false , a runtime error occurs and the execution of the 1C: Enterprise module is terminated. Memory for an array of parameters is allocated and freed by 1C: Enterprise.
CallAsFunc
Executes a method with the specified sequence number. If the method returns false, a runtime error occurs and the execution of the 1C: Enterprise module is terminated. Memory for an array of parameters is allocated 1C: Enterprise. If the return value is of type string or binary data, the component allocates memory with the AllocMemory function of the memory manager, writes data there, and stores this address in the corresponding field of the structure. 1C: Enterprise will free this memory by calling FreeMemory .
A complete description of the methods, including a list of parameters, is described in detail in the documentation supplied on the ITS disk.
Consider the implementation of the methods described above.
In the component code, two arrays are defined:
static wchar_t *g_MethodNames[] = {L"Enable", L"Disable", L"ShowInStatusLine", L"StartTimer", L"StopTimer", L"LoadPicture"};
static wchar_t *g_MethodNamesRu[] = {L"Включить", L"Выключить", L"ПоказатьВСтрокеСтатуса", L"СтартТаймер", L"СтопТаймер", L"ЗагрузитьКартинку"};
and listing:
enum Methods
    {
        eMethEnable = 0,
        eMethDisable,
        eMethShowInStatusLine,
        eMethStartTimer,
        eMethStopTimer,
        eMethLoadPicture,
        eMethLast      // Always last
    };
They are used in the GetNMethods , FindMethod, and GetMethodName functions , similar to the description of properties.
The GetNParams , GetParamDefValue , HasRetVal methods implement a switch, depending on the parameters passed and the application logic, return the required value. The HasRetVal method in its code has a list of only methods that can return a result. For them, it returns true . For all steel methods, false is returned .
Methods CallAsProc and CallAsFunc contain directly executable code method.
To add a method that can only be called as a function, you need to make the following changes in the source code of the external component:
- Add the method name to the g_MethodNames and g_MethodNamesRu arrays ( AddInNative.cpp file )
- Add a meaningful method identifier to the Methods enumeration ( AddInNative.h file )
- Make changes to the code of the GetNParams function in accordance with the program logic
- If necessary, make changes to the GetParamDefValue method code if you want to use the default values of the method parameters.
- Make changes to the HasRetVal function
- Make changes to the logic of the CallAsProc or CallAsFunc functions by placing the directly executable method code there
Here are the g_MethodNames and g_MethodNamesRu arrays , as well as the Methods enumeration :
static wchar_t *g_MethodNames[] = {L"Enable", L"Disable", L"ShowInStatusLine", L"StartTimer", L"StopTimer", L"LoadPicture", L"Test"};
static wchar_t *g_MethodNamesRu[] = {L"Включить", L"Выключить", L"ПоказатьВСтрокеСтатуса", L"СтартТаймер", L"СтопТаймер", L"ЗагрузитьКартинку", L"Тест"};
 enum Methods
    {
        eMethEnable = 0,
        eMethDisable,
        eMethShowInStatusLine,
        eMethStartTimer,
        eMethStopTimer,
        eMethLoadPicture,
		eMethTest,
        eMethLast      // Always last
    };
Let's edit the GetNProps function so that it returns the number of parameters of the Test method:
long CAddInNative::GetNParams(const long lMethodNum)
{
    switch(lMethodNum)
    {
    case eMethShowInStatusLine:
        return 1;
    case eMethLoadPicture:
        return 1;
    case eMethTest:
        return 2;
	default:
        return 0;
    }
return 0;
}
Let's make changes to the CAddInNative :: GetParamDefValue function :
bool CAddInNative::GetParamDefValue(const long lMethodNum, const long lParamNum, tVariant *pvarParamDefValue)
{
    TV_VT(pvarParamDefValue)= VTYPE_EMPTY;
    switch(lMethodNum)
    {
    case eMethEnable:
    case eMethDisable:
    case eMethShowInStatusLine:
    case eMethStartTimer:
    case eMethStopTimer:
	case eMethTest:
        // There are no parameter values by default
        break;
    default:
        return false;
    }
    return false;
}
Thanks to the added line
case eMethTest:
in the absence of one or more arguments, the corresponding parameters will have an empty value ( VTYPE_EMPTY ). If you need a default value for the parameter, you must set it in the eMethTest section of the switch statement of the CAddInNative :: GetParamDefValue function .
Since the Test method can return a value, it is necessary to make changes to the HasRetVal function code :
bool CAddInNative::HasRetVal(const long lMethodNum)
{
    switch(lMethodNum)
    {
    case eMethLoadPicture:
	case eMethTest:
        return true;
    default:
        return false;
    }
    return false;
}
And add the executable method code to the CallAsFunc function :
bool CAddInNative::CallAsFunc(const long lMethodNum,
                tVariant* pvarRetValue, tVariant* paParams, const long lSizeArray)
{
...
std::wstring s1, s2;
    switch(lMethodNum)
    {
    case eMethLoadPicture:
	   ...
        break;
	case eMethTest:
        if (!lSizeArray || !paParams)
            return false;
	    s1 = (paParams) -> pwstrVal;
	    s2 = (paParams+1) -> pwstrVal;
	    wstring_to_p(std::wstring(s1+s2), pvarRetValue);
	    ret = true;
	    break;
    }
    return ret;
}
Compile the component and bring the configuration code to the form:
перем ДемоКомп;
Процедура ПриНачалеРаботыСистемы()
	ПодключитьВнешнююКомпоненту("...", "DemoVK", ТипВнешнейКомпоненты.Native);
	ДемоКомп = Новый("AddIn.DemoVK.SomeName");
	пер = ДемоКомп.Тест("Привет, ", "Мир!");
	Сообщить(пер);
КонецПроцедуры
After starting the configuration, we will receive the message: “Hello World!”, Which indicates that the method worked successfully.
Timer
Task:
- Learn timer implementation in demo VK
- Modify the "StartTimer" method, adding the ability to pass in the parameters the timer interval (in milliseconds)
- Make sure that the changes made are working.
In WinAPI, you can use the WM_TIMER message to work with time . This message will be sent to your program at the time interval that you set when creating the timer.
To create a timer, use the SetTimer function :
UINT SetTimer(HWND hWnd,              // описатель окна
              UINT nIDevent,          // идентификатор (номер) таймера
              UINT nElapse,           // задержка
              TIMERPROC lpTimerFunc); // указатель на функцию
The operating system will send a WM_TIMER message to the program at the interval specified in the nElapse argument (in milliseconds). In the last parameter, you can specify the function that will be executed each time the timer is triggered. The title of this function should look like this (the name can be anything):
void __stdcall TimerProc (HWND hwnd, UINT uMsg, UINT_PTR idEvent, DWORD dwTime)
Consider a timer implementation in a demo VK.
Since we are considering the process of developing an external component for an OS of the Windows family, we will not consider the implementation of the timer in other operating systems. For GNU / Linux, in particular, the implementation will differ in the syntax of the SetTimer and TimerProc functions .
In the executable code, the SetTimer method is called , to which the MyTimerProc function is passed :
m_uiTimer = ::SetTimer(NULL,0,100,(TIMERPROC)MyTimerProc);
The identifier of the created timer is placed in the m_uiTimer variable so that it can be disabled later.
The MyTimerProc function is as follows:
VOID CALLBACK MyTimerProc(
  HWND hwnd,    // handle of window for timer messages
  UINT uMsg,    // WM_TIMER message
  UINT idEvent, // timer identifier
  DWORD dwTime  // current system time
)
{
    if (!pAsyncEvent)
        return;
    wchar_t *who = L"ComponentNative", *what = L"Timer";
    wchar_t *wstime = new wchar_t[TIME_LEN];
    if (wstime)
    {
        wmemset(wstime, 0, TIME_LEN);
        ::_ultow(dwTime, wstime, 10);
        pAsyncEvent->ExternalEvent(who, what, wstime);
        delete[] wstime;
    }
}
The essence of the function is that the ExternalEvent method is called , which sends a message to the 1C: Enterprise system.
To expand the functionality of the StartTimer method, perform the following actions:
Modify the code of the GetNParams method so that it returns 1 for the eMethStartTimer method :
case eMethStartTimer:
	return 1;
Let's bring the code of the CallAsProc method to the form:
case eMethStartTimer:
	if (!lSizeArray || TV_VT(paParams) != VTYPE_I4 || TV_I4(paParams) <= 0)
		return false;
	pAsyncEvent = m_iConnect;
#ifndef __linux__
        m_uiTimer = ::SetTimer(NULL,0,TV_I4(paParams),(TIMERPROC)MyTimerProc);
#else
// код для GNU/Linux
#endif
	break;
Now check the performance. To do this, in the module of the managed application configuration, write the code:
перем ДемоКомп;
Процедура ПриНачалеРаботыСистемы()
	ПодключитьВнешнююКомпоненту("...", "DemoVK", ТипВнешнейКомпоненты.Native);
	ДемоКомп = Новый("AddIn.DemoVK.SomeName");
	ДемоКомп.СтартТаймер(2000);
КонецПроцедуры
After starting the configuration, the program will receive messages with an interval of 2 seconds, which indicates the correct operation of the timer.
Interaction with the system "1C: Enterprise"
For interaction between the external component and the 1C: Enterprise system, methods of the IAddInDefBase class described in the AddInDefBase.h file are used . Here are the most commonly used ones:
Generating an error message
virtual bool ADDIN_API AddError(unsigned short wcode, const WCHAR_T* source, const WCHAR_T* descr, long scode)
wcode , scode - error codes (a list of error codes with a description can be found on the ITS disk)
source - error source
descr - error description
Sending a message to the 1C: Enterprise system
virtual bool ADDIN_API ExternalEvent(WCHAR_T* wszSource, WCHAR_T* wszMessage, WCHAR_T* wszData) = 0;
wszSource - message source
wszMessage - message text
wszData - transmitted data The
message is intercepted by the Processing of an
External Event Registration of an external component in the "1C: Enterprise" system
virtual bool ADDIN_API RegisterProfileAs(WCHAR_T* wszProfileName)
wszProfileName is the name of the component.
These methods are enough for the full interaction of VK and 1C. To receive data by the external component from the 1C: Enterprise system and vice versa, the external component sends a special message, which in turn is intercepted by the 1C system and, if necessary, calls the methods of the external component for data feedback.
TVariant data type
When exchanging data between an external component and the 1C: Enterprise system, the tVariant data type is used. It is described in the types.h file, which can be found on the ITS drive:
struct _tVariant
{
    _ANONYMOUS_UNION union
    {
        int8_t         i8Val;
        int16_t        shortVal;
        int32_t        lVal;
        int            intVal;
        unsigned int   uintVal;
        int64_t        llVal;
        uint8_t        ui8Val;
        uint16_t       ushortVal;
        uint32_t       ulVal;
        uint64_t       ullVal;
        int32_t        errCode;
        long           hRes;
        float          fltVal;
        double         dblVal;
        bool           bVal;
        char           chVal;
        wchar_t        wchVal;
        DATE           date;
        IID            IDVal;
        struct _tVariant *pvarVal;
        struct tm      tmVal;
        _ANONYMOUS_STRUCT struct
        {
            void*  pInterfaceVal;
            IID        InterfaceID;
        } __VARIANT_NAME_2/*iface*/;
        _ANONYMOUS_STRUCT struct
        {
            char*        pstrVal;
            uint32_t     strLen; //count of bytes
        } __VARIANT_NAME_3/*str*/;
        _ANONYMOUS_STRUCT struct
        {
            WCHAR_T*    pwstrVal;
            uint32_t    wstrLen; //count of symbol
        } __VARIANT_NAME_4/*wstr*/;
    } __VARIANT_NAME_1;
    uint32_t      cbElements;    //Dimension for an one-dimensional array in pvarVal
    TYPEVAR       vt;
};
Type tVariant is a structure that includes:
- mixture (union) intended directly for data storage
- data type identifier
In general, working with variables of the tVariant type occurs according to the following algorithm:
- Determining the type of data that is currently stored in a variable
- Access to the corresponding field of the mixture, for direct access to data
Using the tVariant type greatly simplifies the interaction of the 1C: Enterprise system and the external component
application
The examples directory contains examples for the article
examples / 1 - launching the demo component
examples / 2 - demonstrating the extension of the property list
examples / 3 - demonstrating the extension of the list of methods
Each directory contains a VS 2008 project and a ready-made 1C configuration.
Download app









