Creating patch on Wix with PatchWiz

Good day to all! I would like to share with all my experience in creating a system for generating patches (forgive the reader for using this word). Quite a lot has been written about wix here and I assume that the reader is a little familiar with it, but the problem of creating patches was somehow circumvented. In our company, they are widely used, mainly because of their size, as well as because of the possibility of rollback.
To begin, I will describe the problem I encountered, then I will describe the basic information for creating patches. I will also do the 2nd part with a concrete example, utilities for simplifying this process and source codes.
Task:
1. There is a highly specialized desktop product that is installed in many regions of the Russian Federation in many branches of the authority related to forestry. For convenience, let's name this conditional product, let's say Ash.
2. For each subject, their own version of the installation is collected, which does not differ in binaries, but in content files that do not change (maps, report templates, base database, etc.).
3. In the "hot" season, updates are issued once every 1-2 weeks (everyone abruptly needs something and often something new). At the same time, the version of the product changes (either major , minor or build )
4. At any time, any client can ask for both an update and the full version. It is necessary to get out of the situation at minimal cost.
5. ClickOnce is not suitable, as some government agencies, oddly enough, do not have direct access to the Internet, or it is very bad.
6. Make everything on Wix , as it is free.
In these conditions (point 4!), In order to save traffic and not send 100 MB of the full version each time, it’s better to make patches many times.
There are a couple of whims of the developers:
1. And also I want freedom in skipping patches, that is, you can, for example, be updated through 1 or 2 updates.
2. On the scheme of possible updates, this whim looks like this:

That is, all sequence options are allowed:
• Receive all patches in sequence, then get the full msi (solid line).
• Skip 2 patches, put the 3rd, and then I understand msi (dashed).
• Put 1 patch, 1 skip, put the next one and get the full version of msi.
• etc.
Let's start from the beginning.
We will deal with versions and with patches
As you know, the version in Wix consists (= takes into account) of 3 numbers: xyz, x - Major version , y - Minor version , z - Build number . The principle of changing these values, in my opinion, is determined by the company, and there is no explicit rule, only recommendations .
At the same time, there are 3 types of updates:
- Major update (more correctly, Major upgrade, but for unity, let's set aside major update):
Major update is a comprehensive product update that affects the structure of installed features, changes the composition and name of components, etc. Major update uninstalls the previous version of the application and installs a new one. - Minor update (or Minor upgrade to be more correct, but to keep unity, let us set aside minor update):
Minor update affects many installation resources, however, none of them require a ProductCode change (more on this below). Minor update can add new features or components, but cannot reorganize the tree of features and components, that is, it cannot delete features and components and move components from one feature to another. - Small update :
Small update is a small update that usually affects several files, changing their contents.
"Base" for updates on Wix
The implementation of the listed upgrade options in Wix is based on 2 variables:
1. The UpgradeCode attribute of the Product element.
2. The ProductCode attribute of the Product element.
We are not talking about Package.Id, as it changes
In a nutshell:
- UpgradeCode product of one generation usually does not change. As soon as the system has been completely rewritten, fundamentally, for example, the applied technologies have been changed, UpgradeCode is changed, cutting off all previously made service packs.
- ProductCode changes if the msi name of the package is changed, Components are removed or changed. If in the new version the existing files simply changed or a new Component was added, then the ProductCode does not change.
Example
Suppose there is already an installed application version 1.0, we are creating the next version of the installation. We can change UpgradeCode and ProductCode in it to a new value relative to the previous version.
Let's see what happens if we change \ leave the values of these attributes old. Our success in trying (1) to create a package and (2) install it is reflected in the table below:
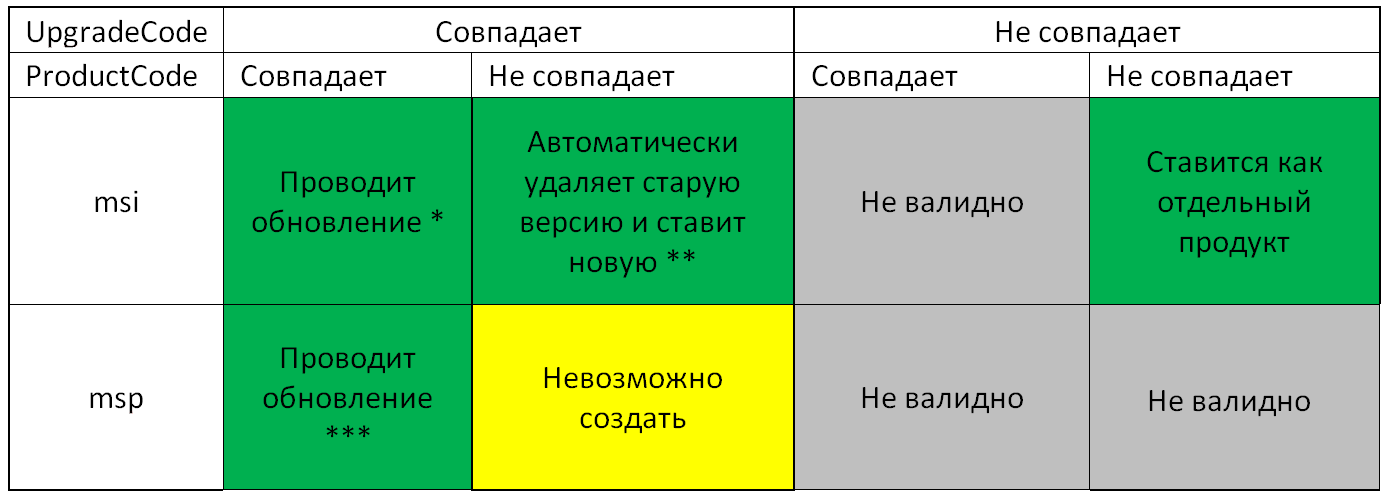
We get: * - minor update , ** - major update , *** - small update
General patch creation approach
The procedure for creating a patch in general looks very simple: there is one or more “base” assemblies and one “final” one. The patch generation utility creates a package that can update the product from the versions that are contained in the "base" assemblies to the version that is contained in the "final" one.
As you know, Wix supports 2 technologies for creating patches: using PatchWiz.dll and Wix itself . I will not go deep into the analysis of all the advantages and disadvantages of these options. This is not the purpose of the article. I can only say that as a result of the experiments we settled on the first option (because only on it we could get a result satisfying us).
Creating a patch on Wix using PatchWiz.dll
To create a patch using PatchWiz (we will use the msimsp.exe utility ), a minimum of 2 installation packages (more precisely 2 msi files) and a patch descriptor (usually a file called Patch.wxs ) are required . I will not describe in detail all the possibilities that are provided for them, otherwise the article will turn out to be too large, but I will touch on the main points. (Details can be found here )
1. First Patch.wxs is created , and in it the PatchCreation element .
Here:
Id - a unique Id patch, always new.
Codepage - code page for an intermediate (for us) file with the PCP extension.
CleanWorkingFolder - clean the temporary folder after creating the patch.
OutputPath - path and name of the intermediate file.
WholeFilesOnly - in the patch we will include the changed files as a whole, and not only the changed blocks in them.
Elements with information about the patch are written inside the PatchCreation, here, I think, everything is clear (PatchMetadata is an optional element).
And, perhaps, the main thing: we indicate the paths where the basic assemblies and the final one lie.
Here:
DiskId - the number of the new entry in the Media table, should not coincide with the Media Id of the base installer.
Name - the name of the update line. I have not tried updating one product with updates with different Family Names.
SequenceStart - the number for the entry in the InstallExecuteSequence table , should not coincide with existing entries. In most of the examples that I saw, it costs 5000. This value does not conflict with the standard Wix values, this value is not used in our package either. (Details on this can be found in the wix articles listed above) UpgradeImage
element - describes the final assembly. SourseFile
- the path to the final assembly (in fact, not quite to it, but to its “unpacked” version, see below)
Id is the identifier of the assembly. TargetImage
element - describes those assemblies that can be updated by the current update. SourceFile - the path to the base assembly. Order - the order of the base assemblies (I did not understand why this is necessary). Id is the identifier of the base assemblies. And at the end of the PatchCreation, the PatchSequence element is inserted
Here:
PatchFamily - indicates which line this patch belongs to (have we seen it somewhere already?)
Sequence - indicates the version of the patch to distinguish in which order the patches were released. Indicated in xxxx format
Supersede - indicates whether this patch can cancel all previous patches (cumulative patch?)
ProductCode - product code (apparently so as not to be mistaken).
Assembly and installation
After the installations and the patch descriptor are ready, you need to do the following:
1. Perform an administrative installation of all installations in separate folders, for example, like this:
msiexec.exe /a 1.0\product.msi /qb TARGETDIR=C:\sample\1.0\admin
msiexec.exe /a 1.1\product.msi /qb TARGETDIR=C:\sample\1.1\admin
Please note that the installation path in PatchCreation should point to these “unpacked” versions, for example, C: \ sample \ 1.0 \ admin \ product.msi
2. We compile the Wix files:
candle.exe patch.wxs
light.exe patch.wixobj -out patch.pcp
3. We use the utility from PatchWiz :
msimsp.exe -s patch.pcp -p patch.msp -l patch.log
And we finally got what we wanted!
Total
We got the desired patch, but to solve the problem we need something more:
- I do not want to create a patch descriptor file each time.
- This system does not work very well when you need to allow skipping patches. The reason is that we indicate which versions this package can patch, if we want it to patch 5 versions, then the volume can increase by 5 times! If we specify only the previous version as installations for the patch, we save space, but lose the ability to skip patches.
- It is necessary to automate this process so as not to spend a lot of time collecting patches.
Accordingly, to solve these inconveniences, I will write the second part and describe everything that I promised at the beginning of the post.
Links:
Wix tutorial (very good tutorial)
Wix - Creating patches
MSDN - Patching and Upgrades









