June 2, 2013 at 17:24
Introducing shaders using the GPUImage example
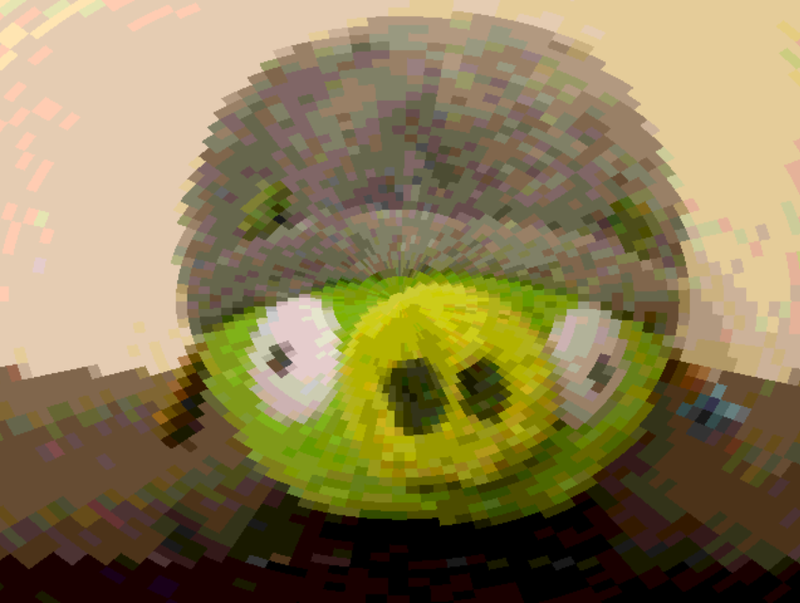
In this article, I am going to describe the development of an application for the iphone that will process video from the device’s camera in real time. To do this, we will use the GPUImage framework, write our own shader on OpenGL ES and try to figure out what filters are for processing images.
GPUImage framework
GPUImage is a library for iOS written by Brad Larson and distributed under the BSD - license that allows you to apply filters and other effects using the GPU to movies, live video and images.
GPU vs CPU
Each iphone is equipped with two processors: CPU and GPU, each of which has its own strengths and weaknesses.
When you write in C or Objective-C in Xcode, you create instructions that will be executed exclusively on the CPU. The GPU, on the contrary, is a specialized chip, especially suitable for calculations that can be divided into many small, independent operations, such as, for example, rendering graphics. The types of instructions for the GPU are fundamentally different from the CPU, so we write code in another language, in OpenGL (or more precisely in the shader language GLSL).
Comparing the performance of video rendering on the CPU and GPU, it is noticeable that the differences are huge:
Frame rate: CPU vs. GPU (Larger FPS is better)
| Calculations | GPU FPS | CPU FPS | Δ |
|---|---|---|---|
| Threshold ☓ 1 | 60.00 | 4.21 | 14.3 |
| Threshold ☓ 2 | 33.63 | 2.36 | 14.3 |
| Threshold ☓ 100 | 1.45 | 0.05 | 28.7 |
GPUImage vs Core Image
Core Image - a standard framework for processing images and video in almost real time. It appeared since ios 5, and for this version it didn’t have such a large set of filters (although for most tasks it’s quite enough), with the release of ios 6 the number of filters increased significantly. Core Image also allows processing on both the CPU and GPU.
Main advantages of GPUImage over Core Image:
- GPUImage allows you to record (create) your own filters (Core Image allows you to do this so far only on OS X, not on iOS);
- GPUImage is faster than Core Image;
- GPUImage uses GLSL instead of its own language;
- GPUImage is Open Source;
GPUImage is also a good way to start learning OpenGL, because there are tons of examples, documentation, and turnkey solutions. You can immediately go to more exciting things, for example, writing new filters, and soon see the results!
GPUImage Structure
GPUImage is essentially an abstraction of Objective-C around the rendering pipeline. Images from an external source, whether it is a camera, network or disk, are downloaded and modified by going through a chain of filters and displaying the result as an image (UIImage), direct rendering to the screen (via GPUImageVIew) or just a data stream.

In another language, the GPUImage API has thousands of camera applications that are just waiting for the right combination of filters and a little imagination.
For example, a Color Levels filter can be applied to an image from a video camera to simulate various types of color blindness and display them in real time.
Color levels
GPUImageVideoCamera *videoCamera = [[GPUImageVideoCamera alloc]
    initWithSessionPreset:AVCaptureSessionPreset640x480
           cameraPosition:AVCaptureDevicePositionBack];
videoCamera.outputImageOrientation = UIInterfaceOrientationPortrait;
GPUImageFilter *filter = [[GPUImageLevelsFilter alloc] initWithFragmentShaderFromFile:@"CustomShader"];
[filter setRedMin:0.299 gamma:1.0 max:1.0 minOut:0.0 maxOut:1.0];
[filter setGreenMin:0.587 gamma:1.0 max:1.0 minOut:0.0 maxOut:1.0];
[filter setBlueMin:0.114 gamma:1.0 max:1.0 minOut:0.0 maxOut:1.0];
[videoCamera addTarget:filter];
GPUImageView *filteredVideoView = [[GPUImageView alloc] initWithFrame:self.view.bounds)];
[filter addTarget:filteredVideoView];
[self.view addSubView:filteredVideoView];
[videoCamera startCameraCapture]
Seriously, the filter presentation app that comes bundled as an example for GPUImage can be hosted on the Apple Store for about $ 3.99 without any changes. And by adding Twitter integration and a couple of sound effects, you can raise the price to just $ 6.99.
Vertex Shaders GPUImage
A shader is a program for the GPU that controls the behavior of one stage of the graphics pipeline and processes the corresponding input data.
For a better understanding of what is happening in the main part of the article, we will touch on the top vertex shaders.
When working with an image, most of the time we are dealing with two-dimensional objects. The image is displayed on a plane that is a rectangle. This is necessary for OpenGL, as everything exists in three-dimensional space. If we want to draw something, then we must first create a surface where we will draw. OpenGL ES 2.0 can only draw triangles (as well as points and lines, but not rectangles), so the plane is built from two triangles.
Vertex shaders are a small program for processing ONE vertex.
This is what the standard vertex shader on the GPUImage looks like:
Vertex shader
attribute vec4 position;
attribute vec4 inputTextureCoordinate;
varying vec2 textureCoordinate;
void main()
{
   gl_Position = position;
   textureCoordinate = inputTextureCoordinate.xy;
}
Three types of variables are passed to the shader: attributes, varyings, and uniforms. For each vertex its own attributes are transmitted - position in space, texture coordinates (how the texture will be displayed on the figure), color, normal, etc.
Varying variables are the relationship between vertex and fragment shaders. Variables of this type are declared and initialized in the vertex shader and then passed to the fragment shader. But, because the fragment shader operates with points on the whole figure - these values are linearly interpolated. For example, if the vertices of the left half of the shape are white and the right is black, then the color of the shape will represent a gradient from white to black.
Uniforms - variables are necessary for the shader to communicate with the outside world (the program itself). They are the same for all vertices and fragments.
In GPUImage we pass two sets of coordinates - these are the coordinates of the plane itself and the texture coordinates. As a rule, we don’t have to take care of this, so we won’t go into details.
We will not include the vertex shader in our developed filter, but will use the standard shader from the GPUImageFilter class .
Create a new GPUImage project
Create a new project for iphone. To do this, execute: File-> Project → Single View Application. You can leave or uncheck the storyboards and ARC.
Next, connect the frameworks to our created project (right-click on the folder with the framework → Add files). Then we need to add some of the frameworks and libraries shown in the screenshot:
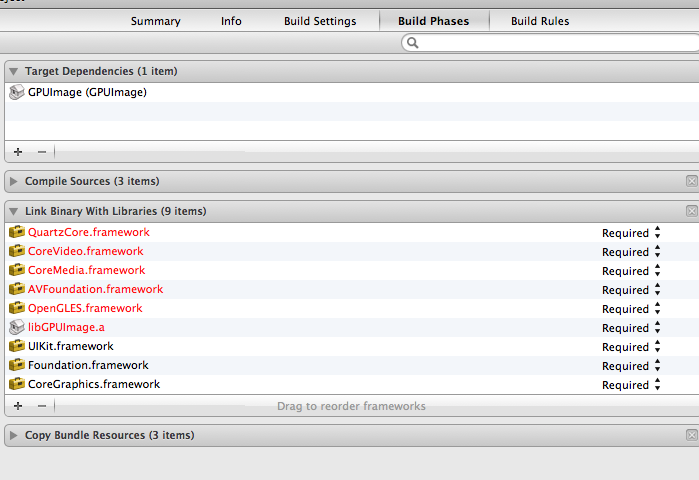
Finally, in the project build settings, we need to add the -ObjC flag to the rest of the linker flags and indicate the location of the folder with the GPUImage framework in the “header search paths”.
Now everything is ready and we can start writing our own filter! We are going to create a polar pixellate shader and expand it by adding twisting and the possibility of posterization (reducing the number of colors displayed on the screen).
Polar Pixellate Posterize Filter
Our filter will use a polar coordinate system to pixelate the incoming image.
The first thing to do is create a new class inherited from GPUImageFilter. Let's call it GPUImagePolarPixellatePosterizeFilter.
GPUImageFilter
#import "GPUImageFilter.h"
@interface GPUImagePolarPixellateFilterPosertize : GPUImageFilter {
    GLint centerUniform, pixelSizeUniform;
}
// The center about which to apply the distortion, with a default of (0.5, 0.5)
@property(readwrite, nonatomic) CGPoint center;
// The amount of distortion to apply, from (-2.0, -2.0) to (2.0, 2.0), with a default of (0.05, 0.05)
@property(readwrite, nonatomic) CGSize pixelSize;
@end
We are going to pass two uniform variables in this filter. The centerUniform variable is the point where the polar coordinate system originates from - by default it is 0.5, 0.5, i.e. the center of the screen. The coordinate system in OpenGL ranges from 0.0, 0.0 to 1.0, 1.0 with a start in the lower left corner (note we are talking about texture coordinates). The pixellate value determines how large the 'pixels' will be after applying the filter. Since we use a polar coordinate system, the value “x” is the radius (distance from the “center”), and the other value is the angle in radians.
Although GPUImageFilter takes responsibility for setting up OpenGL and creating the necessary framebuffers, we still need to write the shader itself and pass the necessary uniform variables to it.
Our first shader
Add the following code before the @ implementation line:
Code
NSString *const kGPUImagePolarPixellatePosterizeFragmentShaderString = SHADER_STRING
(
 varying highp vec2 textureCoordinate;
 uniform highp vec2 center;
 uniform highp vec2 pixelSize;
 uniform sampler2D inputImageTexture;
 void main()
 {
     highp vec2 normCoord = 2.0 * textureCoordinate - 1.0;
     highp vec2 normCenter = 2.0 * center - 1.0;
     normCoord -= normCenter;
     highp float r = length(normCoord); // to polar coords
     highp float phi = atan(normCoord.y, normCoord.x); // to polar coords
     r = r - mod(r, pixelSize.x) + 0.03;
     phi = phi - mod(phi, pixelSize.y);
     normCoord.x = r * cos(phi);
     normCoord.y = r * sin(phi);
     normCoord += normCenter;
     mediump vec2 textureCoordinateToUse = normCoord / 2.0 + 0.5;
     mediump vec4 color = texture2D(inputImageTexture, textureCoordinateToUse );
     color = color - mod(color, 0.1);
     gl_FragColor = color;
  }
 );
The shader code is enclosed in the macro SHADER_STRING (), to represent it as an NSString string.
A few words about data types and operations in GLSL. The main data types used are int, float, vector (vec2, vec3, vec4) and matrices (mat2, mat3, mat4). You can perform simple arithmetic operations on matrices and vectors, such as, for example, adding vec2 + vec2. In addition, operations to multiply a vector by a number (int or float) are allowed, for example: float * vec2 = vec2.x * float, vec2.y * float. You can also use the call: vec4.xyz if you want to get vec3. A complete list of supported types can be found here .
Let's see what happens here. Varying textureCoordinate of type vec2 comes to us from the default vertex shader. Uniform - the center and pixelSize variables - are the variables that we pass from our filter class. And finally, we have an inputImageTexture variable of type sampler2D. This uniform variable is set at the superclass, GPUImageFilter, and represents the two-dimensional texture of the image that we want to process.
You may have noticed that we always use the highp classifier. This is done to tell GLSL about the level of accuracy of our data types. As you can imagine, the higher the accuracy, the greater the accuracy of our data types. But this is not always relevant - for simple rendering, less accuracy will fit the screen, which will allow you to perform calculations a little faster. Accuracy classifiers are lowp, mediump, highp. You can learn more about accuracy and actual limitations here .
The shader always has the main function main (). The result of the fragment shader is the color that will be set for the fragment being processed. This color in our case is taken from the original image at the normCoord coordinates. We will use this value to perform pixelation depending on the position in the polar coordinate system.
The first thing we do is turn our coordinate system into a system with polar coordinates. The TextureCoordinate variable is defined between 0.0, 0.0 to 1.0, 1.0. The uniform variable Center is defined in the same range. In order to describe our screen in polar coordinates, we need coordinates from -1.0, -1.0 to 1.0, 1.0. The first two lines perform this conversion. The third line subtracts normCoord from the center. Those. we simply shifted the coordinate system to a new point centered in normCoord. We find the value of the radius and angle phi, after which we again return to the Cartesian coordinate system, shifting its center to its former place. Thus, we get the range 0.0, 0.0 1.0, 1.0, which is needed to search for textures. To do this, we call the texture2D () function, which takes two parameters as input:
Finally, we reduce the color gamut for red, green, blue (and alpha, but alpha is always 1.0 in this case ...) from 256 values for each component (16.8 million colors) to 10 (1000 colors) .
This is our fragment shader and it will work very quickly. If we needed to do the same operation on the processor (CPU) to achieve the same goal, it would take much more time. In many cases, real-time video filtering can be performed on the GPU, which would not be possible using the CPU.
We are completing the development of the filter
After we wrote the shader, the only thing left for us is the setters for the uniform variables. During initialization, we pass the text of the shader to the superclass, define pointers to uniform variables and set some default values.
Add the following code after @implementation:
Code
@synthesize center = _center;
@synthesize pixelSize = _pixelSize;
#pragma mark -
#pragma mark Initialization and teardown
- (id)init {
    if (!(self = [super initWithFragmentShaderFromString:kGPUImagePolarPixellatePosterizeFragmentShaderString])) {
                return nil;
    }
    pixelSizeUniform = [filterProgram uniformIndex:@"pixelSize"];
    centerUniform = [filterProgram uniformIndex:@"center"];
    self.pixelSize = CGSizeMake(0.05, 0.05);
    self.center = CGPointMake(0.5, 0.5);
    return self;
}
When invoking initWithFragmentShaderFromString, our shader goes through the appropriate methods for verification and compilation, so that it is ready to run on the GPU. If we wanted to submit the vertex shader in the same way, then for him there is the same challenge to go through all the same operations.
We must call [filterProgram uniformIndex:] for each uniform - variable contained in our shader. This method returns a pointer of type Glint to a Uniform variable, with which we can set the value of the variable.
Finally, we set some default values at the initialization stage, so that our filter works without user intervention.
The last thing we need to do is to set setters and getters for our uniform variables:
Code
- (void)setPixelSize:(CGSize)pixelSize
{
    _pixelSize = pixelSize;
    [self setSize:pixelSize forUniform: pixelSizeUniform program:filterProgram];
}
- (void)setCenter:(CGPoint)newValue;
{
    _center = newValue;
    [self setPoint:newValue forUniform: centerUniform program:filterProgram];
}
Create an application
Now create a simple video application. Let's go to the View Controller class, which we took as a template and configured earlier. Change the following lines in this file:
Code
#import "JGViewController.h"
#import "GPUImage.h"
#import "GPUImagePolarPixellatePosterizeFilter.h"
@interface JGViewController () {
    GPUImageVideoCamera *vc;
    GPUImagePolarPixellatePosterizeFilter *ppf;
}
@end
@implementation JGViewController
- (void)viewDidLoad {
    [super viewDidLoad];
    vc = [[GPUImageVideoCamera alloc] initWithSessionPreset:AVCaptureSessionPreset640x480 cameraPosition:AVCaptureDevicePositionBack ];
    vc.outputImageOrientation = UIInterfaceOrientationPortrait;
    ppf = [[GPUImagePolarPixellatePosterizeFilter alloc] init];
    [vc addTarget:ppf];
    GPUImageView *v = [[GPUImageView alloc] init];
    [ppf addTarget:v];
    self.view = v;
    [vc startCameraCapture];
}
-(void)touchesBegan:(NSSet *)touches withEvent:(UIEvent *)event {
    CGPoint location = [[touches anyObject] locationInView:self.view];
    CGSize pixelS = CGSizeMake(location.x / self.view.bounds.size.width * 0.5, location.y / self.view.bounds.size.height * 0.5);
    [ppf setPixelSize:pixelS];
}
-(void)touchesMoved:(NSSet *)touches withEvent:(UIEvent *)event {
    CGPoint location = [[touches anyObject] locationInView:self.view];
    CGSize pixelS = CGSizeMake(location.x / self.view.bounds.size.width * 0.5, location.y / self.view.bounds.size.height * 0.5);
    [ppf setPixelSize:pixelS];
}
We create a video camera with a specific resolution and location of the GPUImageVideoCamera and our GPUImagePolarPixellatePosterizeFilter filter.
And set the GPUImageView as the main view of our view controller.
Thus, our conveyor looks as follows: video from the camera - filter pikselizatsii and pasteurization (polarpixellateposterizefilter) - GPUImageView, which we will use to display video on the phone screen.
At this stage, we can already run the application and get a working filter. But it would be nice to add some more interactivity! To do this, we use the touchesmoved and touchesbegan methods , which capture the click, affecting the pixelSize uniform variable of our filter.
To get the smallest 'pixels', just touch the upper left corner of the image, and for the largest - in the lower right. Now you can experiment with the filter yourself to get completely different results.
Congratulations! You wrote your first shader!
Other examples of image processing using shaders
Reducing levels of red and green in the image, increasing blue:
Code
lowp vec4 color = sampler2D(inputImageTexture, textureCoordinate);
lowp vec4 alter = vec4(0.1, 0.5, 1.5, 1.0);
gl_FragColor = color * alter;
Brightness reduction:
Code
lowp vec4 textureColor = texture2D(inputImageTexture, textureCoordinate);
gl_FragColor = vec4((textureColor.rgb + vec3(-0.5)), textureColor.w);
Popular image blur:
Code
mediump float texelWidthOffset = 0.01;
mediump float texelHeightOffset = 0.01;
vec2 firstOffset = vec2(1.5 * texelWidthOffset, 1.5 * texelHeightOffset);
vec2 secondOffset = vec2(3.5 * texelWidthOffset, 3.5 * texelHeightOffset);
mediump oneStepLeftTextureCoordinate = inputTextureCoordinate - firstOffset;
mediump twoStepsLeftTextureCoordinate = inputTextureCoordinate - secondOffset;
mediump oneStepRightTextureCoordinate = inputTextureCoordinate + firstOffset;
mediump twoStepsRightTextureCoordinate = inputTextureCoordinate + secondOffset;
mediump vec4 fragmentColor = texture2D(inputImageTexture, inputTextureCoordinate) * 0.2;
fragmentColor += texture2D(inputImageTexture, oneStepLeftTextureCoordinate) * 0.2;
fragmentColor += texture2D(inputImageTexture, oneStepRightTextureCoordinate) * 0.2;
fragmentColor += texture2D(inputImageTexture, twoStepsLeftTextureCoordinate) * 0.2;
fragmentColor += texture2D(inputImageTexture, twoStepsRightTextureCoordinate) * 0.2;
gl_FragColor = fragmentColor;
Getting started with GPUImage is easy enough and it's quite powerful to embody everything you dreamed about. And even more, GPUImage is a dizzying number of filters, color settings, blending modes, and visual effects that you could only dream about (or even didn't know about their existence). You can find a bunch of examples using modern filters that include edge recognition, fisheye, and a ton of other cool stuff.
Sources
Introduction to OpenGL ES 2.0 (GLSL) and the graphics pipeline device: one , two , three .
The article is a creative adaptation with knowledge processing and translation: source 1 , source 2