 March 20, 2013 at 18:50
Testing memory with Memtest86 + and VirtualBox
By type of activity, one has to deal with hardware, with a large number of computers of various configurations, and, in particular, to test them. Naturally, I want this process to be automated as much as possible. For these purposes, I use diskless Linux download via PXE, on which the corresponding scripts with different tests are prepared for autorun, daemons monitor the state of the system, and monitoring on the server shows the results and swears if something is wrong.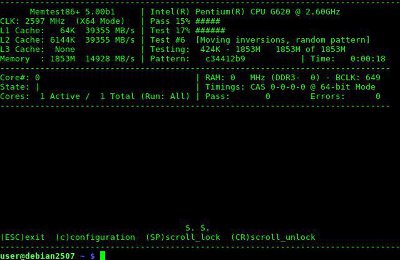 In general, everyone can be satisfied, but I never liked the process of checking RAM. Native for Linux memtester, subjectively, works too long before it finds something, and it does not always find it. Building a kernel or playing with archives is a good way to check the system for stability, but memory is not always to blame for glitches. And the most effective way, ultimately, is the good old Memtest86. But with it it is necessary to monitor each computer individually, the entire automation process is lost, and when there are too many computers, time starts to run out. Unfortunately, deprived of all sorts of cunning kvm'ami.
Reflecting on this, I turned my eyes to virtualization. Why not give it a try? At least just for lulz. Memory is used the same.
For these purposes, in VirtualBox we create a virtual machine of the simplest configuration: without a network, without hard drives, only a CD-ROM where the image with MemTest is connected. We create using the GUI or in the console:
We connect the boot image with Memtest to our machine. I used the fifth version beta, you can download it from the official forum .
Before starting, we clear the Linux cache from memory:
We decide how much free memory we will give for verification, and how much we will leave for the needs of the operating system:
If you leave too little memory, Linux starts to behave unstably, especially a diskless system where there is no swap.
The fifth version of the memtest supports multi-core, we’ll take advantage of this and give it a test as much as you wish:
We make the appropriate changes to the machine:
And run in the background in console mode:
You can turn off the virtual machine with the command:
We monitor the status of the test using the VirtualBox debugger:
An example of output to the terminal:
Now it’s enough to parse the output to the terminal in any convenient way to find out the time, number of passes, errors found, and other interesting information. And, accordingly, write control scripts for this business, for the sake of which everything was conceived.
For example, if I have an error, a “screenshot” of the screen is written to the log, and a corresponding warning is sent to the server:
I started this business to be tested on several computers with not the highest quality memory, and the result was not long in coming:
To confirm, restart Memtest in normal mode:
The method surprisingly works. Therefore, I use it for myself on an equal basis with others. Thus, it turned out to reveal already many memory bars with errors.
Pros:
There are certainly disadvantages:
Hope someone finds the article helpful. Well, or at least smile.
In general, everyone can be satisfied, but I never liked the process of checking RAM. Native for Linux memtester, subjectively, works too long before it finds something, and it does not always find it. Building a kernel or playing with archives is a good way to check the system for stability, but memory is not always to blame for glitches. And the most effective way, ultimately, is the good old Memtest86. But with it it is necessary to monitor each computer individually, the entire automation process is lost, and when there are too many computers, time starts to run out. Unfortunately, deprived of all sorts of cunning kvm'ami. Reflecting on this, I turned my eyes to virtualization. Why not give it a try? At least just for lulz. Memory is used the same.
For these purposes, in VirtualBox we create a virtual machine of the simplest configuration: without a network, without hard drives, only a CD-ROM where the image with MemTest is connected. We create using the GUI or in the console:
VBoxManage createvm --name memtest --ostype Linux --register
We connect the boot image with Memtest to our machine. I used the fifth version beta, you can download it from the official forum .
VBoxManage storagectl memtest --name "IDE Controller" --add ide
VBoxManage storageattach memtest --storagectl "IDE Controller" --port 0 --device 0 --type dvddrive --medium /home/user/mt500b1.iso
Before starting, we clear the Linux cache from memory:
sudo sync
sudo echo 3 > /proc/sys/vm/drop_caches
We decide how much free memory we will give for verification, and how much we will leave for the needs of the operating system:
a=`free -m | grep "cache:" | awk {'print $4'}`
b=$(($a*20/100))
free=$(($a - $b))
If you leave too little memory, Linux starts to behave unstably, especially a diskless system where there is no swap.
The fifth version of the memtest supports multi-core, we’ll take advantage of this and give it a test as much as you wish:
cpus=$((`lscpu | grep "Core(s) per socket:" | awk {'print $4'}`*`lscpu | grep "Thread(s) per core:" | awk {'print $4'}`-1))
if [ $cpus -lt 1 ]; then
cpus=1
fi
We make the appropriate changes to the machine:
VBoxManage modifyvm memtest --memory $free --cpus $cpus --ioapic on
And run in the background in console mode:
VBoxManage startvm memtest --type headless
You can turn off the virtual machine with the command:
VBoxManage controlvm memtest poweroff
We monitor the status of the test using the VirtualBox debugger:
VBoxManage debugvm memtest info vgatext
An example of output to the terminal:
Hidden text
--------------------------------------------------------------------------------
      Memtest86+ 5.00b1     | Intel(R) Pentium(R) CPU G620 @ 2.60GHz
CLK: 2600 MHz  (X64 Mode)   | Pass 10% ###
L1 Cache:   64K  39386 MB/s | Test  4% #
L2 Cache: 6144K  50971 MB/s | Test #6  [Moving inversions, random pattern]
L3 Cache:  None             | Testing:    0K -   32M     32M of 1853M
Memory  : 1853M  14939 MB/s | Pattern:   e2e5e6e8       R   | Time:   0:00:16
------------------------------------------------------------------------------
Core#: 0                               | RAM: 0   MHz (DDR3-  0) - BCLK: 650
State: -                               | Timings: CAS 0-0-0-0 @ 64-bit Mode
Cores:  1 Active /  1 Total (Run: All) | Pass:       0        Errors:      0
------------------------------------------------------------------------------
                                     S. S.
(ESC)exit  (c)configuration  (SP)scroll_lock  (CR)scroll_unlock
--------------------------------------------------------------------------------
Now it’s enough to parse the output to the terminal in any convenient way to find out the time, number of passes, errors found, and other interesting information. And, accordingly, write control scripts for this business, for the sake of which everything was conceived.
For example, if I have an error, a “screenshot” of the screen is written to the log, and a corresponding warning is sent to the server:
if [[ `VBoxManage debugvm memtest info vgatext | grep Errors: | awk {'print $13'}` > 0 ]];then
	"$path"/sendmess flog "`VBoxManage debugvm memtest info vgatext`"
	"$path"/sendmess nonstoperr "[error] Memtest"
	sleep 15
fi
I started this business to be tested on several computers with not the highest quality memory, and the result was not long in coming:
Hidden text
--------------------------------------------------------------------------------
      Memtest86+ 5.00b1     | Intel(R) Core(TM) i3-2130 CPU @ 3.40GHz
CLK: 3383 MHz  (X64 Mode)   | Pass  7% ##
L1 Cache:   64K  51253 MB/s | Test 77% ##############################
L2 Cache: 6144K  51253 MB/s | Test #5  [Moving inversions, 8 bit pattern]
L3 Cache:  None             | Testing: 2048M - 3042M    994M of 3042M
Memory  : 3042M        MB/s | Pattern:   80808080           | Time:   0:00:38
------------------------------------------------------------------------------
Core#: 012                             | RAM: 0   MHz (DDR3-  0) - BCLK: 845
State: ---                             | Timings: CAS 0-0-0-0 @ 64-bit Mode
Cores:  3 Active /  3 Total (Run: All) | Pass:       0        Errors:        2
------------------------------------------------------------------------------
Tst  Pass   Failing Address          Good       Bad     Err-Bits  Count CPU
---  ----  -----------------------  --------  --------  --------  ----- ----
  3     0  0004396be2c -  1081.6MB  02020202  02020206  00000004      1   1
  3     0  0004396bd3c -  1081.6MB  02020202  0202020a  00000008      2   1
(ESC)exit  (c)configuration  (SP)scroll_lock  (CR)scroll_unlock
--------------------------------------------------------------------------------
To confirm, restart Memtest in normal mode:
indeed there is a mistake
The method surprisingly works. Therefore, I use it for myself on an equal basis with others. Thus, it turned out to reveal already many memory bars with errors.
Pros:
- This is the good old Memtest with an eye-pleasing interface.
- The ability to fully automate its work.
- We have the corresponding efficiency.
There are certainly disadvantages:
- The memory is not fully tested, but only part of it.
- This method alone can lead to unstable operation of the system. Rarely, but it happens, unfortunately.
Hope someone finds the article helpful. Well, or at least smile.









