 April 1, 2013 at 13:00
Smart home: protection against water leaks, Aquastorozh system
I already wrote about the components of a smart home - a lighting control system . A smart home, like any robot, must obey the three laws of robotics , the third of which says: the robot must take care of its security to the extent that it does not contradict the First and Second Laws. Those. One of the tasks of a smart home is to take care of its safety, to prevent break-ins, fires, flooding, and other damage. We’ll talk about protection against leaks and flooding today.
Aquastorozh is a system that automatically shuts off water when flooding is detected. A pipe burst - water slashes on the floor, falls on the sensor, and the servo-driver shuts off the taps on risers. Of course, this will not save you from wet floors - part of the water will still be on the floor, but the repair will protect, and at the same time, protect the neighbors below from flooding after flooding. Let's see, we will analyze the Aquastorozh system into parts and find out whether it is so good?
Controller
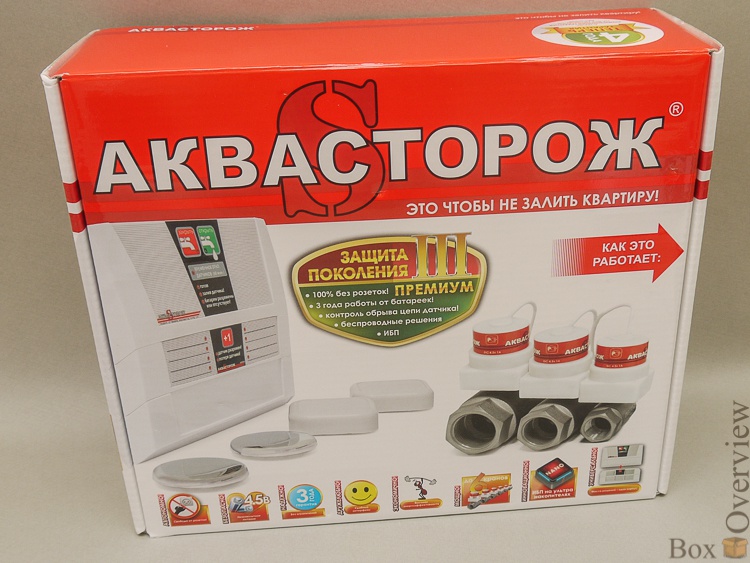
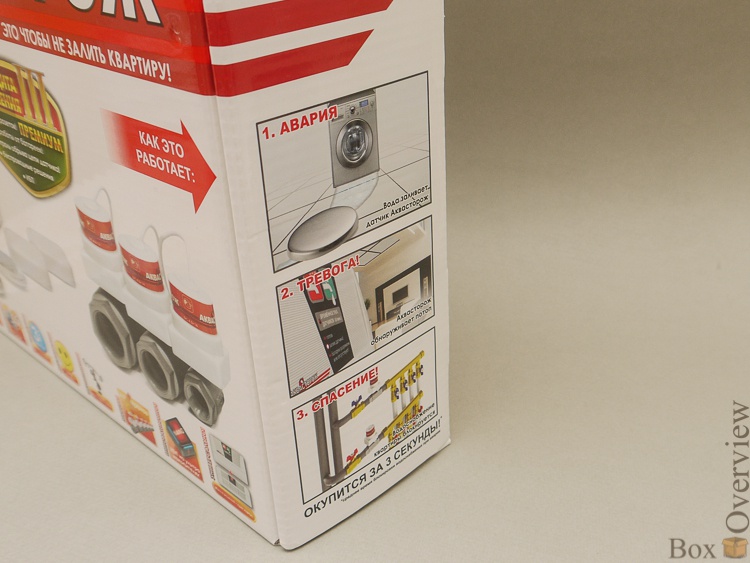
The entire kit is located in such a box: The kit is
shown on the front, and the principle of the system’s operation is shown on the side:
There is a good and clearly written user manual:

The main part of the system looks like this:
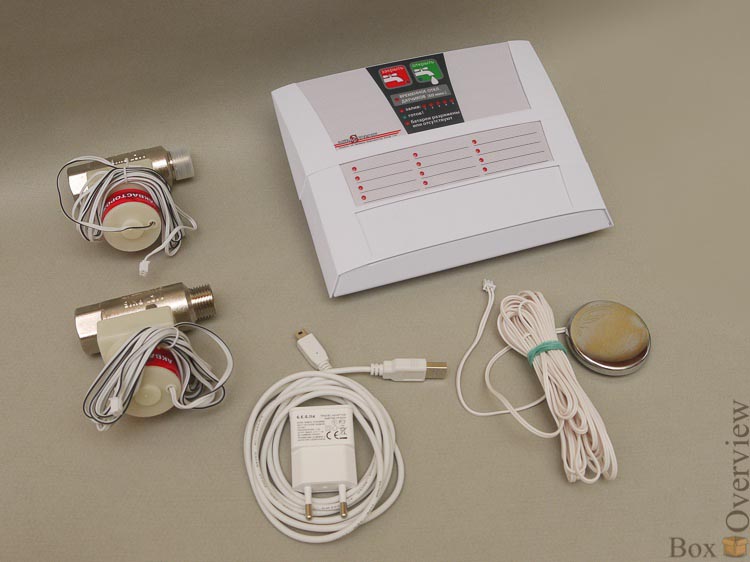
Two taps for cold and hot water, the main control unit, sensors Bay, external power supply.
Here is the main unit (TK03) closer:
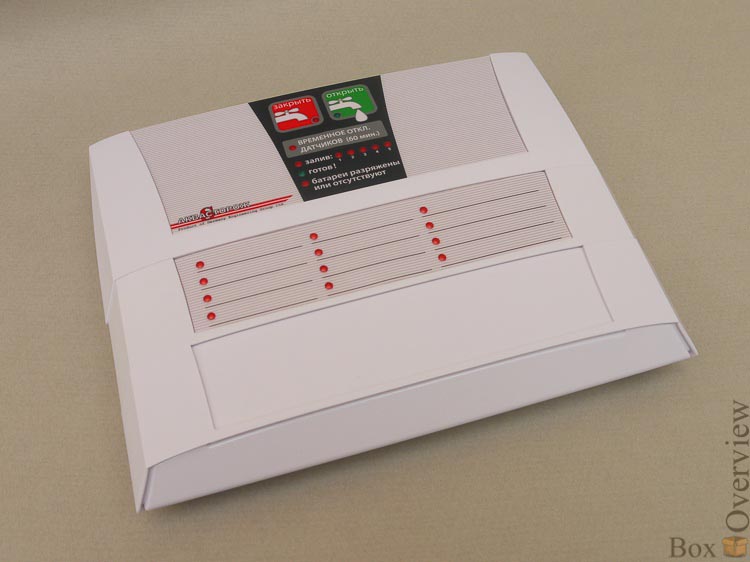
The controller is made very interesting - it is assembled as a constructor into which additional extension blocks are inserted. Lack of 6 wired sensors? Add a panel, we get 18 sensors. Want to make a wireless system out of a regular system? We insert the radio base and plug it into a special plug. Need the ability to turn off the heat or pump when the water is turned off? We connect the panel with power rails. Not enough standard battery pack? We insert another one, extend the autonomous operation of the system for another year (if the system has only wired sensors, then for three years).
The entire system, except for wired sensors, has a 4-year warranty. The sensors have a lifetime warranty. True, they promise free replacement of no more than 3 sensors per user, apparently guided by the consideration "if a person breaks 3 sensors in a row, then the problem is not with the sensors."
In my version of the sensors there are four - two wired, and two radio sensors. The system can simultaneously work with both of them. The maximum number of wireless sensors is 8 (2 included), or 20 with an expander panel (TK19). The number of wired sensors is almost unlimited - a chain of up to 100 pieces can be connected to each connector, in total - as many as 600 pieces.
The site has a page on which all possible components with articles are described - in the future I will give them in brackets for convenience.
Very interesting solution. Here is the mechanism for connecting the blocks, on one side of the latch:
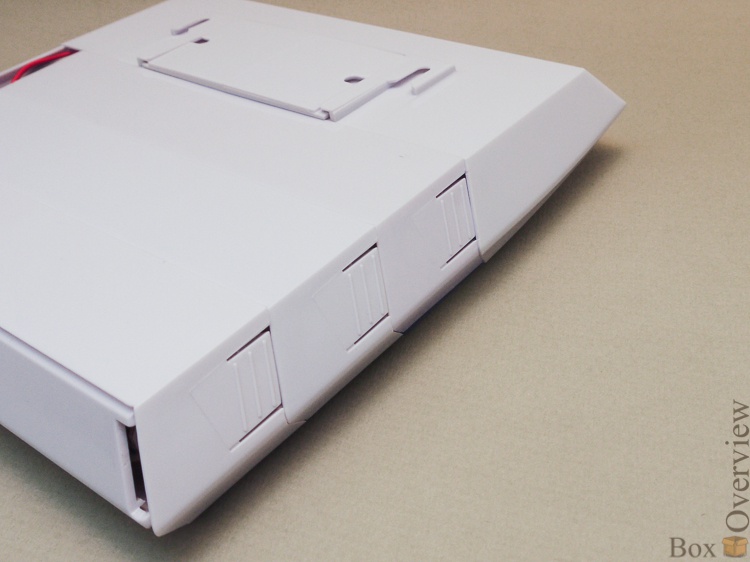
On the other, there is a place for the wires that connect the blocks to each other:

Disassemble. Although it’s difficult to call disassembly - we just pull the board out of the grooves:
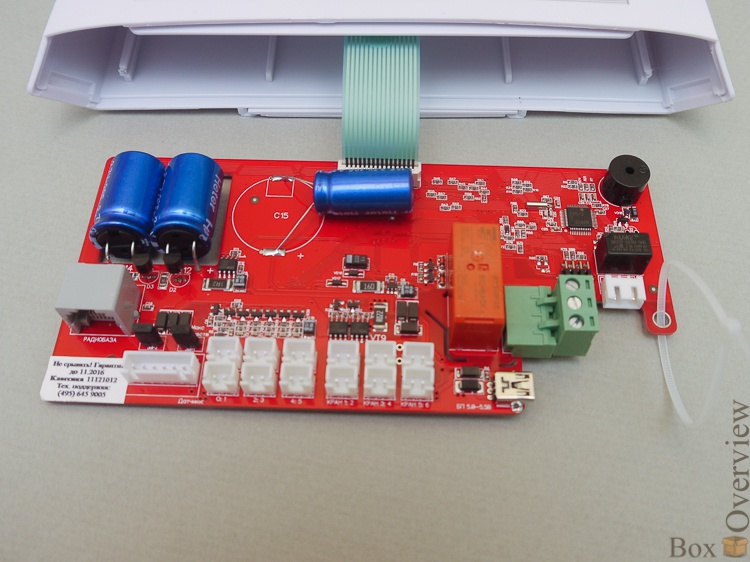
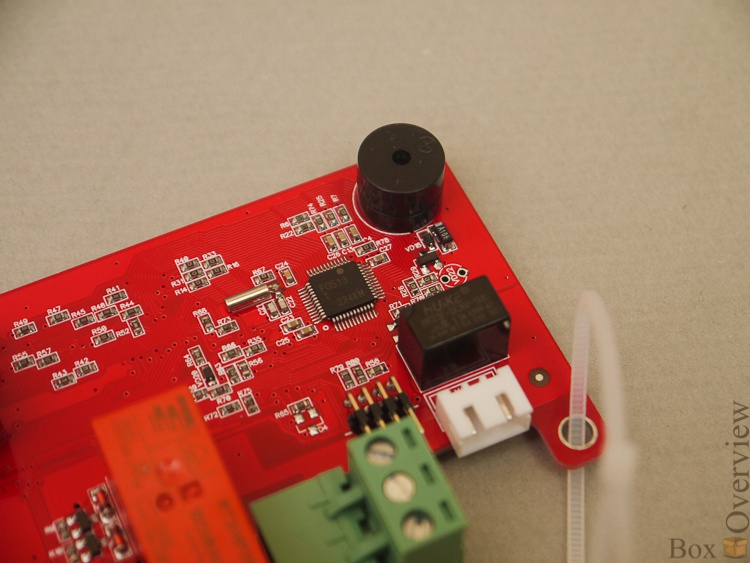
Controller, tweeter (very loud and nasty):
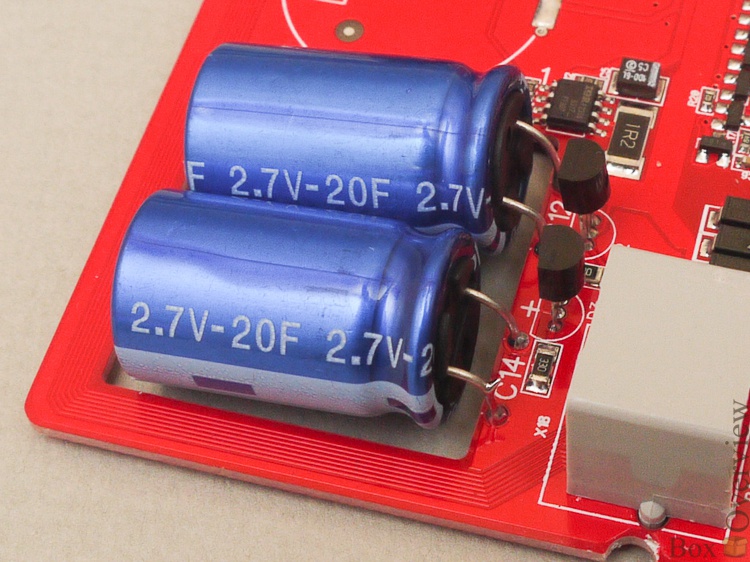
Two 20F ionistors:
And one on 10:
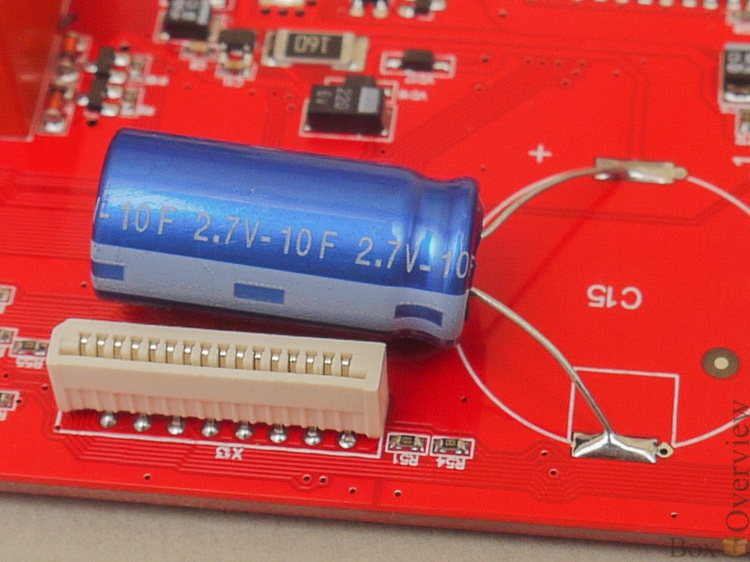
These are the same Nano-UPS :)
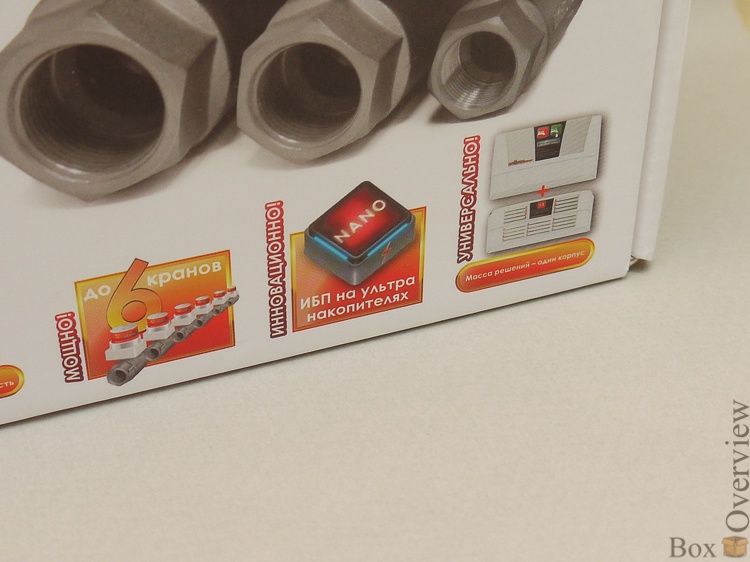
But in fact, it’s right - they store a supply of energy, which is enough for the device to work and turn off the taps after the batteries are completely exhausted. In general, if an accident occurs - the system will work and block the water even with dead batteries. After that, you can still open the taps with the button once, if you urgently need water, and there is no time to run after the batteries - this moment is thought out, which is nice. But after that, the batteries will have to be replaced.
Below the board are 14 connectors, one of which is for the battery pack, one for connecting the blocks, 6 for wired sensors, and 6 for taps. As I already wrote - there can be an almost unlimited number of wired sensors - they can be connected in parallel to each other. However, when using a sensor with a break control, it must be the last in the chain - otherwise the controller will not notice a break after it.
Cranes
Here are two cranes (TK12):
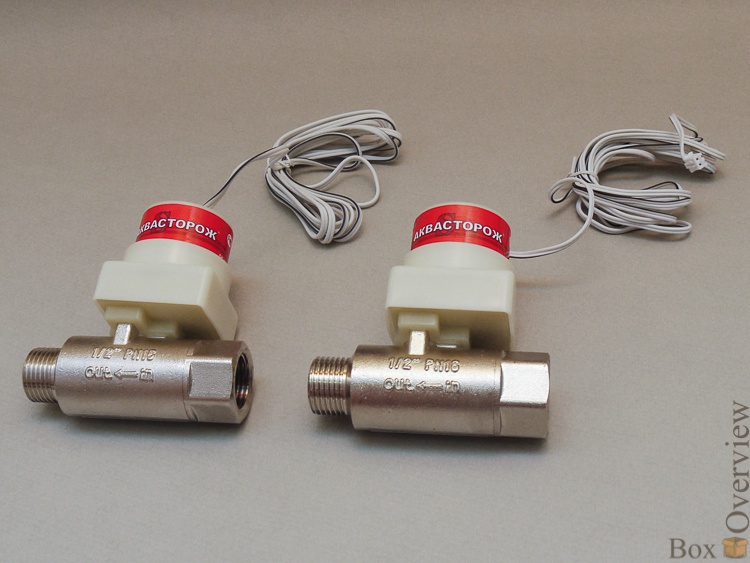
On each - a strict piece of paper :) We
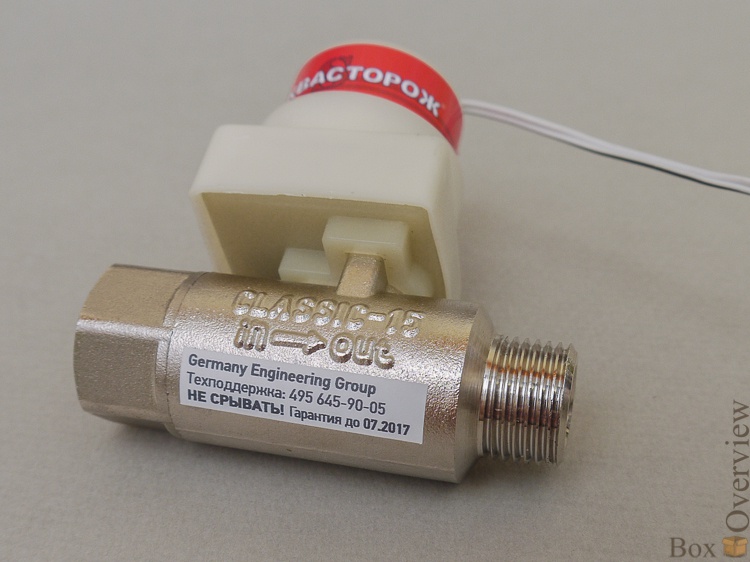
disassemble the crane into two parts:
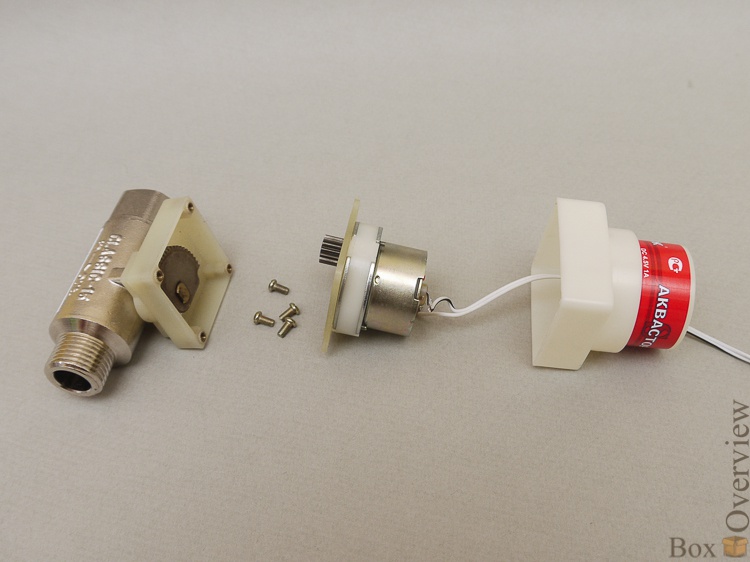
From the side of the crane:
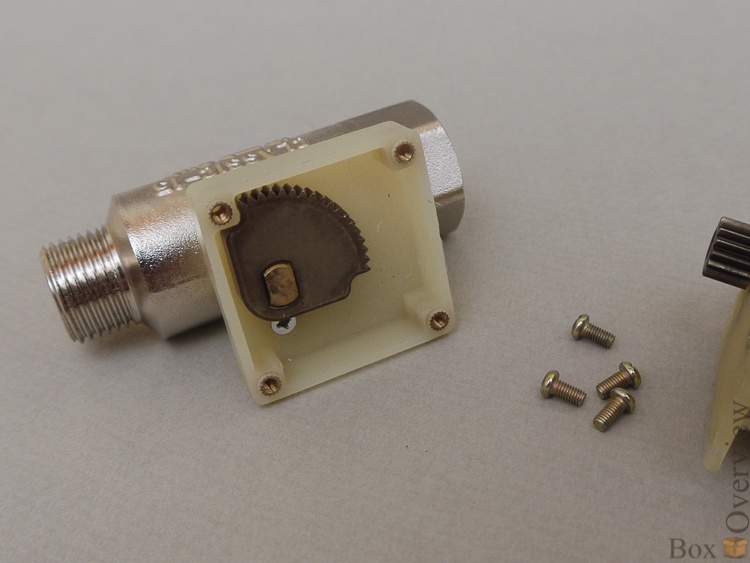
A serious metal gear that closes the ball valve. In the first versions it was plastic, but they fixed this defect. Engine side:
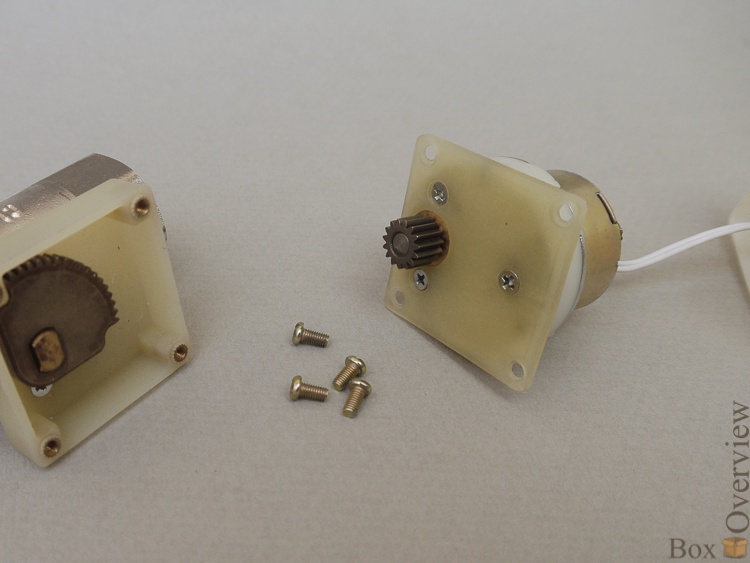
Also a metal gear of the output shaft of the gearbox (a device that reduces the speed of rotation and increases the force). Everything looks serious. Cranes, by the way, are also special - with low friction, to facilitate the rotation of the crane with a small engine. It closes really easily - you can use your finger to turn it without strain. Other systems have cranes with an engine that is powered by 220v, but there is another problem - safety and the inability to turn off the tap when the power is turned off. And according to the law of Murphy, electricity will be cut off at the most inopportune moment. So I'd rather overpay a little for a crane with a low voltage engine.
Sensor
A wired flooding sensor (TK24), as simple as two pennies:
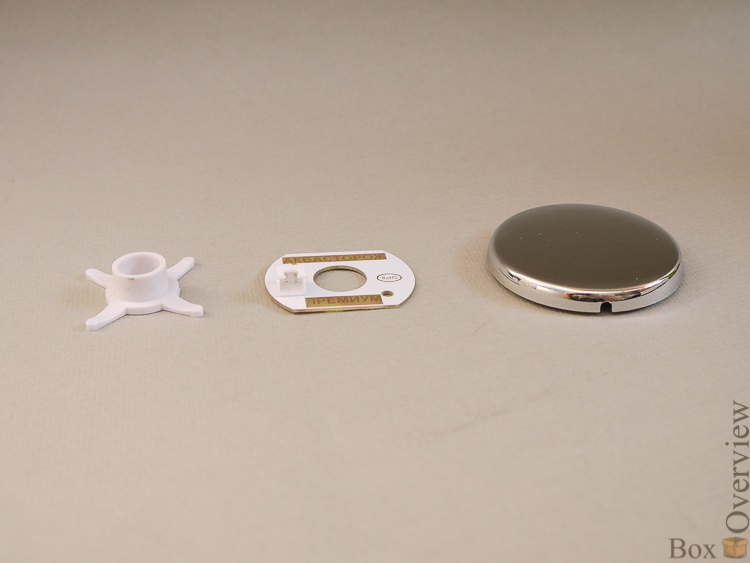
A wire, a body, and a fiberglass plate with two contacts. The contacts get wet - the resistance decreases, the controller understands this and shuts off the water. There is nothing to break here - the contacts are covered with immersion gold, which means they will not oxidize and do not rot.
Contact pads:
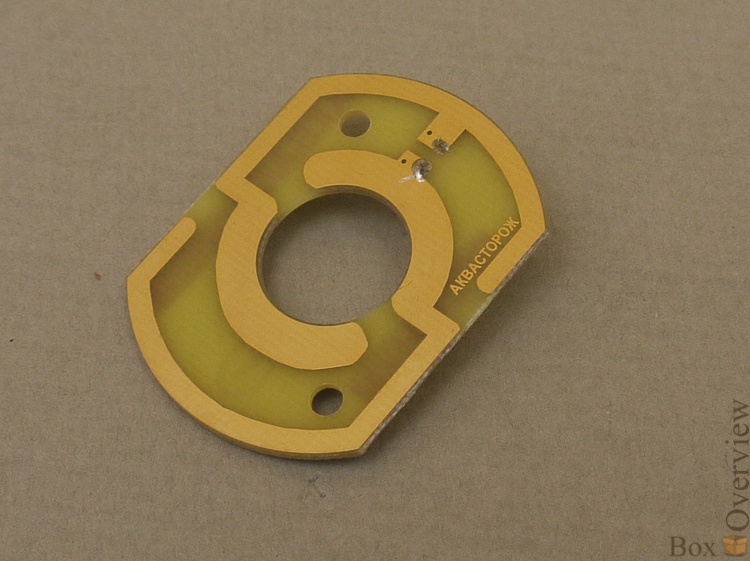
This is a “premium” sensor, and in simple terms - with wire break protection. The problem is that for the controller a “normal” sensor that did not work, and the sensor whose wire was cut off, is the same thing. Protection against this is a simple capacitor:
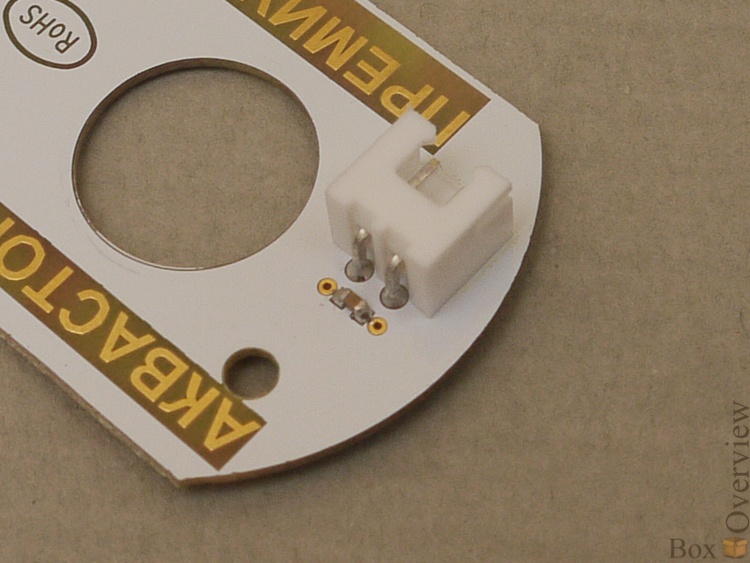
It conducts alternating current, and by its presence the controller can already determine three states - a short circuit (flood), no short circuit (sensor in place), and no contact (wire break).
The sensor is very simple, and if you have straight hands, you can make them as many as you want for your needs - at least with LUT from PCB, at least from two strips of a can and wire. Just take care of protection against splashes - otherwise one day during a shower you will be forced to get out of the bath and explain to the controller that it’s not a flood, but just a drop has fallen :) But I’m talking about a makeshift sensor - the “branded” case design provides protection against accidental splashes . In addition, they will only work if the water level reaches 1mm over the entire sensor area - this is approximately 10-15ml of water.
Radio base and sensors
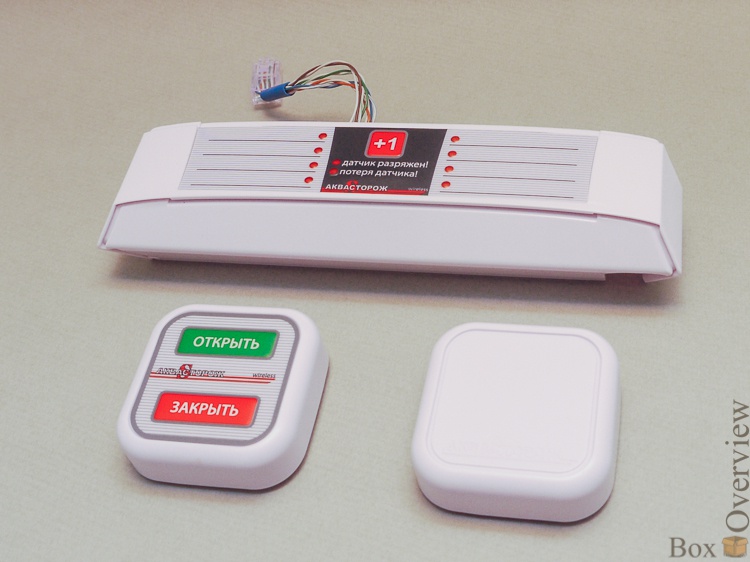
Optional unit (TK17), which adds several wireless sensors to conventional sensors. There are two of them in the set, but you can buy and add 6 more - they are attached to this block. And 12 more sensors are connected to the expansion unit (TK19). As a result, the total number of wireless sensors is 20 pieces. I don’t know why so much, except for some big cottage.
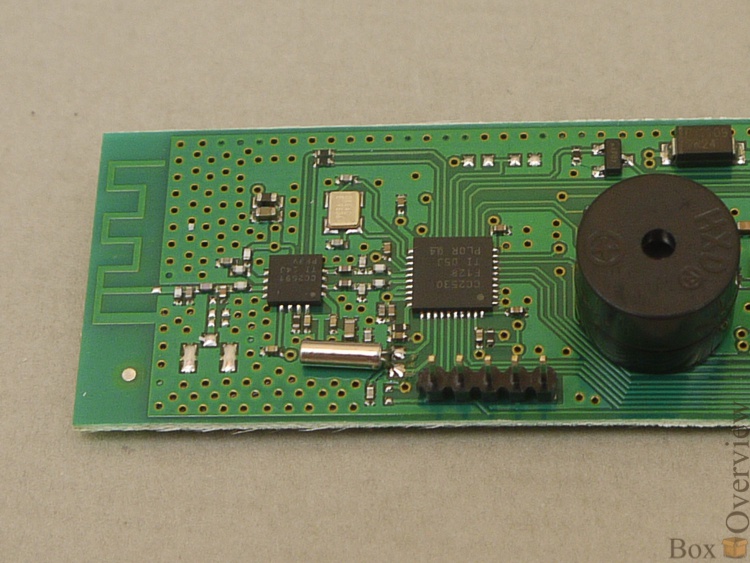
The radio base board has its own personal ionistor so as not to waste the energy of the main board for servicing the radio sensors.
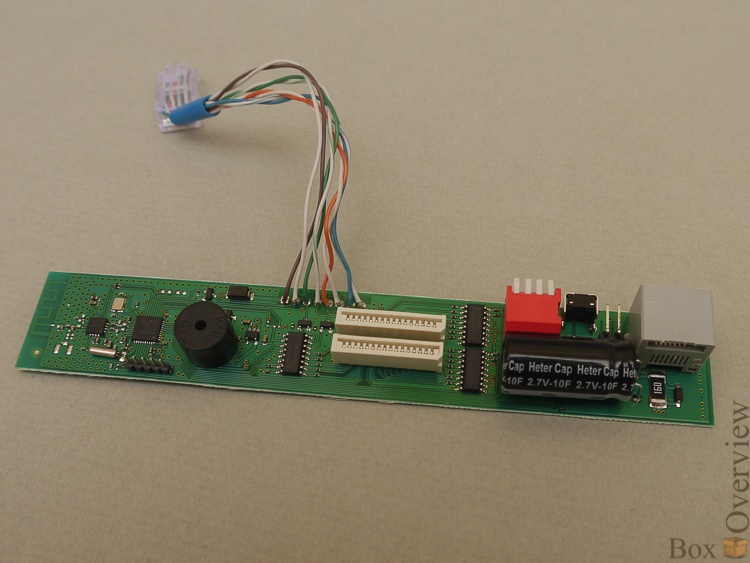
The controller, and another tweeter:
And here are the radio sensors: The
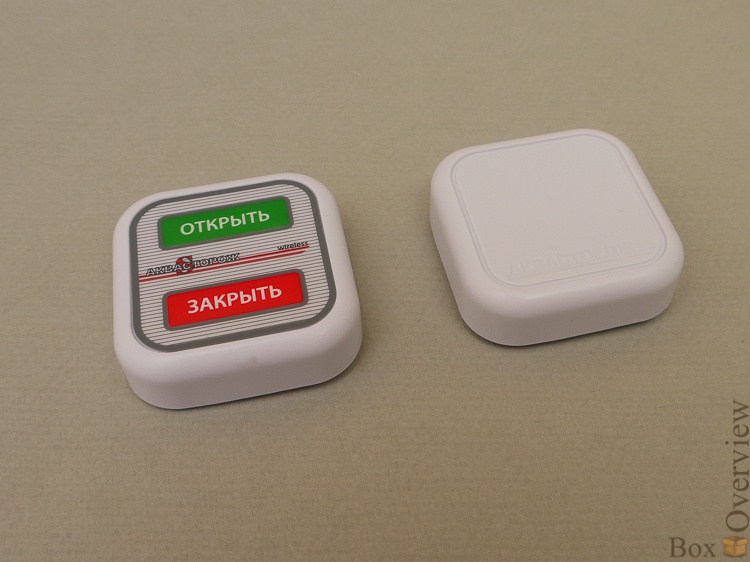
right one is just a sensor (TK16), and the left one is a sensor-control panel (TK18). The buttons can be used to close and open taps at any time.
On the back of both sensors, we already know the board with the contacts:
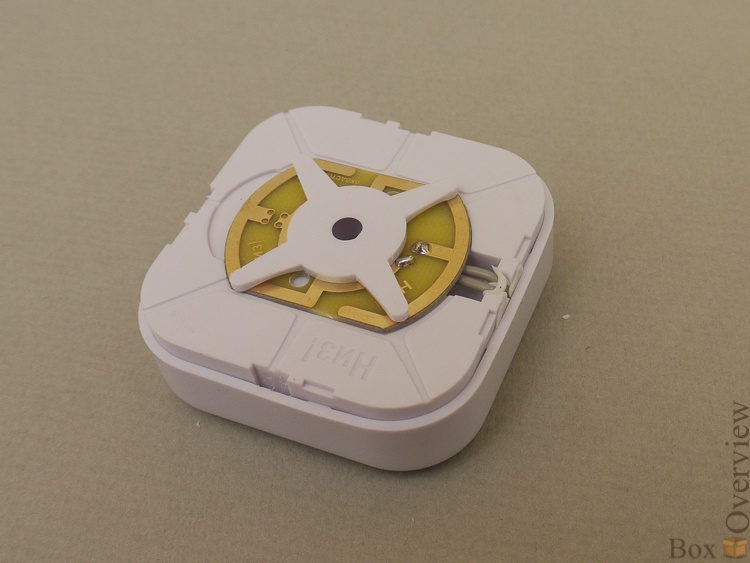
The sensor is disassembled quite simply - it is necessary in turn on all sides with a flat screwdriver to pry off the central part. It holds very firmly - as I understand it, this is done from the penetration of water.
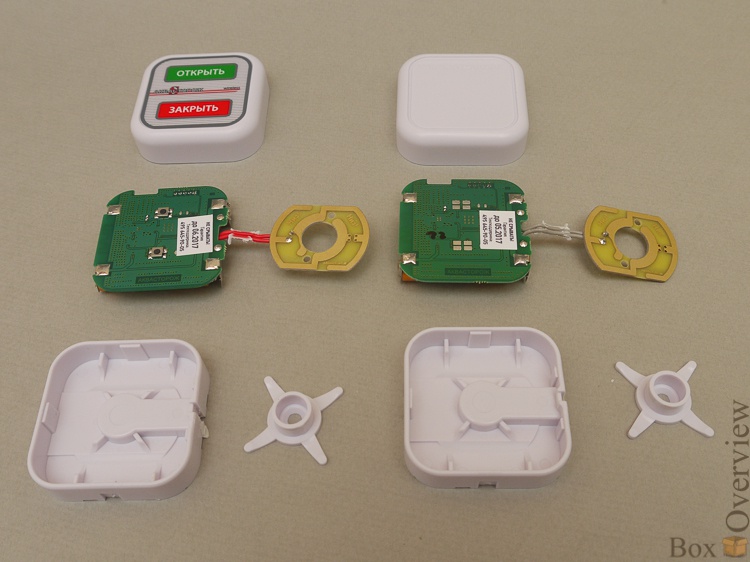
By the way, the sensor with the button is the same as the sensor without the button, only with the button:
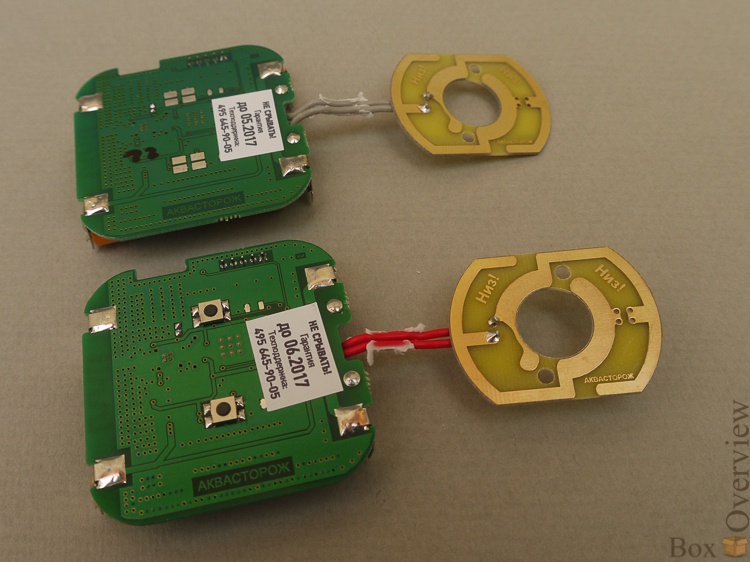
So if your hands itch and the soldering iron is heated, the button can be attached - I checked, the contacts work.
On the back of the board are battery contacts (2xAAA):
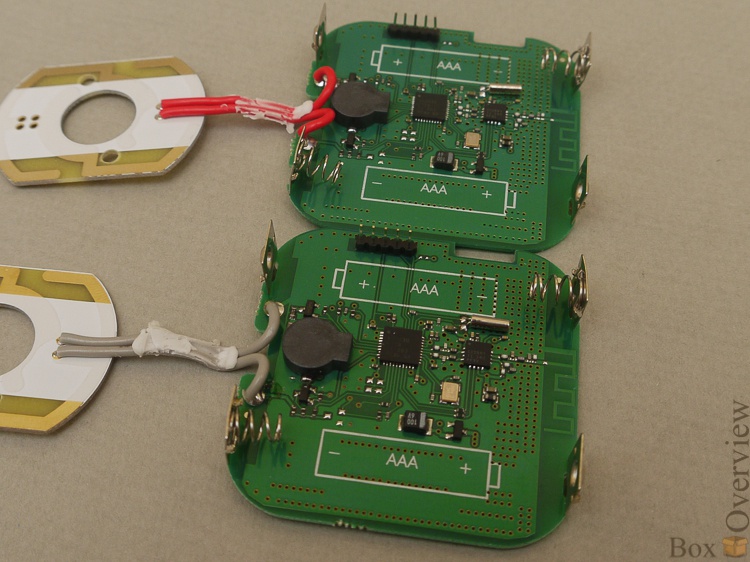
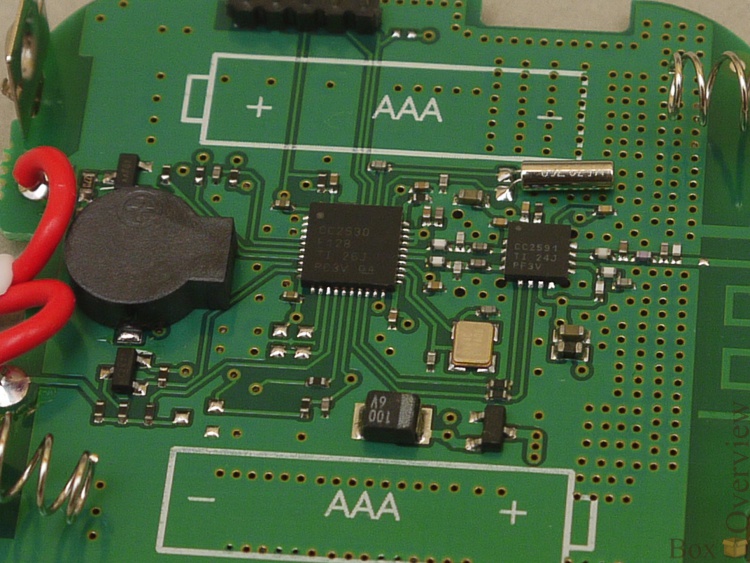
Controller, harness and tweeter:
Assembly
We begin to assemble the system to our requirements. Add the second battery pack:

Just insert the wires into the empty socket sockets:

And connect the two blocks together:
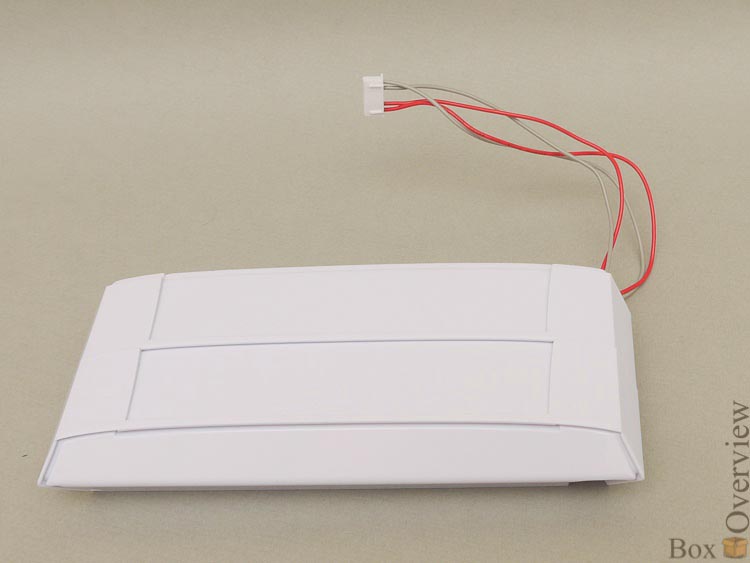
Take the radio base:
Turn off the additional sensor block and connect the radio base:
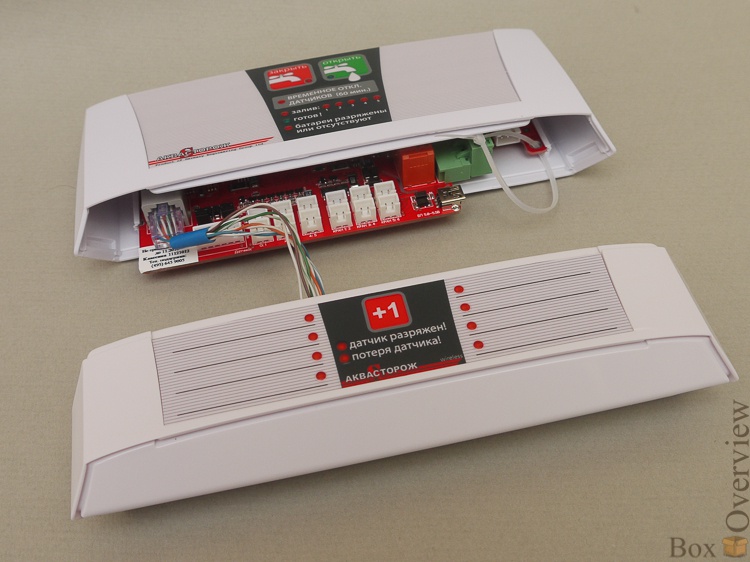
Connect the battery blocks:
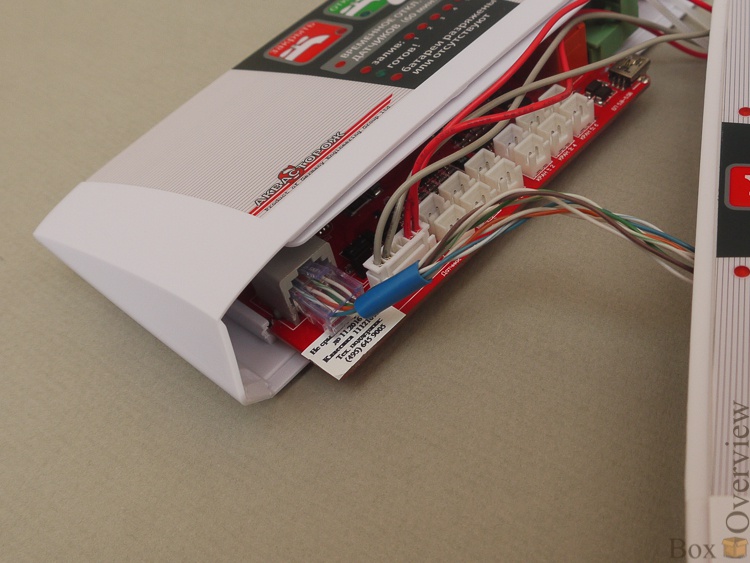
And put it all together:
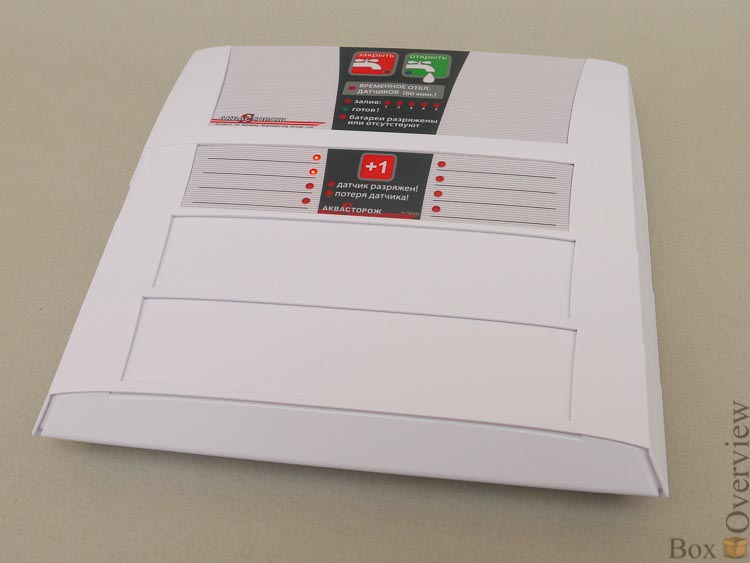
Constructor. By the way, we forgot to connect taps and a wired sensor. And external power, if necessary - when using it, battery power is not wasted, and wireless sensors are interrogated constantly. When using battery power, the reaction to pressing a button on a wireless sensor or to flooding it follows with a slight delay - from 1 second to 5.
Installation
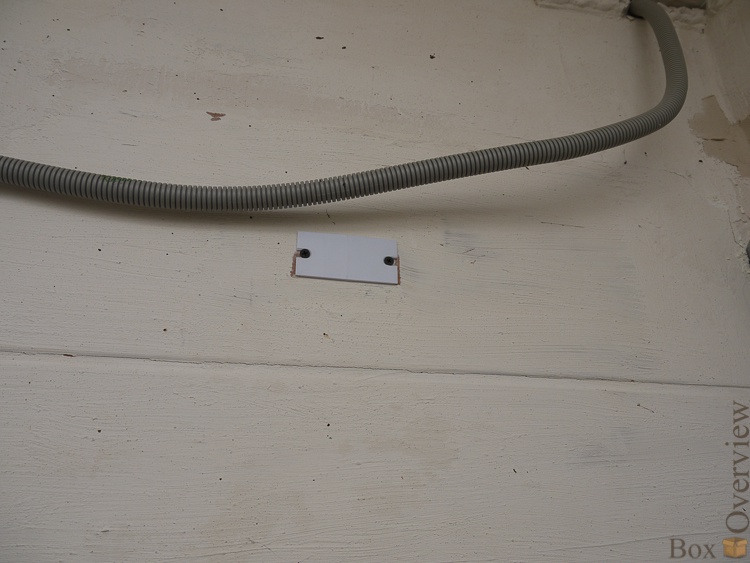
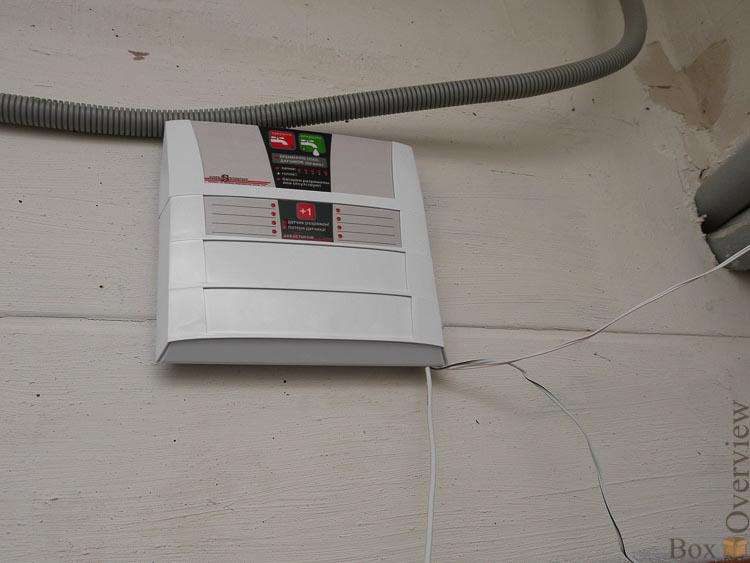
First, we do the simplest thing - we fasten the mounting panel with two screws:
And we hang the controller on it:
Disassemble the taps:
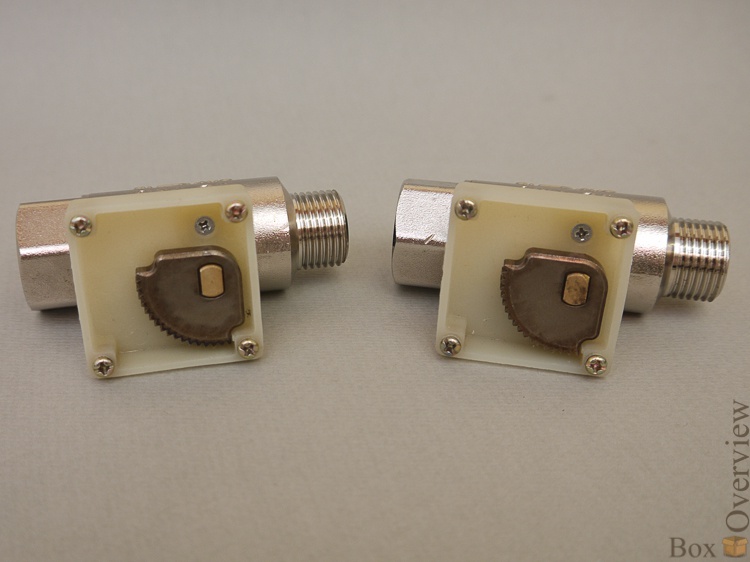
I did this for ease of installation on a ready-made system, because the engine protruded too much - it was not very convenient to fix it.
We wrap the faucet tap threads: We shut off the
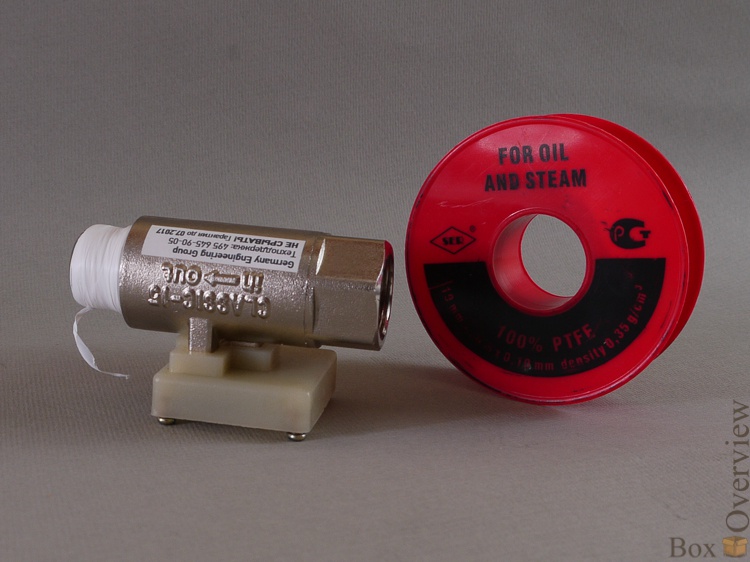
water, and we think where to insert the tap, so as not to cause plumbing to rebuild the entire system?
I have a little free space after the counter - where the check valve is. Look at the lower pipe (I didn’t take off the process of installing the tap on hot water):
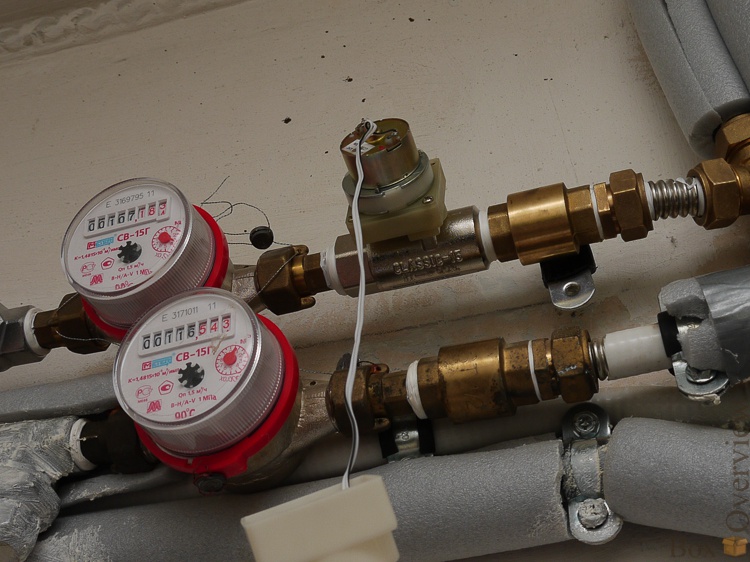
Unscrew what you unscrew. We see a free thread - we wrap it around with a tape :) We wind the

valve onto the tap:

And we wind this whole design back onto the counter.
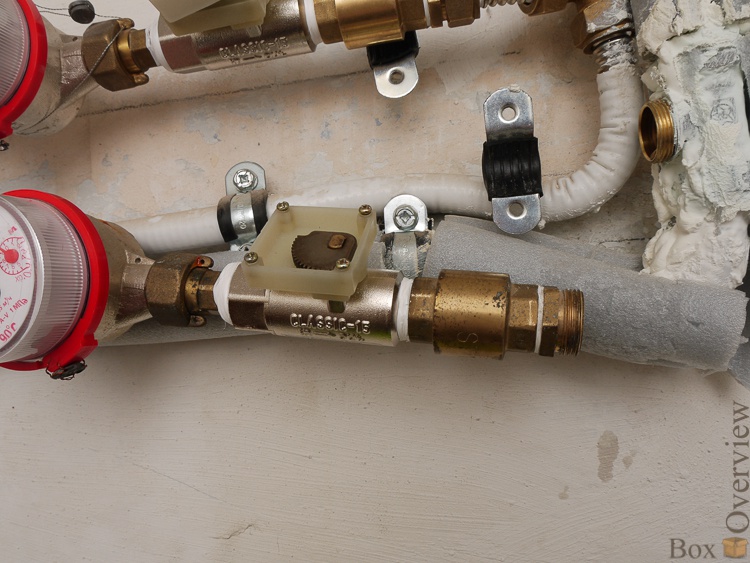
We cut the connecting pipe - the crane has taken its place, but can not transfer all the other pipes for this?
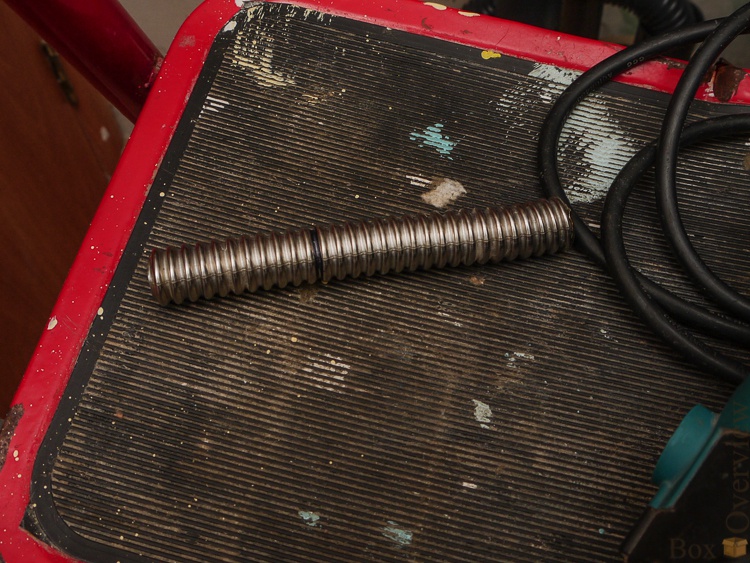
And we put it in place:
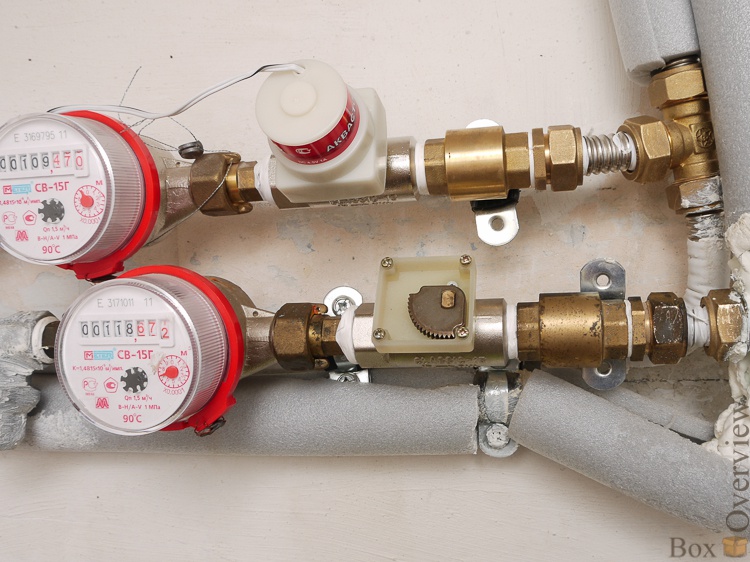
We fasten the engine in place and put the wires in order: We
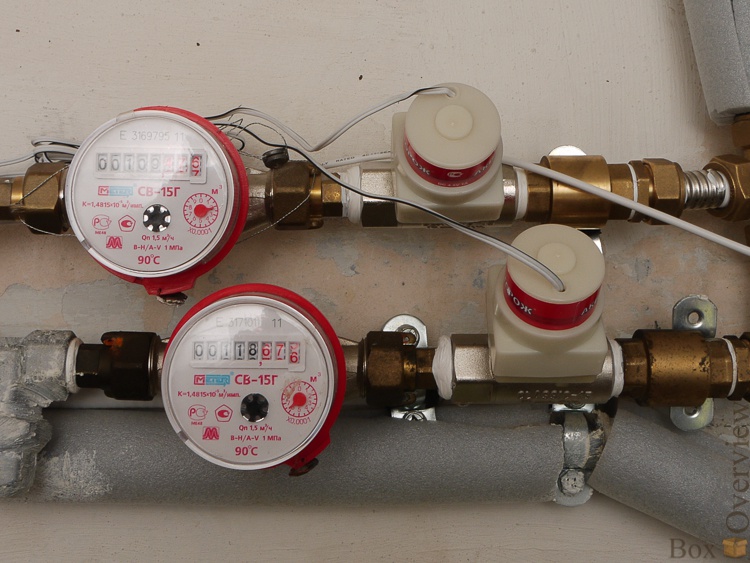
simply put the radio sensors in the places of possible flooding:

We remove the wire through a hole in the wall (it was necessary to cut the wire, and then connect it using adhesive tapes ): Lower the

wire down:

We fasten the platform to the floor, install the sensor itself:
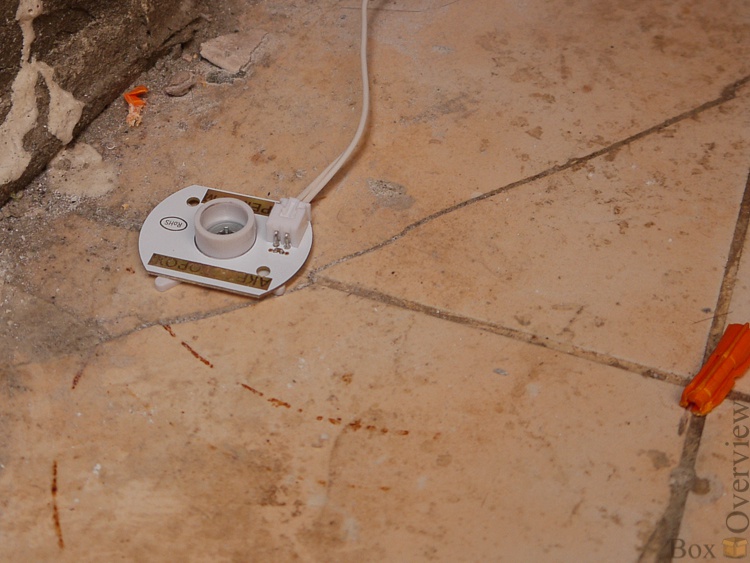
And close the lid: The
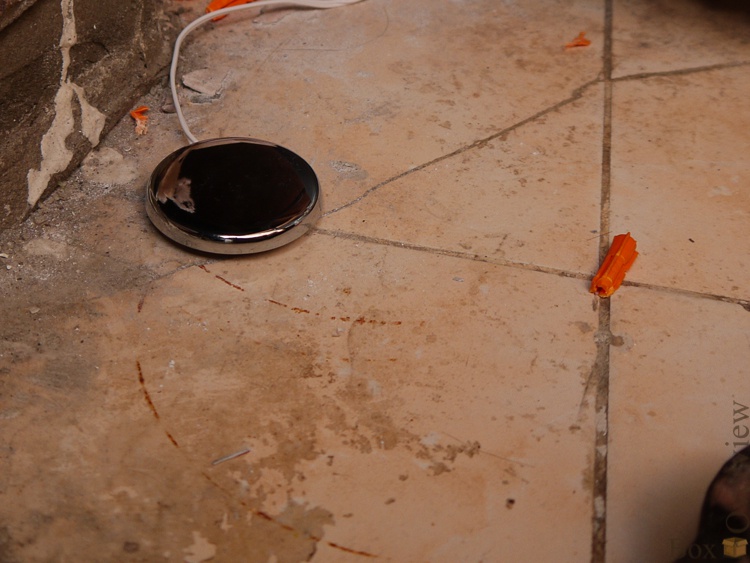
sensors are located around the apartment like this:
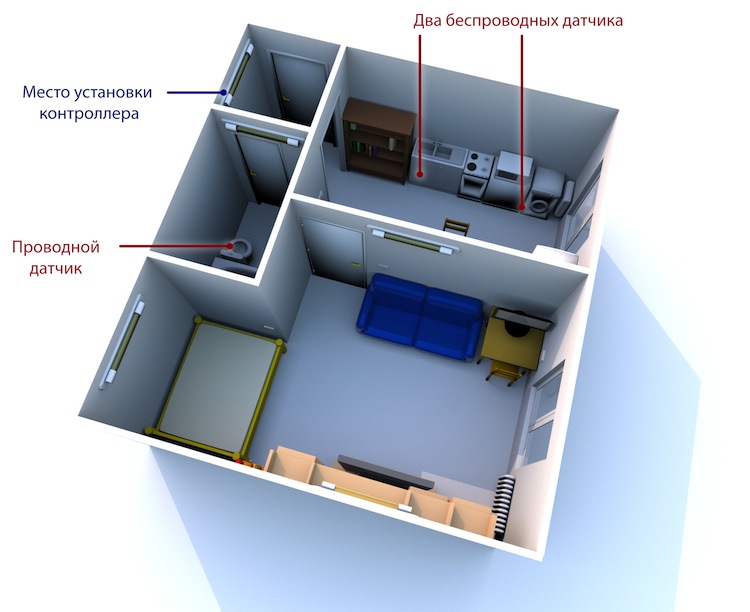
One under the sink, the other under the washing machine. Wired sensor - under the bath. The plan was drawn in SweetHome 3D
We connect the wires to the controller:
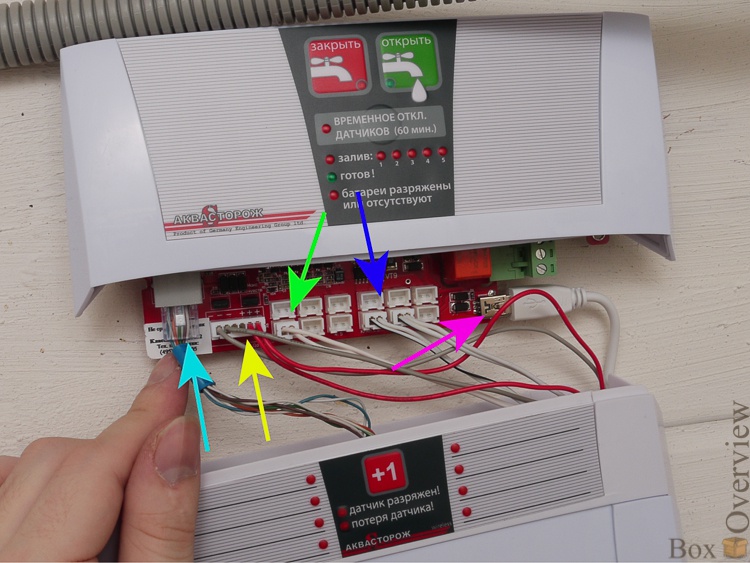
Green - sensor. In the first connector (it is signed as zero) - only the sensor (or a chain of sensors) is turned on without monitoring a wire break. The remaining connectors are sensors with open circuit monitoring.
The blue arrow is the faucet connectors. There is no difference, they all close and open the same way. Lilac and yellow - external and battery power, respectively. Blue - connector for expansion cards (we have a radio base connected to it).
In general, the system after installation looks like this: It
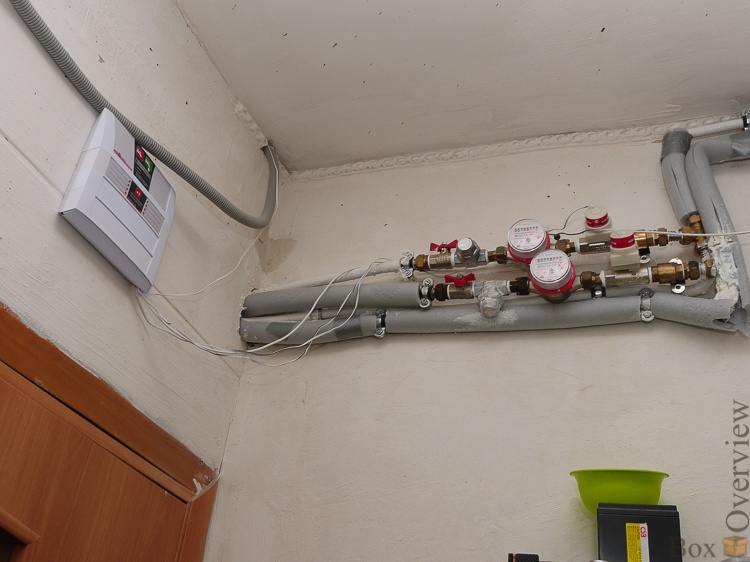
remains only to comb the wires so that they do not hang overhead.
Check
I did not break the pipe, but I had to figure out a small flood in the bathroom:
The price depends on the kit, for example the cheapest (TH00) will cost you 6,220 rubles. It includes two wired sensors, and one tap. The additional crane (TK12) is 2 390 rubles more. Thus, the most budgetary solution for an apartment with hot and cold water is 8610 rubles.
The version of the system that I had - will cost 15,990 rubles. It includes two cranes, and four sensors - two wired and two radios.
References
 Overview by AlexeyNadezhin
 Official site Offsite
Mirror
System Suppliers in Belarus
 Overview of the old version of the system from DataLab
 Discussion on IXBT
If you do not have an account on Habrahabr, you can read and comment on our articles on BoxOverview.com
Aquastorozh is a system that automatically shuts off water when flooding is detected. A pipe burst - water slashes on the floor, falls on the sensor, and the servo-driver shuts off the taps on risers. Of course, this will not save you from wet floors - part of the water will still be on the floor, but the repair will protect, and at the same time, protect the neighbors below from flooding after flooding. Let's see, we will analyze the Aquastorozh system into parts and find out whether it is so good?
Controller
The entire kit is located in such a box: The kit is shown on the front, and the principle of the system’s operation is shown on the side:
There is a good and clearly written user manual:
The main part of the system looks like this:
Two taps for cold and hot water, the main control unit, sensors Bay, external power supply.
Here is the main unit (TK03) closer:
The controller is made very interesting - it is assembled as a constructor into which additional extension blocks are inserted. Lack of 6 wired sensors? Add a panel, we get 18 sensors. Want to make a wireless system out of a regular system? We insert the radio base and plug it into a special plug. Need the ability to turn off the heat or pump when the water is turned off? We connect the panel with power rails. Not enough standard battery pack? We insert another one, extend the autonomous operation of the system for another year (if the system has only wired sensors, then for three years).
The entire system, except for wired sensors, has a 4-year warranty. The sensors have a lifetime warranty. True, they promise free replacement of no more than 3 sensors per user, apparently guided by the consideration "if a person breaks 3 sensors in a row, then the problem is not with the sensors."
In my version of the sensors there are four - two wired, and two radio sensors. The system can simultaneously work with both of them. The maximum number of wireless sensors is 8 (2 included), or 20 with an expander panel (TK19). The number of wired sensors is almost unlimited - a chain of up to 100 pieces can be connected to each connector, in total - as many as 600 pieces.
The site has a page on which all possible components with articles are described - in the future I will give them in brackets for convenience.
Very interesting solution. Here is the mechanism for connecting the blocks, on one side of the latch:
On the other, there is a place for the wires that connect the blocks to each other:
Disassemble. Although it’s difficult to call disassembly - we just pull the board out of the grooves:
Controller, tweeter (very loud and nasty):
Two 20F ionistors:
And one on 10:
These are the same Nano-UPS :)
But in fact, it’s right - they store a supply of energy, which is enough for the device to work and turn off the taps after the batteries are completely exhausted. In general, if an accident occurs - the system will work and block the water even with dead batteries. After that, you can still open the taps with the button once, if you urgently need water, and there is no time to run after the batteries - this moment is thought out, which is nice. But after that, the batteries will have to be replaced.
Below the board are 14 connectors, one of which is for the battery pack, one for connecting the blocks, 6 for wired sensors, and 6 for taps. As I already wrote - there can be an almost unlimited number of wired sensors - they can be connected in parallel to each other. However, when using a sensor with a break control, it must be the last in the chain - otherwise the controller will not notice a break after it.
Cranes
Here are two cranes (TK12): On each - a strict piece of paper :) We
disassemble the crane into two parts:
From the side of the crane:
A serious metal gear that closes the ball valve. In the first versions it was plastic, but they fixed this defect. Engine side:
Also a metal gear of the output shaft of the gearbox (a device that reduces the speed of rotation and increases the force). Everything looks serious. Cranes, by the way, are also special - with low friction, to facilitate the rotation of the crane with a small engine. It closes really easily - you can use your finger to turn it without strain. Other systems have cranes with an engine that is powered by 220v, but there is another problem - safety and the inability to turn off the tap when the power is turned off. And according to the law of Murphy, electricity will be cut off at the most inopportune moment. So I'd rather overpay a little for a crane with a low voltage engine.
Sensor
A wired flooding sensor (TK24), as simple as two pennies: A wire, a body, and a fiberglass plate with two contacts. The contacts get wet - the resistance decreases, the controller understands this and shuts off the water. There is nothing to break here - the contacts are covered with immersion gold, which means they will not oxidize and do not rot.
Contact pads:
This is a “premium” sensor, and in simple terms - with wire break protection. The problem is that for the controller a “normal” sensor that did not work, and the sensor whose wire was cut off, is the same thing. Protection against this is a simple capacitor:
It conducts alternating current, and by its presence the controller can already determine three states - a short circuit (flood), no short circuit (sensor in place), and no contact (wire break).
The sensor is very simple, and if you have straight hands, you can make them as many as you want for your needs - at least with LUT from PCB, at least from two strips of a can and wire. Just take care of protection against splashes - otherwise one day during a shower you will be forced to get out of the bath and explain to the controller that it’s not a flood, but just a drop has fallen :) But I’m talking about a makeshift sensor - the “branded” case design provides protection against accidental splashes . In addition, they will only work if the water level reaches 1mm over the entire sensor area - this is approximately 10-15ml of water.
Radio base and sensors
Optional unit (TK17), which adds several wireless sensors to conventional sensors. There are two of them in the set, but you can buy and add 6 more - they are attached to this block. And 12 more sensors are connected to the expansion unit (TK19). As a result, the total number of wireless sensors is 20 pieces. I don’t know why so much, except for some big cottage.
The radio base board has its own personal ionistor so as not to waste the energy of the main board for servicing the radio sensors.
The controller, and another tweeter:
And here are the radio sensors: The
right one is just a sensor (TK16), and the left one is a sensor-control panel (TK18). The buttons can be used to close and open taps at any time.
On the back of both sensors, we already know the board with the contacts:
The sensor is disassembled quite simply - it is necessary in turn on all sides with a flat screwdriver to pry off the central part. It holds very firmly - as I understand it, this is done from the penetration of water.
By the way, the sensor with the button is the same as the sensor without the button, only with the button:
So if your hands itch and the soldering iron is heated, the button can be attached - I checked, the contacts work.
On the back of the board are battery contacts (2xAAA):
Controller, harness and tweeter:
Assembly
We begin to assemble the system to our requirements. Add the second battery pack: Just insert the wires into the empty socket sockets:
And connect the two blocks together:
Take the radio base:
Turn off the additional sensor block and connect the radio base:
Connect the battery blocks:
And put it all together:
Constructor. By the way, we forgot to connect taps and a wired sensor. And external power, if necessary - when using it, battery power is not wasted, and wireless sensors are interrogated constantly. When using battery power, the reaction to pressing a button on a wireless sensor or to flooding it follows with a slight delay - from 1 second to 5.
Installation
First, we do the simplest thing - we fasten the mounting panel with two screws: And we hang the controller on it:
Disassemble the taps:
I did this for ease of installation on a ready-made system, because the engine protruded too much - it was not very convenient to fix it.
We wrap the faucet tap threads: We shut off the
water, and we think where to insert the tap, so as not to cause plumbing to rebuild the entire system?
I have a little free space after the counter - where the check valve is. Look at the lower pipe (I didn’t take off the process of installing the tap on hot water):
Unscrew what you unscrew. We see a free thread - we wrap it around with a tape :) We wind the
valve onto the tap:
And we wind this whole design back onto the counter.
We cut the connecting pipe - the crane has taken its place, but can not transfer all the other pipes for this?
And we put it in place:
We fasten the engine in place and put the wires in order: We
simply put the radio sensors in the places of possible flooding:
We remove the wire through a hole in the wall (it was necessary to cut the wire, and then connect it using adhesive tapes ): Lower the
wire down:
We fasten the platform to the floor, install the sensor itself:
And close the lid: The
sensors are located around the apartment like this:
One under the sink, the other under the washing machine. Wired sensor - under the bath. The plan was drawn in SweetHome 3D
We connect the wires to the controller:
Green - sensor. In the first connector (it is signed as zero) - only the sensor (or a chain of sensors) is turned on without monitoring a wire break. The remaining connectors are sensors with open circuit monitoring.
The blue arrow is the faucet connectors. There is no difference, they all close and open the same way. Lilac and yellow - external and battery power, respectively. Blue - connector for expansion cards (we have a radio base connected to it).
In general, the system after installation looks like this: It
remains only to comb the wires so that they do not hang overhead.
Check
I did not break the pipe, but I had to figure out a small flood in the bathroom:Price
You can buy the system on the official website .The price depends on the kit, for example the cheapest (TH00) will cost you 6,220 rubles. It includes two wired sensors, and one tap. The additional crane (TK12) is 2 390 rubles more. Thus, the most budgetary solution for an apartment with hot and cold water is 8610 rubles.
The version of the system that I had - will cost 15,990 rubles. It includes two cranes, and four sensors - two wired and two radios.
References
Overview by AlexeyNadezhin Official site Offsite Mirror System Suppliers in Belarus Overview of the old version of the system from DataLab Discussion on IXBTIf you do not have an account on Habrahabr, you can read and comment on our articles on BoxOverview.com
Only registered users can participate in the survey. Please come in.
Have you had a flood?
- 25.7% Yes, I drowned neighbors below 564
- 27.8% Yes, neighbors from above flooded me 610
- 32.1% No, there were 703
- 14.2% Yes, I drowned, and 312 drowned me
Was the damage more than 10k (including compensation)?
- 13.8% Yes, more than 264
- 48.9% No, less than 932
- 1.9% Insurance covered 37
- 35.2% There were no Floods 671









