Publish to Azure Blob Storage with Shared Access Signature
- Tutorial
Hey. This article will be much like the previous one . Here I’ll also explain how to use Windows Azure Mobile Services to publish high-volume data to Blob Storage. However, this time we will get rid of the WCF service and at the same time add an additional layer of protection against unauthorized access using Shared Access Signature . The purpose of this article is to show additional features of Windows Azure for working with data, as well as the ability to quickly create a server backend Mobile Services.
Before proceeding to further reading, I advise you to read the previous article, because there some points are revealed in more detail than here.
To begin with, it's worth telling what exactly is this same Shared Access Signature, or just SAS. Behind these three letters is nothing more than a simple URL that allows you to differentiate access rights to a Windows Azure Blob, Table, or Queue resource. If you recall the previous article and how the data was exchanged between the Windows 8 application and the WCF service, you can immediately understand that such a solution clearly suffered from the absence of any protection. Firstly, the data transmission channel was opened (HTTP), which allowed a potential attacker to intercept user information. Secondly, even if the channel is made encrypted (HTTPS), then we did not have any verification of the authenticity of the request. I want to say that if we had several users in the system, there was no way to determine whether a particular user has write permissions to the repository, and indeed whether the request was sent from the application or is it just that the hacker is trying to send his malicious data. Well, I don’t consider the option of storing data to connect to Blob Storage directly in a Windows 8 application - it’s not too secure.
Using Shared Access Signature in combination with Mobile Services will allow us to avoid such problems. The thing is that SAS will be formed on the server side, directly in Mobile Services, where we are protected from prying eyes, we also have all the necessary information about the user and can restrict access to anonymous people. The signature itself will be issued for a very limited period of time, about 5 minutes, which will also minimize the possibility of its theft and use for personal gain.
Perhaps everything is quite difficult to explain in words, so I suggest moving on to practice. To do this, I will take the idea from the previous post and slightly modify the application code.
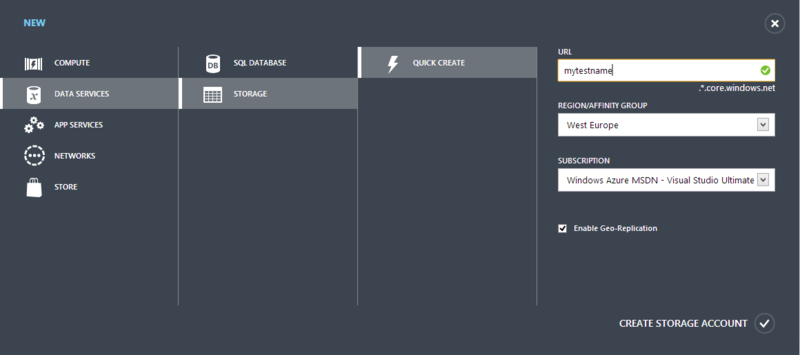
So, for starters, we need to create the necessary services in Windows Azure. Go to the new management portal and create a Blob repository. Using the standard menu for adding a service, select the item Data Services -> Storage -> Quick Create, where we need to specify the name of the future service, the region of the subscription within which it will work:
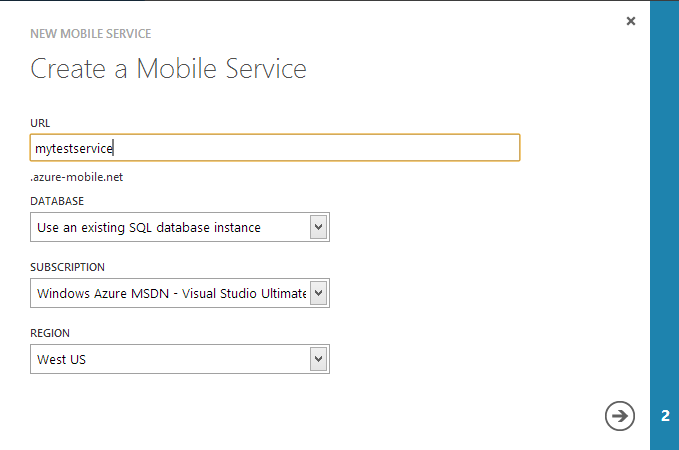
We also need a mobile service, which can be created in the same portal menu in the Compute -> Mobile Service section:
You can not do both of these steps if you already have the blob-storage or mobile service created.
Unlike where we started the last time, now our first place to write code is Windows Azure Mobile Services. Yes, I’ve never described myself here - we will write the code directly in the cloud service. This is possible thanks to the built-in script function that can be executed when one of the CRUD operations on the table is performed.
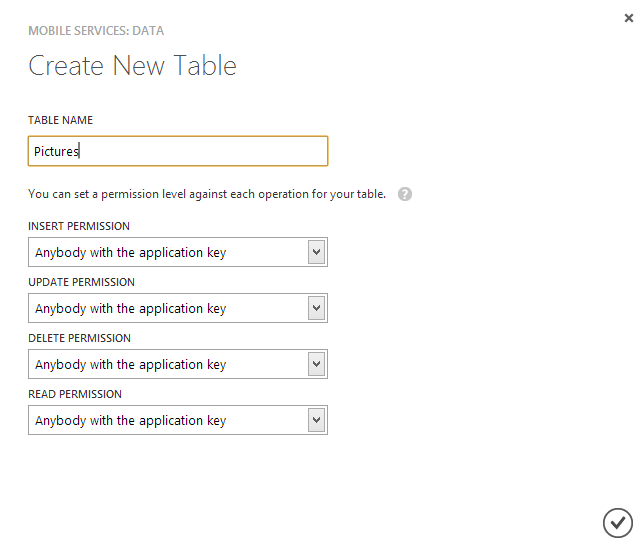
This time we will save photos with a brief description in our application. First, create a new table in Mobile Services, in which the records will be located. Let's call her Picture:
When creating a table in the fields called Permission, specify "Anybody with the application key." This means that any user (even anonymous) who has access keys to the Mobile Service at their disposal can perform this operation. If you select “Only authenticated users”, then the user will be checked before accessing the operation, and if it is not set, the operation will be prohibited. In this article, I will not consider authentication using Mobile Services, so we will leave the default values in these fields.
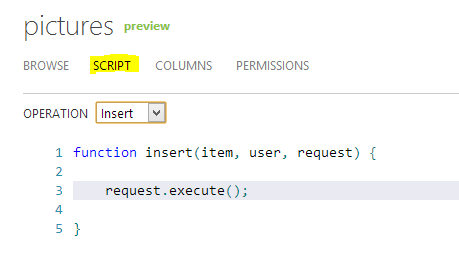
Now that the table is created, you can open the scripts. To do this, go to the Data section in the control panel of your mobile service, select the table you just created. At the top of it, the Script section will be available, which we need:
If you expand the Operation menu, it will have four options: Insert, Update, Delete, and Read. Each of these options corresponds to a separate script, which is executed at the time of the occurrence of an event. If we draw an analogy, then these scripts can be compared with database triggers. At the same time, the main body of the “trigger” itself is the function of the same name, but you can write additional functions below. The language of these scripts is JavaScript, with all the positive consequences that follow, in the form of asynchrony, closures, etc.
So, when it became a little clearer with the principle of the scripts, it was time to write a little server code that will create Shared Access Signature for us. To do this, we need a script for the insert event - Insert. Scripts in Mobile Services allow you to use some APIs to work with other Windows Azure services. Such APIs are connected as external library classes and are used in the code easily and simply. Let's take a look at this as an example (I apologize for the fact that the code is inserted as a picture, but it is more clear):
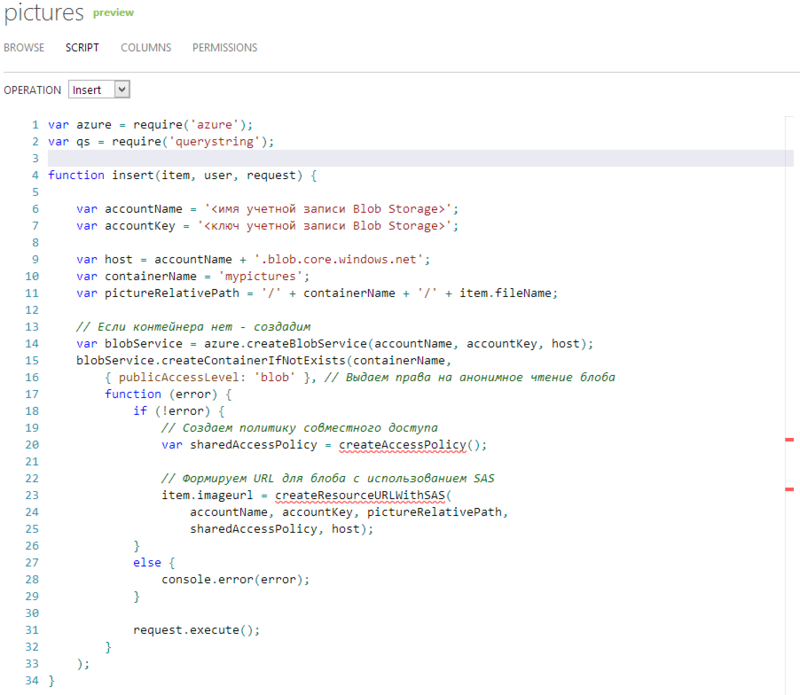
Lines 1 and 2 just declare the plug-ins and give them names. The azure module is responsible for working with Windows Azure services, and the querystring module is responsible for generating URLs with parameters (see below). However, before we get into the code (which, incidentally, should be very clear), I want to draw your attention to how convenient the built-in editor is. Firstly, there is syntax highlighting and automatic alignment, which, however, you will not surprise anyone. Secondly, it has built-in automatic code validation. Funtian createAccessPolicy and createResourceURLWithSASnot yet declared in the code, and the editor highlights them with an underline and a red stroke in the margin. Well, in addition, thirdly, IntelliSense is built into the editor. Of course, it is not as cool as in Visual Studio, but it also slightly simplifies life.
Now let's look at the code itself. As I said, there is nothing complicated and incomprehensible here. In a nutshell, then along with recording information about the new image, we also need to write down the URL with which we can perform operations with the BLOB storage (this URL contains SAS). First you need to access the store using its name and key (line 14), which can be obtained in the Windows Azure management portal in the storage management section. Then we create a container (line 15), if it is not already there, and set access rights: we allow reading to everyone. Then, using an anonymous function and closures, we define the code that will be executed after the container is created. This is how we get the application to run asynchronously, which is better for server performance. createResourceURLWithSAS (line 23).
Let's look at the rest of the code:
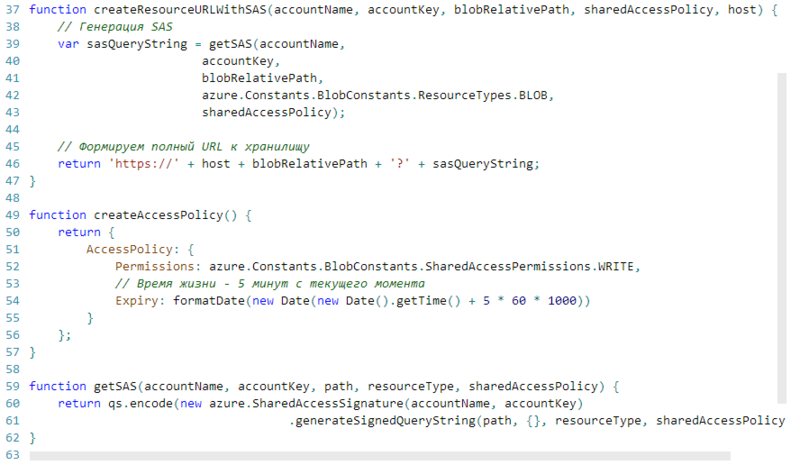
This code snippet contains the rest of the functions that were missing in the previous block. The most interesting are createAccessPolicy and getSAS . The first simply returns a special object that describes the access policy. We create it with write permissions only, and also indicate the expiration of rights - 5 minutes from the date of creation. Explicitly setting the SAS lifetime is a fairly correct approach. If suddenly an attacker somehow gets a link with a SAS that has the Expiry parameter set, then he simply can’t do anything with it, because after the expiration the access is closed and such a SAS becomes useless. GetSAS
functionIt contains a fairly simple logic of creating the SAS object directly and forming part of the URL string with parameters. All this is done using the Windows Azure API, connected to the current script at the very beginning.
At the end of editing the script, do not forget to click on the Save button at the bottom of the page, otherwise all the work will be done.
So, we figured out the server logic and realized that there is nothing particularly complicated about it. We now have a certain URL in which Shared Access Signature is registered, and now let's see what to do with it. In the previous article, the application for Windows 8 was only responsible for communicating with Windows Azure Mobile Services and the WCF service, shifting the responsibility of saving binary data from blobs to other subsystems. This time, the application will independently save all the information in the Windows Azure services.
To get started, let's create an empty application for Windows 8. I did not choose anything as a template, focusing on the Blank App. Since now the article is not about how to write applications, the interface and functionality of the program will be at a minimum sufficient level. In other words - without frills, but it works.
From the interface elements on the main page of the application, I suggest placing two buttons, a text box and a container for images, where we will place the pictures received from the camera. It all looks something like this for me:
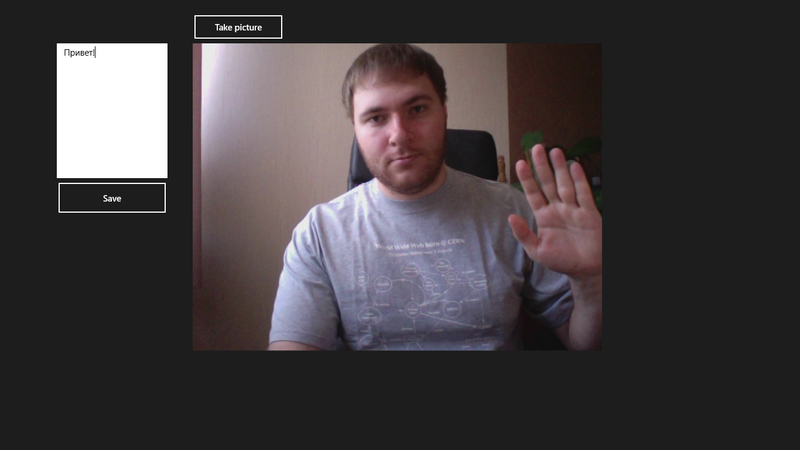
You need to repent a bit and apologize to all the designers and people with a good sense of taste - the application was made not for the sake of use, but for demonstration. Accordingly, the code will also be without any frills - neither MVVM, nor other cool things. Three methods, but everything is clear.
Let's start by defining a class that will correspond to the Picture table in Mobile Services:
This is a simple class that must have the Id field / property. Other properties are converted to similar fields in the table. The DataMember attribute helps to explicitly specify the name of the table field into which this or that property of the class should turn.
Next is the method responsible for receiving the image from the camera and displaying it on the screen:
Here, too, everything is simple. Anyone familiar with the development of Windows 8 (WinRT) will immediately understand what is happening here. And who does not know - he will guess. First, we ask the camera for a photo or video (by the way, the video can also be transferred to the BLOB storage without problems), and then we get the stream from the received file, write it to the bitmap and display it on the application form. Yes, and do not forget that in order to work with the camera in Windows 8 it is necessary, firstly, to specify in the application manifest that we are basically going to do this, and secondly, to obtain permission from the user to access the device. If any of these conditions is not met, then the code above will fail, because nothing is written to _file.
Well, for starters, the most important thing remains - recording the received data in the Mobile Service table, receiving Shared Access Control from it and writing the file to the cloud storage. It sounds complicated, but actually a few lines of code:
Let's go in order. The ButtonSaveClick method is called when the Save button is clicked. In it, we first form the Picture object, filling it with the value from the description field and the name of the image file. Then begins working with Windows Azure. We need to get the Picture table from Mobile Services and insert a new record into it. As you can see, this is done in two lines. Then the work with the BLOB storage occurs. Immediately after the new record was inserted into the table, the ImageU property of the picture object changed, into which the URL of the future blob was added with the Shared Access Signature added to it. Using this URL, we can now access Blob Storage without knowing its name and Primary Key.
Working with the storage is made in a separate, but also a small UploadBlob method. All the necessary steps fit into four simple steps. First, we get the Shared Access Signature from the URL of the image, which is passed as a query parameter. Then with the help of this SAS we get the container that will work with. Then, in the same way, we get the blob by its name, and in the end - we load the binary image data from the stream directly into Azure Blob Storage.
Yes, I forgot to mention that to work with Blob Storage in Windows 8, you need a library, which you can get here . In NuGet, I did not find this, so you need to connect it manually. But I think that this will change soon.
In this article, I tried to demonstrate how to work with data in Windows Azure from Windows 8 mobile applications more easily, reliably, and without additional infrastructure layers using Windows Azure Mobile Services and Shared Access Signature. By and large, all the logic for writing / retrieving data from a table or blob storage fits in a couple of code lines, which greatly simplifies life when you need to get the result of your work as quickly as possible. For independent developers and startups, such an opportunity will greatly help in a successful start and save you from unnecessary headaches.
PS This article was partially based on official source code examples for working with Mobile Services and Shared Access Signature. You can familiarize yourself with this example here: http://code.msdn.microsoft.com/windowsapps/Upload-File-to-Windows-c9169190
Before proceeding to further reading, I advise you to read the previous article, because there some points are revealed in more detail than here.
Shared access signature
To begin with, it's worth telling what exactly is this same Shared Access Signature, or just SAS. Behind these three letters is nothing more than a simple URL that allows you to differentiate access rights to a Windows Azure Blob, Table, or Queue resource. If you recall the previous article and how the data was exchanged between the Windows 8 application and the WCF service, you can immediately understand that such a solution clearly suffered from the absence of any protection. Firstly, the data transmission channel was opened (HTTP), which allowed a potential attacker to intercept user information. Secondly, even if the channel is made encrypted (HTTPS), then we did not have any verification of the authenticity of the request. I want to say that if we had several users in the system, there was no way to determine whether a particular user has write permissions to the repository, and indeed whether the request was sent from the application or is it just that the hacker is trying to send his malicious data. Well, I don’t consider the option of storing data to connect to Blob Storage directly in a Windows 8 application - it’s not too secure.
Using Shared Access Signature in combination with Mobile Services will allow us to avoid such problems. The thing is that SAS will be formed on the server side, directly in Mobile Services, where we are protected from prying eyes, we also have all the necessary information about the user and can restrict access to anonymous people. The signature itself will be issued for a very limited period of time, about 5 minutes, which will also minimize the possibility of its theft and use for personal gain.
Perhaps everything is quite difficult to explain in words, so I suggest moving on to practice. To do this, I will take the idea from the previous post and slightly modify the application code.
Training
So, for starters, we need to create the necessary services in Windows Azure. Go to the new management portal and create a Blob repository. Using the standard menu for adding a service, select the item Data Services -> Storage -> Quick Create, where we need to specify the name of the future service, the region of the subscription within which it will work:
We also need a mobile service, which can be created in the same portal menu in the Compute -> Mobile Service section:
You can not do both of these steps if you already have the blob-storage or mobile service created.
Creating Shared Access Signature
Unlike where we started the last time, now our first place to write code is Windows Azure Mobile Services. Yes, I’ve never described myself here - we will write the code directly in the cloud service. This is possible thanks to the built-in script function that can be executed when one of the CRUD operations on the table is performed.
This time we will save photos with a brief description in our application. First, create a new table in Mobile Services, in which the records will be located. Let's call her Picture:
When creating a table in the fields called Permission, specify "Anybody with the application key." This means that any user (even anonymous) who has access keys to the Mobile Service at their disposal can perform this operation. If you select “Only authenticated users”, then the user will be checked before accessing the operation, and if it is not set, the operation will be prohibited. In this article, I will not consider authentication using Mobile Services, so we will leave the default values in these fields.
Now that the table is created, you can open the scripts. To do this, go to the Data section in the control panel of your mobile service, select the table you just created. At the top of it, the Script section will be available, which we need:
If you expand the Operation menu, it will have four options: Insert, Update, Delete, and Read. Each of these options corresponds to a separate script, which is executed at the time of the occurrence of an event. If we draw an analogy, then these scripts can be compared with database triggers. At the same time, the main body of the “trigger” itself is the function of the same name, but you can write additional functions below. The language of these scripts is JavaScript, with all the positive consequences that follow, in the form of asynchrony, closures, etc.
So, when it became a little clearer with the principle of the scripts, it was time to write a little server code that will create Shared Access Signature for us. To do this, we need a script for the insert event - Insert. Scripts in Mobile Services allow you to use some APIs to work with other Windows Azure services. Such APIs are connected as external library classes and are used in the code easily and simply. Let's take a look at this as an example (I apologize for the fact that the code is inserted as a picture, but it is more clear):
Lines 1 and 2 just declare the plug-ins and give them names. The azure module is responsible for working with Windows Azure services, and the querystring module is responsible for generating URLs with parameters (see below). However, before we get into the code (which, incidentally, should be very clear), I want to draw your attention to how convenient the built-in editor is. Firstly, there is syntax highlighting and automatic alignment, which, however, you will not surprise anyone. Secondly, it has built-in automatic code validation. Funtian createAccessPolicy and createResourceURLWithSASnot yet declared in the code, and the editor highlights them with an underline and a red stroke in the margin. Well, in addition, thirdly, IntelliSense is built into the editor. Of course, it is not as cool as in Visual Studio, but it also slightly simplifies life.
Now let's look at the code itself. As I said, there is nothing complicated and incomprehensible here. In a nutshell, then along with recording information about the new image, we also need to write down the URL with which we can perform operations with the BLOB storage (this URL contains SAS). First you need to access the store using its name and key (line 14), which can be obtained in the Windows Azure management portal in the storage management section. Then we create a container (line 15), if it is not already there, and set access rights: we allow reading to everyone. Then, using an anonymous function and closures, we define the code that will be executed after the container is created. This is how we get the application to run asynchronously, which is better for server performance. createResourceURLWithSAS (line 23).
Let's look at the rest of the code:
This code snippet contains the rest of the functions that were missing in the previous block. The most interesting are createAccessPolicy and getSAS . The first simply returns a special object that describes the access policy. We create it with write permissions only, and also indicate the expiration of rights - 5 minutes from the date of creation. Explicitly setting the SAS lifetime is a fairly correct approach. If suddenly an attacker somehow gets a link with a SAS that has the Expiry parameter set, then he simply can’t do anything with it, because after the expiration the access is closed and such a SAS becomes useless. GetSAS
functionIt contains a fairly simple logic of creating the SAS object directly and forming part of the URL string with parameters. All this is done using the Windows Azure API, connected to the current script at the very beginning.
At the end of editing the script, do not forget to click on the Save button at the bottom of the page, otherwise all the work will be done.
Client
So, we figured out the server logic and realized that there is nothing particularly complicated about it. We now have a certain URL in which Shared Access Signature is registered, and now let's see what to do with it. In the previous article, the application for Windows 8 was only responsible for communicating with Windows Azure Mobile Services and the WCF service, shifting the responsibility of saving binary data from blobs to other subsystems. This time, the application will independently save all the information in the Windows Azure services.
To get started, let's create an empty application for Windows 8. I did not choose anything as a template, focusing on the Blank App. Since now the article is not about how to write applications, the interface and functionality of the program will be at a minimum sufficient level. In other words - without frills, but it works.
From the interface elements on the main page of the application, I suggest placing two buttons, a text box and a container for images, where we will place the pictures received from the camera. It all looks something like this for me:
You need to repent a bit and apologize to all the designers and people with a good sense of taste - the application was made not for the sake of use, but for demonstration. Accordingly, the code will also be without any frills - neither MVVM, nor other cool things. Three methods, but everything is clear.
Let's start by defining a class that will correspond to the Picture table in Mobile Services:
    public class Picture
    {
        public int Id { get; set; }
        [DataMember(Name = "description")]
        public string Description { get; set; }
        [DataMember(Name = "fileName")]
        public string FileName { get; set; }
        [DataMember(Name = "imageurl")]
        public string ImageUrl { get; set; }
    }
This is a simple class that must have the Id field / property. Other properties are converted to similar fields in the table. The DataMember attribute helps to explicitly specify the name of the table field into which this or that property of the class should turn.
Next is the method responsible for receiving the image from the camera and displaying it on the screen:
        private async void ButtonPhotoClick(object sender, RoutedEventArgs e)
        {
            // Получение фото или видео
            CameraCaptureUI cameraCapture = new CameraCaptureUI();
            _file = await cameraCapture.CaptureFileAsync(CameraCaptureUIMode.PhotoOrVideo);
            BitmapImage bitmapImage = new BitmapImage(); // Сохранение сначала в битмап, а потом на форму
            FileRandomAccessStream stream = (FileRandomAccessStream)await _file.OpenAsync(FileAccessMode.Read);
            bitmapImage.SetSource(stream);
            Photo.Source = bitmapImage;
        }
Here, too, everything is simple. Anyone familiar with the development of Windows 8 (WinRT) will immediately understand what is happening here. And who does not know - he will guess. First, we ask the camera for a photo or video (by the way, the video can also be transferred to the BLOB storage without problems), and then we get the stream from the received file, write it to the bitmap and display it on the application form. Yes, and do not forget that in order to work with the camera in Windows 8 it is necessary, firstly, to specify in the application manifest that we are basically going to do this, and secondly, to obtain permission from the user to access the device. If any of these conditions is not met, then the code above will fail, because nothing is written to _file.
Well, for starters, the most important thing remains - recording the received data in the Mobile Service table, receiving Shared Access Control from it and writing the file to the cloud storage. It sounds complicated, but actually a few lines of code:
        private async void ButtonSaveClick(object sender, RoutedEventArgs e)
        {
            var picture = new Picture();
            picture.Description = Description.Text;
            picture.FileName = _file.Name;
            // Созраняем запись в таблице Mobile Service
            var table = App.MobileService.GetTable();
            await table.InsertAsync(picture);
            var containerName = "mypictures";
            // Загружаем картинк на сервер
            using (var fileStream = await _file.OpenStreamForReadAsync())
            {
                await UploadBlob(fileStream, picture.FileName, picture.ImageUrl, containerName);
            }
            // Удалим SAS из URL изображения
            picture.ImageUrl = picture.ImageUrl.Substring(0, picture.ImageUrl.IndexOf('?'));
            await table.UpdateAsync(picture);
        }
        public static async Task UploadBlob(Stream fileStream, string fileName, string blobUrl, string containerName)
        {
            fileStream.Position = 0;
            var sasUri = new Uri(blobUrl);
            // Получаем SAS из URL картинки
            StorageCredentials cred = new StorageCredentials(sasUri.Query.Substring(1));
            // Получаем контейнер
            CloudBlobContainer container = new CloudBlobContainer(new Uri(string.Format("https://{0}/{1}", sasUri.Host, containerName)), cred);
            // И соответствующий BLOB
            CloudBlockBlob blobFromSASCredential = container.GetBlockBlobReference(fileName);
            // Пишем данные
            await blobFromSASCredential.UploadFromStreamAsync(fileStream.AsInputStream());
        }
Let's go in order. The ButtonSaveClick method is called when the Save button is clicked. In it, we first form the Picture object, filling it with the value from the description field and the name of the image file. Then begins working with Windows Azure. We need to get the Picture table from Mobile Services and insert a new record into it. As you can see, this is done in two lines. Then the work with the BLOB storage occurs. Immediately after the new record was inserted into the table, the ImageU property of the picture object changed, into which the URL of the future blob was added with the Shared Access Signature added to it. Using this URL, we can now access Blob Storage without knowing its name and Primary Key.
Working with the storage is made in a separate, but also a small UploadBlob method. All the necessary steps fit into four simple steps. First, we get the Shared Access Signature from the URL of the image, which is passed as a query parameter. Then with the help of this SAS we get the container that will work with. Then, in the same way, we get the blob by its name, and in the end - we load the binary image data from the stream directly into Azure Blob Storage.
Yes, I forgot to mention that to work with Blob Storage in Windows 8, you need a library, which you can get here . In NuGet, I did not find this, so you need to connect it manually. But I think that this will change soon.
Conclusion
In this article, I tried to demonstrate how to work with data in Windows Azure from Windows 8 mobile applications more easily, reliably, and without additional infrastructure layers using Windows Azure Mobile Services and Shared Access Signature. By and large, all the logic for writing / retrieving data from a table or blob storage fits in a couple of code lines, which greatly simplifies life when you need to get the result of your work as quickly as possible. For independent developers and startups, such an opportunity will greatly help in a successful start and save you from unnecessary headaches.
PS This article was partially based on official source code examples for working with Mobile Services and Shared Access Signature. You can familiarize yourself with this example here: http://code.msdn.microsoft.com/windowsapps/Upload-File-to-Windows-c9169190