Stack of a web developer in a virtual machine with FreeBSD
I'm terribly tired of moving from one computer to another and from one system to another, raising the environment for development. I mainly write in PHP / Python, so the classic (M / W / L) AMP bundle is usually used. I heard for a long time that some developers moved to virtual machines, but I did not dare to take this step myself, but there was free time and I lifted the stack for web development and now use the VirtualBox virtual machine, with a full-fledged system - FreeBSD, which is as close as possible to production.
In a virtual machine, the system works without windows and in a minimal configuration, so it requires a minimum of resources. Enough will be even 64Mb of RAM. Ports for http, ssh are forwarded to the outside. As a result, I have a full-fledged server in the box, and outside in the real system I use a full-fledged IDE (NetBeans / Eclipse) with a browser, debugger and terminal that access the virtual machine.
So, further I will tell you how to put it all together and give a link to the finished image for VirtualBox, the second step is to configure the IDE.
I will skip all the details of creating a virtual machine and installation, this is nothing interesting, and the environment is individual for each. On freebsd.org, the FreeBSD i386 8.1 Stable image was taken, loaded into the virtual machine, and then the installation went.
After installation, the first thing I do is forward SSH out to access it from the local machine. And I issue ip through the DHCP of the virtual machine. There should be something like this in /etc/rc.d:
ifconfig_em0 = "DHCP"
sshd_enable = "YES"
Here I indicated that we will get the IP address on the em0 interface via DHCP from VirtualBox. The rest is the start of the necessary demons.
In the virtualbox settings, I go to Network-> Port forwarding and do this: the
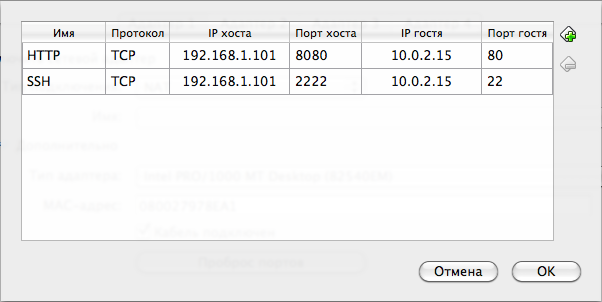
host IP is the IP address of my local machine on which VirtualBox is installed, the IP of the guest is the address that DHCP issued, you can see it iffconfig.
For convenience, I allow root access via SSH, for this you need to add the PermitRootLogin yes line to / etc / ssh / sshd_config
Now you can connect from the local machine to VirtualBox. In putty or iTerm, depending on your desktop, use # ssh 192.168.1.101 -p 2222 -l root and we are inside FreeBSD.
Next, the ports and the AMP bundle are installed and updated, after which you can proceed to configure the IDE.
The subtle point is debugging, which you need to access from the desktop. Everything is solved very simply. I put xdebug for PHP from the ports into the VM, and just add it to the php.ini config:
zend_extension = / usr / local / lib / php / 20090626 / xdebug.so
xdebug.remote_enable = on
xdebug.remote_log = "/ var / log / xdebugug .log "
xdebug.remote_host = 192.168.1.101
xdebug.remote_handler = dbgp
xdebug.remote_port = 9000
Where, remote_host is equal to the ip address of my desktop on which the IDE will listen on the 9000 port.
In Netbeans, everything works out of the box, in Eclipse you have to deliver plugins. Therefore, I will tell you how I work in the Netbeans IDE.
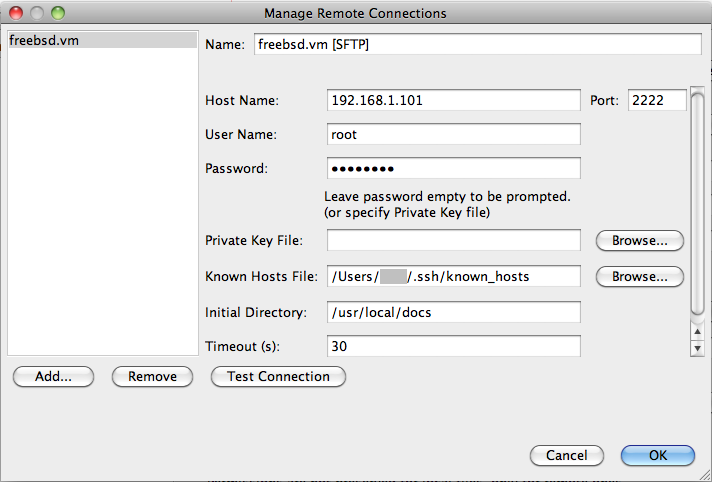
First of all, I create a project and specify the local folder where the files will be stored, go to its properties -> Run Configuration and select launch as Remote Web Site (FTP, SFTP), specify Project Url and Index File (it will be needed by the debugger).
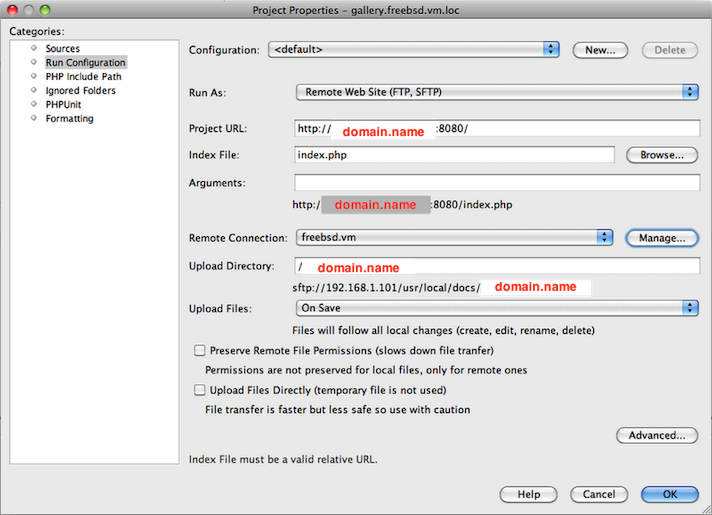
In Remote Connection, Port: 2222, Login: root and its password are driven in. The Initial Directory points to the folder that Apache accesses for virtual hosts.
1) The main system is not clogged with all sorts of unnecessary demons.
2) I always have a full-fledged console and all the benefits of the system (ports, cron, etc.)
3) The environment for my code is as close as possible to combat conditions.
4) Easy portability of the environment from one machine to another.
5) Everything works very fast.
As an additional element of the elegance of the solution, my home router works. If I need to show the customer the project that I’m working on right now, then for this it’s enough to forward the addresses 80 to the home router from my home router and 192.168.1.101:8080 to my local machine.
You can download the finished image here.. The image includes current stable versions of Apache / PHP + Extensions / Python / Mysql / Phpmyadmin / ZendFramework and others. SSH login: root, password: toor; MYSQL login: admin, password: nimda. Do not forget to rewrite virtual hosts, or edit / etc / hosts, because by default my domain and ip addresses are set.
Happy New Year 2011!
UPD: Filled a new archive, now the image with maximum compression weighs 259Mb, the link is updated.
In a virtual machine, the system works without windows and in a minimal configuration, so it requires a minimum of resources. Enough will be even 64Mb of RAM. Ports for http, ssh are forwarded to the outside. As a result, I have a full-fledged server in the box, and outside in the real system I use a full-fledged IDE (NetBeans / Eclipse) with a browser, debugger and terminal that access the virtual machine.
So, further I will tell you how to put it all together and give a link to the finished image for VirtualBox, the second step is to configure the IDE.
I will skip all the details of creating a virtual machine and installation, this is nothing interesting, and the environment is individual for each. On freebsd.org, the FreeBSD i386 8.1 Stable image was taken, loaded into the virtual machine, and then the installation went.
Configure FreeBSD
After installation, the first thing I do is forward SSH out to access it from the local machine. And I issue ip through the DHCP of the virtual machine. There should be something like this in /etc/rc.d:
ifconfig_em0 = "DHCP"
sshd_enable = "YES"
Here I indicated that we will get the IP address on the em0 interface via DHCP from VirtualBox. The rest is the start of the necessary demons.
Configure VirtualBox
In the virtualbox settings, I go to Network-> Port forwarding and do this: the
host IP is the IP address of my local machine on which VirtualBox is installed, the IP of the guest is the address that DHCP issued, you can see it iffconfig.
For convenience, I allow root access via SSH, for this you need to add the PermitRootLogin yes line to / etc / ssh / sshd_config
Now you can connect from the local machine to VirtualBox. In putty or iTerm, depending on your desktop, use # ssh 192.168.1.101 -p 2222 -l root and we are inside FreeBSD.
Next, the ports and the AMP bundle are installed and updated, after which you can proceed to configure the IDE.
Debugger setting
The subtle point is debugging, which you need to access from the desktop. Everything is solved very simply. I put xdebug for PHP from the ports into the VM, and just add it to the php.ini config:
zend_extension = / usr / local / lib / php / 20090626 / xdebug.so
xdebug.remote_enable = on
xdebug.remote_log = "/ var / log / xdebugug .log "
xdebug.remote_host = 192.168.1.101
xdebug.remote_handler = dbgp
xdebug.remote_port = 9000
Where, remote_host is equal to the ip address of my desktop on which the IDE will listen on the 9000 port.
In Netbeans, everything works out of the box, in Eclipse you have to deliver plugins. Therefore, I will tell you how I work in the Netbeans IDE.
Configure NetBeans IDE
First of all, I create a project and specify the local folder where the files will be stored, go to its properties -> Run Configuration and select launch as Remote Web Site (FTP, SFTP), specify Project Url and Index File (it will be needed by the debugger).
In Remote Connection, Port: 2222, Login: root and its password are driven in. The Initial Directory points to the folder that Apache accesses for virtual hosts.
Total
1) The main system is not clogged with all sorts of unnecessary demons.
2) I always have a full-fledged console and all the benefits of the system (ports, cron, etc.)
3) The environment for my code is as close as possible to combat conditions.
4) Easy portability of the environment from one machine to another.
5) Everything works very fast.
As an additional element of the elegance of the solution, my home router works. If I need to show the customer the project that I’m working on right now, then for this it’s enough to forward the addresses 80 to the home router from my home router and 192.168.1.101:8080 to my local machine.
You can download the finished image here.. The image includes current stable versions of Apache / PHP + Extensions / Python / Mysql / Phpmyadmin / ZendFramework and others. SSH login: root, password: toor; MYSQL login: admin, password: nimda. Do not forget to rewrite virtual hosts, or edit / etc / hosts, because by default my domain and ip addresses are set.
Happy New Year 2011!
UPD: Filled a new archive, now the image with maximum compression weighs 259Mb, the link is updated.