Apple Machine Learning Tools
In the past few years, the topic of artificial intelligence and machine learning has ceased to be for people something from the realm of fiction and has firmly entered everyday life. Social networks offer to visit interesting events for us, cars on the roads have learned to move without driver participation, and a voice assistant in the phone tells you when to leave home to avoid traffic jams and whether you need to take an umbrella with you.
In this article, we will look at the machine learning tools that Apple offers, analyze what the company has shown in this area at WWDC18, and try to understand how this can be put into practice.
Machine learning
So, machine learning is a process in which the system, using certain data analysis algorithms and processing a huge number of examples, identifies patterns and uses them to predict the characteristics of new data.
Machine learning was born from the theory that computers can learn on their own, while not yet programmed to perform certain actions. In other words, unlike conventional programs with pre-entered instructions for solving specific problems, machine learning allows the system to learn how to recognize patterns and make predictions.
BNNS and CNN
Apple has been using machine learning technology on its devices for quite some time: Mail identifies emails containing spam, Siri helps you quickly find out the answers to your questions, Photos recognizes faces in images.
At WWDC16, the company introduced two APIs based on neural networks - Basic Neural Network Subroutines (BNNS) and Convolutional Neural Networks (CNN). BNNS is part of the Accelerate system, which is the basis for performing fast computing on the CPU, and CNN is the part of the Metal Performance Shaders library using the GPU. More information about these technologies can be found, for example, here .
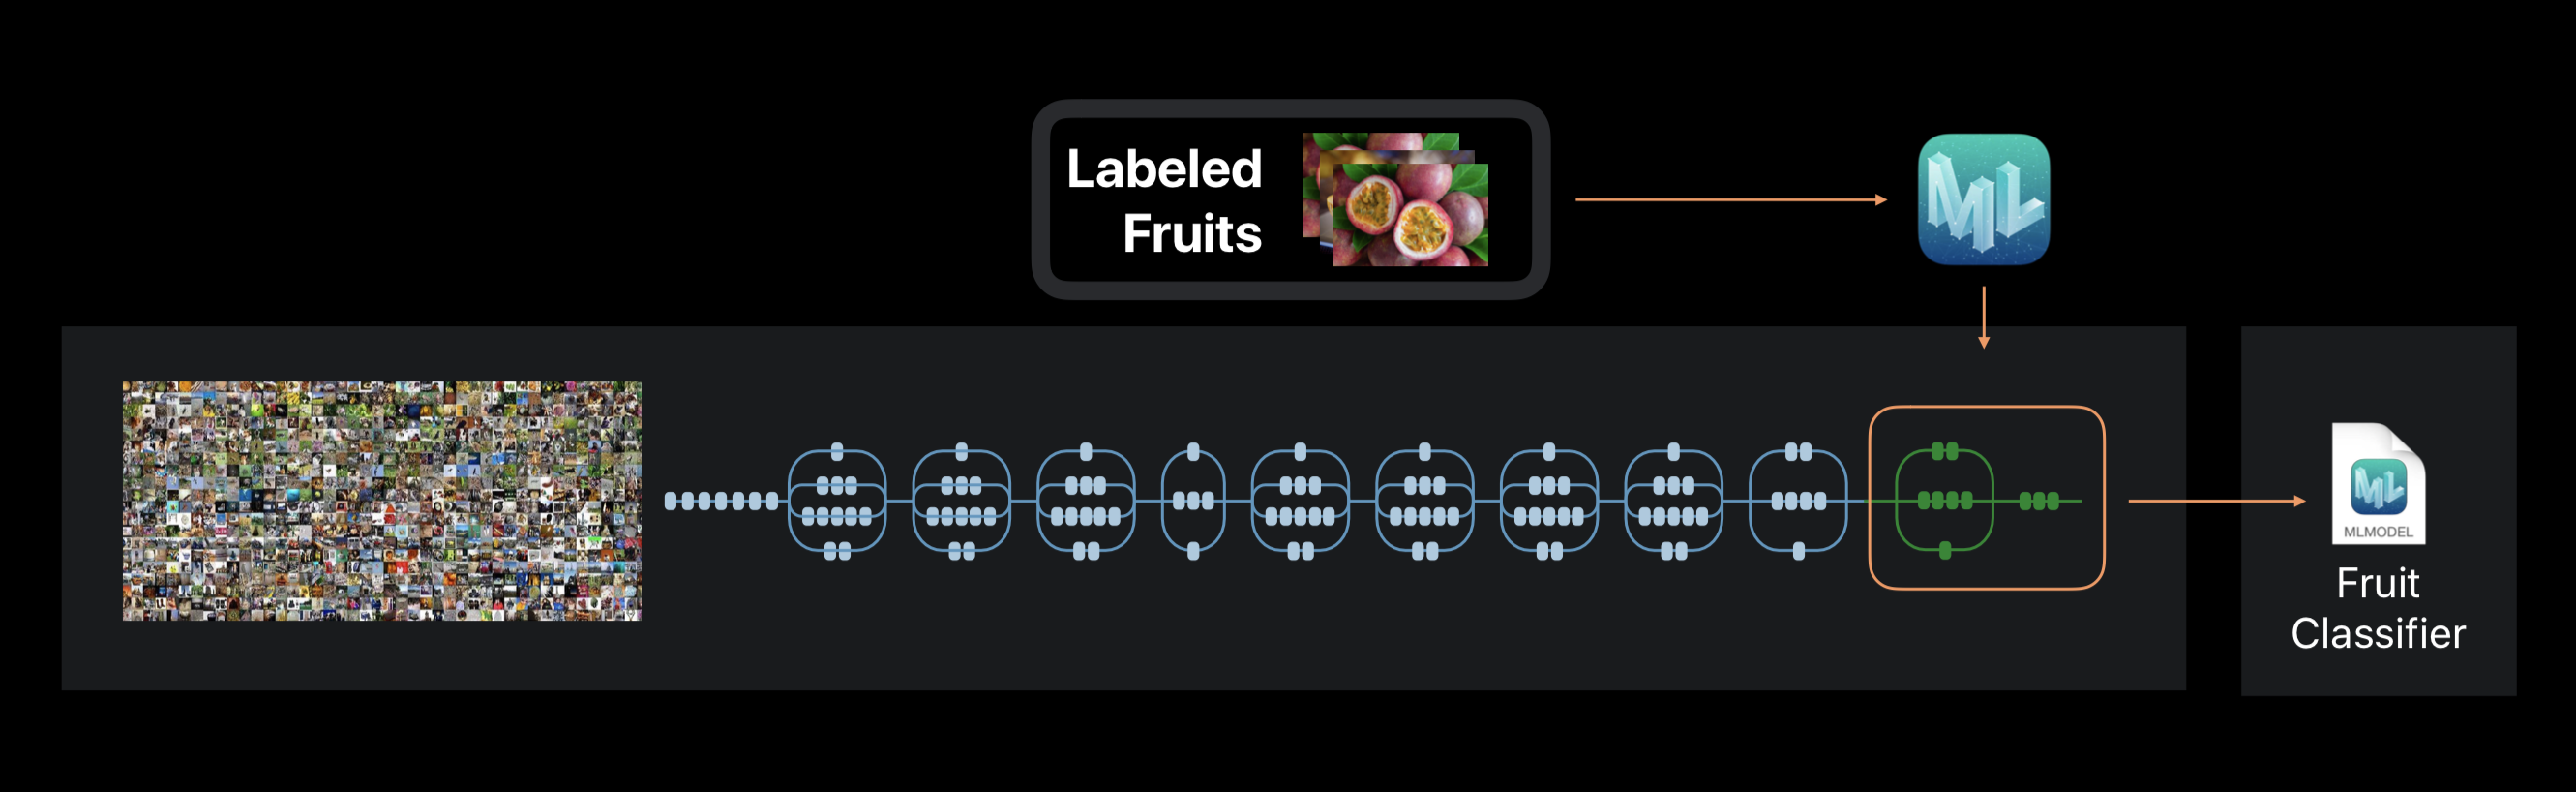
Core ML and Turi Create
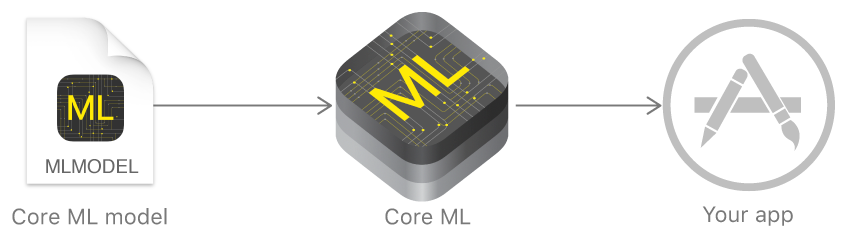
In the past year, Apple announced a framework that significantly simplifies work with machine learning technologies - Core ML. It is based on the idea of taking a pre-trained data model, and integrating it into your application in just a few lines of code.
With Core ML you can implement many functions:
- identification of objects in the photo and video;
- predictive text input;
- face tracking and recognition;
- motion analysis;
- definition of bar codes;
- text comprehension and recognition;
- image recognition in real time;
- stylization of images;
- and much more.
Core ML, in turn, uses low-level Metal, Accelerate and BNNS, and therefore the results of calculations occur very quickly.
The kernel supports neural networks, generalized linear models, feature engineering, tree ensembles, support vector machines, and pipeline models.
But Apple initially did not show its own technologies for creating and training models, but only made a converter for other popular frameworks: Caffe, Keras, scikit-learn, XGBoost, LIBSVM.
Using third-party tools was often not the easiest task, the trained models were quite large, and the training itself took a lot of time.
At the end of the year, the company introduced Turi Create - a framework for teaching models, the main idea of which was ease of use and support for a large number of scenarios - image classification, object definition, recommender systems, and many others. But Turi Create, despite its relative ease of use, only supported Python.
Create ML
And this year, Apple, in addition to Core ML 2, finally showed its own tool for training models - the Create ML framework using Apple native technologies - Xcode and Swift.
It works quickly, and creating model models using Create ML becomes really easy.
At WWDC, impressive indicators of Create ML and Core ML 2 were announced on the example of the Memrise application. If earlier it took 24 hours to train one model using 20 thousand images, then Create ML reduces this time to 48 minutes on a MacBook Pro and up to 18 minutes on iMac Pro. The size of the trained model has decreased from 90MB to 3MB.
Create ML allows you to use as source data images, texts and structured objects - for example, tables.
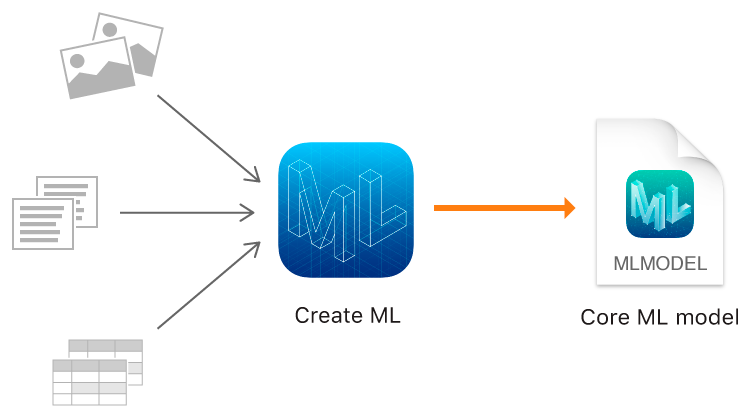
Image classification
Let's see how the classification of images works. To train a model, we need an initial data set: take three groups of photos of animals: dogs, cats and birds and distribute them into folders with appropriate names, which will become the names of the categories of the model. Each group contains 100 images with a resolution up to 1920x1080 pixels and up to 1Mb in size. Photographs should be as different as possible, so that the trained model does not rely on features such as color in the image or the surrounding space.
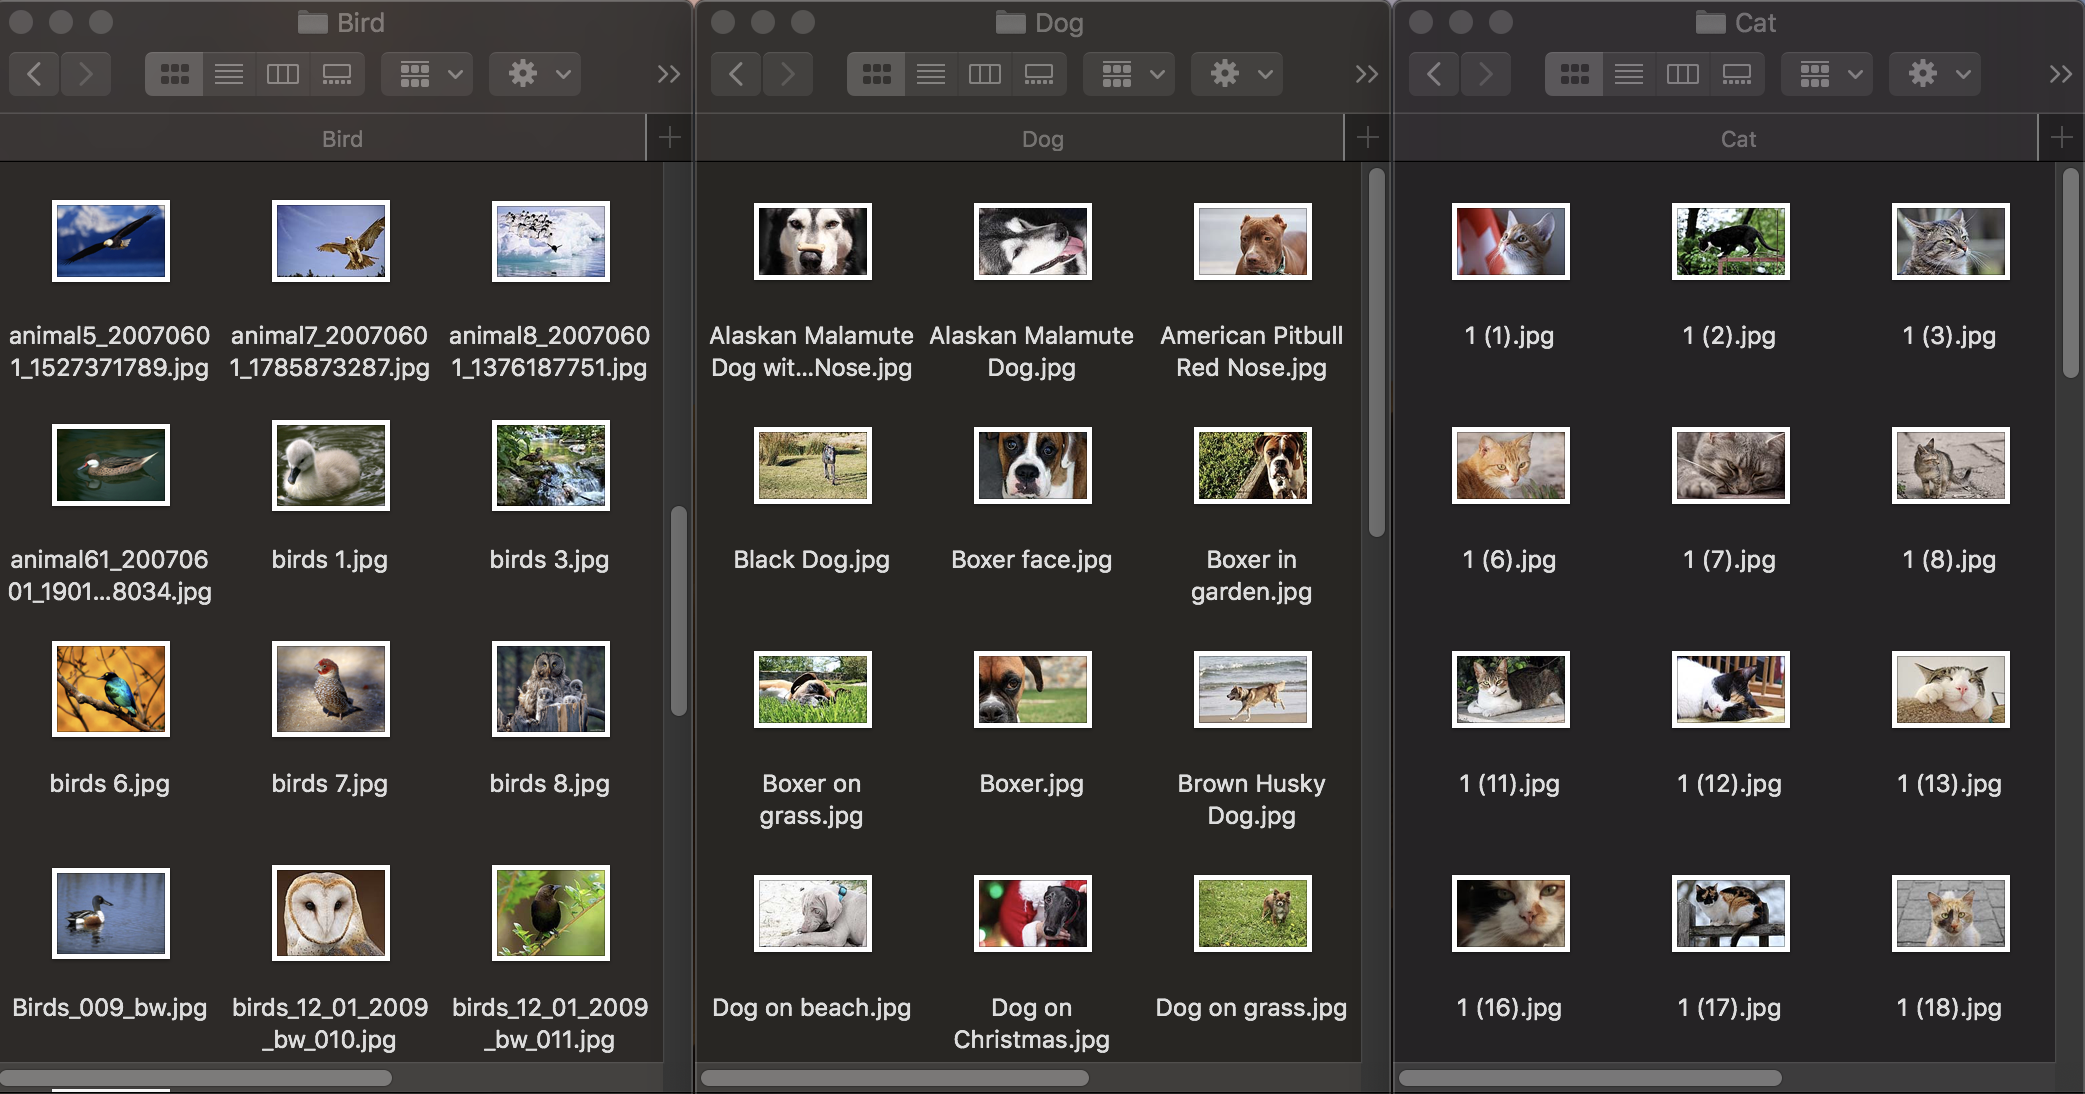
Also, to test how well a trained model copes with the recognition of objects, a test data set is needed - images that are not included in the original dataset.
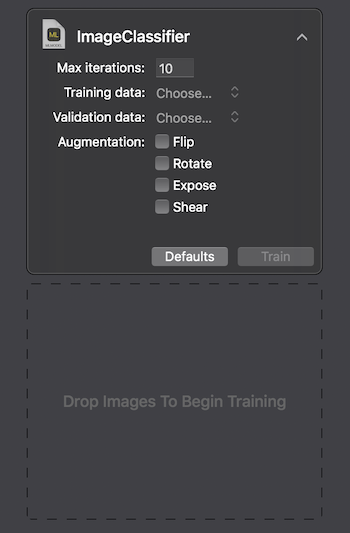
Apple provides two ways to interact with Create ML: using the UI on the MacOS Playground Xcode and programmatically using CreateMLUI.framework and CreateML.framework. Using the first method, it is enough to write a couple of lines of code, transfer the selected images to the specified area, and wait until the model is trained.

On the Macbook Pro 2017, in the maximum configuration, training took 29 seconds for 10 iterations, and the size of the trained model was 33Kb. Looks impressive.
Let's try to figure out how to achieve such indicators and what is “under the hood”.
The task of image classification is one of the most popular use cases for convolutional neural networks. For a start it is worth explaining what they are.
A person, seeing an image of an animal, can quickly attribute it to a certain class on the basis of any distinctive features. The neural network acts in a similar way, conducting a search for basic characteristics. Accepting the initial array of pixels as input, it sequentially passes information through groups of convolutional layers and builds more and more complex abstractions. On each subsequent layer, she learns to highlight certain signs — first these are lines, then sets of lines, geometric shapes, body parts, and so on. On the last layer, we get the output of a class or group of probable classes.
In the case of Create ML, neural network training is not performed from scratch. The framework uses a neural network previously trained on a huge data set, which already includes a large number of layers and has high accuracy.
This technology is called transfer learning. With it, you can change the architecture of a pre-trained network so that it is suitable for solving a new problem. The modified network is then trained on the new data set.
Create ML during training extracts from the photo about 1000 distinctive features. These can be the shapes of objects, the color of the textures, the location of the eyes, the dimensions, and many others.
It should be noted that the initial data set on which the used neural network is trained, like ours, may contain photographs of cats, dogs and birds, but it is precisely these categories that are not distinguished in it. All categories form a hierarchy. Therefore, it is impossible to simply apply this network in its pure form - it is necessary to train it on our data.
At the end of the process, we see how accurately our model has been trained and tested after several iterations. To improve results, we can increase the number of images in the original data set or change the number of iterations.
Then we can check the model ourselves on a test dataset. Images in it must be unique, i.e. Do not enter the original set.
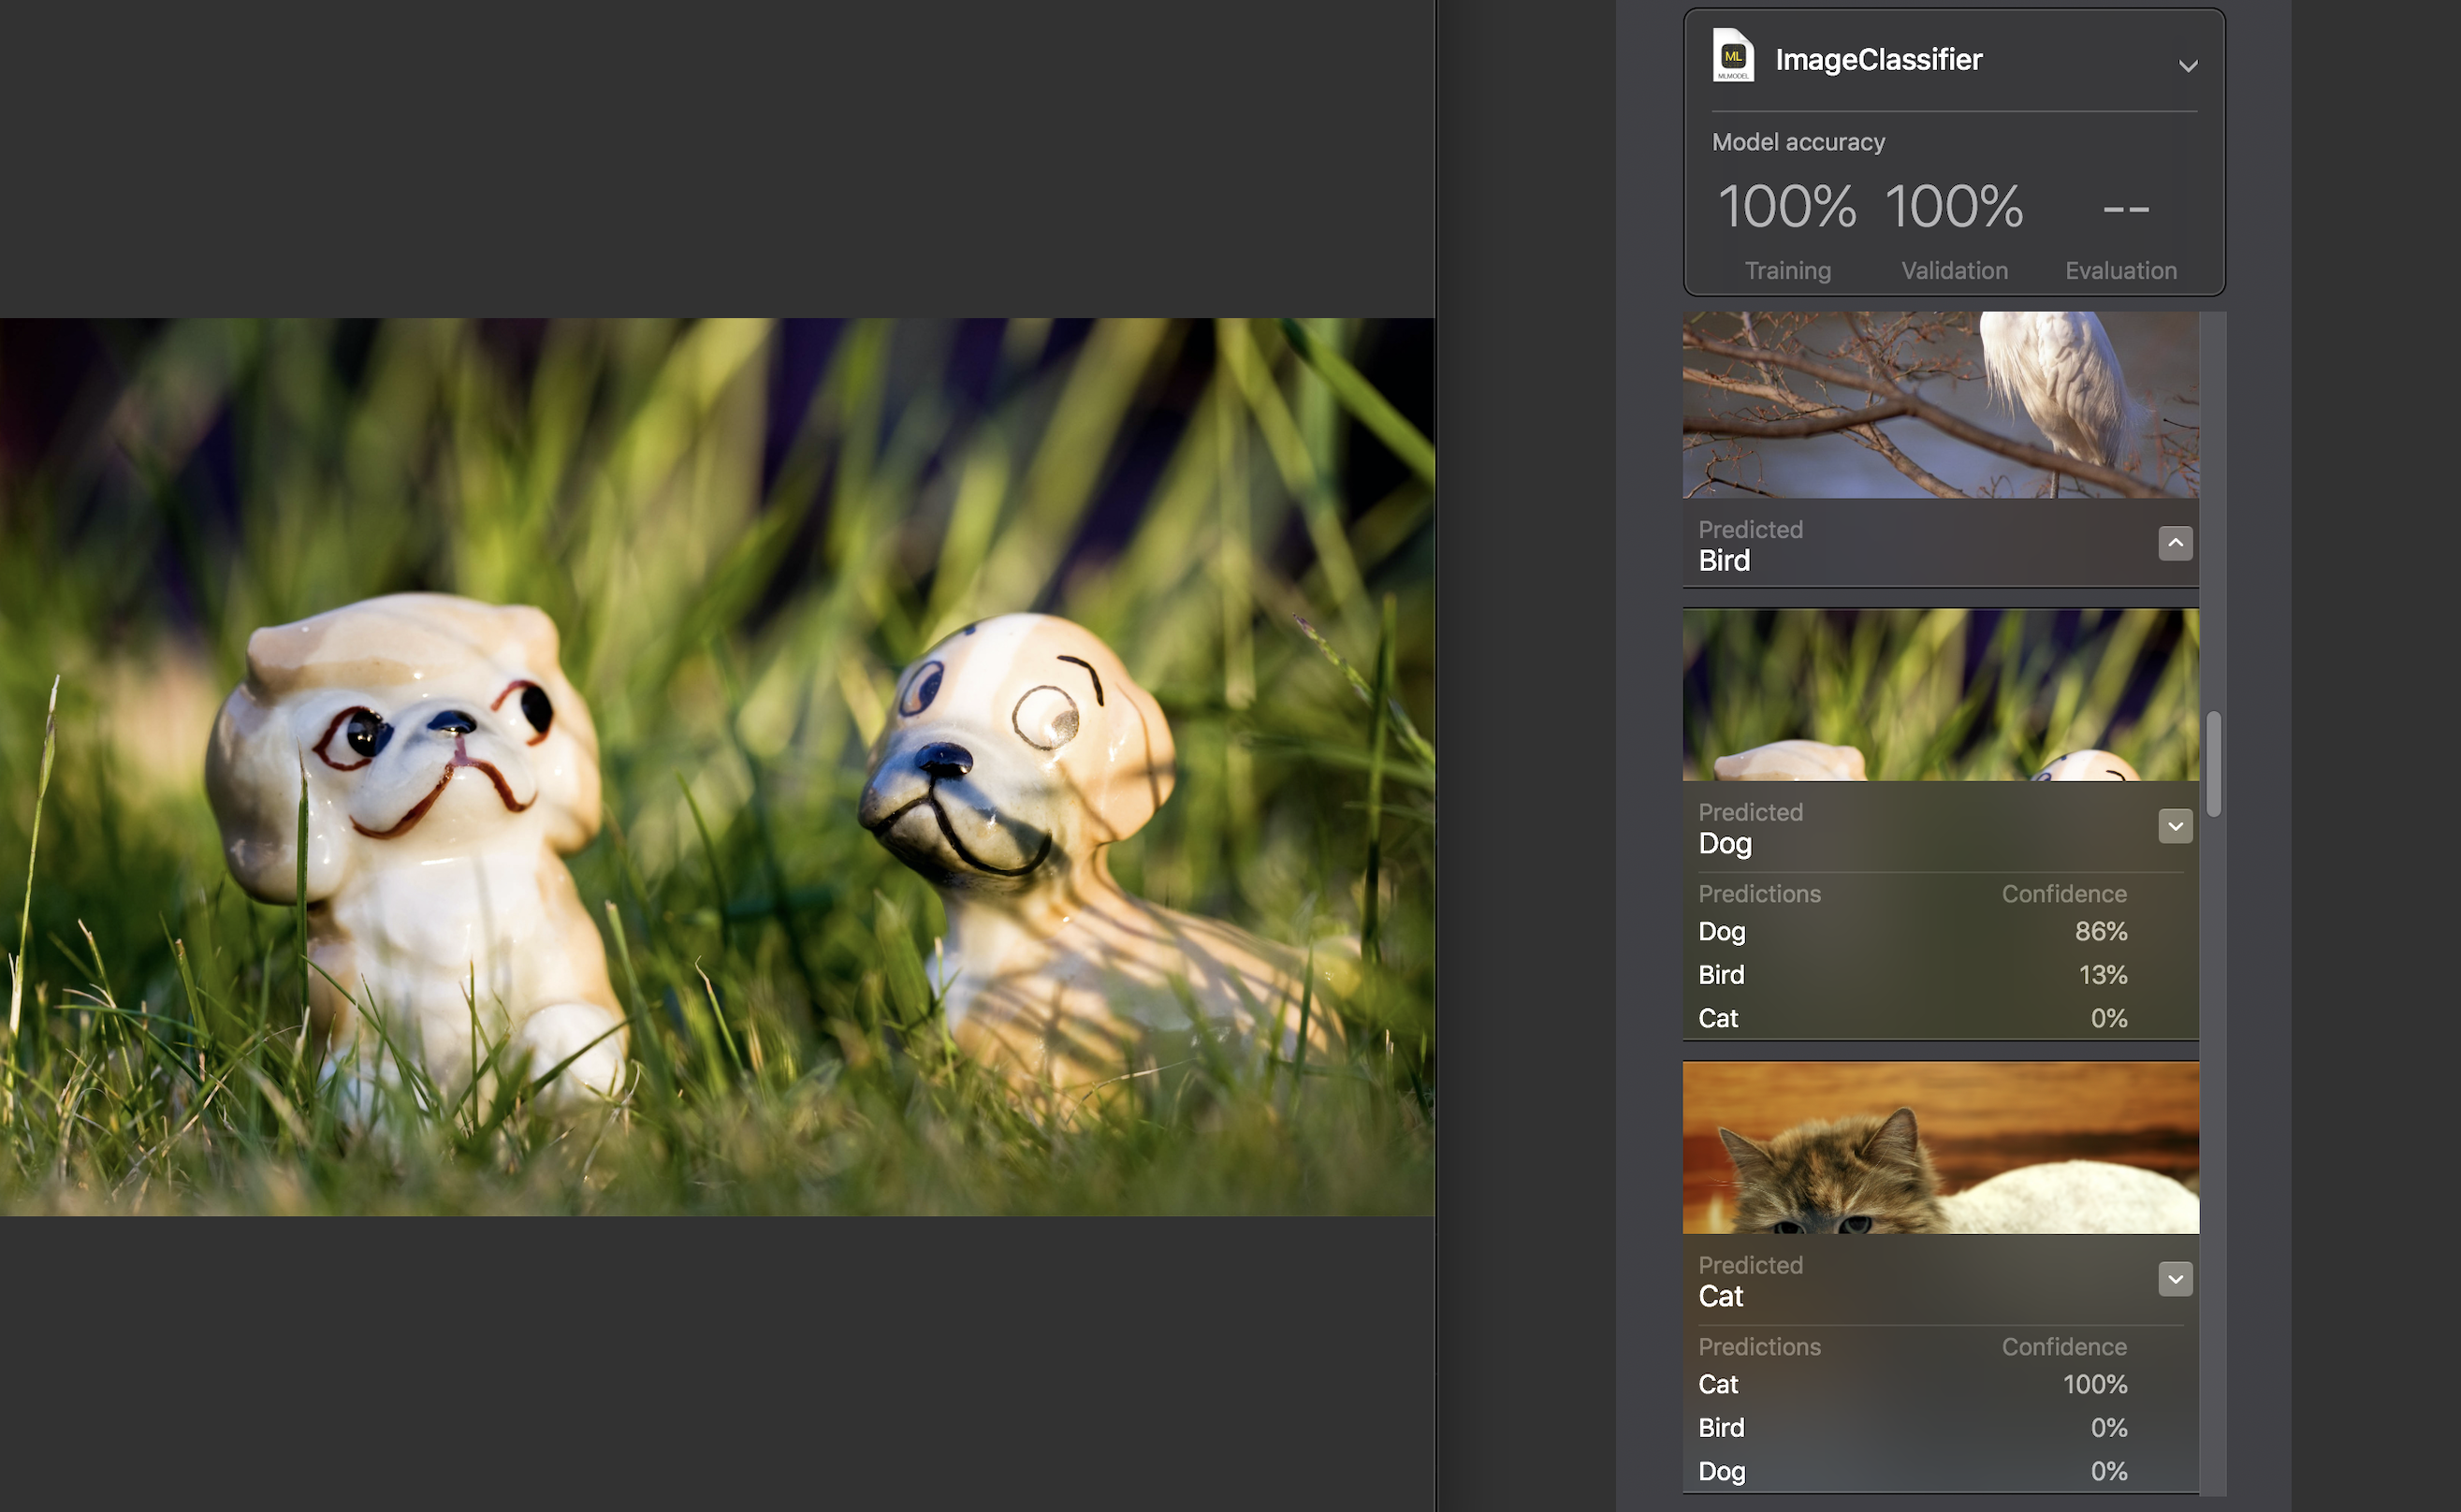
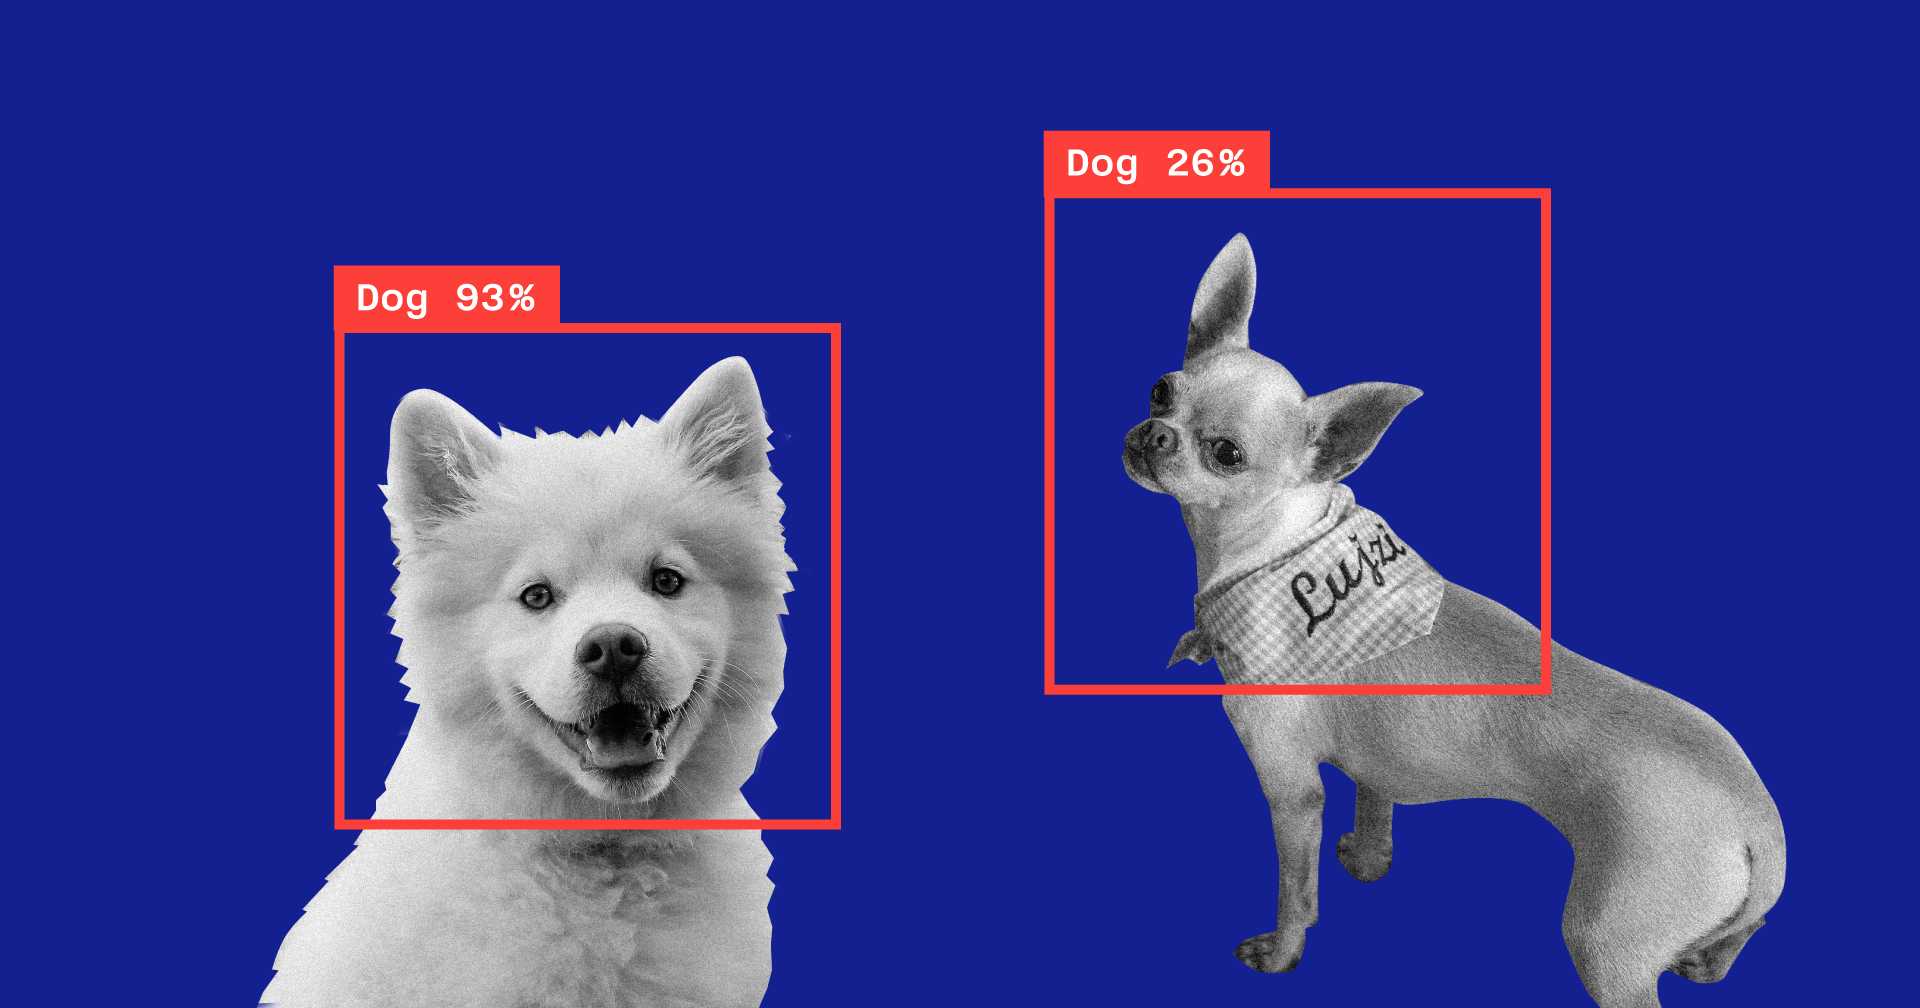
For each image, an indicator of confidence is displayed - how accurately a category was recognized using our model.
For almost all photos, with rare exceptions, this figure was 100%. I specifically added to the test dataset the image that you see above, and, as you can see, Create ML recognized the dog in 86% and the bird in 13%.
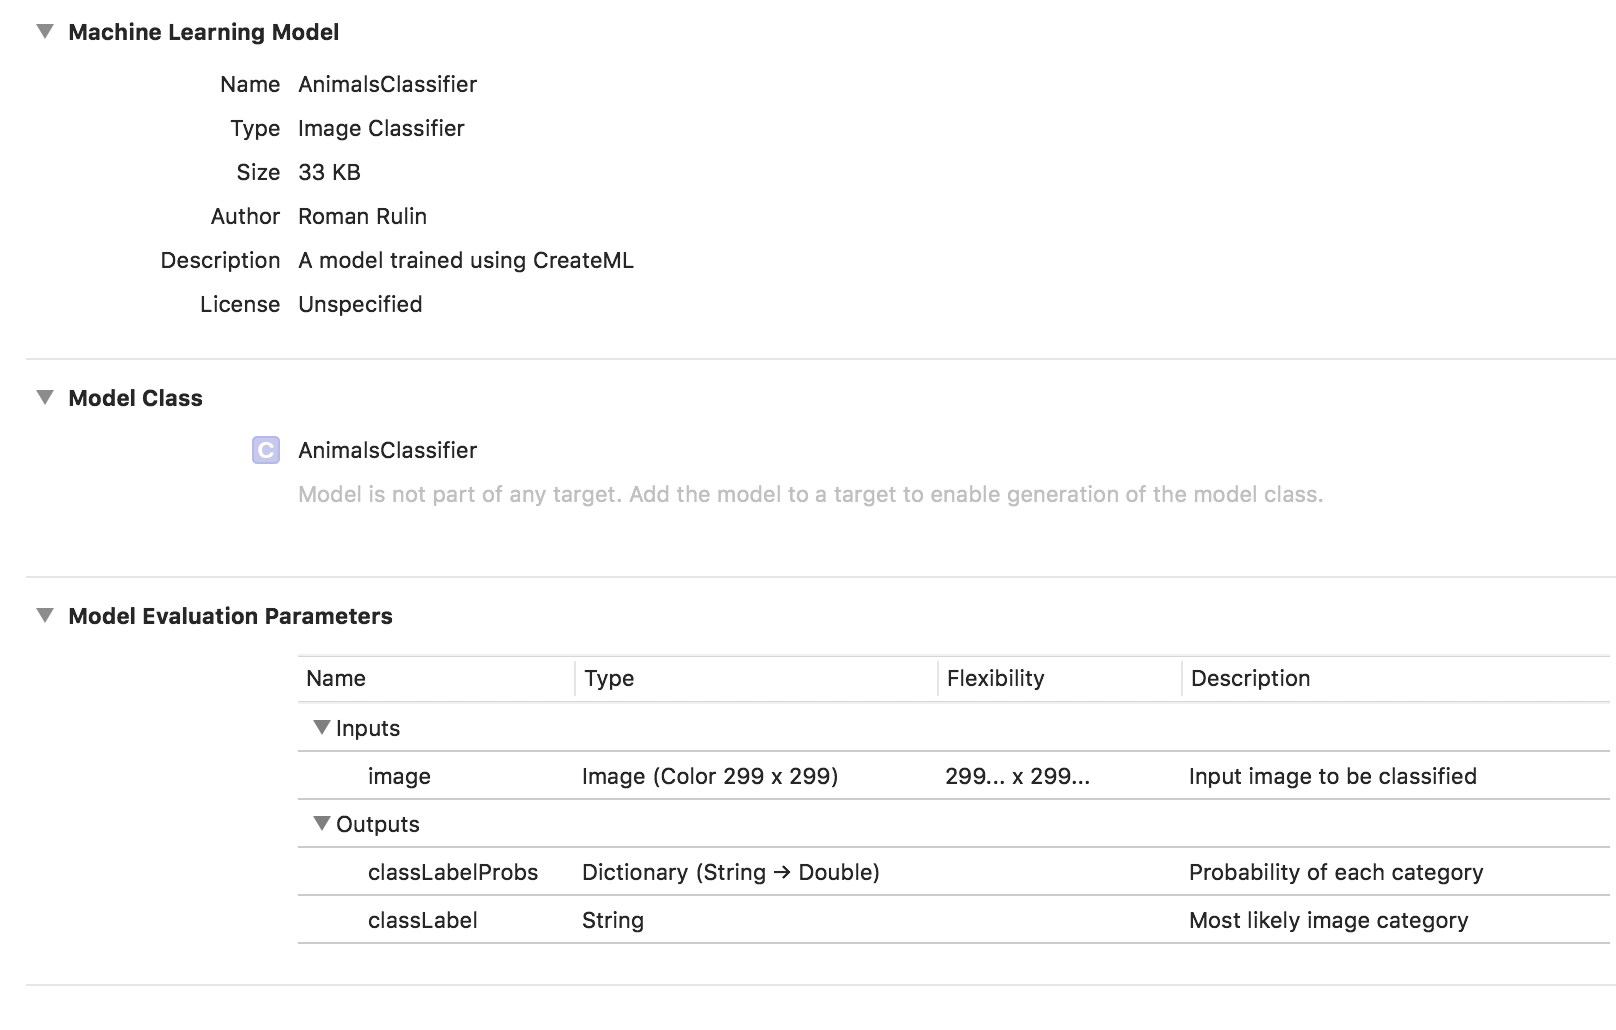
The training of the model is completed, and all that remains is for us to save the * .mlmodel file and add it to our project.
To test the model, I wrote a simple application using the Vision framework. It allows you to work with Core ML models and solve problems like image classification or object detection with their help.
Our application will recognize the picture from the device’s camera and display the category and the percentage of confidence in the classification.
We initialize the Core ML model to work with Vision and configure the query:
funcsetupVision() {
    guardlet visionModel = try? VNCoreMLModel(for: AnimalsClassifier().model)
        else { fatalError("Can't load VisionML model") }
    let request = VNCoreMLRequest(model: visionModel) { (request, error) inguardlet results = request.results else { return }
        self.handleRequestResults(results)
    }
    requests = [request]
}
Add a method that will process the results obtained VNCoreMLRequest. Let's display only those whose confidence index is more than 70%:
funchandleRequestResults(_ results: [Any]) {
    let categoryText: String?defer {
        DispatchQueue.main.async {
            self.categoryLabel.text = categoryText
        }
    }
    guardlet foundObject = results
        .compactMap({ $0as? VNClassificationObservation })
        .first(where: { $0.confidence > 0.7 })
        else {
            categoryText = nilreturn
    }
    let category = categoryTitle(identifier: foundObject.identifier)
    let confidence = "\(round(foundObject.confidence * 100 * 100) / 100)%"
    categoryText = "\(category) \(confidence)"
}
And the last thing is to add the delegate method AVCaptureVideoDataOutputSampleBufferDelegate, which will be called for each new frame from the camera and execute the query:
funccaptureOutput(
    _ output: AVCaptureOutput,
    didOutput sampleBuffer: CMSampleBuffer,
    from connection: AVCaptureConnection) {
    guardlet pixelBuffer = CMSampleBufferGetImageBuffer(sampleBuffer) else {
        return
    }
    var requestOptions: [VNImageOption: Any] = [:]
    iflet cameraIntrinsicData = CMGetAttachment(
        sampleBuffer,
        key: kCMSampleBufferAttachmentKey_CameraIntrinsicMatrix,
        attachmentModeOut: nil) {
        requestOptions = [.cameraIntrinsics:cameraIntrinsicData]
    }
    let imageRequestHandler = VNImageRequestHandler(
        cvPixelBuffer: pixelBuffer,
        options: requestOptions)
    do {
        try imageRequestHandler.perform(requests)
    } catch {
        print(error)
    }
}
Let's check how well the model does its task:

The category is determined with rather high accuracy, and this is especially surprising when one considers how fast the training went and how small the initial data was. Periodically, on a dark background, the model detects birds, but I think this is easily solved by increasing the number of images in the original dataset or increasing the minimum acceptable level of confidence.
If we want to train the model to classify any other category, it’s enough to add a new group of images and repeat the process - it will take a few minutes.
As an experiment, I made another data set in which I changed all the photos of cats in a photo of one cat from different angles, but on the same background and in the same environment. In this case, the model began to almost always make mistakes and recognize the category in an empty room, apparently relying on color as a key feature.
Another interesting feature presented in Vision only this year is the ability to recognize objects in the image in real time. It is represented by the VNRecognizedObjectObservation class, which allows you to get a category of an object and its location - boundingBox.

Now Create ML does not allow to create models for the implementation of this functionality. Apple suggests in this case to use Turi Create. The process is not much more complicated than the above: it is necessary to prepare category folders with photos and a file in which the coordinates of the rectangle where the object is located will be indicated for each image.
Natural language processing
The following function, Create ML, is teaching models to classify texts in natural language — for example, to determine the emotional coloring of sentences or to identify spam.
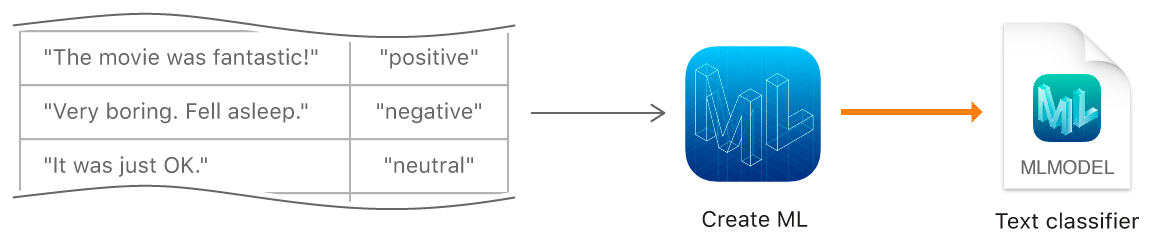
To create a model, we must assemble a table with an initial data set — sentences or whole texts related to a specific category — and train it with a model using the MLTextClassifier object:
let data = tryMLDataTable(contentsOf: URL(fileURLWithPath: "/Users/CreateMLTest/texts.json"))
let (trainingData, testingData) = data.randomSplit(by: 0.8, seed: 5)
let textClassifier = tryMLTextClassifier(trainingData: trainingData, textColumn: "text", labelColumn: "label")
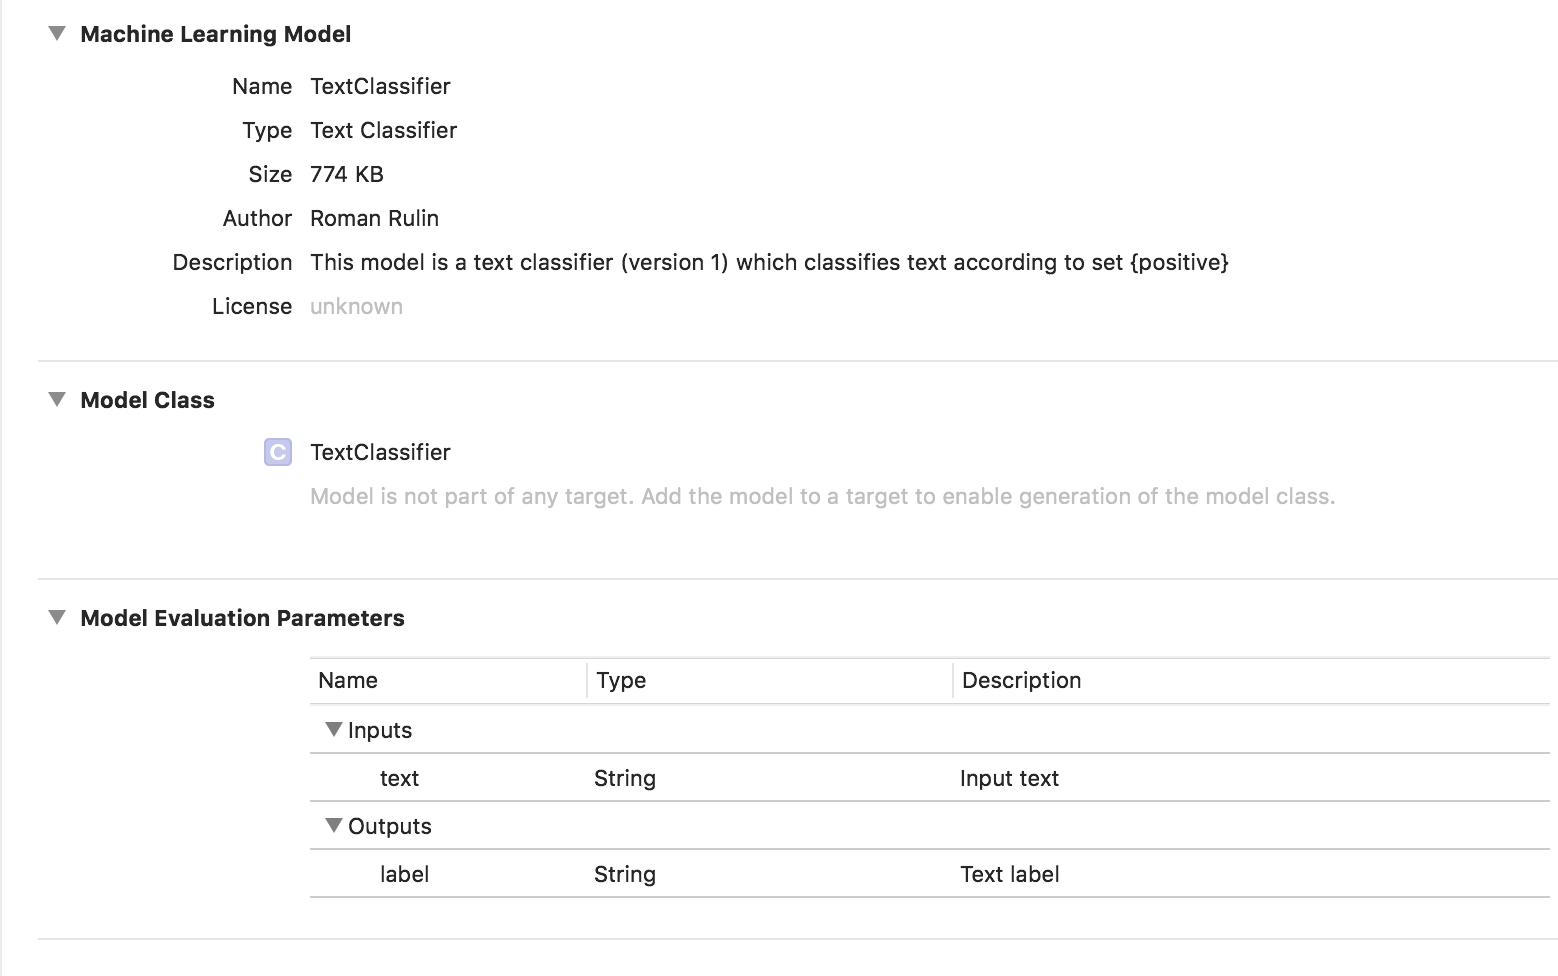
try textClassifier.write(to: URL(fileURLWithPath: "/Users/CreateMLTest/TextClassifier.mlmodel"))In this case, the trained model has the type Text Classifier:
Tabular data
Let's take a closer look at another feature of Create ML - model training using structured data (tables).
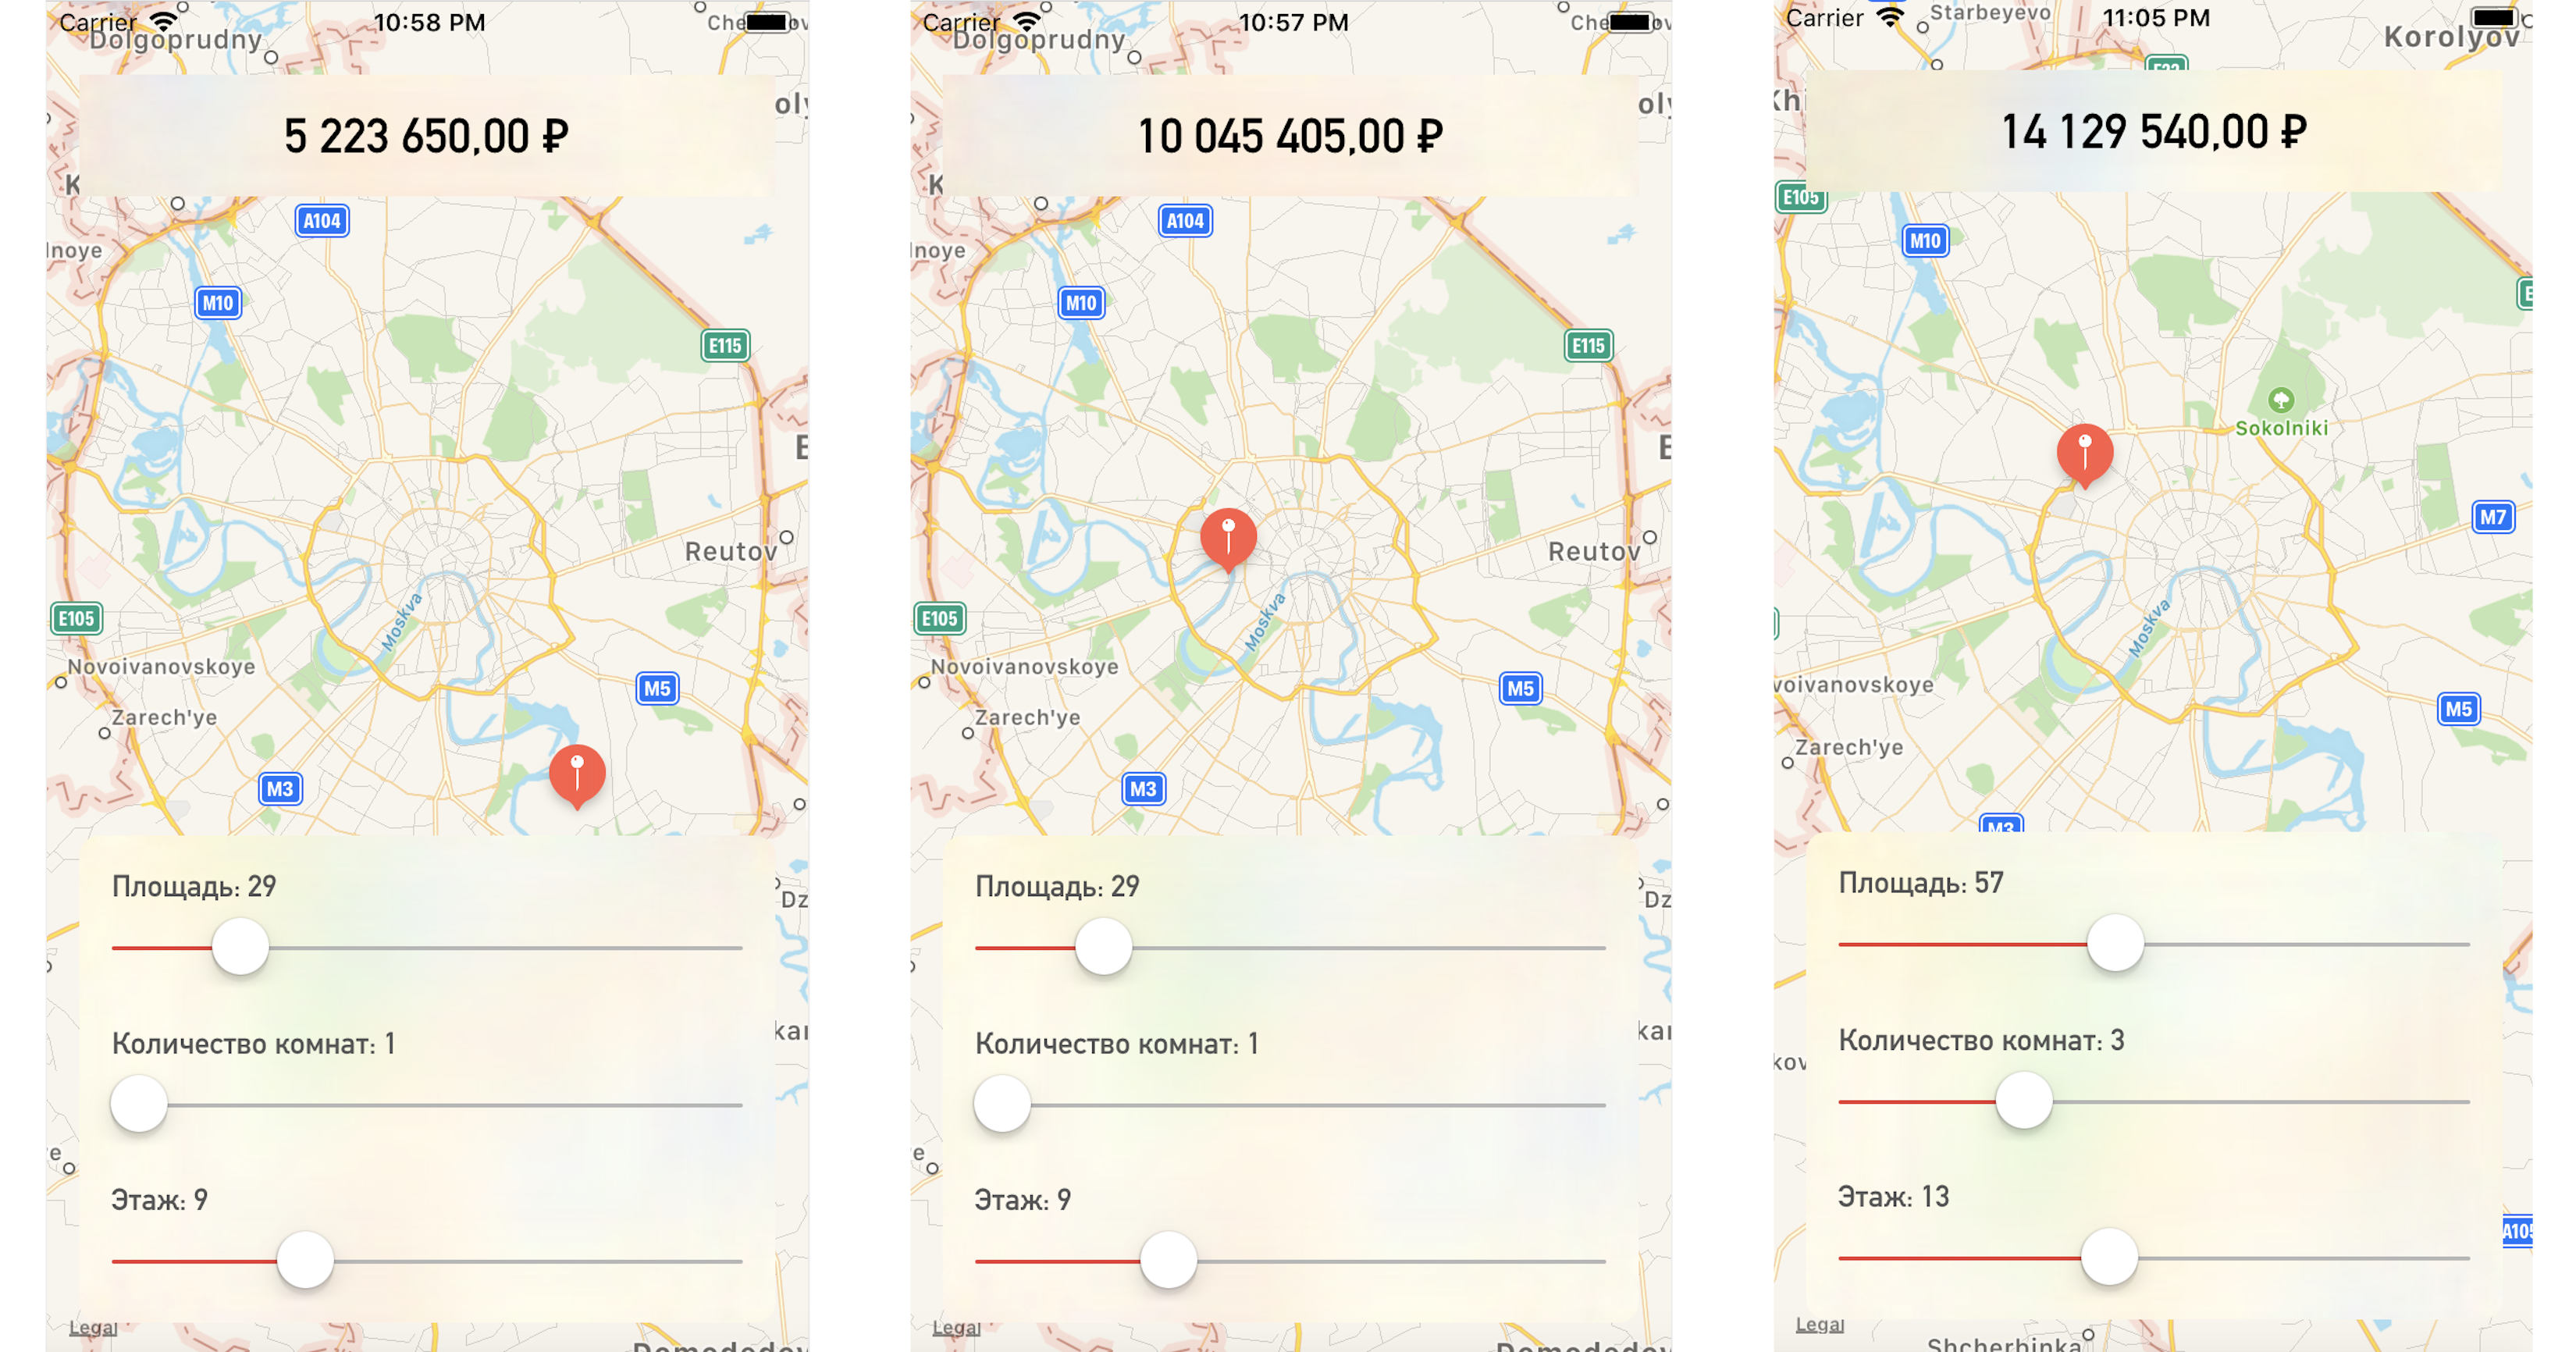
We will write a test application that predicts the price of an apartment based on its location on the map and other specified parameters.
So, we have a table with abstract data about apartments in Moscow in the form of a csv file: the area of each apartment, the floor, the number of rooms and coordinates (latitude and longitude) are known. In addition, the cost of each apartment is known. The closer to the center or the larger the area, the higher the price.

The task of Create ML will be to build a model capable of predicting the price of an apartment on the basis of the indicated signs. Such a task in machine learning is called a regression problem and is a classic example of learning with a teacher.
Create ML supports many models - Linear Regression, Decision Tree Regression, Tree Classifier, Logistic Regression, Random Forest Classifier, Boosted Trees Regression, and others.
We will use the MLRegressor object, which, based on the input data, will select the best option itself.
First, we initialize the MLDataTable object with the contents of our csv file:
let trainingFile = URL(fileURLWithPath: "/Users/CreateMLTest/Apartments.csv")
let apartmentsData = try MLDataTable(contentsOf: trainingFile)
We divide the initial data set into data for training the model and testing as a percentage of 80/20:
let (trainingData, testData) = apartmentsData.randomSplit(by: 0.8, seed: 0)We create the MLRegressor model, specifying the data for training and the name of the column whose values we want to predict. A task-specific type of regressor (linear, decision tree, boosted tree or random forest) will be automatically selected based on a study of the input data. We can also specify feature columns - specific columns-parameters for analysis, but in this example there is no need for this, we will use all parameters. At the end, save the trained model and add to the project:
let model = tryMLRegressor(trainingData: apartmentsData, targetColumn: "Price")
let modelPath = URL(fileURLWithPath: "/Users/CreateMLTest/ApartmentsPricer.mlmodel")
try model.write(to: modelPath, metadata: nil)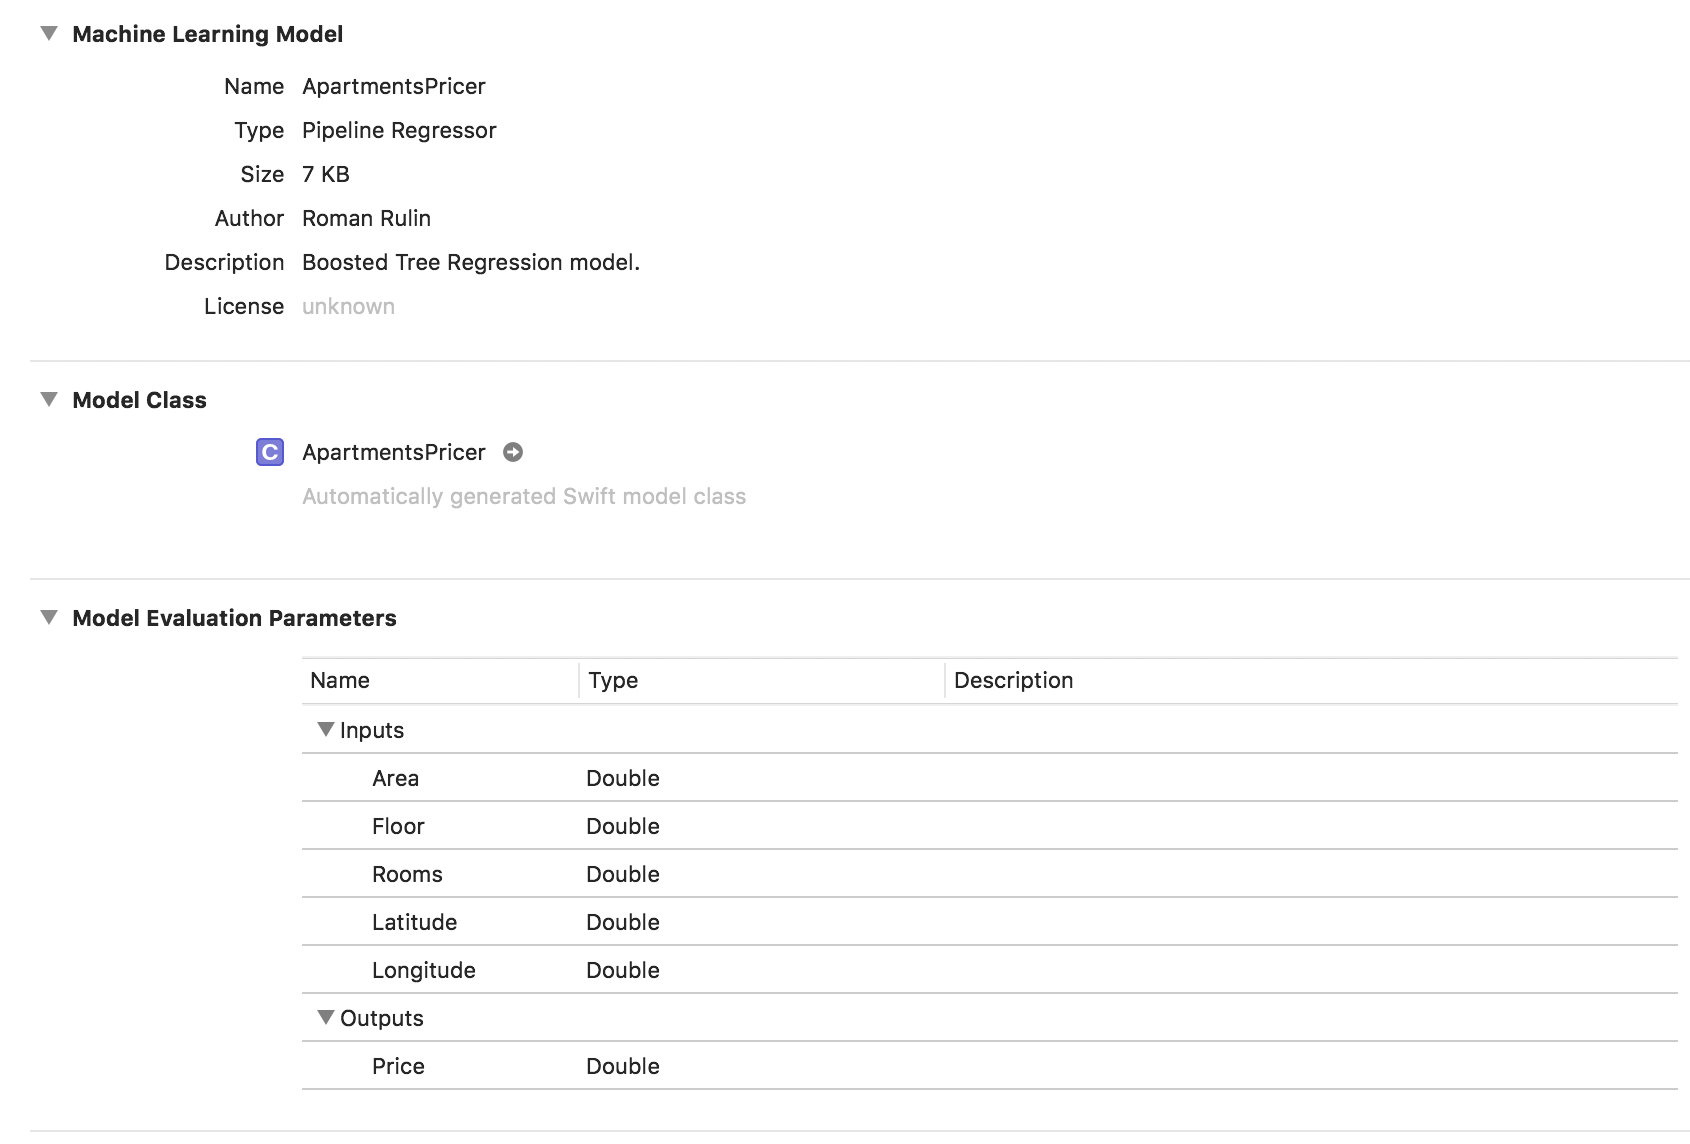
In this example, we see that the model type is already the Pipeline Regressor, and the Description field indicates the automatically selected regressor type - the Boosted Tree Regression Model. The parameters Inputs and Outputs correspond to the columns of the table, but their data type is Double.
Now check the resulting result.
Initialize the model object:
let model = ApartmentsPricer()Call the prediction method, passing in the specified parameters:
let area = Double(areaSlider.value)
let floor = Double(floorSlider.value)
let rooms = Double(roomsSlider.value)
let latitude = annotation.coordinate.latitude
let longitude = annotation.coordinate.longitude
let prediction = try? model.prediction(
    area: area,
    floor: floor,
    rooms: rooms,
    latitude: latitude,
    longitude: longitude)
Display the predicted value of the cost:
let price = prediction?.price
priceLabel.text = formattedPrice(price)
Changing the point on the map or the values of the parameters, we get the apartment price quite close to our test data:
Conclusion
Now the Create ML framework is one of the easiest ways to work with machine learning technologies. It still does not allow creating models for solving some tasks: recognition of objects in the image, photo styling, definition of similar images, recognition of physical actions based on accelerometer or gyroscope data, which Turi Create, for example, does.
But it is worth noting that Apple has quite seriously advanced in this area over the past year, and for sure, we will soon see the development of the described technologies.