Two crazy ways to finish the chip
- An atom consists of a nucleus and electrons that are around it.
- And what is between the nucleus and the electrons?
- Well ... How what? Air!
 Like an atom, the case of the microcircuit consists mainly of plastic
 In theory, yes. But in practice?
1. Sawing across
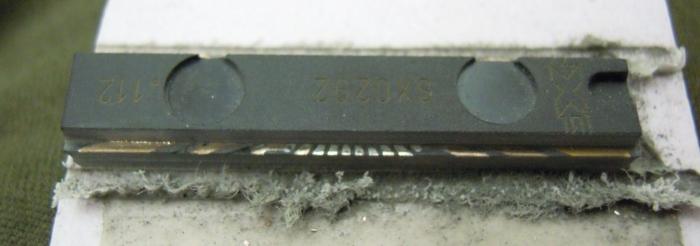
Gregory Davill (Gregory Davill) decided to build the simplest RFID emulator on the microcontroller MSP430G2211 , but he was haunted by the large size of the case (DIP-14). Of course, you could take a smaller case, or, at worst, choose a different controller model, but it's not interesting! Therefore, Greg went the other way, and taking a dremel, sawed off a piece of the case from two sides:
As a result, the MSP430 family was replenished with a new - six-legged - model.
The crystal was not hurt, so MK remained fully operational, not counting the loss of eight "extra" conclusions. But hey, the power leads are now cut off too! How will it work? In the usual scheme, it won’t, but here one interesting hack is used. This RFID tag consists of only two parts: the controller and the coil.

The controller is powered by a variable EMF induced in the coil by the reader field. The voltage is rectified by built-in protective diodes, a pair of which "hangs" on each terminal of the controller, and is supplied to the internal power bus.


The clock signal is taken from the same coil. Thus, all the conclusions, except for two, are not needed, and they can be safely cut off (of course, it is necessary to fill in the firmware in advance). This trick will also work with PIC and AVR controllers.
A source
2. We saw along
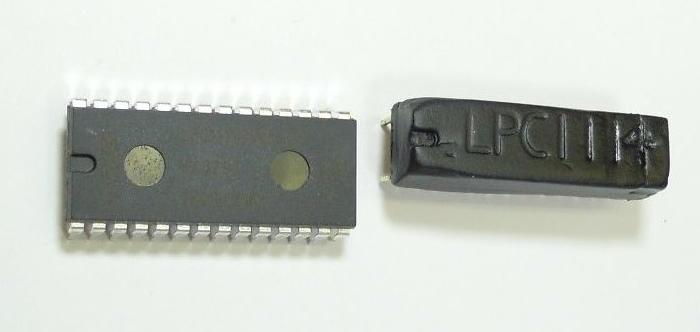
The LPC1114 controller is by far the only ARM in a "friendly" DIP package. It is easy to solder for beginners, it can be stuck in the breadboard without adapters. Joy is overshadowed only by the large width of the case - 600 mil (15.24 mm). The Japanese under the nickname TheAxid9999 was able to finish this controller to half the width (300 mil).You just can’t get by with straight arms and a grinder, so the controller was fixed on the table of the milling machine ...
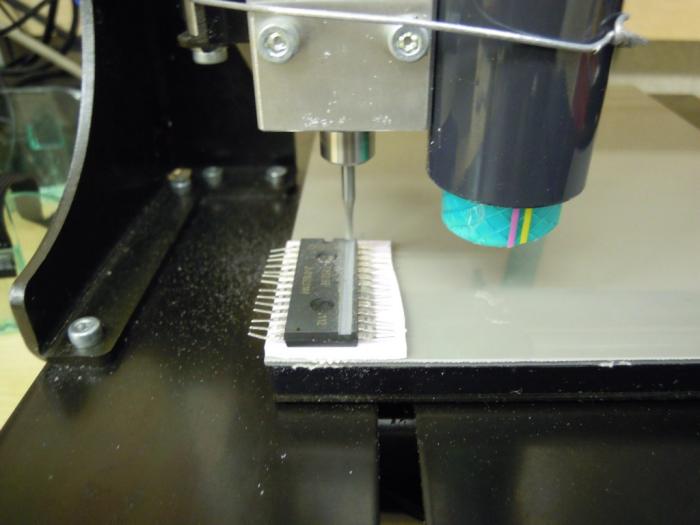
... and cut down 150 mil on each side for several passes. Together with the legs.

Now, to connect to the crystal, you need to get to the metal paths that go in the body of the case. On the same machine, taking a fraction of a millimeter per pass, we carefully milled two grooves, exposing the layer with the tracks, but without damaging the latter.
The hardest part is behind. Now you can solder to the controller new leads made of two comb connectors.

So that the entire structure could be removed from the board without fear of breaking it, it was flooded with epoxy polymer. After the polymer solidified, it was again milled to give a uniform shape.

This is how the result looks in comparison with the untouched case. The width was halved, though at the cost of increasing thickness.
Video instruction:
Source (in Japanese)
Conclusion
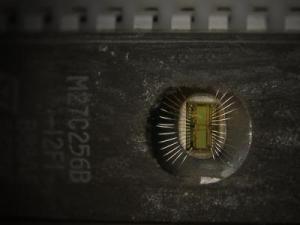
In addition to “along” and “across”, another way to cut microcircuits remained horizontal: horizontal. Unlike the first two methods, horizontal sawing is not useless fun, but quite a serious tool. It is used to access the crystal for:- Work with a microcircuit in which the crystal connections with the terminals are broken;
- Extract protected data, for example, locked firmware;
- Reverse engineering.
Well, the methods described in this article, of course, have no practical application and are considered exclusively as “Just for fun”. All modern microcircuits are produced in miniature cases, and if dimensions are important, it is enough to choose a suitable design, and not engage in artistic carving in DIP cases.