Creating a cartoon water shader for the web. Part 3
- Transfer

In the second part, we looked at buoyancy and foam lines. In this last part, we will apply underwater distortion as a post-processing effect.
Refraction and post-processing effects
Our goal is to visualize the refraction of light in water. We have already described how to create this type of distortion in a fragment shader for a 2D scene. Here the only difference is that we need to understand which area of the screen is under water and apply distortion only to it.
Post processing
In general, the post-processing effect is any effect applied to the entire scene after it is rendered, for example, shades of color or the effect of an old CRT screen . Instead of rendering the scene directly to the screen, we first render it into a buffer or texture, and then, having skipped the scene through our shader, we render it to the screen.
In PlayCanvas, you can customize this post-processing effect by creating a new script. Let's call it Refraction.js and copy into it as a template this template:
//--------------- ОПРЕДЕЛЕНИЕ ЭФФЕКТА ПОСТОБРАБОТКИ------------------------//
pc.extend(pc, function () {
    // Конструктор - создаёт экземпляр нашего эффекта постобработкиvar RefractionPostEffect = function (graphicsDevice, vs, fs, buffer) {
        var fragmentShader = "precision " + graphicsDevice.precision + " float;\n";
        fragmentShader = fragmentShader + fs;
        // это определение шейдера для эффектаthis.shader = new pc.Shader(graphicsDevice, {
            attributes: {
                aPosition: pc.SEMANTIC_POSITION
            },
            vshader: vs,
            fshader: fs
        });
        this.buffer =  buffer;
    };
    // Наш эффект должен порождаться из pc.PostEffect
    RefractionPostEffect = pc.inherits(RefractionPostEffect, pc.PostEffect);
    RefractionPostEffect.prototype = pc.extend(RefractionPostEffect.prototype, {
        // Каждый постэффект должен реализовывать метод render,// который задаёт все параметры, которые могут понадобиться шейдеру,// а также рендерит эффект на экран
        render: function (inputTarget, outputTarget, rect) {
            var device = this.device;
            var scope = device.scope;
            // Задаём шейдер в качестве входного целевого рендера. Это изображение, отрендеренное из нашей камеры
            scope.resolve("uColorBuffer").setValue(inputTarget.colorBuffer);
            // Отрисовываем четырёхугольник полного экрана в целевой вывод. В нашем случае цеелвым выводом является экран.// Отристовка четырёхугольника полного экрана будет выполнять определённый выше шейдер
            pc.drawFullscreenQuad(device, outputTarget, this.vertexBuffer, this.shader, rect);
        }
    });
    return {
        RefractionPostEffect: RefractionPostEffect
    };
}());
//--------------- ОПРЕДЕЛЕНИЕ СКРИПТА------------------------//var Refraction = pc.createScript('refraction');
Refraction.attributes.add('vs', {
    type: 'asset',
    assetType: 'shader',
    title: 'Vertex Shader'
});
Refraction.attributes.add('fs', {
    type: 'asset',
    assetType: 'shader',
    title: 'Fragment Shader'
});
// Код initialize вызывается один раз для каждой сущности
Refraction.prototype.initialize = function() {
    var effect = new pc.RefractionPostEffect(this.app.graphicsDevice, this.vs.resource, this.fs.resource);
    // добавляем эффект очередь камеры postEffectsvar queue = this.entity.camera.postEffects;
    queue.addEffect(effect);
    this.effect = effect;
    // Сохраняем текущие шейдеры для горячей перезагрузкиthis.savedVS = this.vs.resource;
    this.savedFS = this.fs.resource;
};
Refraction.prototype.update = function(){
     if(this.savedFS != this.fs.resource || this.savedVS != this.vs.resource){
         this.swap(this);
     }
};
Refraction.prototype.swap = function(old){
    this.entity.camera.postEffects.removeEffect(old.effect);
    this.initialize();
};
This is similar to a regular script, but we define a class
RefractionPostEffectthat can be applied to the camera. For rendering, it needs vertex and fragment shaders. Attributes are already configured, so let's create a Refraction.frag with the following contents:precision highp float;
uniform sampler2D uColorBuffer;
varying vec2 vUv0;
void main() {
vec4 color = texture2D(uColorBuffer, vUv0);
gl_FragColor = color;
}And Refraction.vert with the base vertex shader:
attribute vec2 aPosition;
varying vec2 vUv0;
void main(void)
{
    gl_Position = vec4(aPosition, 0.0, 1.0);
    vUv0 = (aPosition.xy + 1.0) * 0.5;
}
Now attach the Refraction.js script to the camera and assign the corresponding attributes to the shaders. When you start the game, you will see the scene in the same way as before. This is an empty post effect that just re-renders the scene. To make sure it works, let's try to give the scene a red hue.
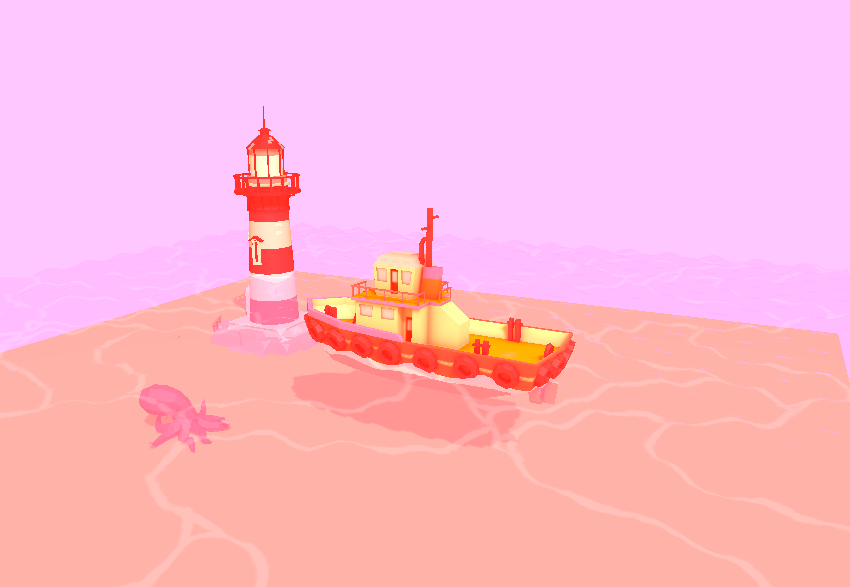
Instead of simply returning the color to Refraction.frag, try setting the red component to 1.0, which should give the image as shown below.
Distortion shader
To create an animated distortion, we need to add a uniform time variable, so let's create it inside this post effect constructor in Refraction.js:
var RefractionPostEffect = function (graphicsDevice, vs, fs) {
    var fragmentShader = "precision " + graphicsDevice.precision + " float;\n";
    fragmentShader = fragmentShader + fs;
    // это определение шейдера для нашего эффектаthis.shader = new pc.Shader(graphicsDevice, {
        attributes: {
            aPosition: pc.SEMANTIC_POSITION
        },
        vshader: vs,
        fshader: fs
    });
    // >>>>>>>>>>>>> Здесь инициализируем времяthis.time = 0;
    };
Now inside the render function, we pass it to our shader to increase it:
RefractionPostEffect.prototype = pc.extend(RefractionPostEffect.prototype, {
    // Каждый постэффект должен реализовывать метод render,// который задаёт все необходимые шейдеру параметры,// а также рендерит эффект на экране
    render: function (inputTarget, outputTarget, rect) {
        var device = this.device;
        var scope = device.scope;
        // Задаём шейдер в качестве входного целевого рендера. Это изображение, отрендеренное из нашей камеры
        scope.resolve("uColorBuffer").setValue(inputTarget.colorBuffer);
        /// >>>>>>>>>>>>>>>>>> Здесь мы передаём uniform-переменную времени
        scope.resolve("uTime").setValue(this.time);
        this.time += 0.1;
        // Отрисовываем четырёхугольник полного экрана в целевой вывод. В нашем случае цеелвым выводом является экран.// Отристовка четырёхугольника полного экрана будет выполнять определённый выше шейдер
        pc.drawFullscreenQuad(device, outputTarget, this.vertexBuffer, this.shader, rect);
    }
});
Now we can use the same shader code from the tutorial on distortion in water, turning our full fragment shader into the following:
precision highp float;
uniform sampler2D uColorBuffer;
uniform float uTime;
varying vec2 vUv0;
void main() {
    vec2 pos = vUv0;
    float X = pos.x*15.+uTime*0.5;
    float Y = pos.y*15.+uTime*0.5;
    pos.y += cos(X+Y)*0.01*cos(Y);
    pos.x += sin(X-Y)*0.01*sin(Y);
    vec4 color = texture2D(uColorBuffer, pos);
    gl_FragColor = color;
}
If everything is done correctly, then the whole picture should look as if it is completely under water.
Task 1: make the distortion apply only to the bottom of the screen.
Camera masks
We are almost done. It remains for us to apply this distortion effect to the underwater part of the screen. The easiest way I thought of is to re-render the scene with the surface of the water rendered in solid white, as shown in the figure below.
It will be rendered into the texture that we use as a mask. Then we will transfer this texture to our refraction shader, which will distort the pixel in the finished image only when the corresponding pixel in the mask has white color.
Let's add a boolean attribute to the surface of the water to know if it is used as a mask. Add the following to Water.js:
Water.attributes.add('isMask', {type:'boolean',title:"Is Mask?"});Then, as usual, we can pass it to the shader using
material.setParameter('isMask',this.isMask);. Then declare it in Water.frag and paint the pixel white if the attribute is true.// Объявляем вверху новую uniform
uniform bool isMask;
// В конце основной функции переопределяем цвет, делая его белым // если маска равна true if(isMask){
color = vec4(1.0);
}Make sure it works by turning on the “Is Mask?” Property in the editor and restarting the game. It should look white, as in the image above.
Now we need a second camera to re-render the scene. Create a new camera in the editor and call it CameraMask . We also duplicate the Water entity in the editor and name the WaterMask duplicate . Make sure that the Water entity “Is Mask?” Is false and WaterMask is true.
To order the new camera to render to the texture rather than to the screen, create a new script CameraMask.js and attach it to the new camera. We create a RenderTarget to capture the output of this camera:
// Код initialize выполняется один раз для каждой сущности
CameraMask.prototype.initialize = function() {
    // Создаём 512x512x24-битный целевой рендер с буфером глубинvar colorBuffer = new pc.Texture(this.app.graphicsDevice, {
        width: 512,
        height: 512,
        format: pc.PIXELFORMAT_R8_G8_B8,
        autoMipmap: true
    });
    colorBuffer.minFilter = pc.FILTER_LINEAR;
    colorBuffer.magFilter = pc.FILTER_LINEAR;
    var renderTarget = new pc.RenderTarget(this.app.graphicsDevice, colorBuffer, {
        depth: true
    });
    this.entity.camera.renderTarget = renderTarget;
};
Now, after launching the application, you will see that this camera no longer renders the screen. We can get the output of its target render in Refraction.js as follows:
Refraction.prototype.initialize = function() {
    var cameraMask = this.app.root.findByName('CameraMask');
    var maskBuffer = cameraMask.camera.renderTarget.colorBuffer;
    var effect = new pc.RefractionPostEffect(this.app.graphicsDevice, this.vs.resource, this.fs.resource, maskBuffer);
    // ...// Остальная часть функции такая же, как и раньше
};
Notice that I pass this mask texture as an argument to the post effect constructor. We need to create a link to it in our constructor, so it will look like this:
//// Добавили новый аргумент в строке нижеvar RefractionPostEffect = function (graphicsDevice, vs, fs, buffer) {
        var fragmentShader = "precision " + graphicsDevice.precision + " float;\n";
        fragmentShader = fragmentShader + fs;
        // это определение шейдера для нашего эффектаthis.shader = new pc.Shader(graphicsDevice, {
            attributes: {
                aPosition: pc.SEMANTIC_POSITION
            },
            vshader: vs,
            fshader: fs
        });
        this.time = 0;
        //// <<<<<<<<<<<<< Здесь сохраняем буферthis.buffer = buffer;
    };
Finally, in the render function, we pass the buffer to our shader:
scope.resolve("uMaskBuffer").setValue(this.buffer);Now, to make sure it all works, I'll leave it to you as a task.
Task 2: render uMaskBuffer to the screen to make sure that it is the output of the second camera.
You need to consider the following: the target render is configured in the initialize script of CameraMask.js, and it should be ready by the time you call Refraction.js. If the scripts work differently, then we get an error. To make sure they are working in the correct order, drag CameraMask to the top of the entity list in the editor, as shown below.

The second camera should always look with the same look as the original one, so let's make sure that it always follows the position and rotation in the update of the CameraMask.js script:
CameraMask.prototype.update = function(dt) {
    var pos = this.CameraToFollow.getPosition();
    var rot = this.CameraToFollow.getRotation();
    this.entity.setPosition(pos.x,pos.y,pos.z);
    this.entity.setRotation(rot);
};
In initialize, we define
CameraToFollow:this.CameraToFollow = this.app.root.findByName('Camera');Clipping mask
Both cameras now render the same thing. We want the mask camera to render everything except real water, and the real camera renders everything except the water mask.
For this we can use the bit mask of the camera clipping. It works like collision masks . The object will be cut off (that is, not rendered) if the bitwise result
ANDbetween its mask and camera mask is 1. Suppose Water has bit 2 and WaterMask has bit 3. All bits of this camera must be set except 3, and the camera masks - all bits except 2. The easiest way to say "all bits except N", as follows:
~(1 << N) >>> 0Read more about bitwise operations here .
To customize the clipping masks of the camera, we can insert the following at the bottom of the initialize script of CameraMask.js :
// Задаём все биты, кроме 2 this.entity.camera.camera.cullingMask &= ~(1 << 2) >>> 0;
    // Задаём все биты, кроме 3this.CameraToFollow.camera.camera.cullingMask &= ~(1 << 3) >>> 0;
    // Если хотите вывести эту битовую маску, то попробуйте следующее:// console.log((this.CameraToFollow.camera.camera.cullingMask >>> 0).toString(2));
Now in Water.js, we set the Bit 2 mask of the Water mesh, and
// Вставьте это в нижнюю часть initialize скрипта Water.js// Задание масок отсеченияvar bit = this.isMask ? 3 : 2;
meshInstance.mask = 0;
meshInstance.mask |= (1 << bit);
Now one kind will be with ordinary water, and the second - with water of solid white color. The image on the left shows the view from the source camera, and on the right is the view from the mask camera.

Mask application
And now the last step! We know that underwater areas are marked with white pixels. We just need to check whether we are in the white pixel, and if we are not, then turn off the distortion in Refraction.frag :
// Проверяем исходную позицию, а также новую искажённую позицию
vec4 maskColor = texture2D(uMaskBuffer, pos);
vec4 maskColor2 = texture2D(uMaskBuffer, vUv0);
// Мы не в белом пикселе?if(maskColor != vec4(1.0) || maskColor2 != vec4(1.0)){
    // Возвращаем его к исходной позиции
    pos = vUv0;
}
And this should solve our problem!
It is also worth noting that since the texture for the mask is initialized at startup, then when the window is resized at runtime, it will no longer match the screen size.
Smoothing
You may notice that the edges of the scene now look a bit sharp. This happened because after applying the post-effect we lost the smoothing.
We can apply additional smoothing on top of our effect as another post effect. Fortunately, there is another variable in PlayCanvas store that we can use. Go to the scripts assets page , click on the big green download button, and select your project from the list that appears. The script will appear at the root of the Assets window as posteffect-fxaa.js . Just attach it to the Camera entity, and your scene will start to look much better!
Thoughts at the end
If you get to here, you can praise yourself! In this tutorial we covered quite a few techniques. Now you have to feel confident when working with vertex shaders, rendering in textures, applying post-processing effects, selectively clipping objects, using the depth buffer and working with blending and transparency. Although we implemented all this in PlayCanvas, you can meet all these general concepts of computer graphics in one form or another on any platform.
All of these techniques are also applicable to a variety of other effects. One particularly interesting use found for vertex shaders was found in the Abzu graphics report , where the developers explain how they used vertex shaders to effectively animate tens of thousands of fish on the screen.
Now you have a beautiful water effect that you can use in your games! You can customize it and add your own details. Much more can be done with water (I did not even mention any type of reflection). Below are a couple of ideas.
Noise-based waves
Instead of just animating the waves with a combination of cosines and sines, you can sample the texture to make the waves look a bit more natural and less predictable.
Dynamic Foam Traces
Instead of completely static lines of water on the surface, you can draw textures as objects move to create dynamic traces of foam. This can be done in many different ways, so this task itself can become a project.
Source
A complete PlayCanvas project can be found here . In our repository there is also a project port under Three.js .