Radio receiver 60-1700 MHz on RTL2832 for 20 bucks or SDR for beginners
In this article I will talk about how, having spent very little money and a little time, get a radio receiver that can receive anything in the range of 60-1700 MHz (radio stations, soundtrack of TV, radio amateurs, pocket radio stations and much more). For this
we use a DVB tuner based on the RTL2832 chip, working in a special mode, which can be purchased for $ 20 or even cheaper.
People use radio waves for a variety of purposes. Radio amateurs communicate with each other, the dispatch service gives instructions to the pilots of the aircraft, taxi drivers take orders that they learn about on the radio, the car alarm keyring talks to the car to confirm its authenticity and open the doors. Therefore, listening to the air has always been interesting to many.
Previously, building a receiver capable of receiving in a wide range of frequencies and decoding different types of signal modulations was a difficult task, so off-the-shelf receivers were expensive, and not everyone could assemble such a receiver. With the advent of productive processors, it became possible to replace a significant part of electronic components with software processing - fine tuning of the reception frequency, demodulation, filtering of noise and interference - all this is perfectly implemented programmatically, and even gets the opportunity for fine tuning without the need for alteration.
The hardware remains only the task of preliminary allocation of the desired portion of the radio range and its digitization. This concept is called SDR - Software-defined Radio.
You can read more about SDR on Wikipedia .
Now anyone can get acquainted with SDR technology. We owe this to Realtek, which released the RTL2832 chip. Its original purpose is a USB DVB-T decoder for receiving digital TV channels. The analog part (tuning to the channel frequency) is implemented by the Elonics E4000 solid-state tuner, for which the RTL2832 has outputs. Thus, based on these two microcircuits and a small number of other parts, manufacturers can assemble USB DVB-T tuners.
This chip was found to have a mode that disables all built-in decoding functions and puts it into a fast ADC mode, which digitizes everything that the E4000 produces with a frequency of up to 3 million eight-bit samples per second. In turn, the E4000 can be tuned to a frequency from 60 to 1700 MHz, giving to the RTL2832 input a selected “piece” of a 3 MHz wide radio range for digitization. Adding to this the processing program on the PC, we get a fully working SDR receiver.
I will try to describe in simple words:
We can not do without a TV tuner based on RTL2832.
Here is a list of devices that suit us.
The easiest and cheapest way to buy a tuner on eBay. Finding it is simple - just use the name of the chips as a request . There is no particular difference between specific tuner models, you can choose the cheapest or in your favorite case.
Consider setting up software for Windows.
Liked? Then the cultivation process is almost endless. There are a large number of much more sensitive and functional SDR consoles. Some of them provide a digitization and viewing band of up to 100 MHz, some can transmit, almost all the more expensive set-top boxes digitize a signal with a resolution of 16 or 24 bits instead of 8. Pay attention to the USRP project .
More sophisticated software tools allow you to decode digital radios, receive signals from a variety of wireless sensors, and even decode analog and digital television signals. Check out PowerSDR and GnuRadio projects.
Upd: Table of SDR receivers with features and approximate prices.
we use a DVB tuner based on the RTL2832 chip, working in a special mode, which can be purchased for $ 20 or even cheaper.
Radio waves
People use radio waves for a variety of purposes. Radio amateurs communicate with each other, the dispatch service gives instructions to the pilots of the aircraft, taxi drivers take orders that they learn about on the radio, the car alarm keyring talks to the car to confirm its authenticity and open the doors. Therefore, listening to the air has always been interesting to many.
Software-defined Radio
Previously, building a receiver capable of receiving in a wide range of frequencies and decoding different types of signal modulations was a difficult task, so off-the-shelf receivers were expensive, and not everyone could assemble such a receiver. With the advent of productive processors, it became possible to replace a significant part of electronic components with software processing - fine tuning of the reception frequency, demodulation, filtering of noise and interference - all this is perfectly implemented programmatically, and even gets the opportunity for fine tuning without the need for alteration.
The hardware remains only the task of preliminary allocation of the desired portion of the radio range and its digitization. This concept is called SDR - Software-defined Radio.
You can read more about SDR on Wikipedia .
TV tuner RTL2832
Now anyone can get acquainted with SDR technology. We owe this to Realtek, which released the RTL2832 chip. Its original purpose is a USB DVB-T decoder for receiving digital TV channels. The analog part (tuning to the channel frequency) is implemented by the Elonics E4000 solid-state tuner, for which the RTL2832 has outputs. Thus, based on these two microcircuits and a small number of other parts, manufacturers can assemble USB DVB-T tuners.
This chip was found to have a mode that disables all built-in decoding functions and puts it into a fast ADC mode, which digitizes everything that the E4000 produces with a frequency of up to 3 million eight-bit samples per second. In turn, the E4000 can be tuned to a frequency from 60 to 1700 MHz, giving to the RTL2832 input a selected “piece” of a 3 MHz wide radio range for digitization. Adding to this the processing program on the PC, we get a fully working SDR receiver.
How does it all work
I will try to describe in simple words:
- An antenna connected to the tuner receives signals from the air.
- The E4000 chip selects a portion of the radio range, starting where we indicated it and with a width of 3 MHz, amplifies it.
- The RTL2832 chip digitizes this section and transfers via USB to the computer.
- The program (GnuRadio, HDSDR or another) "tunes" to the selected frequency within the previously selected 3 MHz, performs demodulation in the specified manner and sends the resulting sound to the sound card. It can also send commands to the E4000 chip to rebuild to another part of the range.
We buy a tuner
We can not do without a TV tuner based on RTL2832.
Here is a list of devices that suit us.
The easiest and cheapest way to buy a tuner on eBay. Finding it is simple - just use the name of the chips as a request . There is no particular difference between specific tuner models, you can choose the cheapest or in your favorite case.
Install and configure
Consider setting up software for Windows.
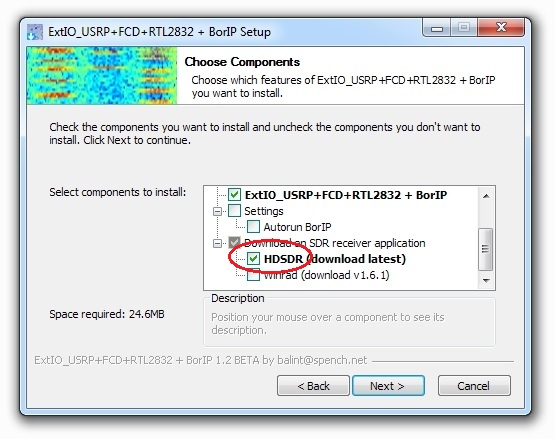
- Download the installer containing the driver for RTL2832, the plug-in for the HDSDR program, and the HDSDR program itself. If the link dies, look for a new version from the author .
- We start, when choosing the components, we note that we need to download HDSDR.
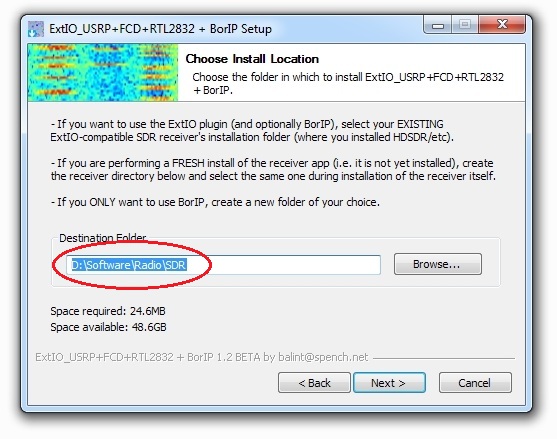
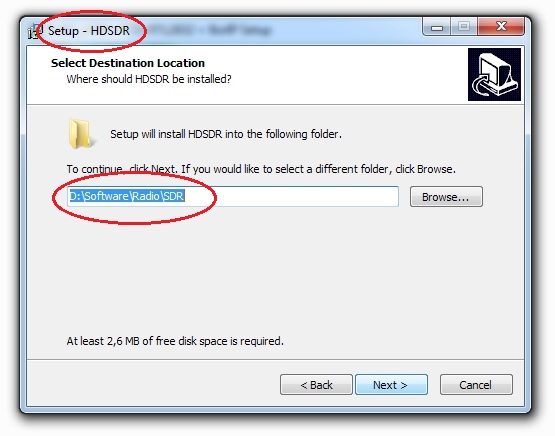
- We indicate the desired path and remember it.
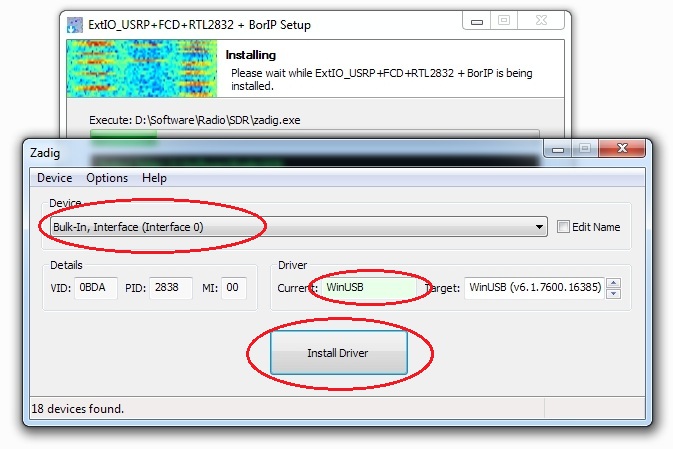
- The Zadig program will start to install the WinUSB driver. In the menu, select "List all devices".
- Our tuner will look something like this: “Bulk-In, interface 0” (for other cases, read here ). We select the tuner, select also “WinUSB”, click “Install”.
- The HDSDR installer starts. We choose the same path as indicated earlier.
- Installed, run. The main HDSDR window opens. Press the ExtIO button.

- The RTL2832 plugin window opens. We write the word “RTL” in the Device Hint field, “2” in the Sample Rate field, click “Create”.

- Click "Start" in the main window. The work has begun!
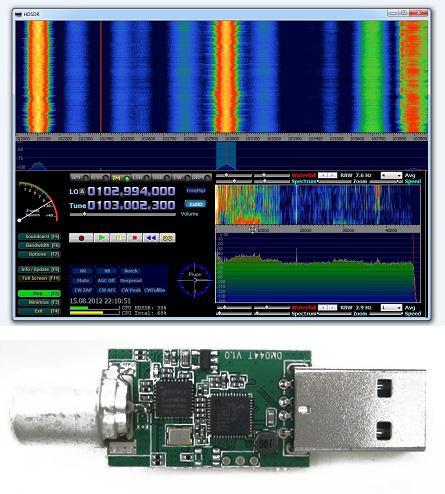
We see a panorama of the selected section of the range at the top.
By dragging the scale under the panorama or the Tune button, we select another section.
By clicking on the panorama - the frequency of fine tuning.
The buttons below it are the type of modulation.
For better quality, click “Bandwidth” and select Output - “48000” or “96000”.
The picture shows a section of the VHF broadcasting band from 102 to 104 MHz and three radio stations on it, one of which we are tuned to.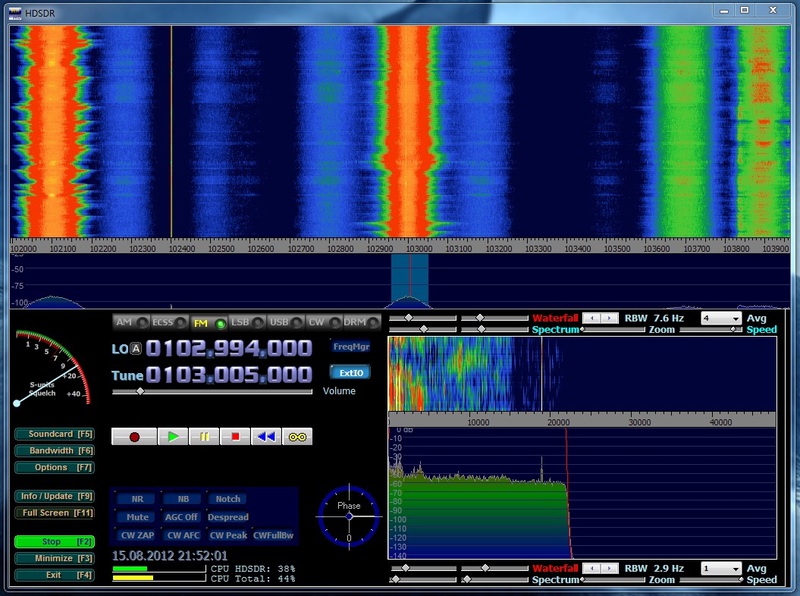
- We are experimenting, listening to the broadcast. Sometimes you may need to turn the tuner off and on again. It is also advisable to find the antenna more serious than the one that comes with it.
What's next?
Liked? Then the cultivation process is almost endless. There are a large number of much more sensitive and functional SDR consoles. Some of them provide a digitization and viewing band of up to 100 MHz, some can transmit, almost all the more expensive set-top boxes digitize a signal with a resolution of 16 or 24 bits instead of 8. Pay attention to the USRP project .
More sophisticated software tools allow you to decode digital radios, receive signals from a variety of wireless sensors, and even decode analog and digital television signals. Check out PowerSDR and GnuRadio projects.
Upd: Table of SDR receivers with features and approximate prices.