HybridAuth - website integration with social networks
- Tutorial
Introduction
On my site on php, for authorization of users, I recently used the Loginza service. Everything was very cool and convenient, but the idea of abandoning this wonderful service began to arise in my head, and here's why:
- Authorization of users in the event of closing Loginza or refusing it - in this case we will lose users whose email profiles are not specified in the linked profiles;
- Additional information, for example, VKontakte can give a user's photo in several ways, including a square avatar. It is not possible to obtain this data with Loginza; the service itself decides which data to request and which to give;
- From the moment of sale to Yandex, Loginza began to die: no one responds to user requests, the service does not develop, but is in the form it was 1-2 years ago.
The question arose of replacing and using alternative services no longer arose a desire - no one imagined the opportunity to "communicate" with social services. network directly, and extended profile fields are usually included in paid services. I wanted a standalone solution with the ability to flexibly customize the requested fields, and in the end I settled on the php library HybridAuth.
HybridAuth
HybridAuth is an open source library that allows you to use authorization using OAuth1, OAuth2 and OpenID. The library already includes settings for most popular social networks. networks such as Google, Facebook, Twitter, and even VKontakte. The current stable version is 2.0.11, the version in development is 2.1.0 - there are links to github at the end of the article. It is distributed under the MIT and GPL licenses, more about this can be read here .
The library includes examples of use and a set of the most popular authorization services. Consider the example of authorization via Twitter, for this we take the latest stable version and install it on a local server. All examples are in the directory
examples, services settings are in hybridauth/config.php, there isinstall.php, which will help us create the settings file automatically, open it: 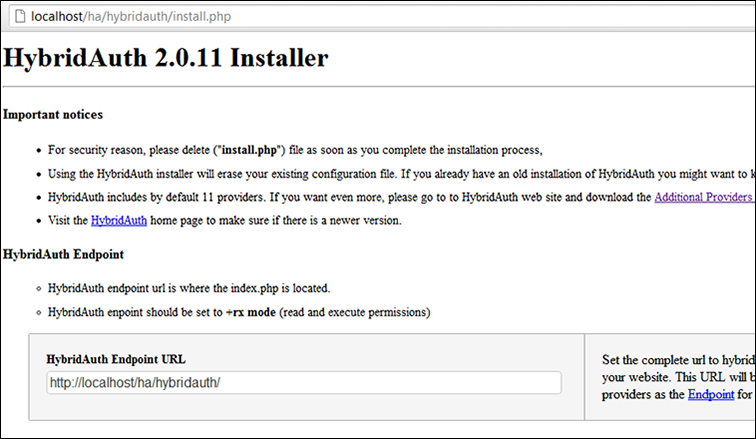
First, we need to specify the Endpoint URL - the full path to the root directory of the plugin, it is used by some services to return to your site. Next are the settings for all authorization services, as well as instructions for obtaining ID and Secret:

For our example, create an application on Twitter. After that, we will add them to the settings of our library and save. Now consider an authorization example, create a file in the root of the site
test.php:authenticate( "twitter" );
$user_profile = $adapter->getUserProfile();
} catch( Exception $e ) {
die( "got an error! " . $e->getMessage() );
}
}
if( ! isset( $user_profile ) ) {
?>
Нажмите Войти для авторизации.
Войти
Consider what he does:
- Checks the GET login parameter; if it is not there, it opens a page with an offer of authorization;
- When clicking on the link mysite.ru/twitter.php?login=1, we start the authorization process. An instance of the Hybrid_Auth class is created and the authenticate method passes the name of the service through which we want to log in;
- Facebook opens with an authorization offer, if the user gives access, then the getUserProfile method will return us his profile data, otherwise we will get an error.
Everything is very simple! Now, let's see what kind of data gets
getUserProfilein the case of Twitter. To do this, open the directory hybridauth/Hybrid/Providerswhere the settings of the authorization services are stored in the form of files, we need Twitter.php. We find the method getUserProfileand see the received data:$this->user->profile->identifier = (property_exists($response,'id'))?$response->id:"";
$this->user->profile->displayName = (property_exists($response,'screen_name'))?$response->screen_name:"";
$this->user->profile->description = (property_exists($response,'description'))?$response->description:"";
$this->user->profile->firstName = (property_exists($response,'name'))?$response->name:"";
$this->user->profile->photoURL = (property_exists($response,'profile_image_url'))?$response->profile_image_url:"";
$this->user->profile->profileURL = (property_exists($response,'screen_name'))?("http://twitter.com/".$response->screen_name):"";
$this->user->profile->webSiteURL = (property_exists($response,'url'))?$response->url:"";
$this->user->profile->region = (property_exists($response,'location'))?$response->location:"";
You can change any data or add your own, the methods for obtaining profile contacts and changing status are also implemented in this file. That is, if necessary, for any social network, you can not only change the set of necessary data, but also add your own functionality based on their API.
Yandex
As an example of adding a new authorization service, we will try to add Yandex, for this we will create
hybridauth/Hybrid/Providers/Yandex.php. Yandex uses OAuth2 for authorization, so our class will inherit it:class Hybrid_Providers_Yandex extends Hybrid_Provider_Model_OAuth2
For OAuth1 you need to use
Hybrid_Provider_Model_OAuth1, and for OpenID - Hybrid_Provider_Model_OpenID. Now we need to figure out what data Yandex needs to authorize a user and access his profile data. First, create a Yandex API application to get ID and Secret fields - go here and register a new application. To obtain profile data, we will use the API Login.Yandex, where we mark the fields of the mailbox and the name of the user.Data Fill Example
We have the necessary keys, it remains to make them in the HybridAuth settings, open
hybridauth/config.phpand add at the end:"Yandex" => array ( "enabled" => true, "keys" => array ( "id" => "Id приложения", "secret" => "Пароль приложения" ) ),
Next, we read the Yandex documentation and see that for authorization we need to contact
oauth.yandex.ru/authorize, and to get the token to oauth.yandex.ru/token. It remains to find out the API login name Yandex. For this, open the API documentation and find the Login via Yandex, and then OAuth + Yandex.Login . Here we find that to obtain information about the user you need to contact login.yandex.ru/info. Well, we have everything we need, go back to Yandex.php, specify the links to the API in the initialize function:$this->api->api_base_url = "https://login.yandex.ru/info";
$this->api->authorize_url = "https://oauth.yandex.ru/authorize";
$this->api->token_url = "https://oauth.yandex.ru/token";
We also indicate that the received token must be passed by the parameter
oauth_token:$this->api->sign_token_name = "oauth_token";
Now in the getProfiles function we’ll write a data parsing, first we’ll form a request for a profile:
$response = $this->api->api( "?format=json" );
Now we have a $ response object that contains all the received data, save it by analogy with Twitter.php:
$this->user->profile->identifier    = (property_exists($response,'id'))?$response->id:"";
$this->user->profile->firstName     = (property_exists($response,'real_name'))?$response->real_name:"";
$this->user->profile->displayName   = (property_exists($response,'display_name'))?$response->display_name:"";
$this->user->profile->photoURL      = 'http://upics.yandex.net/'. $this->user->profile->identifier .'/normal';
$this->user->profile->gender        = (property_exists($response,'sex'))?$response->sex:"";
$this->user->profile->email         = (property_exists($response,'default_email'))?$response->default_email:"";
$this->user->profile->emailVerified = (property_exists($response,'default_email'))?$response->default_email:"";
As a result, we got this file:
Yandex.php
api->api_base_url    = "https://login.yandex.ru/info";
    $this->api->authorize_url   = "https://oauth.yandex.ru/authorize";
    $this->api->token_url       = "https://oauth.yandex.ru/token";
    $this->api->sign_token_name = "oauth_token";
  }
  function getUserProfile() {
    $response = $this->api->api( "?format=json" );
    if ( !isset( $response->id ) ) {
      throw new Exception( "User profile request failed! {$this->providerId} returned an invalide response.", 6 );
    }
    $this->user->profile->identifier    = (property_exists($response,'id'))?$response->id:"";
    $this->user->profile->firstName     = (property_exists($response,'real_name'))?$response->real_name:"";
    $this->user->profile->displayName   = (property_exists($response,'display_name'))?$response->display_name:"";
    $this->user->profile->photoURL      = 'http://upics.yandex.net/'. $this->user->profile->identifier .'/normal';
    $this->user->profile->gender        = (property_exists($response,'sex'))?$response->sex:"";
    $this->user->profile->email         = (property_exists($response,'default_email'))?$response->default_email:"";
    $this->user->profile->emailVerified = (property_exists($response,'default_email'))?$response->default_email:"";
    return $this->user->profile;
  }
}
?>
Change our example from Twitter to Yandex:
$adapter = $hybridauth->authenticate( "yandex" );
We try to log in:

And in the end we get:
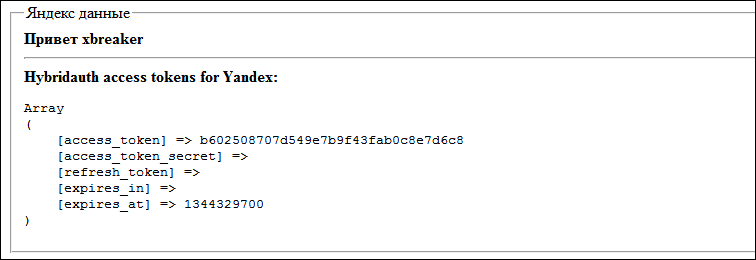
That's all, authorization through Yandex was successful. You can engage in connecting the remaining services that we need.
Convenient connection, simple addition of new services and open source code - all that was missing when working with third-party services. Also, to simplify integration, the library has plugins for popular frameworks and CMS, such as Yii, Symfony2, Wordpress, Drupal and others .
For errors and inaccuracies, as well as additions, please contact in PM.
Related links:
- Library page on sourceforge
- Library and plugins download page
- GitHub Project Page
- My fork of the project on GitHub
- Online demo authorization
upd : posted authorization for Yandex and Mail.ru , Odnoklassniki turned out with a crutch for compatibility with PHP> 5.3.0.
