Material preparation and balancing
Last time
We placed the instruments in the “space” of the mix, applying panning and equalization, which from the point of view of the sound engineer: the horizontal position of the instrument (panorama), and the vertical position that sets the equalization (the higher the frequency range of the sound, the higher it feels in space). And if you and I began to discuss the process of mixing, then you just need to go back a little bit and highlight two more issues:
- preparation of material
- determination of the distance to the instrument (balance of instruments by volume)
Material preparation
Before starting the mixing process, all instrument tracks must be converted to the WAV 32 bit or 24 bit format (“home version”) with a sampling frequency of 44100 kHz. This, first of all, concerns those who work with MIDI information, that is, with midi-scores of synthesizers and drum machines. Before conversion, you need to turn off all effects in the mixer channels. Save the mixer settings if you think you need to leave the current processing. Unfortunately, I can’t explain how this is done in each of the existing hosts, so “google to help”, as they say.
We prepared the mixer channels for conversion, now we need to convert each track into a separate WAV file. I will explain how to do this using FL Studio and Cubase as examples.
Fl studio
In the conversion (rendering) dialog box, turn on the light to the left of “split mixer tracks” (which means “split mixer channels”), and specify the folder where the scores of your instruments will be converted. The process is very simple and is no different from the master bus rendering process.
Cubase
In the “Audio Mixdown” window, enable the checkbox to the left of “Channel Batch Export”, in the narrow field below it, select all the tools and make sure that the “Stereo Out” checkbox is unchecked - this is the master bus, we do not need it. Also uncheck the send effects (FX Channel Track).
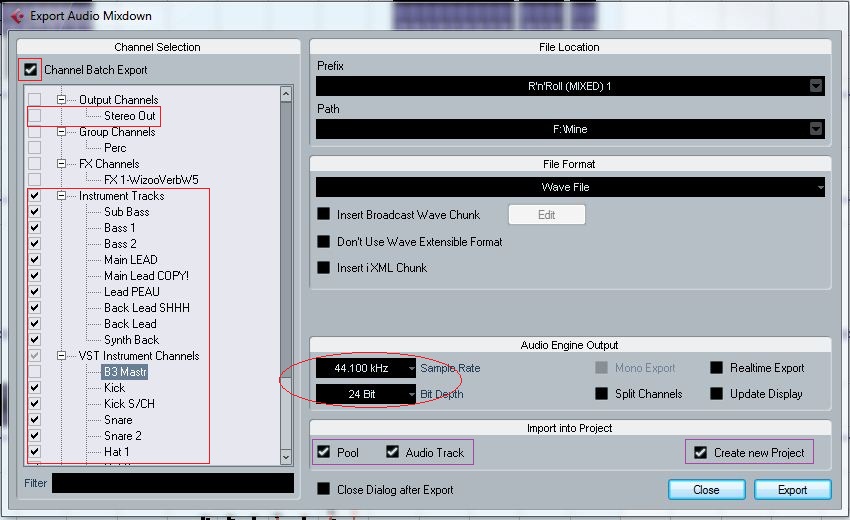
The “Pool” and “Audio Track” checkboxes allow you to put all the tracks in the pool and create the corresponding Audio tracks in the project for “instant start”, and the “Create New Project” will determine whether a new project will be created for this or the current one will be used (unchecked) . If the power of your computer allows you to comfortably perform the mixing (in the course of which computer resources will still be required for processing), you can use the current project, making your task much easier. Create a track folder (Folder Track) and put in it all the tracks (except FX), and then mute it. Now everything is at hand: send effects with saved settings and all “insert” effects that can be transferred from the bus to the bus at any time.
Why is this all?
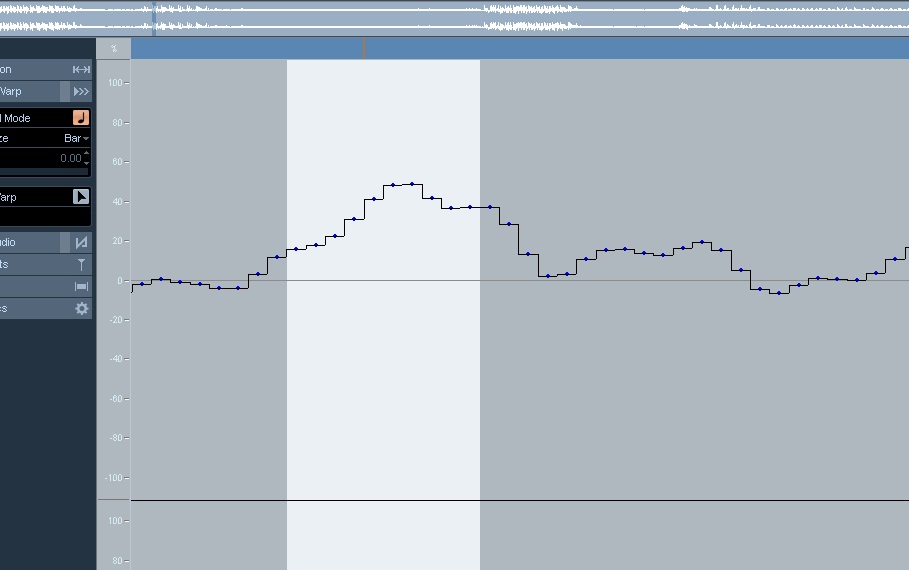
First of all, the audio is stable: there will be no unexpected clicks (as can be the case with MIDI and synthesizers). And all existing (after conversion) amplitude “jumps” can be eliminated by “post-sample” editing of the audio track. In Cubase, this is done simply: open the Audio editing window, listen to the “solo” of the instrument (vocals), look for distortions (amplitude “jumps”, they are clicks or crackles), do Zoom In until samples (points through which the curve passes) appear amplitudes) and adjust with a pencil as in the Paint program.
Balancing and entry levels
Balance - adjust the volume of instruments in the mix. This is where the mix begins.
Before starting this crucial process, it is necessary to determine the initial level of all instruments (the position of the faders of all active mixer channels from which balancing starts). Someone suggests using separate "initial levels" for each type of instrument (for example: "-3" - a barrel, "-5" - a bass), but I don’t see the point. I use values from -7 to -10 dB for all instruments. In Cubase, the easiest way to do this is to select all the active channels in the mixer, right-click and select “Link Channels”.

Now the channels are “linked” and all the volume faders will move simultaneously. Do not forget to do the same later, just click “Unlink Channels” to remove the “link”.
Balancing is based on the fact that the volume of the instrument sets the initial distance to it, although, of course, reverb and delay effects (Delay) will make a more significant contribution to determining the distance, but at the initial stage, all instruments should be balanced in volume. Watch the output level on the master bus: do not allow signal clipping (exceeding the threshold 0 dB), but rather keep a distance to the threshold (-2, -3 dB). In no case do you use limiters in the mixing process!
Keep in mind that during the mixing process you will return to the volume fader more than once. This balancing is preliminary and will require adjustment after equalization, compression and application of effects (both break and send).
Important: at some points in this article, the subjective point of my view is reflected; everything described here is not an axiom and has a cognitive character.