Restoring the interior of the Dual Opteron 252 server
I recently got a Tyan 2882-D motherboard with the words: “There was a pair of swollen capacitors, and it was somehow problematic ...” There were two AMD Opteron 252 processors and 6 Gigabytes of memory on the board. After replacing the capacitors, the board started up, but it worked unstably. In the BIOS, the temperature of one of the processors was 88 degrees. The second was 54 degrees. Also not miracles of coolness, but these Opterons were distinguished by increased heat dissipation. The solution to the problem under habrakat.

I decided to see what will happen next and after a couple of minutes the board turned off safely. The heatsinks on the processors were barely warm. In order to make sure that the motherboard is working, I swapped the processors. The overheating processor moved to the first socket and continued to overheat. I had to pull it out to configure the system on a non-overheating processor and see how it would behave under load. The result was already expected:
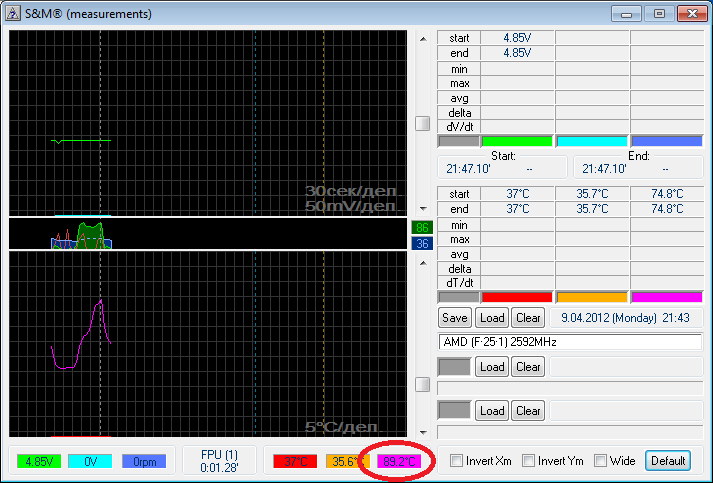
Having reached 90 degrees, S&M reported that thermal protection worked in the processor and interrupted the test.
Before that, I already suggested that the problem is the loss of the thermal interface between the crystal and the lid that closes it. It was decided to remove the covers from both processors and restore the heat sink. Out of curiosity, I searched the Internet for the current price of 252 Opterons and was very surprised that they were still for sale. And the price of 15,000 rubles apiece seemed completely inadequate.
Attention! You can repeat all further actions at your own peril and risk! If your non-overclocked processor does not overheat in inactivity, do not remove the cover from it solely out of curiosity. On all modern Intel processors, the lid is soldered to the core and additional steps must be taken to remove it. If you use force, you simply vomit the core and destroy the processor.
To remove the cover we need a blade. Its thickness is less than the thickness of the gap filled with rubber, which holds the cover on the PCB. In order not to accidentally cut myself, I worked in fabric gloves. In order not to bend the processor legs, insert it into the foam. At first I tried to insert it into the foam, but it turned out to be too rigid and then I had to straighten the folded legs of the processor. We insert the blade between the cover and the textolite and carefully deepen. Next, carefully hold the blade around the perimeter. The blade will be difficult to slip in the rubber, so it is necessary to apply force, but make sure that the blade does not bend and cut off the textolite. The blade can be deepened under the cover to 5mm. If during the movement the springy recoil disappears and the blade gets stuck, then most likely it rested on the hinged elements around the core.
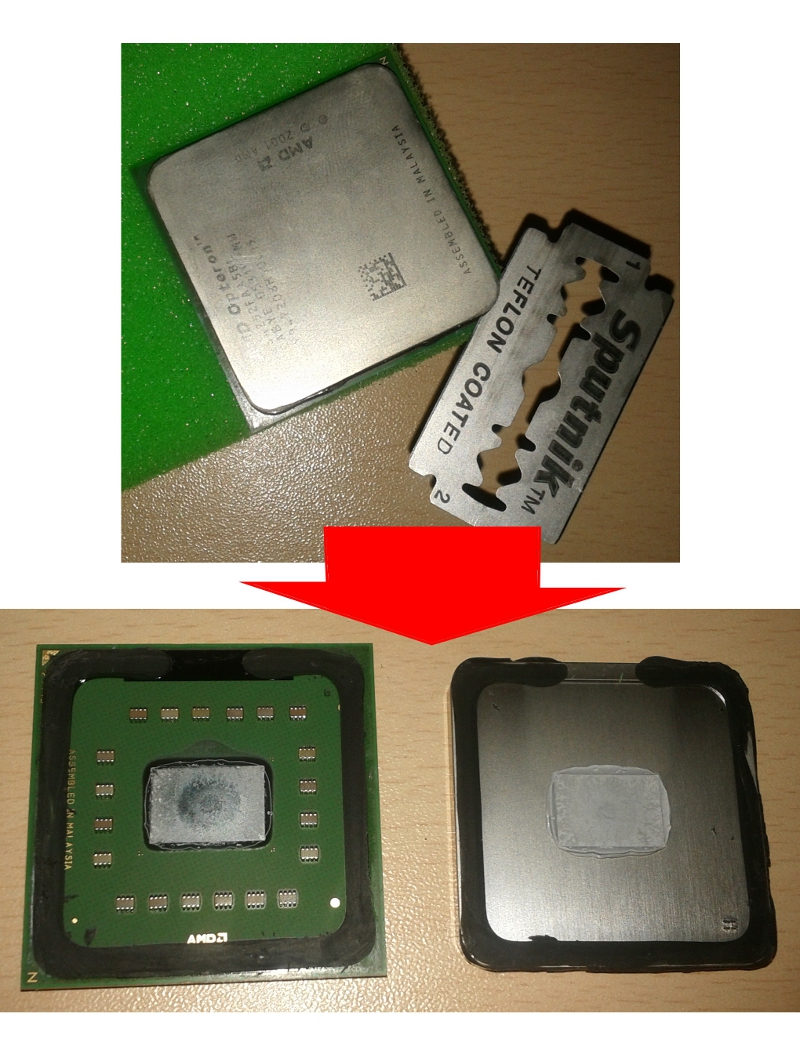
It is clearly seen that the thermal paste of the manufacturer has dried in the center of the crystal and has ceased to remove heat to the lid. We clean the old paste, put a new one on the core, insert the processor into the socket, cover it, press the cooler on top, and check. Run the processor test. The initial temperature is 55 degrees, but now with a load it does not exceed 67.

So we correctly identified the problem. We repeat the analysis and replacement of thermal paste for another processor. Now you need to collect everything.

We clear all the remnants of thermal paste from processors and coolers, apply thermal paste only to the cores. Degrease the corners of the PCB around the cores and the corners of the lid. Apply droplets of silicone sealant to the corners around the core. Cover and press, but not very much. We remove the extra seal squeezed out from under the cover. We insert the processor into the socket and press the cooler. There is no thermal paste on the cooler right now. We will apply it after the sealant has dried. In the meantime, the cooler will work as a press. Leave for a day to harden the seal. Remove the coolers, apply thermal grease and collect for the final check.

In the test for maximum warming, the temperature was 66.5 degrees. The system is back to work.
I did everything described for the first time, so that with accurate work no problems should arise.
I decided to see what will happen next and after a couple of minutes the board turned off safely. The heatsinks on the processors were barely warm. In order to make sure that the motherboard is working, I swapped the processors. The overheating processor moved to the first socket and continued to overheat. I had to pull it out to configure the system on a non-overheating processor and see how it would behave under load. The result was already expected:
Having reached 90 degrees, S&M reported that thermal protection worked in the processor and interrupted the test.
Before that, I already suggested that the problem is the loss of the thermal interface between the crystal and the lid that closes it. It was decided to remove the covers from both processors and restore the heat sink. Out of curiosity, I searched the Internet for the current price of 252 Opterons and was very surprised that they were still for sale. And the price of 15,000 rubles apiece seemed completely inadequate.
Attention! You can repeat all further actions at your own peril and risk! If your non-overclocked processor does not overheat in inactivity, do not remove the cover from it solely out of curiosity. On all modern Intel processors, the lid is soldered to the core and additional steps must be taken to remove it. If you use force, you simply vomit the core and destroy the processor.
To remove the cover we need a blade. Its thickness is less than the thickness of the gap filled with rubber, which holds the cover on the PCB. In order not to accidentally cut myself, I worked in fabric gloves. In order not to bend the processor legs, insert it into the foam. At first I tried to insert it into the foam, but it turned out to be too rigid and then I had to straighten the folded legs of the processor. We insert the blade between the cover and the textolite and carefully deepen. Next, carefully hold the blade around the perimeter. The blade will be difficult to slip in the rubber, so it is necessary to apply force, but make sure that the blade does not bend and cut off the textolite. The blade can be deepened under the cover to 5mm. If during the movement the springy recoil disappears and the blade gets stuck, then most likely it rested on the hinged elements around the core.
It is clearly seen that the thermal paste of the manufacturer has dried in the center of the crystal and has ceased to remove heat to the lid. We clean the old paste, put a new one on the core, insert the processor into the socket, cover it, press the cooler on top, and check. Run the processor test. The initial temperature is 55 degrees, but now with a load it does not exceed 67.
So we correctly identified the problem. We repeat the analysis and replacement of thermal paste for another processor. Now you need to collect everything.
We clear all the remnants of thermal paste from processors and coolers, apply thermal paste only to the cores. Degrease the corners of the PCB around the cores and the corners of the lid. Apply droplets of silicone sealant to the corners around the core. Cover and press, but not very much. We remove the extra seal squeezed out from under the cover. We insert the processor into the socket and press the cooler. There is no thermal paste on the cooler right now. We will apply it after the sealant has dried. In the meantime, the cooler will work as a press. Leave for a day to harden the seal. Remove the coolers, apply thermal grease and collect for the final check.
In the test for maximum warming, the temperature was 66.5 degrees. The system is back to work.
I did everything described for the first time, so that with accurate work no problems should arise.