HA kubernetes cluster with containerd. Or is there life without a docker?
- Tutorial
Deploying kubernetes HA with containerd

Good afternoon, dear readers of Habr! 05/24/2018, in the official blog Kubernetes, an article was published under the name Kubernetes Containerd Integration Goes GA , which states that containerd integration with Kubernetes is ready for production. Also, the guys from the company Flant posted a translation of the article into Russian in their blog , adding a few clarifications from themselves. After reading the project documentation on github , I decided to try containerd on my own skin.
Our company has several projects at the stage "before production is still very far away." So they will become our experimental subjects; for them, we decided to try deploying the Kubernetes failover cluster using containerd and see if there is life without a docker.
If you are interested to see how we did it and what came out of it, welcome under cat.
Deployment Scheme and Description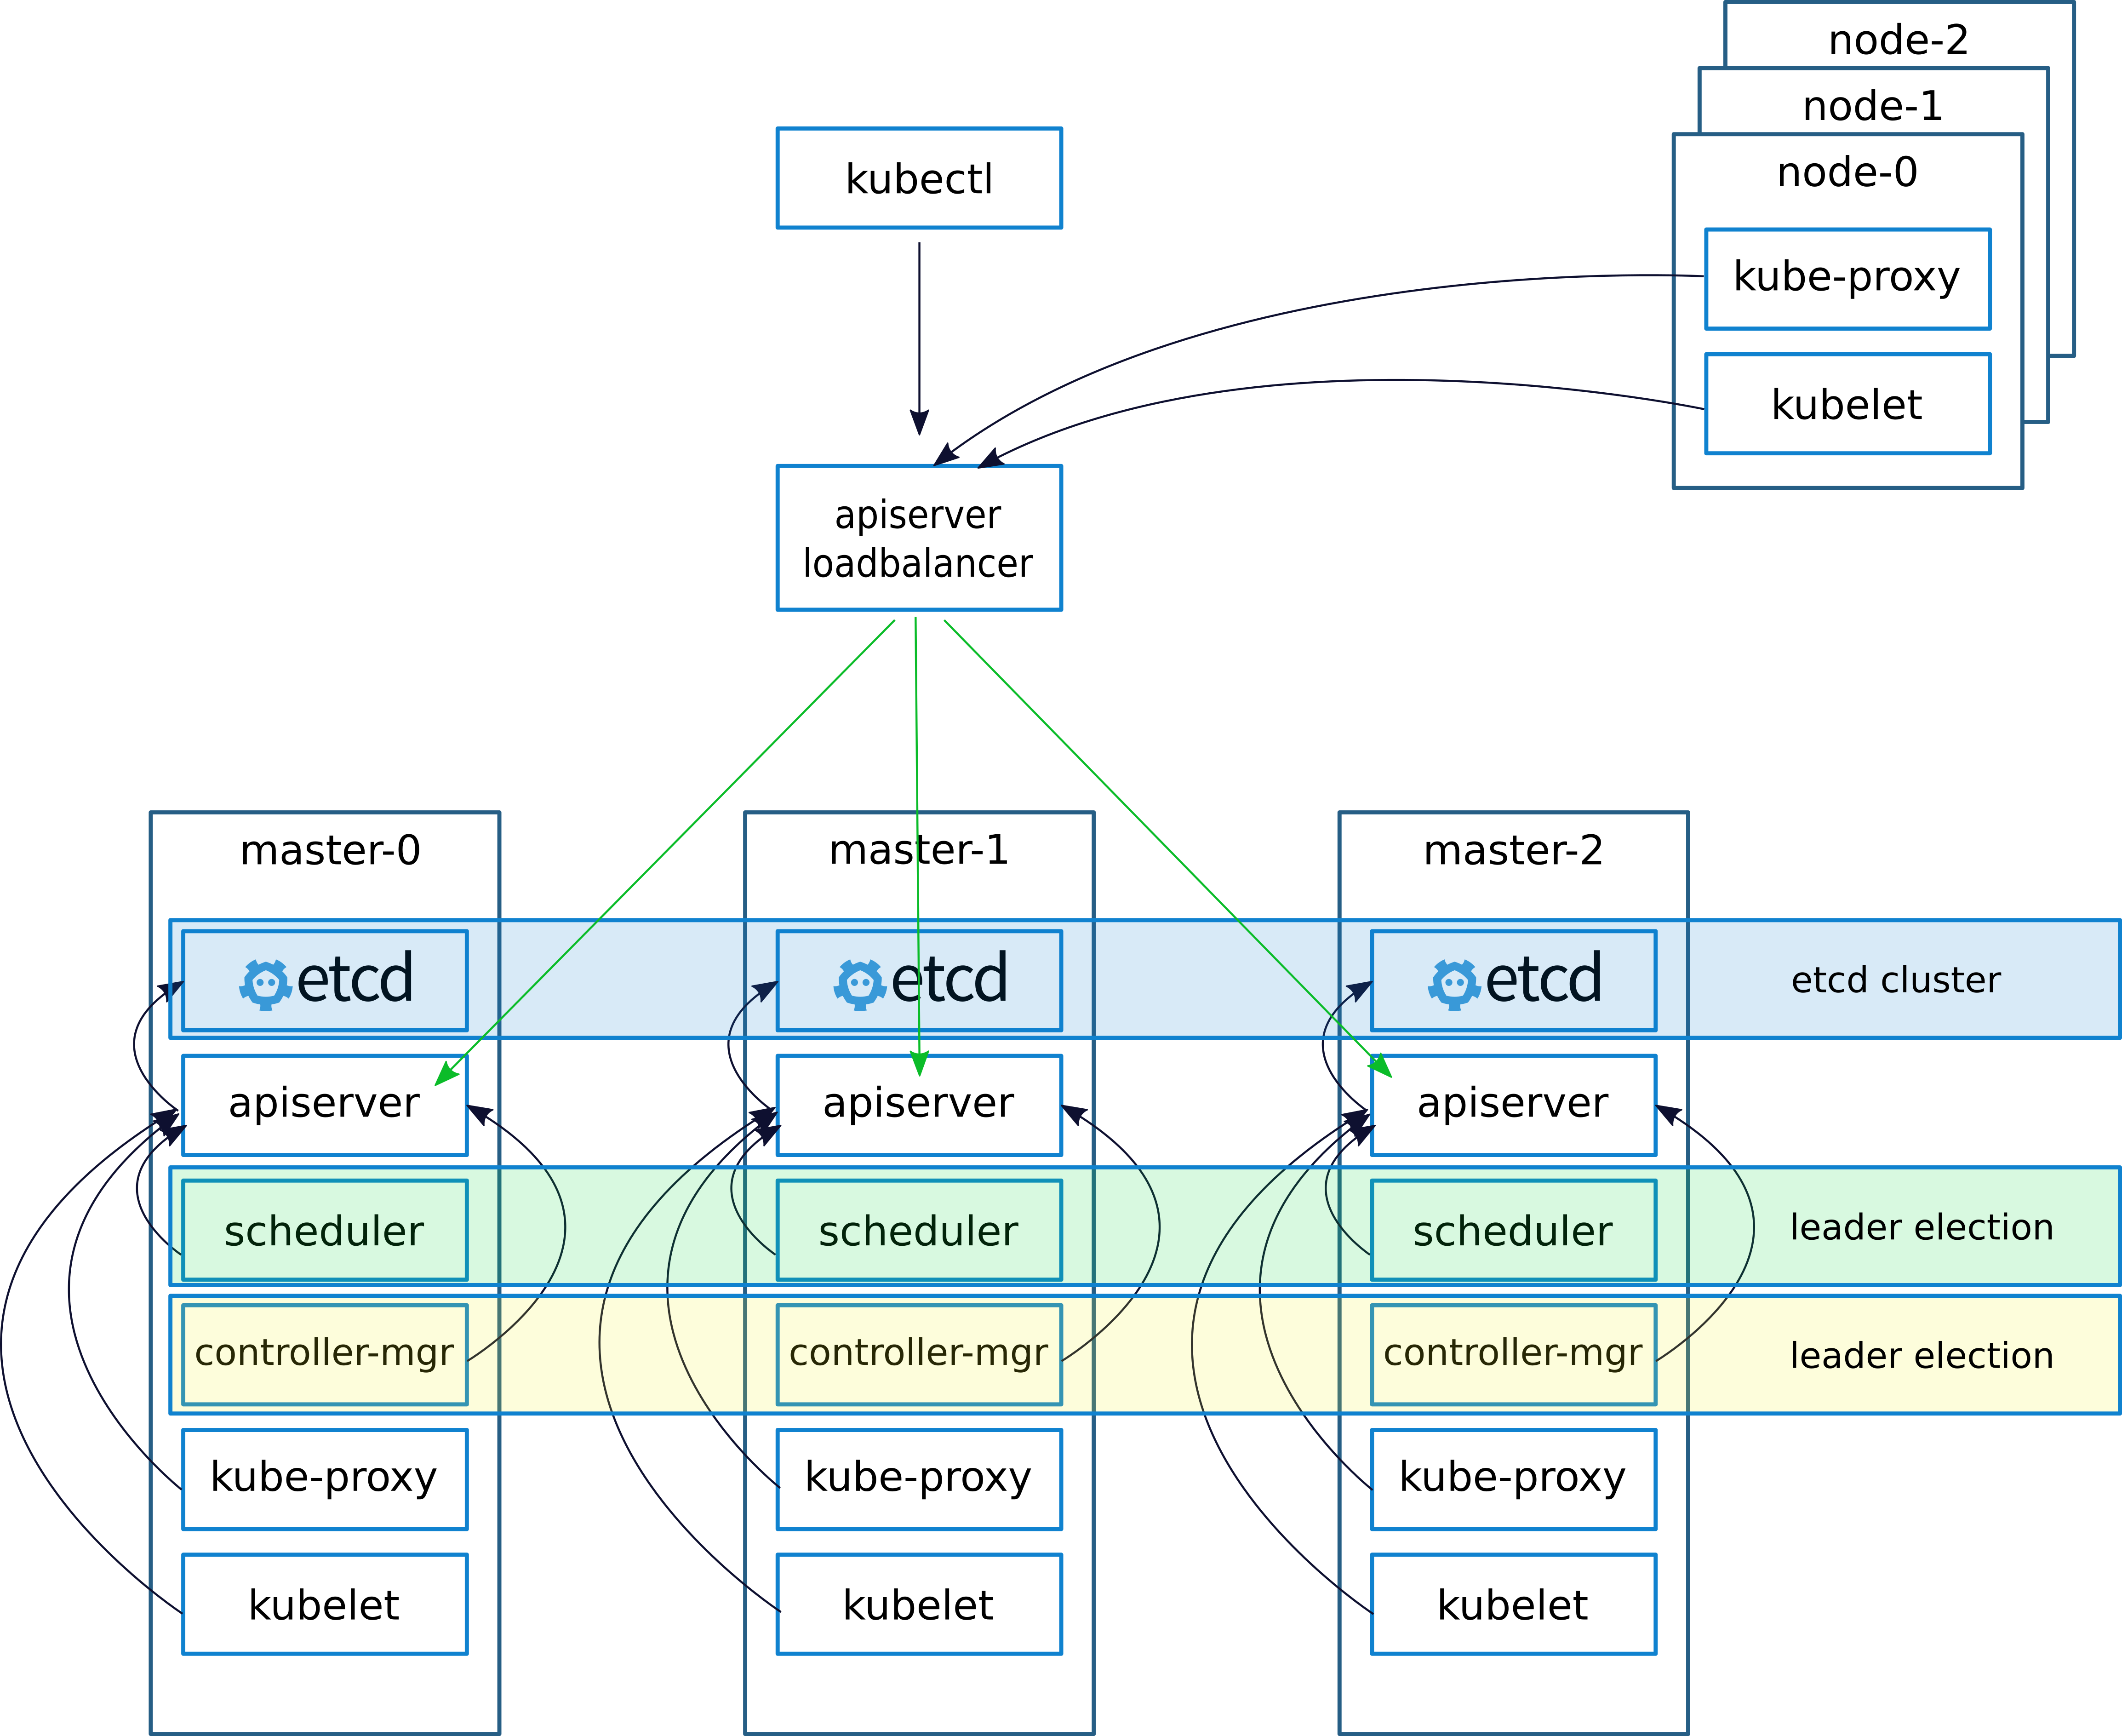
When deploying a cluster, as usual (this is what I wrote in a previous article , we use the
The keepalived daemons communicate via VRRP protocol, sending each other messages to the address 224.0.0.18.
If the neighbor has not sent his message, then at the expiration of the period he is considered dead. As soon as the fallen server starts sending its messages to the network, everything returns to its place.
We configure the work with the API server on the kubernetes nodes as follows.
After installing the cluster, we configure kube-proxy, change the port from 6443 to 16443 (details below). On each of the masters, nginx is deployed, which works as loadbalancer, listens on port 16443 and makes upstream through all three masters to port 6443 (details below).
This scheme achieved increased fault tolerance with the help of keepalived, as well as with the help of nginx achieved balancing between API servers on the wizards.
In the last article I described the deployment of nginx and etcd to docker. But in this case we don’t have a docker, so nginx and etcd will work locally on master nodes.
Theoretically, it would be possible to deploy nginx and etcd using containerd, but in case of any problems, this approach would complicate the diagnostics, so they decided not to experiment and run from local.
Description of servers for deployment:
| Name | IP | Services |
|---|---|---|
| VIRTIP | 172.26.133.160 | ------ |
| kube-master01 | 172.26.133.161 | kubeadm, kubelet, kubectl, etcd, containerd, nginx, keepalived |
| kube-master02 | 172.26.133.162 | kubeadm, kubelet, kubectl, etcd, containerd, nginx, keepalived |
| kube-master03 | 172.26.133.163 | kubeadm, kubelet, kubectl, etcd, containerd, nginx, keepalived |
| kube-node01 | 172.26.133.164 | kubeadm, kubelet, kubectl, containerd |
| kube-node02 | 172.26.133.165 | kubeadm, kubelet, kubectl, containerd |
| kube-node03 | 172.26.133.166 | kubeadm, kubelet, kubectl, containerd |
Installing kubeadm, kubelet, kubectl and related packages
All commands to execute from under root
sudo -iapt-get update && apt-get install -y apt-transport-https curl
curl -s https://packages.cloud.google.com/apt/doc/apt-key.gpg | apt-key add -
cat <<EOF >/etc/apt/sources.list.d/kubernetes.list
deb http://apt.kubernetes.io/ kubernetes-xenial main
EOF
apt-get update
apt-get install -y kubelet kubeadm kubectl unzip tar apt-transport-https btrfs-tools libseccomp2 socat util-linux mc vim keepalivedInstall conteinerd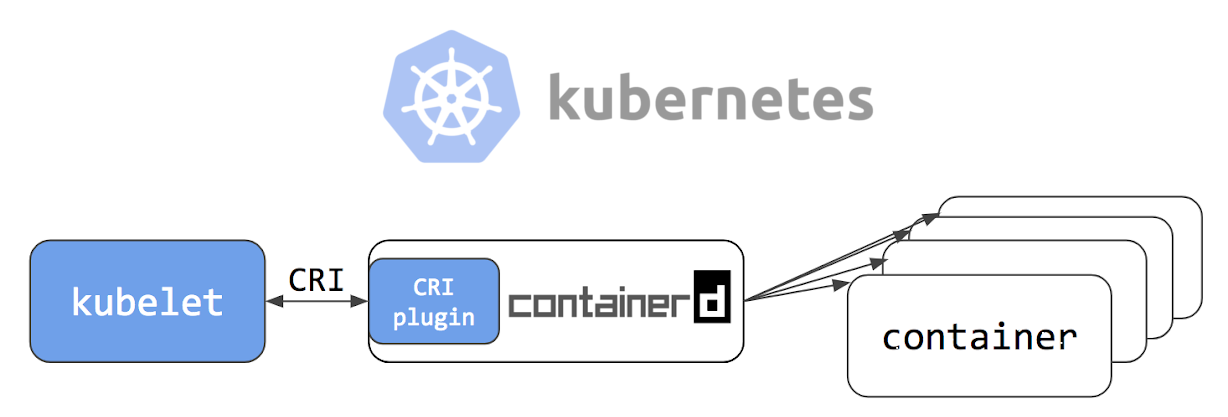
cd /
wget https://storage.googleapis.com/cri-containerd-release/cri-containerd-1.1.0-rc.0.linux-amd64.tar.gz
tar -xvf cri-containerd-1.1.0-rc.0.linux-amd64.tar.gz
Configure containerd configs
mkdir -p /etc/containerd
nano /etc/containerd/config.toml
Add to file:
[plugins.cri]
  enable_tls_streaming = true
We start conteinerd and check that everything is OK
systemctl enable containerd
systemctl start containerd
systemctl status containerd
● containerd.service - containerd container runtime
   Loaded: loaded (/etc/systemd/system/containerd.service; disabled; vendor preset: enabled)
   Active: active (running) since Mon 2018-06-25 12:32:01 MSK; 7s ago
     Docs: https://containerd.io
  Process: 10725 ExecStartPre=/sbin/modprobe overlay (code=exited, status=0/SUCCESS)
 Main PID: 10730 (containerd)
    Tasks: 15 (limit: 4915)
   Memory: 14.9M
      CPU: 375ms
  CGroup: /system.slice/containerd.service
           └─10730 /usr/local/bin/containerd
Jun 25 12:32:01 hb-master02 containerd[10730]: time="2018-06-25T12:32:01+03:00" level=info msg="Get image filesystem path "/var/lib/containerd/io.containerd.snapshotter.v1.overlayfs""
Jun 25 12:32:01 hb-master02 containerd[10730]: time="2018-06-25T12:32:01+03:00" level=error msg="Failed to load cni during init, please check CRI plugin status before setting up network for pods" error="cni con
Jun 25 12:32:01 hb-master02 containerd[10730]: time="2018-06-25T12:32:01+03:00" level=info msg="loading plugin "io.containerd.grpc.v1.introspection"..." type=io.containerd.grpc.v1
Jun 25 12:32:01 hb-master02 containerd[10730]: time="2018-06-25T12:32:01+03:00" level=info msg="Start subscribing containerd event"
Jun 25 12:32:01 hb-master02 containerd[10730]: time="2018-06-25T12:32:01+03:00" level=info msg="Start recovering state"
Jun 25 12:32:01 hb-master02 containerd[10730]: time="2018-06-25T12:32:01+03:00" level=info msg=serving... address="/run/containerd/containerd.sock"
Jun 25 12:32:01 hb-master02 containerd[10730]: time="2018-06-25T12:32:01+03:00" level=info msg="containerd successfully booted in 0.308755s"
Jun 25 12:32:01 hb-master02 containerd[10730]: time="2018-06-25T12:32:01+03:00" level=info msg="Start event monitor"
Jun 25 12:32:01 hb-master02 containerd[10730]: time="2018-06-25T12:32:01+03:00" level=info msg="Start snapshots syncer"
Jun 25 12:32:01 hb-master02 containerd[10730]: time="2018-06-25T12:32:01+03:00" level=info msg="Start streaming server"
Installing and running etcd
Important note, I installed the kubernetes cluster version 1.10. Literally a couple of days, version 1.11 was released at the time of writing the article. If you install version 1.11, then set the variable ETCD_VERSION = "v3.2.17", if 1.10, then ETCD_VERSION = "v3.1.12".
export ETCD_VERSION="v3.1.12"
curl -sSL https://github.com/coreos/etcd/releases/download/${ETCD_VERSION}/etcd-${ETCD_VERSION}-linux-amd64.tar.gz | tar -xzv --strip-components=1 -C /usr/local/bin/
We copy configs from gitahaba.
git clone https://github.com/rjeka/k8s-containerd.git
cd k8s-containerd
We configure variables in a config file.
vim create-config.sh#!/bin/bash
# local machine ip addressexport K8SHA_IPLOCAL=172.26.133.161
# local machine etcd name, options: etcd1, etcd2, etcd3export K8SHA_ETCDNAME=kube-master01
# local machine keepalived state config, options: MASTER, BACKUP. One keepalived cluster only one MASTER, other's are BACKUPexport K8SHA_KA_STATE=MASTER
# local machine keepalived priority config, options: 102, 101,100 MASTER must 102export K8SHA_KA_PRIO=102
# local machine keepalived network interface name config, for example: eth0export K8SHA_KA_INTF=ens18
######################################## all masters settings below must be same######################################## master keepalived virtual ip addressexport K8SHA_IPVIRTUAL=172.26.133.160
# master01 ip addressexport K8SHA_IP1=172.26.133.161
# master02 ip addressexport K8SHA_IP2=172.26.133.162
# master03 ip addressexport K8SHA_IP3=172.26.133.163
# master01 hostnameexport K8SHA_HOSTNAME1=kube-master01
# master02 hostnameexport K8SHA_HOSTNAME2=kube-master02
# master03 hostnameexport K8SHA_HOSTNAME3=kube-master03
# keepalived auth_pass config, all masters must be sameexport K8SHA_KA_AUTH=56cf8dd754c90194d1600c483e10abfr
#etcd tocken:export ETCD_TOKEN=9489bf67bdfe1b3ae077d6fd9e7efefd
# kubernetes cluster token, you can use 'kubeadm token generate' to get a new oneexport K8SHA_TOKEN=535tdi.utzk5hf75b04ht8l
# kubernetes CIDR pod subnet, if CIDR pod subnet is "10.244.0.0/16" please set to "10.244.0.0\\/16"export K8SHA_CIDR=10.244.0.0\\/16настройки на локальной машине каждой из нод (на каждой ноде свои)
K8SHA_IPLOCAL — IP адрес ноды на которой настраивается скрипт
K8SHA_ETCDNAME — имя локальной машины в кластере ETCD
K8SHA_KA_STATE — роль в keepalived. Одна нода MASTER, все остальные BACKUP.
K8SHA_KA_PRIO — приоритет keepalived, у мастера 102 у остальных 101, 100 При падении мастера с номером 102, его место занимает нода с номером 101 и так далее.
K8SHA_KA_INTF — keepalived network interface. Имя интерфейса который будет слушать keepalived.
Общие настройки для всех мастернод одинаковые:
K8SHA_IPVIRTUAL=172.26.133.160 — виртуальный IP кластера.
K8SHA_IP1...K8SHA_IP3 — IP адреса мастеров
K8SHA_HOSTNAME1 ...K8SHA_HOSTNAME3 — имена хостов для мастернод. Важный пункт, по этим именам kubeadm будет генерировать сертификаты.
K8SHA_KA_AUTH — пароль для keepalived. Можно задать произвольный
K8SHA_TOKEN — токен кластера. Можно сгенерировать командой kubeadm token generate
K8SHA_CIDR — адрес подсети для подов. Я использую flannel поэтому CIDR 0.244.0.0/16. Обязательно экранировать — в конфиге должно быть K8SHA_CIDR=10.244.0.0\/16
Run the script that configures nginx, keepalived, etcd and kubeadmin
./create-config.shRun etcd.
etcd i picked up without tls. If you need tls, then the official kubernetes documentation details how to generate certificates for etcd.
systemctl daemon-reload && systemctl start etcd && systemctl enable etcdStatus check
etcdctl cluster-health
member ad059013ec46f37 is healthy: got healthy result from http://192.168.5.49:2379
member 4d63136c9a3226a1 is healthy: got healthy result from http://192.168.4.169:2379
member d61978cb3555071e is healthy: got healthy result from http://192.168.4.170:2379
cluster is healthy
etcdctl member list
ad059013ec46f37: name=hb-master03 peerURLs=http://192.168.5.48:2380 clientURLs=http://192.168.5.49:2379,http://192.168.5.49:4001 isLeader=false
4d63136c9a3226a1: name=hb-master01 peerURLs=http://192.168.4.169:2380 clientURLs=http://192.168.4.169:2379,http://192.168.4.169:4001 isLeader=true
d61978cb3555071e: name=hb-master02 peerURLs=http://192.168.4.170:2380 clientURLs=http://192.168.4.170:2379,http://192.168.4.170:4001 isLeader=false
If all is well, proceed to the next step.
Configuring kubeadmin
If you are using kubeadm version 1.11, you can skip this step.
In order for kybernetes to start working not with docker, but with containerd, we’ll configure kubeadmin config
vim /etc/systemd/system/kubelet.service.d/10-kubeadm.confAfter [Service] we add a line to the block
Environment="KUBELET_EXTRA_ARGS=--runtime-cgroups=/system.slice/containerd.service --container-runtime=remote --runtime-request-timeout=15m --container-runtime-endpoint=unix:///run/containerd/containerd.sock"[Service]
Environment="KUBELET_EXTRA_ARGS=--runtime-cgroups=/system.slice/containerd.service --container-runtime=remote --runtime-request-timeout=15m --container-runtime-endpoint=unix:///run/containerd/containerd.sock"
Environment="KUBELET_KUBECONFIG_ARGS=--bootstrap-kubeconfig=/etc/kubernetes/bootstrap-kubelet.conf --kubeconfig=/etc/kubernetes/kubelet.conf"
Environment="KUBELET_SYSTEM_PODS_ARGS=--pod-manifest-path=/etc/kubernetes/manifests --allow-privileged=true"
Environment="KUBELET_NETWORK_ARGS=--network-plugin=cni --cni-conf-dir=/etc/cni/net.d --cni-bin-dir=/opt/cni/bin"
Environment="KUBELET_DNS_ARGS=--cluster-dns=10.96.0.10 --cluster-domain=cluster.local"
Environment="KUBELET_AUTHZ_ARGS=--authorization-mode=Webhook --client-ca-file=/etc/kubernetes/pki/ca.crt"
Environment="KUBELET_CADVISOR_ARGS=--cadvisor-port=0"
Environment="KUBELET_CERTIFICATE_ARGS=--rotate-certificates=true --cert-dir=/var/lib/kubelet/pki"
ExecStart=
ExecStart=/usr/bin/kubelet $KUBELET_KUBECONFIG_ARGS $KUBELET_SYSTEM_PODS_ARGS $KUBELET_NETWORK_ARGS $KUBELET_DNS_ARGS $KUBELET_AUTHZ_ARGS $KUBELET_CADVISOR_ARGS $KUBELET_CERTIFICATE_ARGS $KUBELET_EXTRA_ARGSIf you install version 1.11 and want to experiment with CoreDNS instead of kube-dns and test dynamic configuration, uncomment the following block in the kubeadm-init.yaml configuration file:
feature-gates:
  DynamicKubeletConfig: true
  CoreDNS: true
Restart kubelet
systemctl daemon-reload && systemctl restart kubeletInitialization of the first master
Before you start kubeadm, you need to restart keepalived and check its status
systemctl restart keepalived.service
systemctl status keepalived.service
● keepalived.service - Keepalive Daemon (LVS and VRRP)
   Loaded: loaded (/lib/systemd/system/keepalived.service; enabled; vendor preset: enabled)
   Active: active (running) since Wed 2018-06-27 10:40:03 MSK; 1min 44s ago
  Process: 4589 ExecStart=/usr/sbin/keepalived $DAEMON_ARGS (code=exited, status=0/SUCCESS)
 Main PID: 4590 (keepalived)
    Tasks: 7 (limit: 4915)
   Memory: 15.3M
      CPU: 968ms
   CGroup: /system.slice/keepalived.service
           ├─4590 /usr/sbin/keepalived
           ├─4591 /usr/sbin/keepalived
           ├─4593 /usr/sbin/keepalived
           ├─5222 /usr/sbin/keepalived
           ├─5223 sh -c /etc/keepalived/check_apiserver.sh
           ├─5224 /bin/bash /etc/keepalived/check_apiserver.sh
           └─5231 sleep 5
check whether VIRTIP pinged
ping -c 4 172.26.133.160
PING 172.26.133.160 (172.26.133.160) 56(84) bytes of data.
64 bytes from 172.26.133.160: icmp_seq=1 ttl=64 time=0.030 ms
64 bytes from 172.26.133.160: icmp_seq=2 ttl=64 time=0.050 ms
64 bytes from 172.26.133.160: icmp_seq=3 ttl=64 time=0.050 ms
64 bytes from 172.26.133.160: icmp_seq=4 ttl=64 time=0.056 ms
--- 172.26.133.160 ping statistics ---
4 packets transmitted, 4 received, 0% packet loss, time 3069ms
rtt min/avg/max/mdev = 0.030/0.046/0.056/0.012 ms
After that, run kubeadmin. Be sure to specify the line --skip-preflight-checks. Kubeadmin by default searches for docker and without skipping checks it will crash with an error.
kubeadm init --config=kubeadm-init.yaml --skip-preflight-checksAfter kubeadm has completed, save the generated string. You will need it to enter work nodes in the cluster.
kubeadm join 172.26.133.160:6443 --token XXXXXXXXXXXXXXXXXXXXXXXXX --discovery-token-ca-cert-hash sha256:XXXXXXXXXXXXXXXXXXXXXXXXXXXXXXXXXXXXXXXXXXXXXXXXXXXNext, we indicate where the admin.conf file is stored.
If we work as root, then:
vim ~/.bashrc
export KUBECONFIG=/etc/kubernetes/admin.conf
source ~/.bashrc
For a simple user, follow the instructions on the screen.
mkdir -p $HOME/.kube
sudo cp -i /etc/kubernetes/admin.conf $HOME/.kube/config
sudo chown $(id -u):$(id -g) $HOME/.kube/config
Add 2 more masters to the cluster. To do this, copy the certificates from kube-master01 to kube-master02 and kube-master03 in the / etc / kubernetes / directory. For this I set up ssh access for root, and after copying the files I returned the settings back.
scp -r /etc/kubernetes/pki 172.26.133.162:/etc/kubernetes/
scp -r /etc/kubernetes/pki 172.26.133.163:/etc/kubernetes/
After copying to kube-master02 and kube-master03 we start.
kubeadm init --config=kubeadm-init.yaml --skip-preflight-checksCIDR flannel installation
on kube-master01 run
kubectl apply -f https://raw.githubusercontent.com/coreos/flannel/v0.10.0/Documentation/kube-flannel.ymlAn up-to-date version of the flanel can be viewed in the kubernetes documentation .
Wait until all the containers are created.
watch -n1 kubectl get pods --all-namespaces -o wide
NAMESPACE     NAME                                    READY     STATUS    RESTARTS   AGE       IP               NODE
kube-system   kube-apiserver-kube-master01            1/1       Running   0          17m       172.26.133.161   kube-master01
kube-system   kube-apiserver-kube-master02            1/1       Running   0          6m        172.26.133.162   kube-master02
kube-system   kube-apiserver-kube-master03            1/1       Running   0          6m        172.26.133.163   kube-master03
kube-system   kube-controller-manager-kube-master01   1/1       Running   0          17m       172.26.133.161   kube-master01
kube-system   kube-controller-manager-kube-master02   1/1       Running   0          6m        172.26.133.162   kube-master02
kube-system   kube-controller-manager-kube-master03   1/1       Running   0          6m        172.26.133.163   kube-master03
kube-system   kube-dns-86f4d74b45-8c24s               3/3       Running   0          17m       10.244.2.2       kube-master03
kube-system   kube-flannel-ds-4h4w7                   1/1       Running   0          2m        172.26.133.163   kube-master03
kube-system   kube-flannel-ds-kf5mj                   1/1       Running   0          2m        172.26.133.162   kube-master02
kube-system   kube-flannel-ds-q6k4z                   1/1       Running   0          2m        172.26.133.161   kube-master01
kube-system   kube-proxy-9cjtp                        1/1       Running   0          6m        172.26.133.163   kube-master03
kube-system   kube-proxy-9sqk2                        1/1       Running   0          17m       172.26.133.161   kube-master01
kube-system   kube-proxy-jg2pt                        1/1       Running   0          6m        172.26.133.162   kube-master02
kube-system   kube-scheduler-kube-master01            1/1       Running   0          18m       172.26.133.161   kube-master01
kube-system   kube-scheduler-kube-master02            1/1       Running   0          6m        172.26.133.162   kube-master02
kube-system   kube-scheduler-kube-master03            1/1       Running   0          6m        172.26.133.163   kube-master03
We do kube-dns replication to all three masters
On kube-master01 run
kubectl scale --replicas=3 -n kube-system deployment/kube-dnsInstall and configure nginx
On each master node, we install nginx as a balancer for the API Kubernetes.
I have all the cluster machines on debian. Of the nginx packages, it does not support the stream module, so add the nginx repositories and install it from the nginx `a repositories. If you have another OS, then see the nginx documentation .
wget https://nginx.org/keys/nginx_signing.key
sudo apt-key add nginx_signing.key
echo -e "\n#nginx\n\
deb http://nginx.org/packages/debian/ stretch nginx\n\
deb-src http://nginx.org/packages/debian/ stretch nginx"  >> /etc/apt/sources.list
apt-get update && apt-get install nginx -y
Create a nginx config (if not already created)
./create-config.shuser nginx;
worker_processes auto;
error_log /var/log/nginx/error.log warn;
pid /var/run/nginx.pid;
events {
worker_connections 1024;
}
http {
include /etc/nginx/mime.types;
default_type application/octet-stream;
log_format  main  '$remote_addr - $remote_user [$time_local] "$request" '
                  '$status $body_bytes_sent "$http_referer" '
                  '"$http_user_agent" "$http_x_forwarded_for"';
access_log  /var/log/nginx/access.log  main;
sendfile        on;
#tcp_nopush     on;
keepalive_timeout  65;
#gzip  on;
include /etc/nginx/conf.d/*.conf;
}
stream {
upstream apiserver {
server 172.26.133.161:6443 weight=5 max_fails=3 fail_timeout=30s;
server 172.26.133.162:6443 weight=5 max_fails=3 fail_timeout=30s;
server 172.26.133.163:6443 weight=5 max_fails=3 fail_timeout=30s;
}
server {
    listen 16443;
    proxy_connect_timeout 1s;
    proxy_timeout 3s;
    proxy_pass apiserver;
}
}
Check that everything is OK and apply the configuration
nginx -t
nginx: the configuration file /etc/nginx/nginx.conf syntax is ok
nginx: configuration file /etc/nginx/nginx.conf test is successful
systemctl restart nginx
systemctl status nginx
● nginx.service - nginx - high performance web server
   Loaded: loaded (/lib/systemd/system/nginx.service; enabled; vendor preset: enabled)
   Active: active (running) since Thu 2018-06-28 08:48:09 MSK; 22s ago
     Docs: http://nginx.org/en/docs/
  Process: 22132 ExecStart=/usr/sbin/nginx -c /etc/nginx/nginx.conf (code=exited, status=0/SUCCESS)
 Main PID: 22133 (nginx)
    Tasks: 2 (limit: 4915)
   Memory: 1.6M
      CPU: 7ms
   CGroup: /system.slice/nginx.service
           ├─22133 nginx: master process /usr/sbin/nginx -c /etc/nginx/nginx.conf
           └─22134 nginx: worker process
We are testing the work of the balancer
curl -k https://172.26.133.161:16443 | wc -l
  % Total    % Received % Xferd  Average Speed   Time    Time     Time  Current
                                 Dload  Upload   Total   Spent    Left  Speed
100   233  100   233    0     0  12348      0 --:--:-- --:--:-- --:--:-- 12944
Configuring kube-proxy to work with the balancer
After the balancer is configured, edit the port in the kubernetes settings.
kubectl edit -n kube-system configmap/kube-proxyChange server settings to https://172.26.133.160:16443
Next, you need to configure kube-proxy to work with the new port
kubectl get pods --all-namespaces -o wide | grep proxy
kube-system   kube-proxy-9cjtp                        1/1       Running   1          22h       172.26.133.163   kube-master03
kube-system   kube-proxy-9sqk2                        1/1       Running   1          22h       172.26.133.161   kube-master01
kube-system   kube-proxy-jg2pt                        1/1       Running   4          22h       172.26.133.162   kube-
We delete all the cards, after deletion they are automatically recreated with new settings
kubectl delete pod -n kube-system kube-proxy-XXX
```bash
Проверяем что все рестартанули. Время жизни должно быть небольшое
```bash
kubectl get pods --all-namespaces -o wide | grep proxy
kube-system   kube-proxy-hqrsw                        1/1       Running   0          33s       172.26.133.161   kube-master01
kube-system   kube-proxy-kzvw5                        1/1       Running   0          47s       172.26.133.163   kube-master03
kube-system   kube-proxy-zzkz5                        1/1       Running   0          7s        172.26.133.162   kube-master02
Adding working nodes to the cluster
On each node, from under the root, execute the command that was generated by kubeadm
kubeadm join 172.26.133.160:6443 --token XXXXXXXXXXXXXXXXXXXXXXXXX --discovery-token-ca-cert-hash sha256:XXXXXXXXXXXXXXXXXXXXXXXXXXXXXXXXXXXXXXXXXXXXXXXXXXX --cri-socket /run/containerd/containerd.sock --skip-preflight-checksIf the line is "lost", then you need to generate a new
kubeadm token generate
kubeadm token create <generated-token> --print-join-command --ttl=0
On the working nodes in the /etc/kubernetes/bootstrap-kubelet.conf and /etc/kubernetes/kubelet.conf files, we change the
value of the server variable to our VIRTIP
vim /etc/kubernetes/bootstrap-kubelet.conf
server: https://172.26.133.60:16443
vim /etc/kubernetes/kubelet.conf
server: https://172.26.133.60:16443
And restart containerd and kubernetes
systemctl restart containerd kubeletInstall dashboard
kubectl apply -f https://raw.githubusercontent.com/kubernetes/dashboard/master/src/deploy/recommended/kubernetes-dashboard.yamlCreate a user with admin privileges:
kubectl apply -f kube-dashboard/dashboard-adminUser.yamlWe get a token to enter:
kubectl -n kube-system describe secret $(kubectl -n kube-system get secret | grep admin-user | awk '{print $1}')Configuring dashboard access via NodePort on VIRTIP
kubectl -n kube-system edit service kubernetes-dashboardReplace the type: ClusterIP value with type: NodePort and in the port section: add the nodePort value: 30000 (or a port in the range of 30000 to 32000 where you want the panel to be accessible):

Now the panel is available at https: // VIRTIP: 30000
Heapster
Next, install Heapster - a tool for obtaining metrics of the cluster.
Installation:
git clone https://github.com/kubernetes/heapster.git
cd heapster
kubectl create -f deploy/kube-config/influxdb/
kubectl create -f deploy/kube-config/rbac/heapster-rbac.yaml
findings
I did not notice any special problems with containerd. Once there was an incomprehensible glitch with the hearth after removing the deployment. Kubernetes believed that it was removed, but it became a kind of zombie under it. It remained on the node, but in the extended status.
I believe Containerd is more oriented as a runtime container for kubernetes. Most likely, in the future, as an environment for launching microservices in Kubernetes, it is possible and necessary to use different environments that will be oriented for different tasks, projects, etc.
The project is developing very quickly. Alibaba Cloud has begun to actively use conatinerd and emphasizes that this is the ideal environment for the execution of containers.
As the developers claim, containerd integration in the Google Kubernetes cloud platform is now equivalent to Docker integration.
A good example of the work of the console utility crictl . I will also give some examples from the created cluster:
kubectl describe nodes | grep "Container Runtime Version:" 
The Docker CLI lacks the basic concepts of Kubernetes, for example, pod and namespace, and crictl supports these concepts.
crictl pods
And if necessary, we can look at containers in a familiar format, like docker's
crictl ps
We can see the images that are on the node
crictl images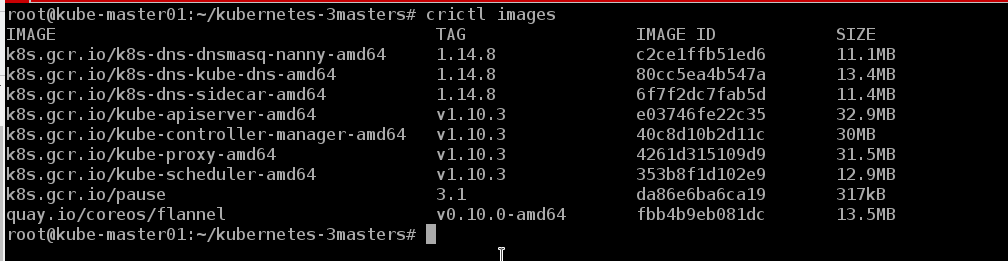
As it turned out, there is life without docker` :)
It’s too early to talk about bugs and glitches, the cluster works for us about a week. In the near future, the test will be transferred to it, and if successful, the dev stand of one of the projects is also likely. This is an idea to write a cycle of articles covering DevOps processes, such as: creating a cluster, setting up an ingress controller and taking it to individual nodes of a cluster, automating image assembly, checking images for vulnerabilities, deploy, etc. In the meantime, we will look at the stability of work, look for bugs and explore new products.
Also this manual is suitable for deploying a failover cluster with docker, you only need to install the docker according to the instructions from the official Kubernetes documentation and skip the steps to install containerd and configure the kubeadm config.
Or you can put containerd and docker at the same time on the same host, and, as the developers claim, they will work fine together. Containerd, as the launch environment for kubernetes, and docker - just like docker)))
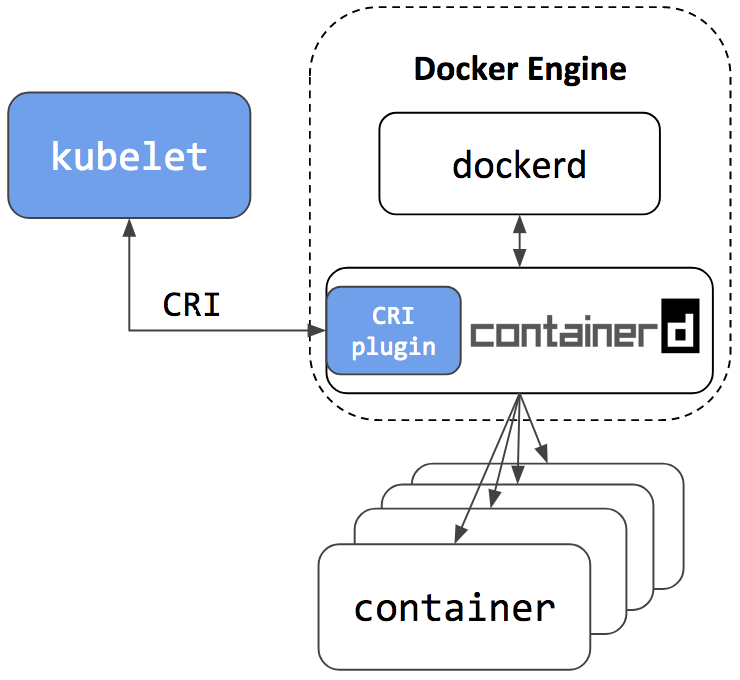
The containerd repository has an ansible playbook for installing a single-master cluster. But it was more interesting for me to “raise” the system with my hands in order to understand in more detail the configuration of each component and understand how it works in practice.
Maybe some time my hands will reach, and I will write my playbook for deploying a cluster with HA, since over the past half year I have deployed them for more than a dozen and it would be time, probably, to automate the process.
Also at the time of writing this article was released version kubernetes 1.11. You can read about the main changes in the blog Flant or in the official blog kubernetes . We updated the test clusters to version 1.11 and replaced kube-dns with CoreDNS. Additionally, we enabled the DynamicKubeletConfig function to test the ability to dynamically update configs.
Materials used:
- Kubernetes Containerd Integration Goes GA
- Containd integration with Kubernetes, replacing Docker, is ready for production
- containerd github
- Kubernetes Documentation
- NGINX Documentation
Thank you for reading to the end.
Since there is very little information on kubernetes, especially on clusters operating under real conditions, in runet, indications of inaccuracy are welcome, as well as comments on the general pattern of cluster deployment. I will try to take them into account and make the appropriate corrections. And I am always ready to answer questions in comments, on githab and in any social networks indicated in my profile.
Sincerely, Eugene.