XBOX 360 xk3y. Part 2 - Installation
- Tutorial
Good afternoon!
In my first article, I talked about a device called xk3y. It's time to share with the community instructions on how to install it in our console.
So, the box with the device is in your hands, but you do not know what to do with all this? Welcome
Installing xk3y is done in several steps:
You have to disassemble the prefix in order to install the xk3y motherboard inside, as well as remove the DVD drive to get the key from it. No special devices are needed to open the console, however, there are kits for opening the console that can save you time and nerves.
For those who don’t know how to remove the key or don’t want to mess with it for a long time, or maybe someone doesn’t have a computer to connect the drive to it, but they have a laptop, there are devices called Maximus 360 Lizard and X360USB Pro that allow you to remove key by connecting the drive to the USB port and removing the key with one click.
If you are not looking for easy ways, read on.
To open the Xbox 360 console, we need the following items:
I will not describe in detail the procedure for opening the console, especially since Fat and Slim are somewhat different from each other. Better tell me about this video:
I’ll say from myself that for the first time, disassembling the prefix is rather tedious, nervous and long, but when the skill appears, you can do it with your eyes closed :)
After you have disassembled the prefix, you can proceed to dump the DVD drive and install xk3y.
The supplied SD card has a capacity of 128 MB. This volume is divided into 3 sections:
1. BootINIT sector.
2. Ext3 sector (this section contains rootfs and uImage, xk3y firmware files). This section cannot be seen on Windows. If you want to update these files, there is no need to install Linux to see this section. You can update xk3y via USB or hard drive, xk3y will see and copy the firmware files for you. You will learn more about this below.
3. 0.98MB FAT32. Here you need to place the drive key file firmware.bin (for XBOX Fat) or dummy.bin (for XBOX Slim), as well as the xk3y configuration file. You will also learn how to get these files below.
If your MicroSD card does not work, it is incorrectly divided into partitions or when you try to start the console an E64 error appears, you can try to restore the MicroSD card. To do this, you will need:
1. USB Image Tool
2. Image of the XK3Y MicroSD card
3. MicroSD card (if the original card is broken or lost, you can
use any other capacity of at least 128 MB)
To get a working XKEY microSD card, make The following:
1. Unzip the USB Image Tool and the XK3Y MicroSD card image into a separate folder.
2. Insert the microSD card into the USB Card Reader. Verify that Windows has assigned the drive letter to the card.
3. Launch the USB Image Tool (on Windows Vista and Windows 7, the program should be run in Administrator mode).
4. Set the “Device Mode”.
5. Select your microSD card.
6. Click on the “Restore” button.
7. In the dialog that opens, select the image file of the XK3Y MicroSD card.
8. Wait for the operation to complete. Remove the finished XK3Y microSD card.
The received XK3Y MicroSD card already has xk3y firmware version 1.02 installed.
So, the prefix is disassembled, the drive model is known, it is time to remove the drive dump.
Attention to owners of the Liteon DG16D4S DVD drive with firmware 9504! An update from Microsoft was released for your drive in mid-2011, changing version 9504 to 0272. It is very important that the dump from the DVD drive be obtained after this update. If you have a set-top box with this drive, and it has not been updated for a long time, then the new XGD3 games will not work.
I shot a dump for this drive firmware interactive. I also recommend using it, everything is very clear in the pictures (: You must act on it until the moment when we have the saved key and drive dump. Namely, when we have the files D ummy.bin, Key.bin, Inquiry. bin, Identify.bin and Serial.bin. Save these files in several places. This is the “passport” of your drive and if it fails, only with the help of these files you can put a new drive in the console and make it work.
To install xkey in Slim console, we need only one file - Dummy.bin. It must be put on the xkey Micro SD card.
Setting up xk3y on Fat consoles is a bit more complicated. Instead of a partial dump from the drive, a full OFW (Official Firmware, official firmware) dump is needed here. If you have only a part of the dump, or CFW (Custom Firmware, third-party firmware) is installed on the set-top box's DVD drive, then you need to convert the dump to the format that xk3y accepts. The file for the XBOX 360 Fat should be called firmware.bin .
To get the correct dump, you need to use the latest version of Jungle Flasher . You will also need a collection of official firmware for DVD drives.
We assume that you have a drive dump (Dummy.bin).
Now copy the resulting dump of the Dummy.bin drive (for the Slim console) or firmware.bin (for the Fat console) to the xkey Micro SD card and insert it into the slot on the board.
1. Insert the microSD card into xk3y, then connect the power and data cables from the set-top box motherboard to xk3y:

2. Connect the supplied SATA and power cables to the set-top box DVD drive:

3. Install the drive so that the cables are laid under xk3y
4. Connect cables from the drive to xk3y
5. Connect the ribbon (flexible flat cable) to xk3y with the blue side up

6. Insulate the xk3y motherboard with a cardboard
If the cardboard did not come with xk3y or you lost it, you can use thisfile. You can print it on thick paper or cardboard. Or you can use other insulating material as a wrapper. After the device is securely isolated, make sure that it does not touch other live parts of the set-top box.
7. Pass the tape through the USB slot (blue side up), and then place xk3y in the corner of the
metal cage
8. Return the DVD drive to its original position
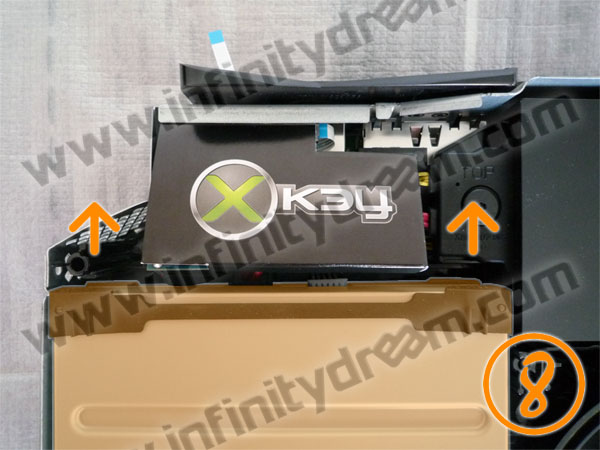
9. Make sure xk3y is correctly positioned and the tape will not be jammed during assembly of the top cover.
10. Connect the external part of the tape to the xk3y USB Dongle, then connect the xk3y control panel to the USB - Micro USB cable.

11. Installation xk3y completed. Now turn on the console (in the case of the XBOX 360 Slim, do not forget to attach the WiFi adapter that you disconnected when disassembling the console) and make sure that both the console and xk3y are functioning properly. If everything is in order - turn off and assemble the console.
This completes the installation of xk3y in the console. In the next and probably the last article, I will talk about the options for connecting a USB drive to xk3y, about the control panel, which is no longer supplied in the new revisions of the device, but is purchased for a fee.
I will write how to update xk3y firmware, how to start games from the remote control and from the console dashboard. I’ll tell you about the xkey.cfg configuration file and why it is needed.
The photos for this article are taken from the official xk3y manual. I don’t have mine, but I didn’t find anything better on the net.
I hope I have stated more or less clear. If something remains unclear, questions are welcome.
Thank you for mastering it to the end!
PS: Thanks for translating the official guide, BeAsT
In my first article, I talked about a device called xk3y. It's time to share with the community instructions on how to install it in our console.
So, the box with the device is in your hands, but you do not know what to do with all this? Welcome
Installing xk3y is done in several steps:
- Opening (disassembling) XBOX 360
- Obtaining a DVD drive key
- Connect and install xk3y inside the console
- XBOX 360 Build
Opening (disassembling) XBOX 360
You have to disassemble the prefix in order to install the xk3y motherboard inside, as well as remove the DVD drive to get the key from it. No special devices are needed to open the console, however, there are kits for opening the console that can save you time and nerves.
For those who don’t know how to remove the key or don’t want to mess with it for a long time, or maybe someone doesn’t have a computer to connect the drive to it, but they have a laptop, there are devices called Maximus 360 Lizard and X360USB Pro that allow you to remove key by connecting the drive to the USB port and removing the key with one click.
If you are not looking for easy ways, read on.
To open the Xbox 360 console, we need the following items:
- T10 screwdriver for loosening screws;
- A long thin stick (or any other analog) to open the latches;
- Negative small screwdriver;
I will not describe in detail the procedure for opening the console, especially since Fat and Slim are somewhat different from each other. Better tell me about this video:
I’ll say from myself that for the first time, disassembling the prefix is rather tedious, nervous and long, but when the skill appears, you can do it with your eyes closed :)
After you have disassembled the prefix, you can proceed to dump the DVD drive and install xk3y.
Configuring and preparing xk3y for work
Xk3y microSD card review
The supplied SD card has a capacity of 128 MB. This volume is divided into 3 sections:
1. BootINIT sector.
2. Ext3 sector (this section contains rootfs and uImage, xk3y firmware files). This section cannot be seen on Windows. If you want to update these files, there is no need to install Linux to see this section. You can update xk3y via USB or hard drive, xk3y will see and copy the firmware files for you. You will learn more about this below.
3. 0.98MB FAT32. Here you need to place the drive key file firmware.bin (for XBOX Fat) or dummy.bin (for XBOX Slim), as well as the xk3y configuration file. You will also learn how to get these files below.
MicroSD card recovery
If your MicroSD card does not work, it is incorrectly divided into partitions or when you try to start the console an E64 error appears, you can try to restore the MicroSD card. To do this, you will need:
1. USB Image Tool
2. Image of the XK3Y MicroSD card
3. MicroSD card (if the original card is broken or lost, you can
use any other capacity of at least 128 MB)
To get a working XKEY microSD card, make The following:
1. Unzip the USB Image Tool and the XK3Y MicroSD card image into a separate folder.
2. Insert the microSD card into the USB Card Reader. Verify that Windows has assigned the drive letter to the card.
3. Launch the USB Image Tool (on Windows Vista and Windows 7, the program should be run in Administrator mode).
4. Set the “Device Mode”.
5. Select your microSD card.
6. Click on the “Restore” button.
7. In the dialog that opens, select the image file of the XK3Y MicroSD card.
8. Wait for the operation to complete. Remove the finished XK3Y microSD card.
The received XK3Y MicroSD card already has xk3y firmware version 1.02 installed.
Obtaining a key from a DVD drive
So, the prefix is disassembled, the drive model is known, it is time to remove the drive dump.
Attention to owners of the Liteon DG16D4S DVD drive with firmware 9504! An update from Microsoft was released for your drive in mid-2011, changing version 9504 to 0272. It is very important that the dump from the DVD drive be obtained after this update. If you have a set-top box with this drive, and it has not been updated for a long time, then the new XGD3 games will not work.
I shot a dump for this drive firmware interactive. I also recommend using it, everything is very clear in the pictures (: You must act on it until the moment when we have the saved key and drive dump. Namely, when we have the files D ummy.bin, Key.bin, Inquiry. bin, Identify.bin and Serial.bin. Save these files in several places. This is the “passport” of your drive and if it fails, only with the help of these files you can put a new drive in the console and make it work.
To install xkey in Slim console, we need only one file - Dummy.bin. It must be put on the xkey Micro SD card.
Setting up xk3y on Fat consoles is a bit more complicated. Instead of a partial dump from the drive, a full OFW (Official Firmware, official firmware) dump is needed here. If you have only a part of the dump, or CFW (Custom Firmware, third-party firmware) is installed on the set-top box's DVD drive, then you need to convert the dump to the format that xk3y accepts. The file for the XBOX 360 Fat should be called firmware.bin .
Getting firmware.bin for the XBOX 360 Fat
To get the correct dump, you need to use the latest version of Jungle Flasher . You will also need a collection of official firmware for DVD drives.
We assume that you have a drive dump (Dummy.bin).
- Open JungleFlasher.exe . You may receive an error message when opening on a 64-bit operating system. Do not pay attention to the error.
In the FirmwareTool32 tab, click on the Open Source Firmware button
- Select the firmware file. Its size should be 256Kb. For demonstration purposes, we will use the file for the LiteOn drive.
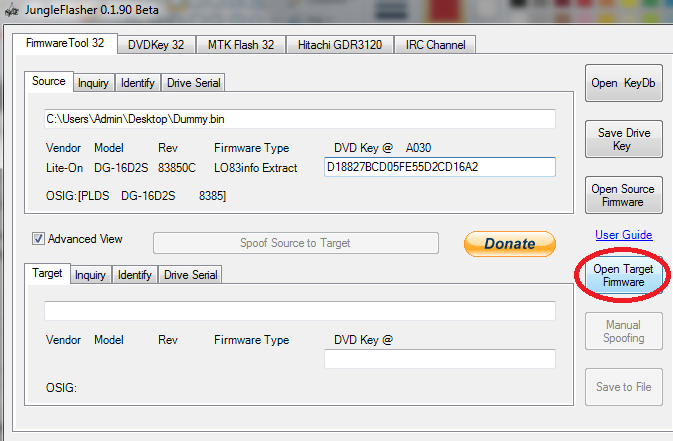
- After opening the firmware, your information will be displayed in the upper panel. The next step is to open a complete original dump to change it. This is a file that needs to be supplemented with your dump. Files are in the archive of the official firmware of the drives, the link to which was higher:
- BenQ;
- Hitachi (Phat);
- LiteOn (Phat);
- Samsung.
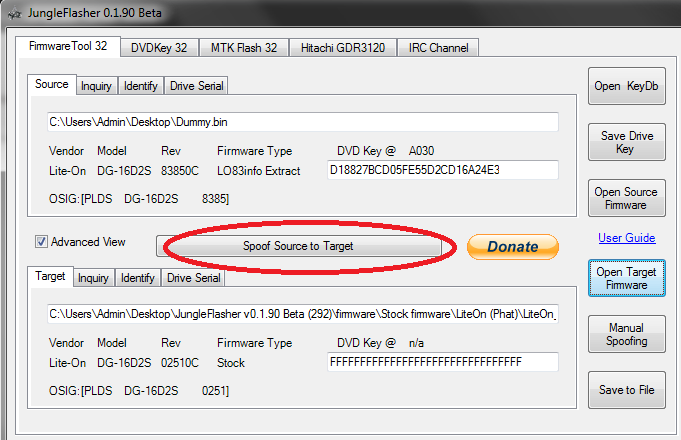
These are 4 companies that made DVD drives for the XBOX 360 Fat. Choose the firmware that suits your DVD drive (see the sticker on the drive cover). - All you need to do now is click the Spoof to Target button. This will allow you to copy all the information from the dump of your DVD-ROM drive into a full firmware dump. As soon as you click on the button, you will see the DVD key change from FFFFFFFFFFFFFFFFF to your DVD key.
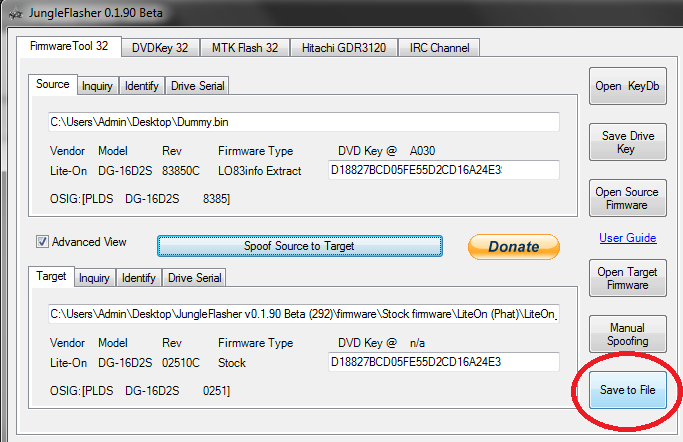
- Click the Save to File button. Save the file as firmware.bin . The name must be lowercase. Save it to your computer, and then copy the file to the xk3y microSD card.
Now copy the resulting dump of the Dummy.bin drive (for the Slim console) or firmware.bin (for the Fat console) to the xkey Micro SD card and insert it into the slot on the board.
Install xk3y in the console
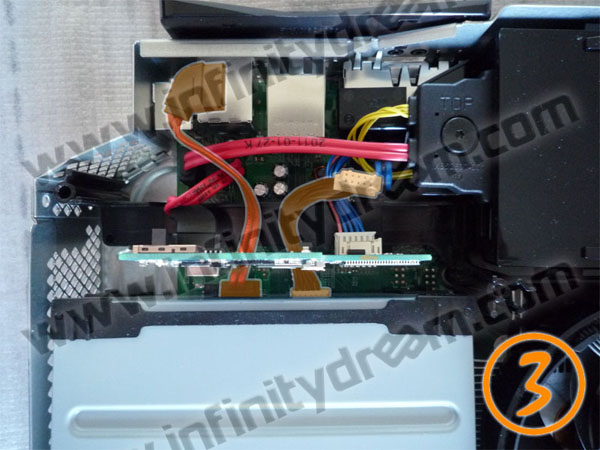
1. Insert the microSD card into xk3y, then connect the power and data cables from the set-top box motherboard to xk3y:
2. Connect the supplied SATA and power cables to the set-top box DVD drive:
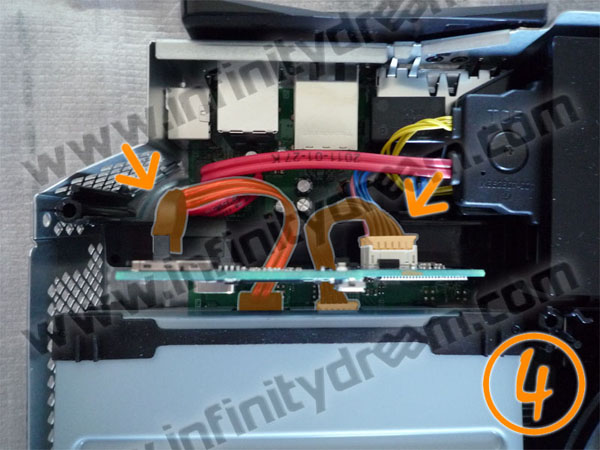
3. Install the drive so that the cables are laid under xk3y
4. Connect cables from the drive to xk3y
5. Connect the ribbon (flexible flat cable) to xk3y with the blue side up
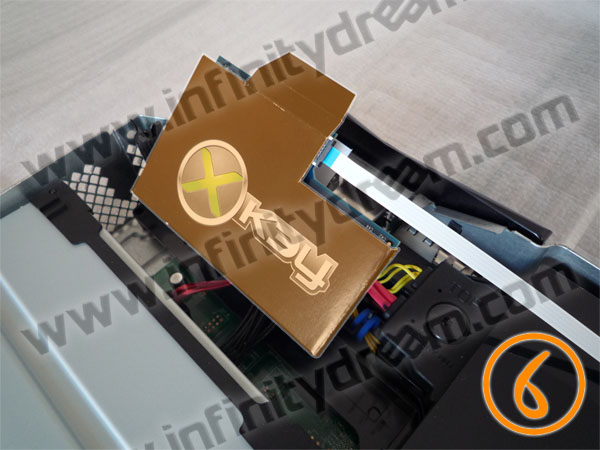
6. Insulate the xk3y motherboard with a cardboard
If the cardboard did not come with xk3y or you lost it, you can use thisfile. You can print it on thick paper or cardboard. Or you can use other insulating material as a wrapper. After the device is securely isolated, make sure that it does not touch other live parts of the set-top box.
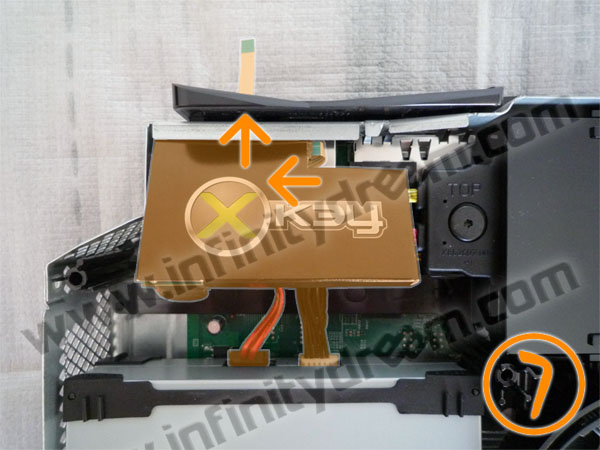
7. Pass the tape through the USB slot (blue side up), and then place xk3y in the corner of the
metal cage
8. Return the DVD drive to its original position
9. Make sure xk3y is correctly positioned and the tape will not be jammed during assembly of the top cover.
10. Connect the external part of the tape to the xk3y USB Dongle, then connect the xk3y control panel to the USB - Micro USB cable.
11. Installation xk3y completed. Now turn on the console (in the case of the XBOX 360 Slim, do not forget to attach the WiFi adapter that you disconnected when disassembling the console) and make sure that both the console and xk3y are functioning properly. If everything is in order - turn off and assemble the console.
This completes the installation of xk3y in the console. In the next and probably the last article, I will talk about the options for connecting a USB drive to xk3y, about the control panel, which is no longer supplied in the new revisions of the device, but is purchased for a fee.
I will write how to update xk3y firmware, how to start games from the remote control and from the console dashboard. I’ll tell you about the xkey.cfg configuration file and why it is needed.
The photos for this article are taken from the official xk3y manual. I don’t have mine, but I didn’t find anything better on the net.
I hope I have stated more or less clear. If something remains unclear, questions are welcome.
Thank you for mastering it to the end!
PS: Thanks for translating the official guide, BeAsT