Description of working with Virtual Grid Control in Visual C ++
Due to the small number of standard controls in Visual C ++, most of the components have to be completed on their own, especially when it comes to displaying tabular data. For less serious systems, the standard ListCtrl is no longer enough. Rummaging on the Internet you can find a considerable number of commercial grids, but you don’t really want to part with your hard-earned money, here a wonderful component from Yuriy Zabroda VirtualGridCtrl comes to the rescue .
This component was written in Visual C ++ 6.0, but to this day it can be successfully used in more recent versions of Visual C ++. In fact, when choosing a grid for myself, I put forward several requirements:
- a multi-line grid cap (without this, it’s difficult to imagine at least some complicated report)
- display of multi-line text
- the ability to replace the standard CEdit in the table rows with your own controls
- the ability to highlight individual entries with color
- the speed of work
Perhaps we start with the last paragraph. The word Virtual in the name means that the data is not stored in the grid itself, but in some data structure, for example a vector. And when displaying data on the screen from this structure, only those data are requested that need to be displayed on the screen, this ensures independence of the speed of work from the number of elements in the list.
We will deal with other features using a small example.
Suppose we have a table document of the following form:
- No. Number
- Date
- Client: Phone, Address
Lines contain plain text.
We need to get about the following view.

VirtualGridCtrl includes a grid appearance constructor, it is called VirtualGridDemo.exe. There is nothing complicated in its use, on the tab, click on the “Columns and Headers constructor” button and on the “Columns” tab, delete all columns and add as many columns as needed, in our case 4. Then, on the “Headers” tab, create a structure caps of our grid.
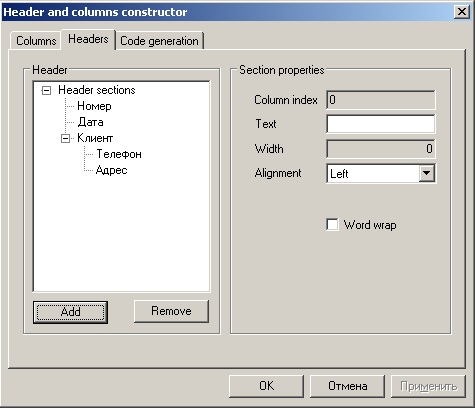
The following will turn out.
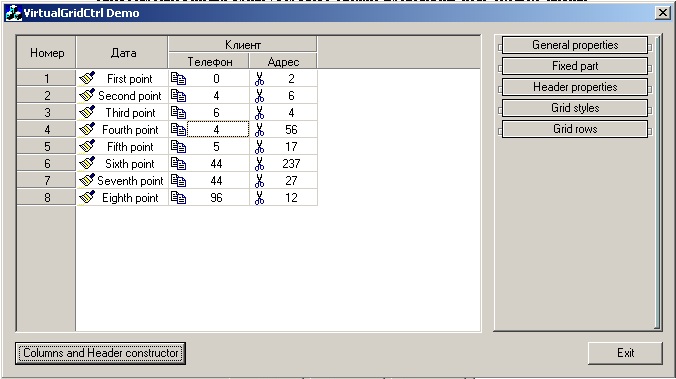
In the right pane, you can also set additional parameters for rows and columns.
Now let's figure out how to use it all now. Again, open the settings window by clicking on the "Columns and Headers constructor" button and go to the "Code generation" tab and click "Generate".
Create a new Visual C ++ project (I use Visual Studio 2008) with the Dialog style and connect the header files to the project: VirtualGridCtrl.h, MemDC.h, TitleTip.h, GridListBox.h, GridEdit.h, GridButton.h. Add “Custom control” to the form, set its “Class” property to “CVirtualGridCtrl” and add the m_grid variable of type “CVirtualGridCtrl”.
Now you can add grid initialization code to OnInitialDialog. We copy the code we received in the constructor there.
I must say right away the shortcomings of the code that we received, not all the settings that we set in the constructor, fell into this code, this is a flaw, but this code is not difficult to add by ourselves. So, we will analyze the code that we received:
You can see how to set additional parameters in the example that comes with VirtualGrid.
Now let's figure out how to work with data. Create the structure:
And declare the m_data variable as follows:
And in OnInitialDialog we initialize the structure:
Now we will add a function for outputting data to the grid, for this we will add a function definition to our class:
in the .cpp file in the BEGIN_MESSAGE_MAP add:
The event handler VGN_GETDISPINFO works as follows:
Similarly, you can add a function to double-click on a line:
Or handlers of any other events.
This grid is quite versatile and can be used in various applications to display lists in a beautiful and visual way. If necessary, it is easy to finalize, because the sources have a clear and understandable structure.
PS: In the application, the grid is in its standard form, and an example from the article with a slightly modified grid (small errors are fixed, gradients are added when drawing lines and headers), so it is better to take source codes from it.
This component was written in Visual C ++ 6.0, but to this day it can be successfully used in more recent versions of Visual C ++. In fact, when choosing a grid for myself, I put forward several requirements:
- a multi-line grid cap (without this, it’s difficult to imagine at least some complicated report)
- display of multi-line text
- the ability to replace the standard CEdit in the table rows with your own controls
- the ability to highlight individual entries with color
- the speed of work
Perhaps we start with the last paragraph. The word Virtual in the name means that the data is not stored in the grid itself, but in some data structure, for example a vector. And when displaying data on the screen from this structure, only those data are requested that need to be displayed on the screen, this ensures independence of the speed of work from the number of elements in the list.
We will deal with other features using a small example.
Suppose we have a table document of the following form:
- No. Number
- Date
- Client: Phone, Address
Lines contain plain text.
We need to get about the following view.
VirtualGridCtrl includes a grid appearance constructor, it is called VirtualGridDemo.exe. There is nothing complicated in its use, on the tab, click on the “Columns and Headers constructor” button and on the “Columns” tab, delete all columns and add as many columns as needed, in our case 4. Then, on the “Headers” tab, create a structure caps of our grid.
The following will turn out.
In the right pane, you can also set additional parameters for rows and columns.
Now let's figure out how to use it all now. Again, open the settings window by clicking on the "Columns and Headers constructor" button and go to the "Code generation" tab and click "Generate".
Create a new Visual C ++ project (I use Visual Studio 2008) with the Dialog style and connect the header files to the project: VirtualGridCtrl.h, MemDC.h, TitleTip.h, GridListBox.h, GridEdit.h, GridButton.h. Add “Custom control” to the form, set its “Class” property to “CVirtualGridCtrl” and add the m_grid variable of type “CVirtualGridCtrl”.
Now you can add grid initialization code to OnInitialDialog. We copy the code we received in the constructor there.
I must say right away the shortcomings of the code that we received, not all the settings that we set in the constructor, fell into this code, this is a flaw, but this code is not difficult to add by ourselves. So, we will analyze the code that we received:
 //  ---------------  Required variables  -----------------
CGridColumn *pColumn;
CGridHeaderSections *pSections;
CGridHeaderSection *pSection;
CGridHeaderSection *pUpperSection;
//  -----------------  Let's add some columns  --------------
m_grid.AddColumn(_T(""), 60, LVCFMT_CENTER); // Добавляются колонки, третий параметр означает выравнивание в стоках
m_grid.AddColumn(_T(""), 92, LVCFMT_CENTER);
m_grid.AddColumn(_T(""), 81, LVCFMT_CENTER);
m_grid.AddColumn(_T(""), 68, LVCFMT_CENTER);
//  ---------------  Set additional column properties  ----------------
pColumn = m_grid.GetColumn(0);
pColumn->SetTabStop(FALSE);
// Выстраиваем структуру шапки грида
//  ---------------  Let's put the grid header into shape  ------------
pSections = m_grid.GetHeader()->GetSections();
pUpperSection = pSections->GetSection(0);
pUpperSection->SetCaption(_T("Номер"));
pUpperSection->SetAlignment(LVCFMT_CENTER);
pUpperSection = pSections->GetSection(1);
pUpperSection->SetCaption(_T("Дата"));
pUpperSection->SetAlignment(LVCFMT_CENTER);
pUpperSection = pSections->GetSection(2);
pUpperSection->SetCaption(_T("Клиент"));
pUpperSection->SetAlignment(LVCFMT_CENTER);
pUpperSection->SetWordWrap(TRUE); // Установим перенос текста в 3-й колонке
pSection = pUpperSection->Add();
pSection->SetCaption(_T("Телефон"));
pSection->SetAlignment(LVCFMT_CENTER);
pUpperSection = pSection;
pUpperSection = pSection->GetParent();
pSection = pUpperSection->Add();
pSection->SetCaption(_T("Адрес"));
pSection->SetAlignment(LVCFMT_CENTER);
pUpperSection = pSection;
pUpperSection = pSection->GetParent();
m_grid.GetHeader()->SynchronizeSections();
//  --------------  Some additional initializations...  ------
// Добавим код вручную
CGridHeader *pHeader = m_grid.GetHeader();
pHeader->SetSectionHeight(25); // Установим высоту шапки
pHeader->SynchronizeSections();
m_grid.SetFixedCount(1); // Можем сделать первую колонку фиксированной
m_grid.SetRowSelect(); // Выделять строки полностью
m_grid.SetRowHeight(25); // Установить высоту строк
You can see how to set additional parameters in the example that comes with VirtualGrid.
Now let's figure out how to work with data. Create the structure:
struct sKlient
{
	int nomer;
	COleDateTime date;
	CString tel;
	CString adres;
};
And declare the m_data variable as follows:
vector m_data; And in OnInitialDialog we initialize the structure:
// Инициализация нашей структуры данных
sKlient tmp;
tmp.nomer = 1;
tmp.date = COleDateTime(2012,1,1,0,0,0);
tmp.tel = L"12-34-56";
tmp.adres = L"Адрес 1";
m_data.push_back(tmp);
tmp.nomer = 2;
tmp.date = COleDateTime(2011,2,3,0,0,0);
tmp.tel = L"78-12-45";
tmp.adres = L"Адрес 2";
m_data.push_back(tmp);
m_grid.SetRowCount(m_data.size()); // Обязательно установим количество строк в гриде
Now we will add a function for outputting data to the grid, for this we will add a function definition to our class:
afx_msg void OnGridGetDispInfo(NMHDR *pNMHDR, LRESULT *pResult);in the .cpp file in the BEGIN_MESSAGE_MAP add:
ON_NOTIFY(VGN_GETDISPINFO, IDC_CUSTOM1, OnGridGetDispInfo)The event handler VGN_GETDISPINFO works as follows:
VG_DISPINFO *pDispInfo = (VG_DISPINFO *)pNMHDR;
CString st;
if (pDispInfo->item.mask & LVIF_TEXT)  // Так устанавливается текст в строках
{
	switch (pDispInfo->item.nColumn)
	{
	case 0:
		{// №
			st.Format(L"%d", m_data[pDispInfo->item.nRow].nomer);
			pDispInfo->item.strText = st;
		}
		break;
               }
}
// А так можно установить цвет фона
if (pDispInfo->item.mask & LVIF_COLOR)
{
	if (pDispInfo->item.nColumn == 1) // Установить фон во второй колонке
	{
		pDispInfo->item.pDC->SetBkColor(RGB(202, 228, 255));
	}
}
Similarly, you can add a function to double-click on a line:
ON_NOTIFY(WM_LBUTTONDBLCLK, IDC_CUSTOM1, OnNMDblclkGrid)
void CCVirtaGridTestDlg::OnNMDblclkGrid(NMHDR *pNMHDR, LRESULT *pResult)
{
	int n;
	n = m_grid.GetRow();
	if (!m_grid.GetRowCount() || (n > m_grid.GetRowCount()-1))
		return;
	::AfxMessageBox(m_data[n].adres);
}
Or handlers of any other events.
This grid is quite versatile and can be used in various applications to display lists in a beautiful and visual way. If necessary, it is easy to finalize, because the sources have a clear and understandable structure.
PS: In the application, the grid is in its standard form, and an example from the article with a slightly modified grid (small errors are fixed, gradients are added when drawing lines and headers), so it is better to take source codes from it.