FreeBSD and D-Link DI-804HV via IPSEC
I want to talk about one of my first experiences with FreeBSD and setting up IPSEC to communicate with D-Link DI-804HV and the problems that arose. I hope this helps people not step on my rake.
It so happened that when I came to a new job, the server with FreeBSD, which was the gateway to the Internet, got into my area of responsibility - it had a mail server and a firewall. According to previous work, I had experience working with Linux, but FreeBSD had never seen it before. And one of the first tasks at a new job was to configure a connection to a remote office via the Internet, for this they bought a D-Link DI-804HV piece of iron. It was decided to connect this entire farm through IPSEC.
Some changes were made to the article based on comments after publication.
So, what we had available (the addresses here are given solely as an example): the
internal network of the enterprise 192.168.250.0/24 , the
internal network of the office 192.168.0.0/24 , the
router of the enterprise 192.168.250.1
office router 192.168.0.1
external address on FreeBSD 10.10 .10.1 ,
external address on DI-804HV 10.10.10.2 .
All work was carried out first on a test machine in order to avoid any unpleasant moments.
Well, it all started as usual - from reading the documentation on the D-link website and other network resources. The D-Link website has a description of the link of FreeBSD 4.8 with this piece of hardware, but some of the information there is already outdated, as it turned out later.
I started my work with rebuilding the kernel, with the inclusion of the necessary options - the kernel configs are in / usr / src / sys / i386 / conf , I copied GENERIC to IPSEC and started making changes.
Since I have FreeBSD 9, the changes are as follows: If the version is less than 7 (as I understood from the discussion on the internet), the following is necessary: I rebuilt the kernel with the commands: where IPSEC is my name for the kernel configuration. I rebooted the car, checked that it was loading.
Next, I proceeded to install the software itself. Before installation, everyone recommends updating the ports, in my case it was through the commands: After that, I started installing the necessary ports. From reading the articles in the forum, I realized that I need racoon, it is located in the ports / usr / ports / security / ipsec-tools . There is racoon2, but we do not need it, because ikev2 is not supported by the DI-804HV. Install the port through: After installation, go to the / usr / local / etc / racoon directory - if it is not there, create it - and create the racoon.conf configuration file : Authentication will occur using the shared key (shared_key), which is located in the / usr file /local/etc/racoon/psk.txt :
I would like to note that for this file you need to change the attributes of type 0600 from the root: Otherwise, then you can figure out why it does not work for a long time. Then we make changes to / etc / rc.conf : Well, the file /etc/ipsec.conf : We reboot, we see that the new interface has appeared, the service has started, and we go to the next step. Well, it’s like you ’ve finished setting up FreeBSD, it's time to start DI-804HV. We go to the web console, go to the VPN tab, enter a name for our VPN connection and click the More button . We get into the following settings and fill out all the fields according to our initial conditions: After filling in these data, click Apply

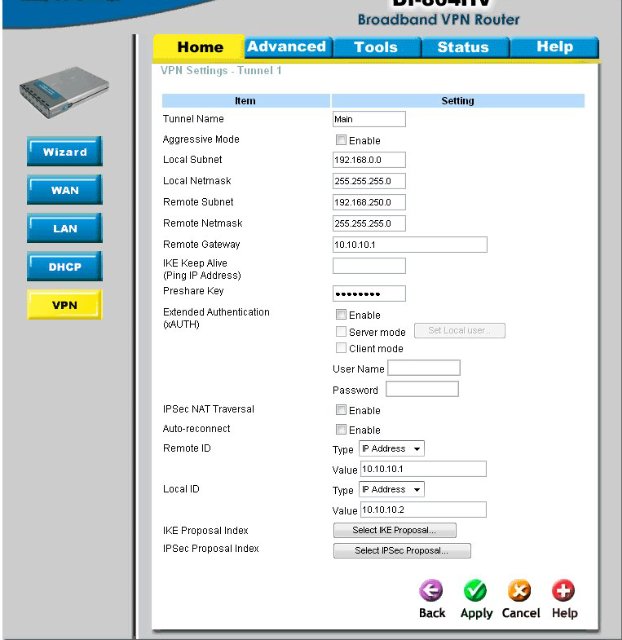
and after reloading the page, we need to go to the IKE Proposal Index, click on the Select IKE Proposal button and what do we see?

And we see there only 56-bit DES, which corresponds to 1DES, and not at all 3DES, as we need.
At first, I did not pay attention to this, because of which I lost half an hour figuring out why the connection was not being established. I decided that there might be a problem in the firmware, went to ftp.dlink.ru and found out that I had the latest firmware 1.53RU. By further googling, I pulled information from the Google cache that there was no 3DES in my firmware, so I had to roll back to the old one. Found version 1.51 for 2008 ftp.dlink.com/Gateway/di804HV/Firmware/di804HV_firmware_151.BIN, upgraded, or rather, downgrade and voila - the 3DES we need appeared on the right page.

Well, then everything is simple - we select DH Group - Group 2 (this is the same as modp1024, if for racoon2), encrypt algorithm - 3DES , Auth algorithm - SHA1 , Life Time = 28800 (you need to make sure that all these parameters coincide with those that are indicated in /usr/local/etc/racoon/racoon.conf. In the end, do not forget to select the desired Proposal ID in the combo box, click Add to Proposal Index and then Apply.
Go back and go to IPSes Proposal and fill in all the necessary fields there:

Also add all this by analogy, save and go to a bookmark Status-> the VPN the Status :
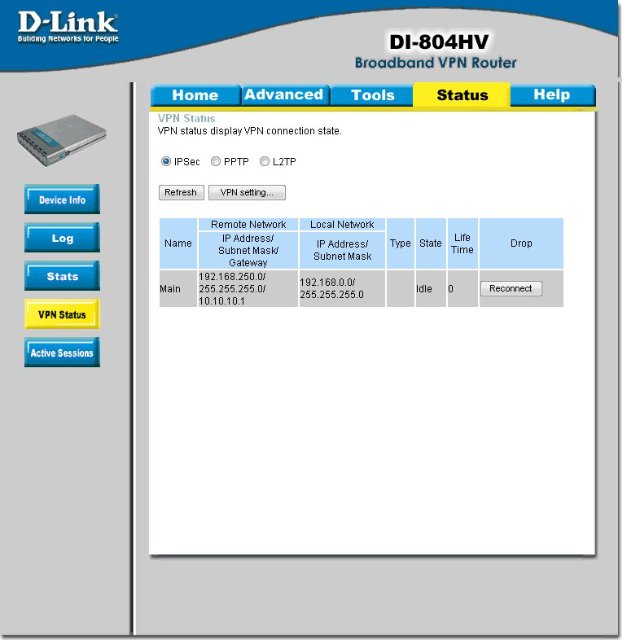
Click Reconnect - and all can be checked channel operation:
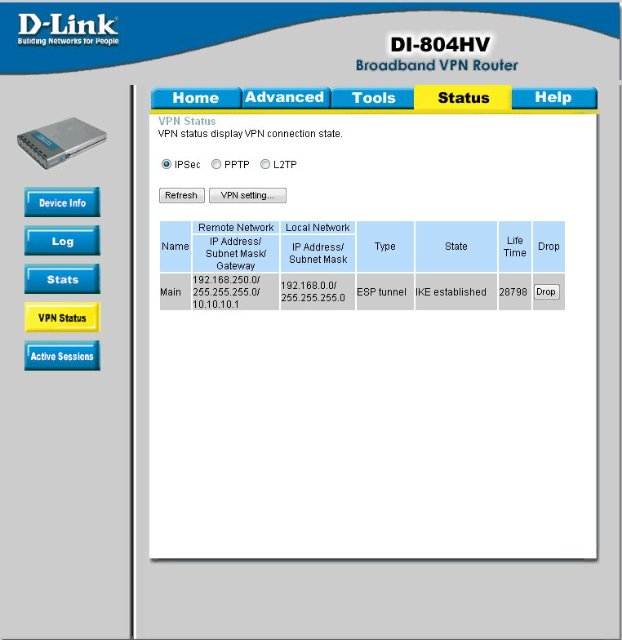
References:
www.opennet.ru
forum.lissyara.su
www.google.ru
PS This article was It was written only to facilitate the installation of this FreeBSD <-> D-Link DI-804HV bundle, because during the setup process I regularly ran across all kinds of problems in this bundle on the forums. Any constructive comments are welcome.
It so happened that when I came to a new job, the server with FreeBSD, which was the gateway to the Internet, got into my area of responsibility - it had a mail server and a firewall. According to previous work, I had experience working with Linux, but FreeBSD had never seen it before. And one of the first tasks at a new job was to configure a connection to a remote office via the Internet, for this they bought a D-Link DI-804HV piece of iron. It was decided to connect this entire farm through IPSEC.
Some changes were made to the article based on comments after publication.
So, what we had available (the addresses here are given solely as an example): the
internal network of the enterprise 192.168.250.0/24 , the
internal network of the office 192.168.0.0/24 , the
router of the enterprise 192.168.250.1
office router 192.168.0.1
external address on FreeBSD 10.10 .10.1 ,
external address on DI-804HV 10.10.10.2 .
All work was carried out first on a test machine in order to avoid any unpleasant moments.
Well, it all started as usual - from reading the documentation on the D-link website and other network resources. The D-Link website has a description of the link of FreeBSD 4.8 with this piece of hardware, but some of the information there is already outdated, as it turned out later.
I started my work with rebuilding the kernel, with the inclusion of the necessary options - the kernel configs are in / usr / src / sys / i386 / conf , I copied GENERIC to IPSEC and started making changes.
Since I have FreeBSD 9, the changes are as follows: If the version is less than 7 (as I understood from the discussion on the internet), the following is necessary: I rebuilt the kernel with the commands: where IPSEC is my name for the kernel configuration. I rebooted the car, checked that it was loading.
options IPSEC

device crypto
options IPSEC

options IPSEC_ESP

options IPSEC_DEBUG # необязательно, но облегчит поиск проблем
make buildkernel KERNCONF=IPSEC

make installkernel KERNCONF=IPSEC
Next, I proceeded to install the software itself. Before installation, everyone recommends updating the ports, in my case it was through the commands: After that, I started installing the necessary ports. From reading the articles in the forum, I realized that I need racoon, it is located in the ports / usr / ports / security / ipsec-tools . There is racoon2, but we do not need it, because ikev2 is not supported by the DI-804HV. Install the port through: After installation, go to the / usr / local / etc / racoon directory - if it is not there, create it - and create the racoon.conf configuration file : Authentication will occur using the shared key (shared_key), which is located in the / usr file /local/etc/racoon/psk.txt :
portsnap fetch

portsnap extract

portsnap update
make install clean
freebsd# cat /usr/local/etc/racoon/racoon.conf

path include "/usr/local/etc/racoon";

path pre_shared_key "/usr/local/etc/racoon/psk.txt";


padding

 {

 maximum_length 20; # maximum padding length.

 randomize off; # enable randomize length.

 strict_check off; # enable strict check.

 exclusive_tail off; # extract last one octet.

 }


listen

 {

 #isakmp ::1 [7000];

 isakmp 10.10.10.1 [500];

 #admin [7002]; # administrative port for racoonctl.

 #strict_address; # requires that all addresses must be bound.

 }


# Specify various default timers.

timer

 {

# These value can be changed per remote node.

 counter 5; # maximum trying count to send.

 interval 20 sec; # maximum interval to resend.

 persend 1; # the number of packets per send.

# maximum time to wait for completing each phase.

 phase1 30 sec;

 phase2 15 sec;

 }


remote anonymous

 {

 exchange_mode main,base;

# doi ipsec_doi;

# situation identity_only;

 lifetime time 28800 sec;

 #my_identifier asn1dn;

 #certificate_type x509 "my.cert.pem" "my.key.pem";

 #nonce_size 16;

# initial_contact on;

 generate_policy on;

 proposal {

 encryption_algorithm 3des;

 hash_algorithm sha1;

 authentication_method pre_shared_key;

 dh_group 2;

 }

 proposal_check strict;


}


sainfo anonymous

 {

 #pfs_group 2;

 lifetime time 28800 sec;

 encryption_algorithm 3des, cast128, blowfish 448, des, rijndael;

 authentication_algorithm hmac_sha1, hmac_md5;

 compression_algorithm deflate;

 }
freebsd# cat /usr/local/etc/racoon/psk.txt

10.10.10.2 123456789q
I would like to note that for this file you need to change the attributes of type 0600 from the root: Otherwise, then you can figure out why it does not work for a long time. Then we make changes to / etc / rc.conf : Well, the file /etc/ipsec.conf : We reboot, we see that the new interface has appeared, the service has started, and we go to the next step. Well, it’s like you ’ve finished setting up FreeBSD, it's time to start DI-804HV. We go to the web console, go to the VPN tab, enter a name for our VPN connection and click the More button . We get into the following settings and fill out all the fields according to our initial conditions: After filling in these data, click Apply
freebsd# ls -l /usr/local/etc/racoon/psk.txt

-rw------- 1 root wheel 21 Jan 31 13:55 /usr/local/etc/racoon/psk.txt
racoon_enable="YES"

#Как выяснилось из обсуждения, gif0 в принципе и не нужен
cloned_interfaces="gif0"

gif_interfaces="gif0"

gifconfig_gif0="10.10.10.1 10.10.10.2"

ifconfig_gif0="inet 192.168.250.1 192.168.0.1 netmask 0xffffffff"

ipsec_enable="YES"

ipsec_file="/etc/ipsec.conf"
flush;

spdflush;

spdadd 192.168.250.0/24 192.168.0.0/24 any -P out ipsec esp/tunnel/10.10.10.1.-10.10.10.2/require;

spdadd 192.168.0.0/24 192.168.250.0/24 any -P in ipsec esp/tunnel/10.10.10.2-10.10.10.1/require;
and after reloading the page, we need to go to the IKE Proposal Index, click on the Select IKE Proposal button and what do we see?
And we see there only 56-bit DES, which corresponds to 1DES, and not at all 3DES, as we need.
At first, I did not pay attention to this, because of which I lost half an hour figuring out why the connection was not being established. I decided that there might be a problem in the firmware, went to ftp.dlink.ru and found out that I had the latest firmware 1.53RU. By further googling, I pulled information from the Google cache that there was no 3DES in my firmware, so I had to roll back to the old one. Found version 1.51 for 2008 ftp.dlink.com/Gateway/di804HV/Firmware/di804HV_firmware_151.BIN, upgraded, or rather, downgrade and voila - the 3DES we need appeared on the right page.
Well, then everything is simple - we select DH Group - Group 2 (this is the same as modp1024, if for racoon2), encrypt algorithm - 3DES , Auth algorithm - SHA1 , Life Time = 28800 (you need to make sure that all these parameters coincide with those that are indicated in /usr/local/etc/racoon/racoon.conf. In the end, do not forget to select the desired Proposal ID in the combo box, click Add to Proposal Index and then Apply.
Go back and go to IPSes Proposal and fill in all the necessary fields there:
Also add all this by analogy, save and go to a bookmark Status-> the VPN the Status :
Click Reconnect - and all can be checked channel operation:
References:
www.opennet.ru
forum.lissyara.su
www.google.ru
PS This article was It was written only to facilitate the installation of this FreeBSD <-> D-Link DI-804HV bundle, because during the setup process I regularly ran across all kinds of problems in this bundle on the forums. Any constructive comments are welcome.