Using Table View
Good day!
For a long time I’ve been trying to force myself to learn another language / platform for programming under Mac OS X / iOS. Of particular interest is the development of applications with a native GUI, since console applications can be developed on anything from C and C ++ to the fashionable Nodejs now. As practice has shown, cross-platform frameworks like Qt are not very suitable here, if only because they do not provide the native Look and Feel, which users of this OS are used to.
There are a sufficient amount of materials on the Habré language on the Objective-C language and the Cocoa framework. From the point of view of the GUI, Cocoa is of interest, and here most of the articles are limited to buttons and text fields. I will try to correct this misunderstanding and describe the work with Table View using an example of an application that displays a list of processes.
The article does not pretend to be complete and absolute correctness of the material and is focused primarily on novice developers. Errors and constructive criticism will be happy to hear in the comments. Who cares, welcome to cat.
For development, we need some knowledge of Table View. Let's start with them. A detailed description of working with Table View is given in [1], here I will limit myself to a brief summary of the main ideas.
There are two types of Table View:
In this article we will consider working with cell-based table view , since its functions are enough for us, the solution will be simpler and will work not only with new versions of OS X.
Data can be transferred to Table View in two ways:
Cocoa Bindings has been introduced in Mac OS X since version 10.3. Its main goal is to reduce the amount of controller code for linking model objects (Model) and views (View).
Cocoa Bindings is based on two mechanisms:
More details about Cocoa Bindings can be found in [3].
On this with the theory finished, we can proceed to practice.
Open Xcode and create a new Cocoa Application project. Let's call it Process Monitor. I am using the latest version of Xcode (4.2.1) at the time of publication, so some steps may vary.
Open the MainMenu.xib file, select Window in it. Set the dimensions to 480 by 500 for it. This is done in Size Inspector (the ruler icon in the right sidebar). There we will set the minimum dimensions - the checkbox and the required sizes.
Add the Table View element from the Object Library (the cube icon in the lower right sidebar) to the window (search by the word "table"). By default, a cell-based table is created. You can verify this if you open the Attributes Inspector (in the right sidebar, to the left of the line). We resize the Table View so that it occupies the entire window. Then open the Size inspector and select all the elements in the Autosizing picture - it is necessary for the Table View to stretch along with the window.
Now we need to add the columns to the table. We will display three columns - the PID of the process, the icon and the name of the process. By default, two columns are added to the table. You need to change this number to 3. To do this, select the table (Table View) by clicking in the window. Here you need to make a small digression. The fact is that window objects are nested into each other and it is not easy to select the desired one. There are two options: either select the desired item in the hierarchy of objects in the Objects window (I think it appeared in Xcode 4, I have not seen it before), or Command + Control + Shift Click on the window with the selection of the desired object. After selecting the table, go to the Attributes Inspector and set the Columns value to 3.
Now assign the names to the columns. This is done by double-clicking on the column heading. The name of the first column is PID, the second is left blank, the third is Process Name.
We change the size of the columns of the table. To do this, select the column and set its size in the Size Inspector. For the first (PID): 60, for the second (Icon): 40, for the third (Process Name) - all the remaining space.
Replace the type of the second column of the table from text to image. To do this, find the Image Cell (search by “image”) in the Object Library and drag it to the second column.
After all these steps, you can click the Run button and see this window:

Now add a controller that will interact with the table. The most suitable type of controller for the table is NSArrayController. We find it in the Object Library (search for "array") and drag it into the Objects list.
Set the binders for the table. To do this, select the Table View and go to the Bindings Inspector (the penultimate tab in the right sidebar). There, in the Table Content section, select Content and install Bind to: Array Controller with Controller Key: arrangedObjects.
Now we will use the KVC technique and indicate what data each column should display. To do this, we take turns selecting each column (Table Column) and in the Bindings Inspector we set the Value to Bind to: Array Controller with Controller Key: arrangedObjects. And for each column, Model Key Path values are, respectively: processIdentifier, icon, localizedName. Why such values are set will be described below.
So we connected the table with the controller. It remains to associate the controller with the data.
First of all, we will determine these very data. Open the AppDelegate.h file and define a contents property of type NSArray:
In the file AppDelegate.m write:
Now back to MainMenu.xib and tell the controller what data to use. Go to the Bindings Inspector and in the Controller Content section set the Content Array to Bind to: App Delegate, and Model Key Path: contents.
On this, the installation of binders is completed, we just have to fill in the contents array in AppDelegate with the necessary data.
There are several ways to get a list of all running processes. I’ll write about this in a separate article. Now let's look at the simplest and most obvious way - using Cocoa. He does not receive a complete list of processes, but let it not concern us so far.
Define the updateProcessList method in AppDelegate:
Let's make this method the first in the class so that it can be called from other methods without a definition in the header file.
A little comment on the code. In the first line we get an object of class NSWorkspace . An object of this class exists in the program in a single copy, a kind of singleton, and is obtained by the sharedWorkspace method .
This object has a runningApplications method that returns a list of running applications in the array. Everything is simple. And we use this array as data for the controller.
Each element of this array represents an object of the NSRunningApplication class . This class has several properties, among which there is a processIdentifier, icon , localizedName . Remember we set them for table columns? So, thanks to KVC, these values from NSRunningApplication will be used during table display .
Now we add a call to the created method during the launch of the application. To do this, add the line:
to the applicationDidFinishLaunching method .
In Mac OS X, it is accepted that an application does not have to terminate after the last window is closed. In our example, this does not make much sense, so add automatic completion. This is done very simply - by adding one method to AppDelegate.m:
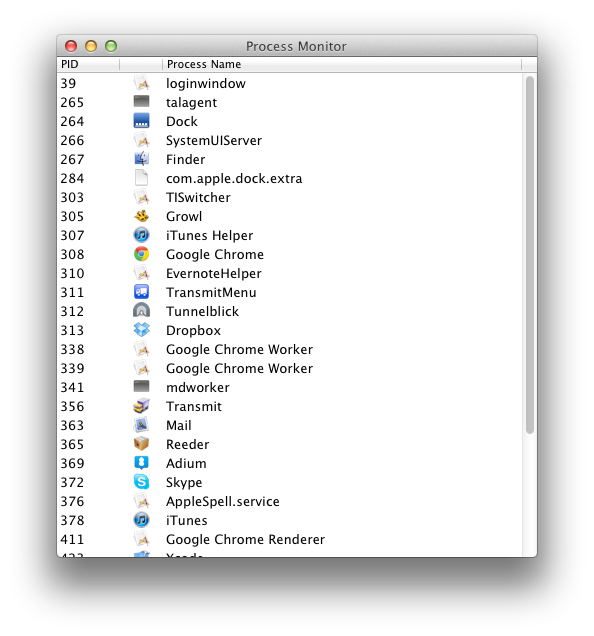
Now our application is ready. If everything is done correctly, then after launch you can see something like this:
As an exercise, I suggest the reader to implement a periodic update of the list of processes. To do this, you can use the NSTimer class and the scheduledTimerWithTimeInterval method of this class [5].
So, in this article, we looked at the process of creating a simple application using Table View. Most of the actions were carried out in Interface Builder and did not require programming at all. Everything that could be simplified was simplified - window controllers ( NSWindowController ), view controllers ( NSViewController ), memory management and much more were not considered .
In the next article, I plan to consider a hierarchical list ( NSOutlineView ) to display a process tree. And, if there is enough code there, I’ll make a repository on github.
Thank you all for your attention!
Upd. Gained karma and transferred to Mac OS X.
For a long time I’ve been trying to force myself to learn another language / platform for programming under Mac OS X / iOS. Of particular interest is the development of applications with a native GUI, since console applications can be developed on anything from C and C ++ to the fashionable Nodejs now. As practice has shown, cross-platform frameworks like Qt are not very suitable here, if only because they do not provide the native Look and Feel, which users of this OS are used to.
There are a sufficient amount of materials on the Habré language on the Objective-C language and the Cocoa framework. From the point of view of the GUI, Cocoa is of interest, and here most of the articles are limited to buttons and text fields. I will try to correct this misunderstanding and describe the work with Table View using an example of an application that displays a list of processes.
The article does not pretend to be complete and absolute correctness of the material and is focused primarily on novice developers. Errors and constructive criticism will be happy to hear in the comments. Who cares, welcome to cat.
Theory
For development, we need some knowledge of Table View. Let's start with them. A detailed description of working with Table View is given in [1], here I will limit myself to a brief summary of the main ideas.
Table View Types
There are two types of Table View:
- cell-based - each table cell is represented by a subclass of NSCell . In most cases, this is enough, but creates difficulties when developing tables with complex cells, because requires subclassing NSCell . In Mac OS X versions 10.6 and earlier, only this type of table existed.
- view-based - each cell is a separate view. This allows you to build complex tables even with support for animation without much difficulty. This type of table appeared only in Mac OS X 10.7.
In this article we will consider working with cell-based table view , since its functions are enough for us, the solution will be simpler and will work not only with new versions of OS X.
Data Transfer to Table View
Data can be transferred to Table View in two ways:
- Using the implementation of the protocols (interfaces) NSTableViewDelegate , NSTableViewDataSource , and then associate the Table View with a class that implements these protocols through Interface Builder. You need to bind Outlets dataSource and delegate . And in this class, in the simplest case, it is necessary to implement two methods:
- numberOfRowsInTableView: - returns the total number of rows in the table
- tableView: objectValueForTableColumn: row: - returns the element for the row passed in the row argument . The column number in this case is determined in various ways using the second argument to objectValueForTableColumn .
- Using a controller and bindings (Bindings). This technique is based on the Model-View-Controller (MVC) pattern [2] and Cocoa Bindings technology. There is probably no point in telling about MVC - everyone has heard about it, and whoever hasn’t heard can find it on the link in the Wiki. Cocoa Bindings will dwell in more detail.
Cocoa bindings
Cocoa Bindings has been introduced in Mac OS X since version 10.3. Its main goal is to reduce the amount of controller code for linking model objects (Model) and views (View).
Cocoa Bindings is based on two mechanisms:
- Key-Value Coding (KVC) - a mechanism for accessing the fields of an object by the names of these fields.
- Key-Value Observing (KVO) - a mechanism that allows one object to monitor changes in other objects.
More details about Cocoa Bindings can be found in [3].
On this with the theory finished, we can proceed to practice.
Practice
Open Xcode and create a new Cocoa Application project. Let's call it Process Monitor. I am using the latest version of Xcode (4.2.1) at the time of publication, so some steps may vary.
GUI creation
Open the MainMenu.xib file, select Window in it. Set the dimensions to 480 by 500 for it. This is done in Size Inspector (the ruler icon in the right sidebar). There we will set the minimum dimensions - the checkbox and the required sizes.
Add the Table View element from the Object Library (the cube icon in the lower right sidebar) to the window (search by the word "table"). By default, a cell-based table is created. You can verify this if you open the Attributes Inspector (in the right sidebar, to the left of the line). We resize the Table View so that it occupies the entire window. Then open the Size inspector and select all the elements in the Autosizing picture - it is necessary for the Table View to stretch along with the window.
Now we need to add the columns to the table. We will display three columns - the PID of the process, the icon and the name of the process. By default, two columns are added to the table. You need to change this number to 3. To do this, select the table (Table View) by clicking in the window. Here you need to make a small digression. The fact is that window objects are nested into each other and it is not easy to select the desired one. There are two options: either select the desired item in the hierarchy of objects in the Objects window (I think it appeared in Xcode 4, I have not seen it before), or Command + Control + Shift Click on the window with the selection of the desired object. After selecting the table, go to the Attributes Inspector and set the Columns value to 3.
Now assign the names to the columns. This is done by double-clicking on the column heading. The name of the first column is PID, the second is left blank, the third is Process Name.
We change the size of the columns of the table. To do this, select the column and set its size in the Size Inspector. For the first (PID): 60, for the second (Icon): 40, for the third (Process Name) - all the remaining space.
Replace the type of the second column of the table from text to image. To do this, find the Image Cell (search by “image”) in the Object Library and drag it to the second column.
After all these steps, you can click the Run button and see this window:
Adding a controller and bindings
Now add a controller that will interact with the table. The most suitable type of controller for the table is NSArrayController. We find it in the Object Library (search for "array") and drag it into the Objects list.
Set the binders for the table. To do this, select the Table View and go to the Bindings Inspector (the penultimate tab in the right sidebar). There, in the Table Content section, select Content and install Bind to: Array Controller with Controller Key: arrangedObjects.
Now we will use the KVC technique and indicate what data each column should display. To do this, we take turns selecting each column (Table Column) and in the Bindings Inspector we set the Value to Bind to: Array Controller with Controller Key: arrangedObjects. And for each column, Model Key Path values are, respectively: processIdentifier, icon, localizedName. Why such values are set will be described below.
So we connected the table with the controller. It remains to associate the controller with the data.
First of all, we will determine these very data. Open the AppDelegate.h file and define a contents property of type NSArray:
@property (retain) NSArray* contents;
In the file AppDelegate.m write:
@synthesize contents;
Now back to MainMenu.xib and tell the controller what data to use. Go to the Bindings Inspector and in the Controller Content section set the Content Array to Bind to: App Delegate, and Model Key Path: contents.
On this, the installation of binders is completed, we just have to fill in the contents array in AppDelegate with the necessary data.
Getting a list of running processes
There are several ways to get a list of all running processes. I’ll write about this in a separate article. Now let's look at the simplest and most obvious way - using Cocoa. He does not receive a complete list of processes, but let it not concern us so far.
Define the updateProcessList method in AppDelegate:
- (void)updateProcessList
{
    NSWorkspace* workspace = [NSWorkspace sharedWorkspace];
    self.contents = [NSArray arrayWithArray:[workspace runningApplications]];
}
Let's make this method the first in the class so that it can be called from other methods without a definition in the header file.
A little comment on the code. In the first line we get an object of class NSWorkspace . An object of this class exists in the program in a single copy, a kind of singleton, and is obtained by the sharedWorkspace method .
This object has a runningApplications method that returns a list of running applications in the array. Everything is simple. And we use this array as data for the controller.
Each element of this array represents an object of the NSRunningApplication class . This class has several properties, among which there is a processIdentifier, icon , localizedName . Remember we set them for table columns? So, thanks to KVC, these values from NSRunningApplication will be used during table display .
Now we add a call to the created method during the launch of the application. To do this, add the line:
[self updateProcessList];
to the applicationDidFinishLaunching method .
Application termination
In Mac OS X, it is accepted that an application does not have to terminate after the last window is closed. In our example, this does not make much sense, so add automatic completion. This is done very simply - by adding one method to AppDelegate.m:
- (BOOL)applicationShouldTerminateAfterLastWindowClosed:(NSApplication *)sender
{
    return YES;
}
Conclusion
Now our application is ready. If everything is done correctly, then after launch you can see something like this:
As an exercise, I suggest the reader to implement a periodic update of the list of processes. To do this, you can use the NSTimer class and the scheduledTimerWithTimeInterval method of this class [5].
So, in this article, we looked at the process of creating a simple application using Table View. Most of the actions were carried out in Interface Builder and did not require programming at all. Everything that could be simplified was simplified - window controllers ( NSWindowController ), view controllers ( NSViewController ), memory management and much more were not considered .
In the next article, I plan to consider a hierarchical list ( NSOutlineView ) to display a process tree. And, if there is enough code there, I’ll make a repository on github.
Thank you all for your attention!
References
- Table View Programming Guide (en)
- Model – view – controller pattern (en)
- Work the Bindings the Cocoa (ru)
- NSWorkspace Class Reference (en)
- NSTask Class Reference (en)
Upd. Gained karma and transferred to Mac OS X.