 January 5, 2012 at 10:07
Programming for the PlayStation 2: Controller Library - Part One
When I started writing this article, I realized that the chapters will go to the controller more:
This is the joystick itself, the second joystick, vibration and Multi-tap (a device for connecting 4 joysticks to one port) - I have it.
For the joystick itself, there are two libraries, each of which gives its own information.
I use 2 original Dual Shock 2 joysticks, however, I have two non-original joysticks (used to connect to a computer through a special device or through a multi-tap for four of us), which I will mention separately.
Each controller has a so-called terminal controller - this is the actual port through which you access the controller.
To control the controllers, there is a special library libpad, which provides data from buttons, changing the controller mode and vibration.
There is also a “regular” libmtap library. Both libraries can work with multitap.
The library supports the following controllers from PS1 and PS2:
Normal digital controller (without analogues): ID = 4 ;
Dual Shock 1 and Dual Shock 2: ID = 7 ;
NeGcon controller: ID = 2 ;
Normal analog stick: ID = 5 ;
Namco gun : ID = 6 ;
Jog controller and fishing controller (this, apparently, also includes the guitar):Specialist. Advanced ID .
About the rest I will replenish the information along the way.
Port and slot
The concepts of port and slot are two different things in PS2.
The port points to the main controllers - those for the first and second joystick on the PS2 itself.
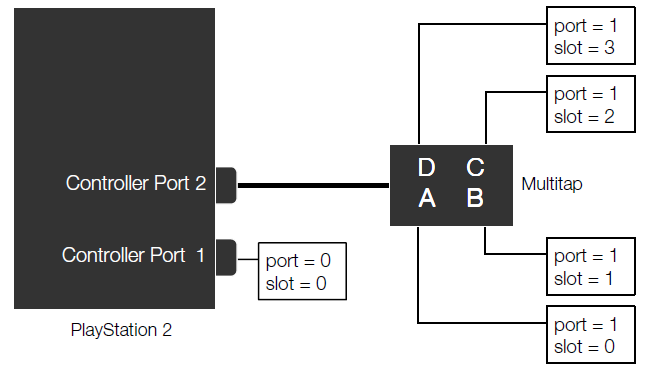
The slot is used, most of the time, when you have a MultiTap. Multi-tap is needed to connect multiple joysticks to one port (maximum - 4). Usually, in games this is displayed as Joystick 1A, Joystick 1B, etc.
If you do not have a multitap, then, in principle, you should not bother: port 0, slot 0 - the first joystick, port 1, slot 0 - the second joystick.
With a multitap it will be different: if, say, a multitap is inserted into the second port and a joystick is connected to it in slot A, then you need to access it using port 1, slot 0. You
can see this in detail in the image:
For the future I’ll say that work with memory cards also happens.
Joysticks
To use libpad, you need to connect the library “libpad.a” and the header file “libpad.h”.
To start, you should use the "sceSifLoadModule ()" function at application startup.
The “–lpad” parameter should be added to the makefile.
The main procedures for using controllers:
scePadInit () - initialization of the library. The parameter is 0.
scePadPortOpen () - open the controller port. Returns Its parameters are: port, slot, buffer to be used. Must be 64 bytes in size. Declared by the view:
static u_long128 pad_dma_buf[scePadDmaBufferMax] __attribute__((aligned (64)));Where scePadDmaBufferMax is a constant that you do not need to declare.
The int function returns, by which you can check that the joystick is inserted - if it is not there, then the parameter will be 0;
Further, the library begins to automatically communicate with the controller when the controller is turned on and open. Then there are two functions:
scePadRead () - used to read buttons.
The function has 3 parameters: port and slot and buffer for saving the result.
The buffer is an unsigned char buffer [32];
The function also returns the result. And if it is equal to zero, then reading is floppy.
Next, we just need to read the buffer, although in fact it is not easy.
scePadGetState () - using it, you can check whether the controller is in a calm state. Accepts port and slot parameters.
Returns the status of the controller. If the status is greater than and equal to zero, and also less than or equal to 7, then something happened.
To close the controllers, use the scePadPortClose () function, where the port and slot parameters, and after scePadEnd () turns off the library. Usually these two functions are not used.
I will add that all these functions are also used to read analogs only if the mode is on.
The most commonplace example would look like this:
main(){
    unsigned char rdata[32];
    u_long128 pad_dma_buff[scePadDmaBufferMax] __attribute__((aligned(64)));
    scePadInit();
    scePadPortOpen(0, 0, pad_dma_buff);
    while(1) {
        scePadRead(0,0,rdata);
        //ваш код
        }
    scePadPortClose(0,0);
    scePadEnd();
}
* This source code was highlighted with Source Code Highlighter.
Working with DualShock and Button Sensitivity
First you need to enable the analog mode with the scePadSetMainMode () function. Takes the parameters port, slot, 1 and 0. Returns the result in the form of 0 or 1, which means it is not turned on or turned on, respectively.
To verify that the controller is indeed DualShock, you need to call the scePadInfoPressMode () function. Takes port and slot parameters, returns the result in the form of 0 or 1.
The mode itself is activated by the scePadEnterPressMode () function. It takes parameters and returns just like the previous function.
Further, through the scePadRead () function in the buffer, we additionally receive one more byte in which the degree to which the buttons were pressed are displayed with values from 0 to 255. Where 0 is equal to the fact that the button is not pressed.
I’ll say, for a note, that my first joystick sometimes shows the very force of pressing up to 3.
By specification, the normal error of analog movement is plus or minus 25.
Using the scePadExitPressMode () function, you can exit the key sensitivity mode. It accepts a port and slot. You may need to switch to the menu.
If the user presses the analog button during the sensitive mode, he will switch to the normal digital mode without sensitivity. Pressing the analog button again will not switch the joystick back to sensitivity mode.
Vibration
Vibration in the joystick is quite simple and at the same time not.
You can connect a separate library for it, or you can use only two functions that are included in libpad.
I’ll tell you about another vibration library the next time, I’ll immediately tell you about two fairly simple functions, these are scePadSetActAlign () and scePadSetActDirect (), which accept a port, slot and 6 bytes about twisting.
In the first byte you indicate a strong motor or a weak motor.
In the second byte, the weak motor takes on the values 0 or 1, which means stop or torsion. A strong motor takes a value from 1 to 255 or 0 in the second byte, which means torsional force or stop.
The scePadSetActDirect () function returns true or false, indicating the completion of the vibration operation. The remaining bytes should preferably be filled with 0xff if you are not using them.
After that, the user’s joystick will receive 10 current units for vibration operation.
To increase the number of current units to 20, simply fill in the remaining values 0x00.
Important!
You need to know that each port is limited by the maximum number of current units equal to 60. If you try to give more than 60, then the port can be blocked until the console reboots (the internal limiter is triggered).
Thus, if I have multitap, and I will supply 20 units of current to the 1A, 1B and 1C joysticks, then I can not do this to the 1D joystick, otherwise I can block the port. Therefore, I do not advise you to use increased current supply.
Also add that these functions cannot be used for long vibrations.
Asynchronous functions
The following functions are asynchronous. They may not return you the result at the same time. In this case, you can get the result of their execution through the functions scePadGetState () or scePadGetReqState ().
scePadSetMainMode - switching input modes;
scePadSetActAlign - vibration function;
scePadEnterPressMode - entry into the button sensitivity mode;
scePadExitPressMode - exit button sensitivity mode.
Closer to the end
In general, in principle, the application will continue to work with the port and slot, even if the joystick is deleted (turned off). You can programmatically verify that the joystick is deleted using scePadGetState (), which will return scePadStateDisconnect.
Before each shot, it is advised to check the status of the controller, so that there is no situation when the joystick accidentally turns off.
Also, depending on the version of the DualShock or DualShock 2 controllers, the specification of analogs may change and you should not rely on the automatic calibration of the joystick. Therefore, most often it is necessary to make amendments to the fact that the analog did not stop at 127x127.
That's all. See you in the next, more detailed article on joysticks.
PS: Seeing the relevance of the topic, I wrote this article half a night and morning. If the SDK is ready for the next article, then instead of the joysticks there will be a description of the installation.
Update : The scePadInit () function is only needed in using the EE, which I am talking about. IOP initializes the library itself.









