Two-factor authentication on a home server - fast, cheap, friendly
Two-factor authentication - providing information from two different types of information authentication [ " ]
For example, it can be sequentially entered password and code that issues a token with a button. I think many of you have seen such devices, and someone even uses them regularly.

It is as if a second lock was put on the door. The key to the first is a regular password. To the second - a one-time code valid for 30 seconds. You can get out the door only if both keys are correct, and not one, as it was before.
For some time now, Google has made available two-factor authentication in its services. Now the token has moved to your Android mobile phone! iPhone and Blackberry also fit in that role. Very comfortably. Having tested it on Gmail, I wanted to do the same thing on my own, then suddenly I found libpam-google-authenticator.
At the very beginning, during initialization, a secret key is created, which will be recorded on the server, and which must be entered into the application on the phone. This is a one-time procedure, then they work on their own. Each time , a code valid for 30 seconds is calculated from the secret key and the current time using a special algorithm .
I emphasize that Google’s servers are not involved in authentication - just the algorithm and key formats are compatible with those used in Google’s services, which makes it possible to use ready-made mobile applications. For paranoid people - the sources are open, a link to them is at the end of the post :)
I have Debian testing (Wheezy), so everything is available “out of the box”:
This module has not yet been added to Debian stable (Sqeeze), but the package from testing is installed without problems.
It's time to get your phone. If it has Android, download Google Authenticator there . A QR code scanner, such as this , is also useful . If the smartphone is different, then you are here .
Each user on the server who plans to get there must first start the console tool, which is called that
And he immediately draws such a nice QR code that contains a secret key
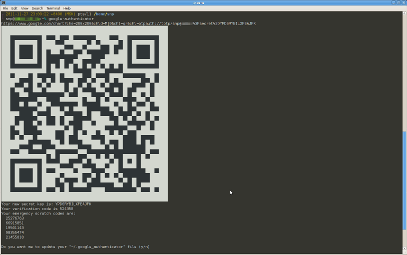
And also 5 backup codes just in case, suddenly something happens with the phone. And you don’t need to go to the URL that the tool also writes - only a more beautiful QR code is drawn there. You don’t want to show your secret code to Google? :) We
immediately scan the QR code from the application, then we answer questions.
- Save everything permanently in
- y
- Prohibit the use of one code several times? Helps to catch or prevent a man-in-the-middle attack.
- y
- Enlarge the time window from approximately 1.5 minutes to 4 minutes?
- n ( and here we immediately check whether the time in the phone
is accurate ) - Limit the number of login attempts for a period of time?
- y
if file
Until everything works, it’s best to leave the root shell open.
In / etc / ssh / sshd_config , enable challenge-response and restart ssh:
To manage authentication, create a file /etc/ssh/two-factor-skip.conf, for example this:
In /etc/pam.d/sshd we enter two lines:
It’s best to write them before
ssh to where you just set it all up. Enter the temporary code, then the password. Enjoy.
Due to the current features of OpenSSH, if we use the key, two-factor authentication does not work (PAM is not used). Unfortunately.
Other services using PAM can be improved in this way.
For example, it can be sequentially entered password and code that issues a token with a button. I think many of you have seen such devices, and someone even uses them regularly.
It is as if a second lock was put on the door. The key to the first is a regular password. To the second - a one-time code valid for 30 seconds. You can get out the door only if both keys are correct, and not one, as it was before.
For some time now, Google has made available two-factor authentication in its services. Now the token has moved to your Android mobile phone! iPhone and Blackberry also fit in that role. Very comfortably. Having tested it on Gmail, I wanted to do the same thing on my own, then suddenly I found libpam-google-authenticator.
At the very beginning, during initialization, a secret key is created, which will be recorded on the server, and which must be entered into the application on the phone. This is a one-time procedure, then they work on their own. Each time , a code valid for 30 seconds is calculated from the secret key and the current time using a special algorithm .
I emphasize that Google’s servers are not involved in authentication - just the algorithm and key formats are compatible with those used in Google’s services, which makes it possible to use ready-made mobile applications. For paranoid people - the sources are open, a link to them is at the end of the post :)
We set and prepare
I have Debian testing (Wheezy), so everything is available “out of the box”:
aptitude install libpam-google-authenticatorThis module has not yet been added to Debian stable (Sqeeze), but the package from testing is installed without problems.
It's time to get your phone. If it has Android, download Google Authenticator there . A QR code scanner, such as this , is also useful . If the smartphone is different, then you are here .
Each user on the server who plans to get there must first start the console tool, which is called that
google-authenticatorAnd he immediately draws such a nice QR code that contains a secret key

And also 5 backup codes just in case, suddenly something happens with the phone. And you don’t need to go to the URL that the tool also writes - only a more beautiful QR code is drawn there. You don’t want to show your secret code to Google? :) We
immediately scan the QR code from the application, then we answer questions.
- Save everything permanently in
~/.google_authenticator? - y
- Prohibit the use of one code several times? Helps to catch or prevent a man-in-the-middle attack.
- y
- Enlarge the time window from approximately 1.5 minutes to 4 minutes?
- n ( and here we immediately check whether the time in the phone
is accurate ) - Limit the number of login attempts for a period of time?
- y
if file
~/.google_authenticator (by the way, the path to it can be changed with the corresponding module option) is missing, then the user will not be allowed.Configure SSH and PAM
Until everything works, it’s best to leave the root shell open.
In / etc / ssh / sshd_config , enable challenge-response and restart ssh:
ChallengeResponseAuthentication yesTo manage authentication, create a file /etc/ssh/two-factor-skip.conf, for example this:
# В локальной сети ходим с одним паролем
+ : ALL : 192.168.1.0/24
# Этот юзер умеет вводить только пароль
+ : bezmobilki : ALL
# Всех остальных заставим вводить ещё и временный код
- : ALL : ALL
In /etc/pam.d/sshd we enter two lines:
auth [success=1 default=ignore] pam_access.so accessfile=/etc/ssh/two-factor-skip.conf
auth       required     pam_google_authenticator.so
It’s best to write them before
@include common-authCheck
ssh to where you just set it all up. Enter the temporary code, then the password. Enjoy.
Due to the current features of OpenSSH, if we use the key, two-factor authentication does not work (PAM is not used). Unfortunately.
What's next?
Other services using PAM can be improved in this way.