July 15, 2011 at 23:15
Unattended installation of Citrix XenServer
Recently, I also became the owner of the HP ProLiant MicroServer N36L server . The fact that Citrix XenServer will be installed on it was decided in advance, the more positive experience of installation on this server is taking place. The installation task was a bit complicated because I was on vacation. At home, except for beeches and a pair of mice, there is no more computer equipment. And for installation, I would like to have a keyboard that could be brought home from work, and a monitor. The problem with the monitor was solved simply, the VGA-connector was on the TV, at home there was a cable for it. I decided to try installing XenServer in automatic mode, watching the installation on TV. Since there is no optical drive on the server, we will install it from a flash drive.
First, download XenServer. If Linux virtual machines will be installed, then we download support for them. You will also need a set of Linux kernel loaders , a DHCP server installed on the local network; I have this function performed by the ZyXEL P-330W EE. Having installed Linux will help a lot. Well, a flash drive formatted by FAT32.
Let us return to the case when the answer file will be on a flash drive. After unpacking the distribution package, install.img will appear on our disk . We will need it, because our answer file must be placed inside this image. We will use the installed Ubuntu, well, or "any other" Linux'om. Unpacking and packing the image did with administrator privileges. To unpack install.img, execute:
First, download XenServer. If Linux virtual machines will be installed, then we download support for them. You will also need a set of Linux kernel loaders , a DHCP server installed on the local network; I have this function performed by the ZyXEL P-330W EE. Having installed Linux will help a lot. Well, a flash drive formatted by FAT32.
- Unpack Syslinux. At the command prompt, in the syslinux \ win32 folder
X: is the letter of your removable disk.syslinux.exe X:
This will make the flash drive bootable. - Unpack the downloaded XenServer to a USB flash drive, copy the files from the boot \ isolinux folder to the root.
- Unpack the support image for Linux guest systems XenServer-xxx-linux-cd. Copy the packages.linux folder to the USB flash drive.
- On the flash drive, rename isolinux.cfg to syslinux.cfg , isolinux.bin to syslinux.bin .
- Now we need to create an answer file. Here we have a couple of options. Either the file will be downloaded from somewhere on the network, or it will be located on a flash drive. For the first case, you can use a Web server on the local network. I have Ubuntu on a beech on my virtual machine, in it I raised Apache. The file will be called xenserver.xml . The URL at which it will be downloaded http://192.168.1.60/xenserver.xml .
Inside the file there will be the following lines: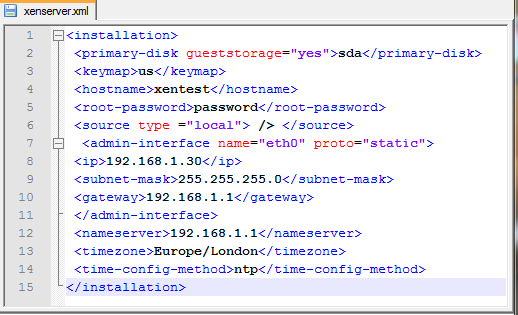
The file itself lies here . About creating an answer file, see here. It is rumored that there are more parameters that can be specified in the answer file than indicated in the basic documentation. The main thing for me was that after installation I could get through the network to the installed XenServer and log in to it. - Now we need to indicate that the installer knows that we are installing using the answer file and where to get it. To do this, make a small change to the syslinux.cfg file .
Let's edit it so that the following lines:
LABEL install
KERNEL mboot.c32
APPEND /boot/xen.gz dom0_mem = 752M com1 = 115200,8n1 console = com1, vga - / boot / vmlinuz xencons = hvc console = hvc0 console = tty0 - / install .img
looked like this:
LABEL install
KERNEL mboot.c32
APPEND /boot/xen.gz dom0_mem = 752M com1 = 115200,8n1 console = com1, vga - / boot / vmlinuz xencons = hvc console = hvc0 console = tty0 answerfile = http: / /192.168.1.60/xenserver.xml install - /install.img - If we try to boot from the flash drive now, the system will curse mboot.c32: not a COM32R image . Therefore, from the syslinux \ com32 \ mboot folder (see section 1), we copy the mboot.c32 file with replacement.
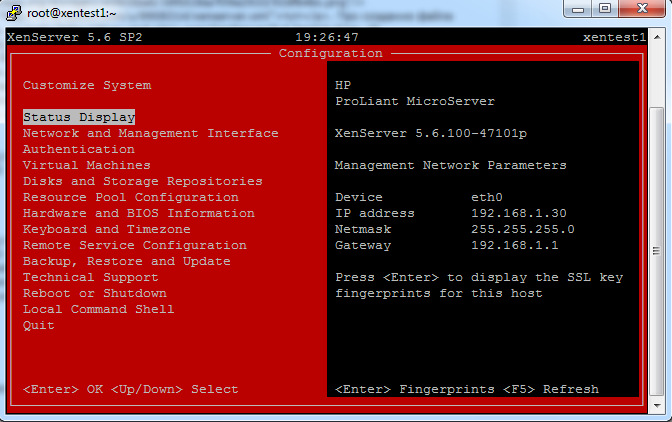
- Now everything is ready for installation, insert the flash drive into the server, wait for the installation to finish, and try to access it, for example, using Putty via SSH, specifying the IP address from the answer file, entering root and the password from the same file. By typing the xsconsole command, we perform the setup, change the password, etc.
Let us return to the case when the answer file will be on a flash drive. After unpacking the distribution package, install.img will appear on our disk . We will need it, because our answer file must be placed inside this image. We will use the installed Ubuntu, well, or "any other" Linux'om. Unpacking and packing the image did with administrator privileges. To unpack install.img, execute:
gunzip -c ./install.img | cpio -ifind . | cpio -o -H newc | gzip > ./install.img