We analyze the protocol of the kettle Redmond G200S and connect it to HomeAssistant
Introduction
On Giktayms already was an article dedicated to the analysis of the protocol kettle Redmond SkyKettle. However, there it was about the model RK-M171S, here it will be a question of a more functional G200S. In this model, the interaction protocol has changed, because of which the approach of the author of the previous article no longer works, and additional functions of the nightlight and the indication of the current temperature in color have appeared.
In this article I will give the results of the analysis of the protocol with examples of code in python (if anyone wants to develop their own module / application to manage the kettle). Also at the end of the article is a link to a ready-made module for connecting a teapot to HomeAssistant (this is my first experience of writing in python after completing an online course, so this module can and even needs to be improved).
Anyone interested is welcome under cat.
Problems and tasks
This kettle has one huge minus (except for those indicated by the author of the first article): as soon as you remove the kettle from the stand, the current time is reset and, as a result, the inability to use the schedule for boiling the kettle. According to the ideas of the authors of this creation, each time after returning the teapot to the stand, you should launch their corporate application and synchronize the teapot with the smartphone. So instead of facilitating routine tasks, the “smart” technique teaches us to perform additional actions. But that all changed when HomeAssistant appeared in the house. Then I decided to understand the protocol.
Instruments
I honestly tried to decompile and disassemble the original application, but it was a fiasco. Those tools that I used did not allow me to understand the logic of the kettle. All procedures and functions were obtained by “curves”, anonymous (by type a, b, c, etc.). Perhaps I do not have enough experience and skill. In the end, I went the same way as the author of the previous article. The only significant difference is that I used the gatttool utility interactive mode. The advantage is that this mode excludes all kinds of “races” about which the author of the first article wrote.
Since HomeAssistant is written in python, we will write all further commands on it. To use the gatttool interactive mode on python, the pexpect library will help us, which allows us to generate entities of third-party applications and monitor their output (it has turned down famously).
Practice
About the general description of the exchange protocol, I will send again to the author of the first article, therefore, without long preludes, let's proceed to the management teams.
- Establish and break a connection
Establish a connection:child = pexpect.spawn("gatttool -I -t random -b " + mac, ignore_sighup=False) child.expect(r'\[LE\]>', timeout=3) child.sendline("connect") child.expect(r'Connection successful.*\[LE\]>', timeout=3)
Here mac is the poppy address of the teapot.
Break the connection:child.sendline("exit") - Subscribing to notifications
After the connection is established, first of all we need to subscribe to receive notifications from the kettle. Without this, the teapot will accept commands, but will not be able to answer anything to us except the text “Successfully.child.sendline("char-write-cmd 0x000c 0100") child.expect(r'\[LE\]>') - Authorization
child.sendline("char-write-req 0x000e 55" + iter + "ff" + key + "aa")
child.expect("value: ")
child.expect("\r\n")
connectedStr = child.before[0:].decode("utf-8")
answer = connectedStr.split()[3] # parse: 00 - no   01 - yes
child.expect(r'\[LE\]>')
Hereafter, iter is an integer iterative hex variable from 0 to 64 (from 0 to 100 in the decimal system). After each command (both successful and unsuccessful), this variable should be increased by 1; when it reaches 64, it is reset to 0; key - hex 8 bytes authorization key (for example: ffffffffffffffffff).
Sample answer:value: 55 00 ff 01 aa
The fourth byte (01) means that the kettle has authorized you, otherwise the answer will be 00. - A bit of street magic.
After logging in, a “magic” request is always sent, the essence of which is not clear to me. There is a theory that it is needed to “hold” the connected state. Supposedly, if you do not send it, the connection is broken within a second, and you need to start all over again. If you send it, the timeout increases significantly, reaching about ten seconds. Reliably confirm this, I could not.child.sendline("char-write-req 0x000e 55" + iter + "01aa") child.expect("value: ") child.expect("\r\n") child.expect(r'\[LE\]>')
Sample answer:value: 55 01 01 02 1d aa
In all my experiments, the answer was invariably the same.
UPD: in the comments suggested that no this is not magic, but simply a request for the software version, the answer, respectively, is this version that is contained. Thus, this request can be removed altogether as superfluous. - Synchronization A
command that synchronizes the time in the teapot with the server clock. She has another effect. In the kettle, you can display the current temperature in idle mode by flashing a certain color LED. This feature only works after syncing. See paragraph 11 for a description of the function itself.child.sendline("char-write-req 0x000e 55" + iter + "6e" + timeNow + tmz + "0000aa") child.expect("value: ") child.expect("\r\n") child.expect(r'\[LE\]>')
Here tmz is the time zone in the inverse hex format (for example, we translate the +3 time zone into seconds, then into hex format and get hex (3 * 60 * 60) = 2a30, divide by pairs and output in reverse order 302a). I don’t know how to deal with negative time zones, I didn’t test it, but there is a suspicion that the next tmz byte is responsible for this. Here timeNow is the current unixtime in reverse hex format. The algorithm is the same: we get the current time in seconds, translate it into HEX, divide it in pairs and print it in a line in the reverse order.
Sample answer:value: 55 02 6e 00 aa
In all my experiments, the answer was invariably the same. - Statistics
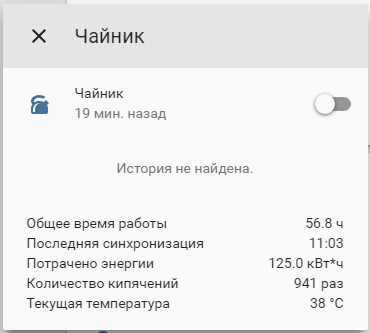
The kettle has a meter of electricity consumed, total running time and number of starts. If someone does not need this data, you can safely skip this item.child.sendline("char-write-req 0x000e 55" + iter + "4700aa") child.expect("value: ") child.expect("\r\n") statusStr = child.before[0:].decode("utf-8") Watts = hexToDec(str(statusStr.split()[11] + statusStr.split()[10] + statusStr.split()[9])) alltime = round(self._Watts/2200, 1) child.expect(r'\[LE\]>') child.sendline("char-write-req 0x000e 55" + iter + "5000aa") child.expect("value: ") child.expect("\r\n") statusStr = child.before[0:].decode("utf-8") times = hexToDec(str(statusStr.split()[7] + statusStr.split()[6])) child.expect(r'\[LE\]>')
Watts - returns the expended energy in Wh, alltime is the time of the kettle's operation in hours, times is the number of starts of the kettle. hexToDec is a conversion function in decimal format. - Read the current mode of operation
child.sendline("char-write-req 0x000e 55" + iter + "06aa")
child.expect("value: ")
child.expect("\r\n")
statusStr = child.before[0:].decode("utf-8")
answer = statusStr.split()
status = str(answer[11])
temp = hexToDec(str(answer[8]))
mode = str(answer[3])
Sample answer:value: 55 04 06 00 00 00 00 01 2a 1e 00 00 00 00 00 00 80 80 00 aa
The fourth byte is the mode of operation (mode): 00 - boiling, 01 - heating to temperature, 03 - night light. The sixth byte is the hex temperature to which it is necessary to heat up in the “heating” operating mode, 00 in the boiling mode. The ninth byte is the hex current water temperature (2a = 42 Celsius). The twelfth byte is the state of the teapot: 00 is off, 02 is on. The seventeenth byte is the duration of the kettle operation after reaching the desired temperature, the default is 80 in hex (apparently, these are some relative units, not exactly seconds). - Record current operation mode
child.sendline("char-write-req 0x000e 55" + iter + "05" + mode + "00" + temp + "00000000000000000000" + howMuchBoil + "0000aa")
child.expect("value: ")
child.expect("\r\n")
statusStr = child.before[0:].decode("utf-8")
answer = statusStr.split()[3]
child.expect(r'\[LE\]>')
Parameter mode: 00 - boiling, 01 - heating to temperature, 03 - night light. The temp parameter is the hex temperature to which it is necessary to heat up in the heating mode, it is equal to 00 in the boiling mode. The howMuchBoil parameter is the duration of the kettle operation after reaching the desired temperature, the default is 80 in hex (apparently, some relative units) just not seconds).
Sample answer:value: 55 05 05 01 aa
The fourth byte of the response indicates the success of the settings: 01 - successful, 00 - not successful. - Run current mode
child.sendline("char-write-req 0x000e 55" + iter + "03aa")
child.expect("value: ")
child.expect("\r\n")
statusStr = self.child.before[0:].decode("utf-8")
answer = statusStr.split()[3]
child.expect(r'\[LE\]>')
Sample answer:value: 55 06 03 01 aa
The fourth byte of the response indicates the success of the inclusion: 01 - successful, 00 - not successful. - Stop the current mode of operation
child.sendline("char-write-req 0x000e 55" + iter + "04aa")
child.expect("value: ")
child.expect("\r\n")
statusStr = self.child.before[0:].decode("utf-8")
answer = statusStr.split()[3]
child.expect(r'\[LE\]>')
Sample answer:value: 55 07 04 01 aa
The fourth byte of the response indicates the success of the shutdown: 01 - successfully, 00 - unsuccessful. - Displays the current temperature in idle color
child.sendline("char-write-req 0x000e 55" + iter + "37c8c8" + onoff + "aa") # 00 - off, 01 - on
child.expect("value: ")
child.expect("\r\n")
child.expect(r'\[LE\]>')
The onoff parameter is either 01 - enable the function or 00 - disable the function.
Sample answer:value: 55 08 37 00 aa
In all my experiments, the answer was invariably the same. - Record the color palette of various operating modes
Sets the matching palette between the LED color and the temperature in the current temperature display mode and heating and boiling modes, as well as the color palette in the nightlight mode.child.sendline("char-write-req 0x000e 55" + iter + "32" + boilOrLight + scale_from + rand + rgb1 + scale_mid + rand + rgb_mid + scale_to + rand + rgb2 + "aa") child.expect("value: ") child.expect("\r\n") child.expect(r'\[LE\]>')
The boilOrLight parameter is 00 if we set the current temperature display mode or 01 if we set the nightlight mode. The scale_from parameter indicates the beginning of the color change range and is equal to 00 in the nightlight mode and 28 in the current temperature display mode (28 is 40 in decimal format and it is from this temperature that a smooth color change will begin). The scale_mid parameter is the middle of the range and is equal to 32 in the nightlight mode and 46 in the current temperature display mode. The scale_to parameter indicates the end of the color change range and is equal to 64 in both modes. The rgb1 parameter is the hex color of the start of the palette. The rgb_mid parameter is the hex color of the middle of the palette (I calculate it as the midpoint between the left and right end, but theoretically you can set any color, this only affects the beautiful and smooth color change). The rgb2 parameter is the hex color of the end of the palette.
Sample answer:value: 55 09 32 00 aa
In all my experiments, the answer was invariably the same. - Read the color palette of different modes of operation
child.sendline("char-write-req 0x000e 55" + iter + "33" + boilOrLight + "aa")
child.expect("value: ")
child.expect("\r\n")
statusStr = self.child.before[0:].decode("utf-8")
child.expect(r'\[LE\]>')
The boilOrLight parameter can be 00 - if we set the current temperature display mode or 01 - if we set the nightlight mode.
Sample answer:value: 55 10 33 01 00 7f 00 00 ff 32 7f 00 ff 00 64 7f ff 00 00 aa
Here, the sixth, eleventh and sixteenth bytes (7f) is the rand parameter from clause 12. The fifth byte is scale_from, the tenth byte is scale_mid, the fifteenth byte is scale_to. The seventh + eighth + ninth bytes is rgb_from. The twelfth + thirteenth + fourteenth bytes is rgb_mid. The seventeenth + eighteenth + nineteenth bytes is rgb_to.
Conclusion
As promised at the end of the article I provide a link to the module for connecting to HomeAssistant.
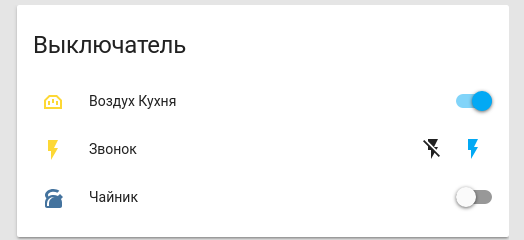
This is what the teapot looks like in the HomeAssistant interface:
To connect this module, you must copy it to the “config_folder_homeassistant / custom_components / switch /” directory, and add the following lines to the configuration:
switch:
  - platform: R4S_G200S
    mac: 'FF:FF:FF:FF:FF:FF' # insert your mac
    key: 'ffffffffffffffff' # generate your own 8 byte key
    scan_interval: 90
    device: hci0 # your bluetooth device
After that, you need to put the kettle in pairing mode and restart the homeassistant service.
Meanwhile, there are unresolved issues:
- These are not all possible commands for controlling a teapot, in the dump I have seen a bunch of unidentified read / write commands, but I don’t need them. For all the main / visible functions of these commands is more than enough. Perhaps someone will be able to beautifully disassemble the branded application and prompt all possible commands, or at least put somewhere readable source code - I will be glad.
- There are some problems and ambiguities in the current commands (magic package, negative time zones, parameter rand in the management of colors, etc.). They need to be dealt with in an amicable way.
- The kettle module for HomeAssistant is trimmed in functions (it can display statistics, as well as switch on / off in boiling mode and use the temperature display mode in idle and heating mode), since the switch module was used as a writing template. In an amicable way, it is more correct to write your ReadyForSky component, and then write your UI for this component, taking into account all modes of operation and giving you the ability to control all the functions of the kettle. If you have experience in writing your own components for HomeAssistant and a desire to help, then I ask in person - I will be glad to help / assist.
UPD : Corrected the version of the module
UPD2 : Corrected the version of the module.
Added a search for devices before connecting, because gatttool does not want to connect to unknown devices. To work correctly, you must perform:
sudo setcap cap_net_raw+ep /usr/bin/hcitool
sudo setcap cap_net_raw+ep /bin/hciconfig
This is necessary in order for the detection to work without root rights. The alternative is to put the root password in the module parameters, which is more undesirable than the commands listed above. Also, the device parameter was added to the config.
UPD3 : Rethinking Module.
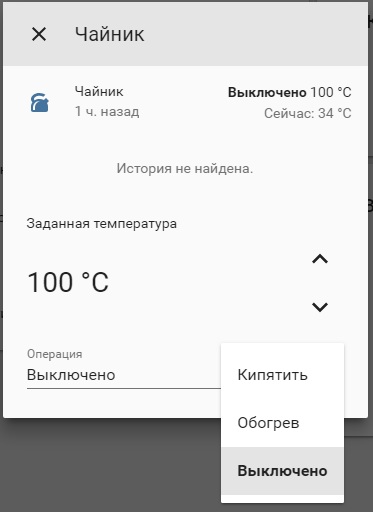
The new version is based on the Climate platform. Now you can set the temperature to which it is necessary to heat the kettle (limits from 40 to 100 degrees). You can also turn on the temperature maintenance mode.
This module now looks like this:
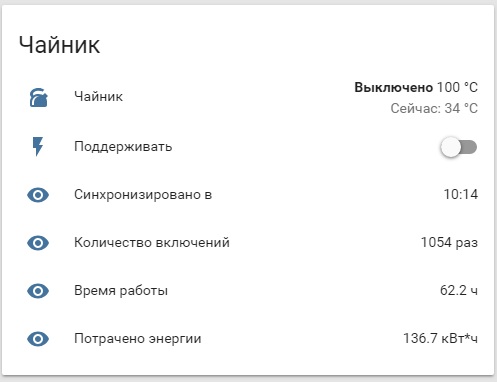
Who cares, download the new version via the link . Place the file in the 'custom_components / climate /' directory inside the HA configuration directory. To make everything look like in the picture, you need to make the following changes to the configuration.yaml configuration file:
climate:
  - platform: R4S_G200S_T
    device: 'hci0' # hardware bluetooth device
    mac: 'FF:FF:FF:FF:FF:FF' # your kettle mac
    key: 'bbbbbbbbbbbbbbbb' # 8 byte password
    scan_interval: 90
switch:
  - platform: template
    switches:
      kettle_hold:
        value_template: "{{ states.climate.g200s.attributes.hold }}"
        turn_on:
          service: climate.set_hold_mode
          data:
            entity_id: climate.g200s
            hold_mode: hold_on
        turn_off:
          service: climate.set_hold_mode
          data:
            entity_id: climate.g200s
            hold_mode: hold_off
sensor:
  - platform: template
    sensors:
      kettler_sync_time:
        friendly_name: Синхронизировано в
        value_template: "{{ states.climate.g200s.attributes.sync_time }}"
      kettler_times:
        friendly_name: Количество включений
        value_template: "{{ states.climate.g200s.attributes.times }}"
      kettler_alltime:
        friendly_name: Время работы
        value_template: "{{ states.climate.g200s.attributes.alltime }}"
      kettler_energy:
        friendly_name: Потрачено энергии
        value_template: "{{ states.climate.g200s.attributes.energy }}"
It is also necessary to group these elements in the correct order. I have a groups.yaml file for a teapot that looks like this:
  kettler:
    name: Чайник
    control: hidden
    entities:
       - climate.g200s
       - switch.kettle_hold
       - sensor.kettler_sync_time
       - sensor.kettler_times
       - sensor.kettler_alltime
       - sensor.kettler_energy
In the “Boiling” mode of operation, the target temperature is automatically set to 100 degrees and the support mode is turned off even if it was turned on (the boiling water support mode is not supported).
The “Heating” mode heats the water to the set temperature. If this will be set to "maintain", then the water will always be maintained at a given level.
The "Off" mode stops the operation of the kettle.
The parameter "set temperature" varies from 40 to 100 degrees in increments of 5 degrees (you can change in the code, if necessary). At the same time, if any value is set, the heating or boiling mode is started depending on the selected temperature with an eye to the “Maintain” mode.
UPD4: Due to changes in HomeAssistant from version 0.88, we had to modify the module.
For newer versions, the module is available via the link climate