Dive into 3D with the Marmalade SDK
Greetings, brothers in the workshop, as well as readers who are just interested in mobile platforms and 3D graphics. In a previous post (as well as in the May issue of Hacker magazine), I already wrote about how to get started with AirplaySDK ( for some time now)it is now called Marmalade) - a toolkit that allows you to create a mobile application in C ++ once and subsequently compile it on many platforms: iOS, Android, Windows Mobile, Bada, Symbian, etc. HelloWorld application is already something, but we don’t like to rest on our laurels, and therefore in this article we will talk about creating a small 3D application. The described SDK has good documentation, and therefore I will limit myself to just a small example of creating a 3D model, uploading it to our mobile application and changing the camera angle to view the scene. Well, let's get started?
So, for starters, create a regular box in Maya and paint it blue.
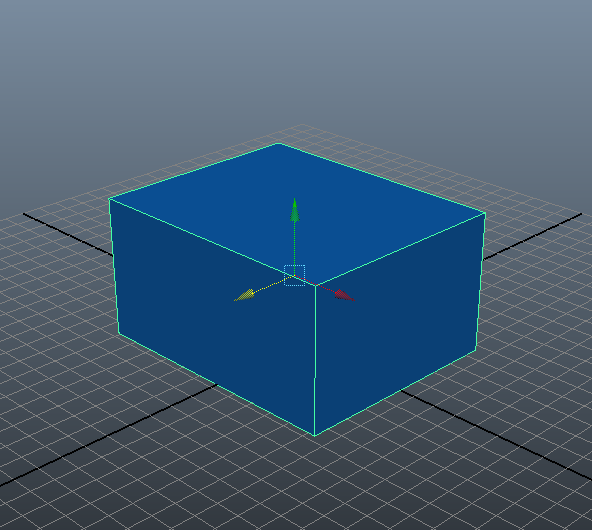
With your permission, I will not overload the article with the manual on creating boxes in Maya, since this is not the main topic of our conversation today, and I am far from being an expert on working in Maya.
So, the box is created. Now we need to install the plugin to export the model to a special format for the Marmalade SDK. To do this, perform the following file copy operations:
/Tools/Exporters/Maya/ASMaya212Exporter.mll -> / bin / plug-ins
/Tools/Exporters/Maya/ASExpUI.dll -> / bin / plug-ins
/Tools/Exporters/Maya/exporter.txt -> / bin / plug-ins
/Tools/Exporters/Maya/metabase.txt -> / bin / plug-ins
/s3e/bin/libeay32.dll -> / bin
where
Now open Maya and in the Windows menu > Settings / Preferences> Plug-in Manager , check the loaded and auto load checkboxes opposite ASMaya212Exporter.mll .
The plugin is installed. We open our project with the created box and in the MEL console we enter the ASMayaExporter command .
At the command of ASMayaExporter , you will see a window for exporting the model.
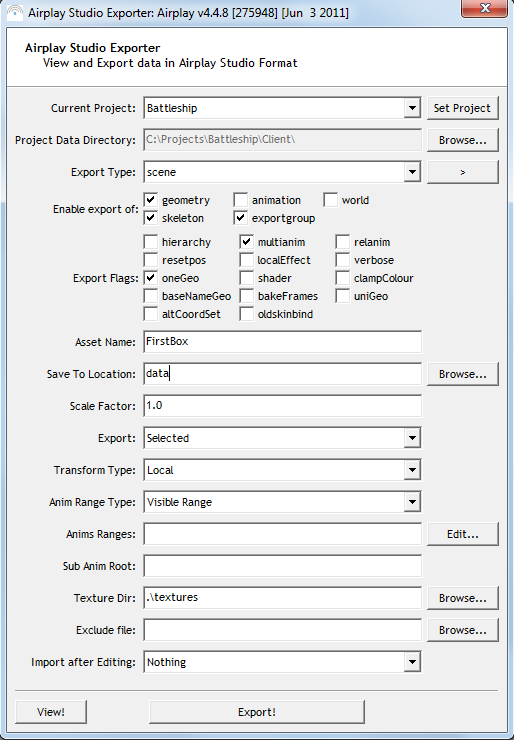
First, set the Project Data Directory parameter to the data directory of your project. In the last post, we sorted out what this directory is and what it is eaten with. Our 3D model will be saved in it. Also required is the Asset name field , where you must specify the name of your model. Let's call it FirstBox , it will be more convenient.
Now about the optional, but no less important parameters. The words geometry , skeleton , animation speak for themselves, but the oneGeo parameterI have already tested on my own skin. If your model will consist of several components, be sure to check this box to get a single GEO file for your model, and not dozens for each of the model primitives.
Now click the Export button and our model appears in the data directory .
Again, in my last article, I wrote about how to create a project for working with the SDK. Therefore, I will not describe the whole process in a new way.
First, I’ll give the source of a single file with the main function main () :
The code is quite simple even for an inexperienced programmer. But I will explain some points.
After exporting the model, the FirstBox.group file appears in the data folder . We load it in the line:
After loading the resource file, we directly load the model created in Maya:
You should also pay special attention to the function IwGxSetPerspMul (...) . This is a kind of setting the degree of the fisheye effect. If you leave this parameter as default, then your scenes along the edges of the screen will give the impression of viewing the bottom of the bottle through thetoilet hole .
The view object is a view of the scene. Its field t with parameters x , y and zsets the position of the camera in space. The LookAt method determines the direction of the gaze: the first parameter is the position (from) set in the previous three lines, the second is the point in the space to which the gaze should be directed to, and the third parameter is the upward direction (i.e., if we, for example, if you set CIwVec3 :: g_AxisY instead of -CIwVec3 :: g_AxisY , then you would look at the scenes “upside down”).
modelMatrix defines the model transformation matrix. Having cast such a boring term out of my head, I’ll explain it more simply: with the help of this object we set such parameters as model rotation and position in space.
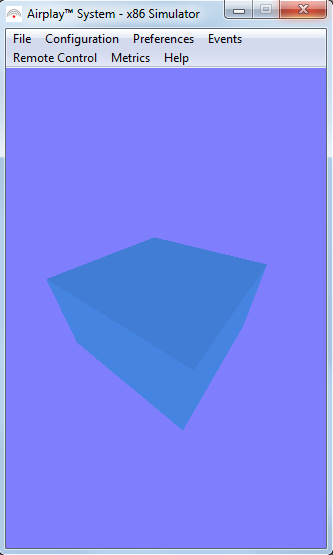
Well, of course, it's worth posting a screenshot of the resulting scene:
Of course, I did not set the goal in this article to tell you about all the possibilities of working with 3D in the Marmalade SDK. The scene is very primitive, but you can learn the rest either from the documentation for the toolkit, or if readers show interest in the topic, I will write more articles on this topic. So I hope for your feedback and for the fact that there will be reasons to write a sequel to my articles.
UPD. For some time now, the Airplay SDK has been renamed the Marmalade SDK.
Preparation for work
So, for starters, create a regular box in Maya and paint it blue.
With your permission, I will not overload the article with the manual on creating boxes in Maya, since this is not the main topic of our conversation today, and I am far from being an expert on working in Maya.
So, the box is created. Now we need to install the plugin to export the model to a special format for the Marmalade SDK. To do this, perform the following file copy operations:
where
Now open Maya and in the Windows menu > Settings / Preferences> Plug-in Manager , check the loaded and auto load checkboxes opposite ASMaya212Exporter.mll .
The plugin is installed. We open our project with the created box and in the MEL console we enter the ASMayaExporter command .
Export Model
At the command of ASMayaExporter , you will see a window for exporting the model.
First, set the Project Data Directory parameter to the data directory of your project. In the last post, we sorted out what this directory is and what it is eaten with. Our 3D model will be saved in it. Also required is the Asset name field , where you must specify the name of your model. Let's call it FirstBox , it will be more convenient.
Now about the optional, but no less important parameters. The words geometry , skeleton , animation speak for themselves, but the oneGeo parameterI have already tested on my own skin. If your model will consist of several components, be sure to check this box to get a single GEO file for your model, and not dozens for each of the model primitives.
Now click the Export button and our model appears in the data directory .
Writing a code
Again, in my last article, I wrote about how to create a project for working with the SDK. Therefore, I will not describe the whole process in a new way.
First, I’ll give the source of a single file with the main function main () :
#include "IwGx.h"
#include "IwGraphics.h"
#include "IwResManager.h"
int main()
{
	IwGxInit();
	IwGraphicsInit();
	IwGetResManager()->LoadGroup("FirstBox.group");
	CIwModel* pModel = (CIwModel*)IwGetResManager()->GetResNamed("FirstBox", "CIwModel");
	IwGxSetLightType(1, IW_GX_LIGHT_DIFFUSE);
	CIwSVec3 dd(0xFF, 0xFF, 0xFF);
	IwGxSetLightDirn(1, &dd);
	IwGxSetPerspMul(0xAF);
	while( !s3eDeviceCheckQuitRequest() )
	{
		IwGxClear( IW_GX_COLOUR_BUFFER_F | IW_GX_DEPTH_BUFFER_F );
		IwGxLightingOn();
		CIwMat view = CIwMat::g_Identity;
		view.t.z = -80;
		view.t.y = 80;
		view.t.x = -60;
		view.LookAt(view.GetTrans(), CIwVec3(0, 0, 0), -CIwVec3::g_AxisY);
		IwGxSetViewMatrix(&view);
		CIwMat modelMatrix = CIwMat::g_Identity;
		IwGxSetModelMatrix(&modelMatrix);
		pModel->Render();
		IwGxFlush();
		IwGxSwapBuffers();
		s3eDeviceYield(0);
	}
	IwGraphicsTerminate();
	IwGxTerminate();
	return 0;
}
The code is quite simple even for an inexperienced programmer. But I will explain some points.
After exporting the model, the FirstBox.group file appears in the data folder . We load it in the line:
IwGetResManager()->LoadGroup("FirstBox.group");After loading the resource file, we directly load the model created in Maya:
CIwModel* pModel = (CIwModel*)IwGetResManager()->GetResNamed("FirstBox", "CIwModel");You should also pay special attention to the function IwGxSetPerspMul (...) . This is a kind of setting the degree of the fisheye effect. If you leave this parameter as default, then your scenes along the edges of the screen will give the impression of viewing the bottom of the bottle through the
The view object is a view of the scene. Its field t with parameters x , y and zsets the position of the camera in space. The LookAt method determines the direction of the gaze: the first parameter is the position (from) set in the previous three lines, the second is the point in the space to which the gaze should be directed to, and the third parameter is the upward direction (i.e., if we, for example, if you set CIwVec3 :: g_AxisY instead of -CIwVec3 :: g_AxisY , then you would look at the scenes “upside down”).
modelMatrix defines the model transformation matrix. Having cast such a boring term out of my head, I’ll explain it more simply: with the help of this object we set such parameters as model rotation and position in space.
Well, of course, it's worth posting a screenshot of the resulting scene:
Conclusion
Of course, I did not set the goal in this article to tell you about all the possibilities of working with 3D in the Marmalade SDK. The scene is very primitive, but you can learn the rest either from the documentation for the toolkit, or if readers show interest in the topic, I will write more articles on this topic. So I hope for your feedback and for the fact that there will be reasons to write a sequel to my articles.
UPD. For some time now, the Airplay SDK has been renamed the Marmalade SDK.