Automatically add files to the WiX installer
Good afternoon, colleagues. In my article I want to highlight the problem that a developer who wants to write his installer using WiX technology may encounter.
I think that many programmers have faced the task of writing an installer for their software product. So the same fate befell me. It was decided to use WiX. It was necessary to make an automatic assembly of the installer on the build server. The projects from which the files are taken for installation can change, and therefore it is impossible to strictly specify the list of files that need to be added to the installer.
Our project is written under MS Visual Studio 2010. For those who do not write their project on it, but use it only to write the installer, this article will also be interesting, since in this case it does not matter what development environment you work under.
WiX comes with heat.exe utility, which serves as a tool for automatically collecting files from folders or projects (there are several other options). A console application, with the commands of which you can find here.
During the initial study of the issue, the option of automatically collecting files from the project output folders seemed to be the best and most convenient option. To do this, you just need to add a link to the project, from which you need to pick up output and make small changes to the project file (an advantage for those who develop on VS). But in the process of studying this possibility, it turned out that the heat.exe utility does not collect anything from output except the * .exe project file and configuration files. A long search for the causes of this problem has led to the fact that, as it turned out, such an error has already been known since March 2010, but it has not yet been resolved.
So the most convenient option has disappeared, but the task has remained the same - you need to add files automatically, the process of studying other solutions has begun. Looking ahead, I can say that, of course, a solution was found!
The heat.exe utility has the ability to add files not only from projects, as mentioned above, but also the ability to collect them from a folder that you can specify to it. I began to research this option. It turned out that heat.exe is already adding all the files from the folder, and not like from the project, only selective ones. It was already a small victory. But there is no silver lining.
When you run the heat.exe utility, you can specify what types of files you want to collect from the folder. I was interested in 2 categories - “Binaries” and “Content”. The first category is responsible for * .dll and * .exe files, and the second is for configuration files. In practice, it turned out that the utility doesn’t care if I pass these parameters or not. She, as if nothing had happened, continued to collect everything that is in the folder. This option could not suit me.
Let's digress a little from the utility itself and talk about what in the end I wanted to get. I need to get a file that will contain a description of the files in the desired format. A file is an xml document that stores the identifier of files and their paths. The identifier is a GUID. Not using an automated tool and stuffing such a file with your hands is not a pleasant task.
The heat.exe utility just generates such a file. But in my case, any garbage gets into it. However, since this is an xml document, I can apply the XSLT transform to it. It is enough to remove the description of unnecessary files from the resulting file. And to my joy, heat.exe can accept such a file as a parameter.
As a result, I wrote a file with transformations and transferred to the input heat.exe. And now I am already the proud owner of the file I need. It remains only to write the correct start line heat.exe in the Pre-Build Event of the installer project and add the generated file to the project. The fruits of long labor were successful and the desired goal was achieved. The installer builds automatically without the intervention of a living organism.
All the same, we are not reading this article for the sake of the author’s red words, but we want to understand how to turn this entire set of letters into a working project.
Create a new installer project and call it “AutoAddingFilesInstaller”. Add a new file to our project, which we will call “Output”. Fig. 1.
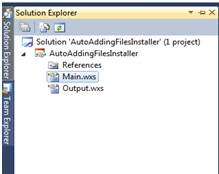
Figure 1 The contents of the project file
In this file we will add a description of the file groups. In my project, I divided the files into 2 groups, the same ones that heat.exe uses:
What will our file look like? Let's look at him.
What is there what? I created 2 directories (“BinariesDir”, “ContentDir”), which are located in the folder where the program is installed - “INSTALLLOCATION”. Thus, I created 2 links to which directories with files will be added to the project.
Next, we need to create a group of components that will include all the file types we select. Let's call it “OutputGroup”. It stores a link to our created directories. Thus, we say that we want to collect information from them.
Now create the file “OutputFiles”, in which the list of our files will be stored. This file will be automatically filled by heat.exe utility. For now, we will make this file almost empty. Add only links to our created folders there. This is how it should look:
Now we need to add a description of our group “OutputGroup” to “Ficha”, so that the installer knows that you need to add it to yourself. To do this, go to the "Main" file and find the "Feature" tag in it. In it we put a record of our group. As a result, it looks like this:
After making sure that everything is written correctly (perhaps even copy-paste'no), we try to assemble our project. Everything should go without errors.
All the infrastructure we have successfully created. Now we pass directly to the heat.exe utility. We’ll go into the properties of our project and go to the “Build Events” tab. On this tab there will be a window "Pre-build Event Command Line". Since we need information about our files to get to the project build, we will add a utility call to this window.
We begin to form a call line. First add "% WIX% \ bin \ heat.exe" . Thus, we will have a path to the utility. Now add the “dir” parameter. This will mean that we want to collect information from a folder.
A little formality. We will go into the folder of our project and create a new folder “source” there. In it we put the files that we want to process. You can specify the folder in which you will have the output of your project or the folder where the necessary files from several projects will be collected. We will do this now only for the sake of the test, in order to make sure that our project is working. This is how our test folder looks from the inside Figure 2.
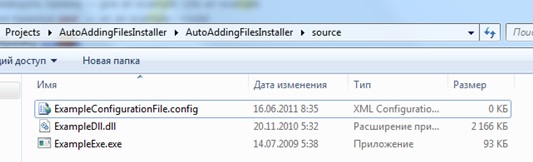
Figure 2 The contents of the folder from which the files will be taken
And so, now our line looks like this: "% WIX% \ bin \ heat.exe" dir $ (ProjectDir) source " . Now add to this line is the file to which the information about the files will be generated. Such a file we have already created is “OutputFiles.”
As a result, we see that our line has acquired the following form:"% WIX% \ bin \ heat.exe" dir "$ (ProjectDir) source" -o "$ (ProjectDir) OutputFiles.wxs" -gg –sfrag
While exploring the possibilities of heat.exe, we already found out that it cannot filter types files that are in the folder. But we can use xslt conversion. The Wix.xslt file was written, which does the conversion of the generated heat.exe file. This file looks like this:
The name of the groups is written in this file, as well as the path to the "source" folder. If you want to use for your own purposes, then you need to change only these fields.
As a result of all these actions, in the "Pre-build Event Command Line" window, we should have the entry:
"% WIX% \ bin \ heat.exe" dir "$ (ProjectDir) source" -t "$ (ProjectDir) Wix.xslt "-o" $ (ProjectDir) OutputFiles.wxs "-gg –sfrag .
After that, we can assemble our project and see that the “OutputFiles” file has changed.
Now it looks like this:
If we open the received installation file “AutoAddingFilesInstaller.msi” using Orca, we will see that in the “File” section we have entries about our 3 files 3.
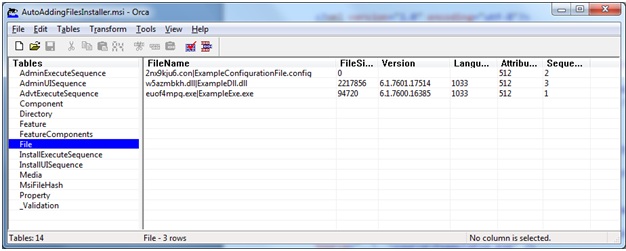
Figure 3 Installer file contents
On this I want to complete my article. I hope that she can help with the development of the installer and make its creation as automated as possible.
I think that many programmers have faced the task of writing an installer for their software product. So the same fate befell me. It was decided to use WiX. It was necessary to make an automatic assembly of the installer on the build server. The projects from which the files are taken for installation can change, and therefore it is impossible to strictly specify the list of files that need to be added to the installer.
Our project is written under MS Visual Studio 2010. For those who do not write their project on it, but use it only to write the installer, this article will also be interesting, since in this case it does not matter what development environment you work under.
WiX comes with heat.exe utility, which serves as a tool for automatically collecting files from folders or projects (there are several other options). A console application, with the commands of which you can find here.
During the initial study of the issue, the option of automatically collecting files from the project output folders seemed to be the best and most convenient option. To do this, you just need to add a link to the project, from which you need to pick up output and make small changes to the project file (an advantage for those who develop on VS). But in the process of studying this possibility, it turned out that the heat.exe utility does not collect anything from output except the * .exe project file and configuration files. A long search for the causes of this problem has led to the fact that, as it turned out, such an error has already been known since March 2010, but it has not yet been resolved.
So the most convenient option has disappeared, but the task has remained the same - you need to add files automatically, the process of studying other solutions has begun. Looking ahead, I can say that, of course, a solution was found!
The heat.exe utility has the ability to add files not only from projects, as mentioned above, but also the ability to collect them from a folder that you can specify to it. I began to research this option. It turned out that heat.exe is already adding all the files from the folder, and not like from the project, only selective ones. It was already a small victory. But there is no silver lining.
When you run the heat.exe utility, you can specify what types of files you want to collect from the folder. I was interested in 2 categories - “Binaries” and “Content”. The first category is responsible for * .dll and * .exe files, and the second is for configuration files. In practice, it turned out that the utility doesn’t care if I pass these parameters or not. She, as if nothing had happened, continued to collect everything that is in the folder. This option could not suit me.
Let's digress a little from the utility itself and talk about what in the end I wanted to get. I need to get a file that will contain a description of the files in the desired format. A file is an xml document that stores the identifier of files and their paths. The identifier is a GUID. Not using an automated tool and stuffing such a file with your hands is not a pleasant task.
The heat.exe utility just generates such a file. But in my case, any garbage gets into it. However, since this is an xml document, I can apply the XSLT transform to it. It is enough to remove the description of unnecessary files from the resulting file. And to my joy, heat.exe can accept such a file as a parameter.
As a result, I wrote a file with transformations and transferred to the input heat.exe. And now I am already the proud owner of the file I need. It remains only to write the correct start line heat.exe in the Pre-Build Event of the installer project and add the generated file to the project. The fruits of long labor were successful and the desired goal was achieved. The installer builds automatically without the intervention of a living organism.
All the same, we are not reading this article for the sake of the author’s red words, but we want to understand how to turn this entire set of letters into a working project.
Create a new installer project and call it “AutoAddingFilesInstaller”. Add a new file to our project, which we will call “Output”. Fig. 1.
Figure 1 The contents of the project file
In this file we will add a description of the file groups. In my project, I divided the files into 2 groups, the same ones that heat.exe uses:
- Binaries - all * .dll and * .exe files.
- Content - configuration files.
What will our file look like? Let's look at him.
-
-
-
-
-
-
-
-
-
-
-
-
-
-
-
-
-
-
-
* This source code was highlighted with Source Code Highlighter.What is there what? I created 2 directories (“BinariesDir”, “ContentDir”), which are located in the folder where the program is installed - “INSTALLLOCATION”. Thus, I created 2 links to which directories with files will be added to the project.
Next, we need to create a group of components that will include all the file types we select. Let's call it “OutputGroup”. It stores a link to our created directories. Thus, we say that we want to collect information from them.
Now create the file “OutputFiles”, in which the list of our files will be stored. This file will be automatically filled by heat.exe utility. For now, we will make this file almost empty. Add only links to our created folders there. This is how it should look:
-
-
-
-
-
-
-
-
-
-
-
-
-
-
* This source code was highlighted with Source Code Highlighter.Now we need to add a description of our group “OutputGroup” to “Ficha”, so that the installer knows that you need to add it to yourself. To do this, go to the "Main" file and find the "Feature" tag in it. In it we put a record of our group. As a result, it looks like this:
-
-
* This source code was highlighted with Source Code Highlighter.After making sure that everything is written correctly (perhaps even copy-paste'no), we try to assemble our project. Everything should go without errors.
All the infrastructure we have successfully created. Now we pass directly to the heat.exe utility. We’ll go into the properties of our project and go to the “Build Events” tab. On this tab there will be a window "Pre-build Event Command Line". Since we need information about our files to get to the project build, we will add a utility call to this window.
We begin to form a call line. First add "% WIX% \ bin \ heat.exe" . Thus, we will have a path to the utility. Now add the “dir” parameter. This will mean that we want to collect information from a folder.
A little formality. We will go into the folder of our project and create a new folder “source” there. In it we put the files that we want to process. You can specify the folder in which you will have the output of your project or the folder where the necessary files from several projects will be collected. We will do this now only for the sake of the test, in order to make sure that our project is working. This is how our test folder looks from the inside Figure 2.
Figure 2 The contents of the folder from which the files will be taken
And so, now our line looks like this: "% WIX% \ bin \ heat.exe" dir $ (ProjectDir) source " . Now add to this line is the file to which the information about the files will be generated. Such a file we have already created is “OutputFiles.”
As a result, we see that our line has acquired the following form:"% WIX% \ bin \ heat.exe" dir "$ (ProjectDir) source" -o "$ (ProjectDir) OutputFiles.wxs" -gg –sfrag
While exploring the possibilities of heat.exe, we already found out that it cannot filter types files that are in the folder. But we can use xslt conversion. The Wix.xslt file was written, which does the conversion of the generated heat.exe file. This file looks like this:
- xmlns:wix="http://schemas.microsoft.com/wix/2006/wi"
- xmlns="http://schemas.microsoft.com/wix/2006/wi"
- exclude-result-prefixes="wix"
- >
-
-
-
-
-
-
-
-
-
-
-
-
-
-
-
-
-
-
-
-
-
-
-
-
-
-
-
-
-
-
-
-
-
-
-
-
-
-
-
-
-
-
-
-
-
-
* This source code was highlighted with Source Code Highlighter.The name of the groups is written in this file, as well as the path to the "source" folder. If you want to use for your own purposes, then you need to change only these fields.
As a result of all these actions, in the "Pre-build Event Command Line" window, we should have the entry:
"% WIX% \ bin \ heat.exe" dir "$ (ProjectDir) source" -t "$ (ProjectDir) Wix.xslt "-o" $ (ProjectDir) OutputFiles.wxs "-gg –sfrag .
After that, we can assemble our project and see that the “OutputFiles” file has changed.
Now it looks like this:
-
-
-
-
-
-
-
-
-
-
-
-
-
-
-
-
-
-
-
-
-
-
-
-
* This source code was highlighted with Source Code Highlighter.If we open the received installation file “AutoAddingFilesInstaller.msi” using Orca, we will see that in the “File” section we have entries about our 3 files 3.
Figure 3 Installer file contents
On this I want to complete my article. I hope that she can help with the development of the installer and make its creation as automated as possible.