UPS inside: disassemble APC Back-UPS Pro 900
 The APC Power Saving Back-UPS Pro 900 is an energy-efficient uninterruptible power supply unit that is the closest relative to the Pro 550 we recently talked about. Nine hundredth is a more powerful model with a rated power of 540 watts, it is able to provide protection against power outages even a very productive home and office computer. However, this time we decided not to confine ourselves to the UPS test for battery life. In addition to this, we will show what components are used in the “uninterruptible”, which makes up its rather decent weight (more than 10 kilos!). We also filmed the entire process of disassembling the UPS in the APC by Schneider Electric service center.
 Let's start with the characteristics of the device and a brief description of its capabilities.

Specifications APC Power Saving Back-UPS Pro 900 (BR900GI)
Maximum output power : 900 VA / 540 W
Number of outlets : 8 (4 with battery backup)
Topology : line-interactive (there is a built-in voltage regulator)
Additionally : LCD display , power-saving function, protection of the local area network and telephone line, computer connection
Output voltage form : Step approximation of a sinusoid
Replaceable battery set : APCRBC123
Charging time : 8 hours
Battery life : 3-5 years (depending on the ambient temperature, number of charge-discharge cycles)
Dimensions: 382x250x100 mm
Price : from 5500 rubles
For all models on the APC website, a graph of the dependence of battery life on power consumption is available. For the Back-UPS Pro 900 model, it looks like this:

In full accordance with the theory, our test office PC, which was used in the previous material, worked on the battery for 1 hour 5 minutes 30 seconds. This is 2.5 times longer than with a Back-UPS Pro 550! With such a UPS, a short-term power outage can simply be waited without turning off the computer.
The rest is a fairly compact model: despite a significant increase in power, the dimensions have not changed significantly compared to the Back-UPS Pro 550: this UPS is noticeably higher, but the thickness increased by only a centimeter. As a result, it can still fit on the table, next to the monitor. As in the 550th, an active cooling system is not used here, the UPS works absolutely silently. In addition to the standard UPS features, Back-UPS Pro provides the ability to automatically shut off peripherals when you turn off your computer or put it into sleep mode.
However, let us return to the main topic of this material. How we disassembled the UPS, you can see the video:
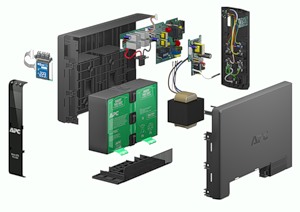
The virtual model of this UPS from the inside looks like this:

By this link the circuit can be downloaded in the original resolution.

The UPS is ready for disassembly! We took a brand new model, just from stock - even the sticker on the glossy surface that covers the display has not yet been removed.

We start by removing the battery cover and removing the battery. Unlike the Pro 550 model, the “nine hundred” uses an interchangeable cartridge, when replacing it there is no need to disconnect and connect the terminals - just pull out or push the battery pack in the right direction until it stops.

Вот так выглядят контакты батарейного блока. Замена блока занимает буквально пару секунд, и можно продолжать работу! Надо отметить, что в обычных условиях дальше батарейного отсека разбирать ИБП не нужно :) Мы хотим показать вам устройство «бесперебойника», но в реальных условиях любые проблемы с ИБП — повод обращаться в сервис, а не хвататься за отвертку. Разборка устройства определенно лишает вас гарантии. В общем, как говорят в одном научно-популярном сериале, не пытайтесь повторить это дома :)

Снимаем декоративную накладку на передней панели. Панель крепится на защелках и при ее снятии не нужно прикладывать значительные усилия (впрочем, при нормальном использовании ИБП ее вообще не нужно снимать :).

It looks like a decorative panel in itself. Three control buttons are “built-in” into it, the contacts for which are wired directly on the display unit.

Unscrew a few more screws.

Including the rear panel with sockets.

We remove the cover and get access to all the inside of the UPS.

Next, disconnect the cables leading from the transformer and outlets to the boards containing power elements and a control controller.

Then you can remove the back panel.

Connectors for protecting the telephone line and for connecting to a PC are routed directly to the "motherboard". On the left are the inverter radiators, next to them are wires with a connector for connecting the UPS battery. To the left is the connector to which the screen is connected.

And this is the LCD itself. On the right are three pins for the control buttons.

The charger is located on a separate board.

It remains to get a rather weighty transformer from the case, and the disassembly is complete. Without much haste, we met in five and a half minutes :) The heaviest elements of any UPS - the battery and the transformer - are in the foreground. The device case consists of two halves, plus a back panel with sockets and connectors, a battery cover and a decorative panel for the display, and, of course, the LCD display itself.
However, this is not all. I decided to go through the macro lens on the details on the motherboard. Further, all photos are provided with links to a full-sized version (carefully, the size of each photo is 5-10 megabytes!).

Full size

Full size
Control chip with model number on the sticker. "Central processor" UPS.

Full size
transformer. Pay attention to the two sets of power cables. When the voltage rises or falls to a certain limit, the UPS automatically switches between the transformer windings, restoring normal values.

Full size
charger board.

In full size,
it is bigger. The UPS motherboard is connected to this connector.

Full size
USB / COM connector for connecting the UPS to a computer and inputs for protecting the telephone line on the system board.

Full size

Full size

Full size

Full size

Full size
Control buttons on the LCD board. In the middle is a button for turning on and off the UPS, the top one is a button for disabling the sound signal and the bottom one is a button for switching between the UPS operation parameters screens.
In the near future - a story about the "heavy iron" - APC by Schneider Electric engineering systems for switching nodes, server rooms and data centers!