GIMP Script-fu: quick learning and writing simple scripts on Scheme (+ batch processing for free)
- Tutorial

Introduction
The article will tell you how to quickly get acquainted with the basics of scripting in GIMP in Scheme and begin directly to solve simple practical problems. This material is intended only for those who are going to automate the routine processing here and now, without much going into subtleties and without sacrificing precious time. Also, the article is not recommended to be used as a guide to Scheme separately from Script-fu. This is due to the simplified programming style in this material and the lack of coverage of other important facts that concern us now much less than the speed of development.
Content:
- What do we need?
- Syntax at a Glance
- Variables
- Functions
- Lists
- Register a script in GIMP
- Code writing
- Conclusion
What do we need?
English interface : for this it is enough to create the environment variable “LANG” with the value “en”. Why is this needed? First of all, it will be easier to look for matching procedures to interface objects. Secondly, I don’t have to give bilingual teams. Thirdly, in English on the Internet the most information.
Script-fu Console : Filters → Script-fu → Console. Here we can test small pieces of code - what you need when mastering the language.
Procedures Browser : Help → Procedure Browser. Here you can easily find the function that performs the required action and read its full description (everything is well documented).
Code editor with highlighting and / or pairing brackets counting. I'll leave it to your taste. Notepad ++ was enough for me. But note, there will be many brackets!
The next few sections contain excerpts from the first four pages of the Script-fu documentation and a little gag. It is highly recommended that you try running the following examples in the console.
Syntax at a Glance
- All expressions in Scheme must be surrounded by parentheses.
- The function name always comes first in parentheses, and then its parameters.
- Math operators are also functions.
(* (+ 1 2) (sqrt (- 13 4)) 10)The last will be the result of the multiplication. As you can see, three arguments are passed to the multiplication function: the result of addition, the result of extracting the root from the difference, and the number. Pay attention to the number of brackets: they are required everywhere. This may interfere, but it’s always clear what is being calculated.
- The function and each of the arguments must be separated by spaces.
(+ 1 2)" is the correct code, " (+1 2)" is not.- Everything that follows the “
;” symbol is a comment and is ignored.
Variables
Variables in Scheme are defined using a construct
let*. General form:(let*
(
(переменная значение)
...
(переменная значение)
)
(выражение)
...
(выражение)
)Compared to imperative languages, this is something like declaring local variables. In other words, after the bracket that closes the construct
let*, the variables cease to exist. Example:
(let*
 (
  (a 1)
  (b (+ a 2))
 )
 (+ a b)
)
Another example:
(let*
 ( (x 9) )
 (sqrt x)
)
Please note that even when we define only one variable, the outer brackets for the list of variables are not omitted !
You can assign a new value to a variable using the construct
set!:(set! переменная значение)Example:
(let*
 ( (a 42) (b 21) (x 0) )
 (set! x (/ a b))
)
Functions
You can define your functions using the design
define:(define (имя_функции аргументы) код_функции)The value of the function will be the result of the last command in the function code.
We implement the function of calculating the difference of the modules (
 ). This can be done using
 abs, but we will make it a bit more complicated:(define (difference x y)
(if (< x 0) (set! x (- x)))
(if (< y 0) (set! y (- y)))
(if (> x y) (- x y) (- y x))
)Here we used a construction
ifthat checks the truth of its first argument and, depending on this, executes either the second or third argument (the latter, as you can see, is optional). Note that a function can treat its arguments as variables, but it only modifies their copies. This can be verified as follows:
(let* ((a 3) (b -4)) (list (difference a b) a b))(The function
listhere is used to output several results — the values of the function, variable, aand variable b— and we will talk more about lists below). Run in the console and check that the values of the variables have not changed.Lists
To define a list, just write (no commas):
'(0 1 1 2 3 5 8 13)An empty list can be specified both through "
'()" and through " ()". Lists can contain both atomic values and other lists:(let*
(
(x
'("GIMP" (1 2 3) ("is" ("great" () ) ) )
)
)
x
)Since we already wrote one apostrophe, it is not necessary to precede internal lists with them.
To add another element to the top of the list, you need to use the concatenation function
cons:(cons 1 '(2 3 4) )It works equally well with empty lists ("
(cons 1 () )" will give a list of one item). To create a list containing the values of previously declared variables, you need the function
list:(let* ( (a 1) (b 2) (c 3) )
(list a b c 4 5)
)To understand the difference with a list definition through an apostrophe, replace "
(list a b c 4 5)" with " '(a b c 4 5)" and compare the output. This is all good, but how do you get the contents of a list? There are two functions for this. The first
car,, returns the head of the list, that is, the first element. The second one cdr, returns the tail of the list, that is, the list containing all the elements except the first. Both functions assume that the list is not empty. Examples:(car '(1 2 3 4) )(cdr '(1 2 3 4) )(car '(1) )(cdr '(1) )Instead of calling in sequence
car, cdrit can be useful to use functions like caadr, cddretc. For example, to get the second element of the list, write the following:(cadr '("first" "second") )(car (cdr '("first" "second") ) )In the following example, try to get to element 3 using only two calls to such functions:
(let* ( (
 x  '( (1 2 (3 4 5) 6)  7  8  (9 10) )
 ) )
 ; здесь ваш код
)
If you succeed, then you are almost ready to write your first script.
Register a script in GIMP
Before you sit down to write code, we will provide ourselves with convenient conditions for this.
For user scripts, GIMP creates a folder in the home directory
.gimp-2.6/scripts. For the script to pick up, just place the scm file in it and select Filters → Script-fu → Refresh Scripts in the GIMP menu (this is if GIMP is already running, otherwise it will load everything at startup). Obviously, the functions we wrote should be placed in the file. It can contain as many functions as you like, but it would be nice to distribute logically different functions into different files, and name the files in honor of the contents. Another recommendation, even a convention: the functions we created should be named by type
script-fu-functionname. By and large, this is already enough for us to call our functions from the console.
But if we want the script to have its own menu, and when it opens, a window opens with the settings, then we need to add two functions that are responsible for registration. And there’s nothing complicated, just look at an example.
Suppose we want to write a function that improves the quality of text in an image with uneven illumination (in fact, I already wrote it, but this does not prevent us from doing this again). Here is her definition:
(define (script-fu-readability inImage inLayer inRadius inHigh-input))I know, I know, there is only a function declaration, and it does nothing. Useful code will be a bit later. Now this is quite enough for us. Registration takes place like this:
(script-fu-register
"script-fu-readability"
"Readability"
"Improves text readability on the photos. It's needed only when there is a non-uniform illumination"
"Dragonizer"
"Copyleft, use it at your own sweet will"
"January 7, 2011"
"RGB* GRAY* INDEXED*"
SF-IMAGE "The image" 0
SF-DRAWABLE "The layer" 0
SF-ADJUSTMENT "Median blur: radius" '(15 1 20 1 5 0 SF-SLIDER)
SF-ADJUSTMENT "Levels: intensity of highest input" '(235 0 255 1 10 0 SF-SPINNER)
)
(script-fu-menu-register "script-fu-readability" "![]() /Filters/User's scripts")
/Filters/User's scripts")The first function is passed the following. The first argument is the name of our function, the second is the display name, the third is the description, the fourth is the author, the fifth is the copyright information, and the sixth is the creation date. Seventh - types of supported images (RGB, RGBA, GRAY, GRAYA, INDEXED, INDEXEDA).
Subsequent arguments are optional. They (except
SF-IMAGEand SF-DRAWABLE) allow you to create widgets in the script window, such as lines, jackdaws, sliders, spinners, color, font, and much more, to transfer the user's choice to the function. The mentioned one SF-IMAGEwill give us a link to the current open image, and SF-DRAWABLE- to the selected layer. I will not describe all these SF-*, their parameters you can see in the tables here(The rest does not need to be read, because it is summarized in this article). I also advise you to look at this picture in order to understand what you need from this (I took it from here ). 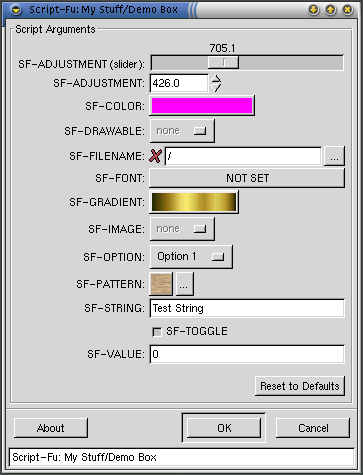
The window is ready, it remains to add its call to the GIMP menu, which makes the second function of the code above. Two arguments: again, the name of the function and the path to the menu. The path begins with
![]()

Another example: if we wanted to write a script that generates an image with desired properties, we have removed the options
SF-IMAGE, and SF-DRAWABLEfrom the first function, instead of "RGB* GRAY* INDEXED*"using an empty string to""(we don’t need an open image, we will create it), and in the second function we would change the path to something like that .
To enjoy the result, we will save our creativity in " " and update the scripts. Now open / create some image and select our script from the menu."![]() /File/Create/Something"
/File/Create/Something"script-fu-readability.scmCode writing
Here he is, a longing moment! But I hasten to upset: there is nothing complicated here. Absolutely. You already know how to write functions. And everything that you may need from the editor is easy to find in the procedure browser. Need some kind of operation with layers? Search for "
layer". Invert image? You need something containing " invert". Etc. I will make only two comments:
- It would be very nice to enclose all the actions performed by the script between functions
gimp-image-undo-group-startandgimp-image-undo-group-end, as is done below, so that the user does not have to cancel each action individually. - All GIMP functions return lists as a result, regardless of the amount of data in the result. It is easy to pierce, expecting, for example
layer, but receiving(layer). So do not forget to docarin such cases.
(define (script-fu-readability inImage inLayer inRadius inHigh-input)
 (let* (
   (layer2 0)
  )
  (gimp-image-undo-group-start inImage)
  (if (not (= (car (gimp-image-base-type inImage)) GRAY)) (gimp-image-convert-grayscale inImage))
  (set! layer2 (car (gimp-layer-copy inLayer FALSE)))
  (gimp-image-add-layer inImage layer2 -1)
  (plug-in-despeckle RUN-NONINTERACTIVE inImage layer2 inRadius 0 -1 256)
  (gimp-layer-set-mode layer2 DIFFERENCE-MODE)
  (set! inLayer (car (gimp-image-flatten inImage)))
  (gimp-invert inLayer)
  (gimp-levels inLayer HISTOGRAM-VALUE 0 inHigh-input 0.1 0 255)
  (gimp-image-undo-group-end inImage)
 )
)
With a procedure browser on hand, it’s easy to figure it out if you're interested.
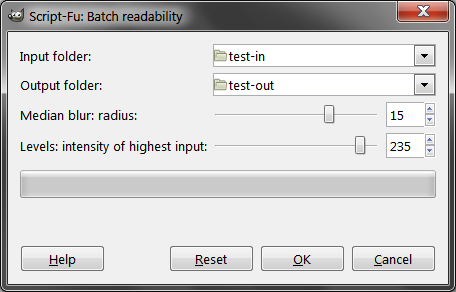
Batch processing
Where where? That's not all. Do you think we have done so much to write some unfortunate script that processes one image? Yes, hands would be faster! So let's make GIMP open all the files from a given folder, process it, and save it to another folder.
The best part is to adapt the code below to do something else, just replace the function it calls with the one you need, everything else will not change (well, unless you want to save the file to a different extension).
The code is partially borrowed from this topic (thanks to Apostol ), but there it saves files, overwriting the original ones. The function is
morph-filenametaken from here .(define (morph-filename orig-name new-extension)
(let* ((buffer (vector "" "" "")))
(if (re-match "^(.*)[.]([^.]+)$" orig-name buffer)
(string-append (substring orig-name 0 (car (vector-ref buffer 2))) new-extension)
)
)
)
(define (script-fu-batch-readability inInFolder inOutFolder inRadius inHigh-input)
(let* ((filelist (cadr (file-glob (string-append inInFolder DIR-SEPARATOR "*") 1))))
(while (not (null? filelist))
(let* ((filename (car filelist))
(image (car (gimp-file-load RUN-NONINTERACTIVE filename filename)))
(layer (car (gimp-image-get-active-layer image)))
)
(script-fu-readability image layer inRadius inHigh-input)
(set! layer (car (gimp-image-get-active-layer image)))
(set! filename (string-append inOutFolder DIR-SEPARATOR
(morph-filename (car (gimp-image-get-name image)) "png")))
(file-png-save2 RUN-NONINTERACTIVE image layer filename filename 0 9 0 0 0 1 0 0 0)
(gimp-image-delete image)
)
(set! filelist (cdr filelist))
)
)
)Conclusion
The Readability script along with the batch version can be downloaded here ( mirror ). The code is commented out, even somewhat redundantly.
Let me remind you once again that the article does not pretend to be comprehensive in the broad sense and is intended only so that the reader can sit down, carefully read, practice at the same time, and start creating scripts that solve his tasks. So that it does not take as much time as is required for a more or less high-quality language study.
If you read the article to the end, now you can Script-fu no worse than me.