Using macros in MASM as an example of creating a window
Back in 2001, I spent a lot of time learning assembly language under Win32. Then, after much torment with writing the same code a hundred times, I set out to write for myself a small library of macros. As a result, it was possible to seriously enough ease our fate and reduce the need to repeat huge towels of code, if necessary, write a simple program with one window.
Recently I came across those projects and decided to lay out some of them, maybe someone will come in handy ...
So let's get started. The project attached below has the following structure.
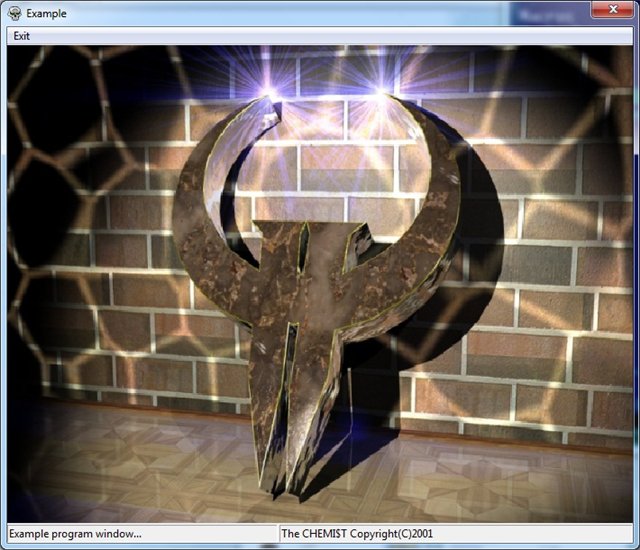
When starting Window.Exe, the displayed window will look like this:
The first line here is the inclusion of the main macros, then the Start macro , which creates the beginning of the program and substitutes information about the memory model, the processor used, and so on. Next is the Uses macro, it includes the necessary library in the program. In this case, we will use kernel32.dll since it contains the function that we use to complete the ExitProcess process termination.
The following is a block of code specified using .code , which contains the main program procedure. In fact, the procedure itself can be called whatever you like and the name WinMain I gave it just from the bulldozer. The main thing is that at the end of the file there is an End line {Input_function_name_name}
This program does not carry any functional load, so after starting it will not do anything - it just finishes its work. Now the source code of the program in the archive:
Now I will explain in stages what is happening in this source. First, macros for implementing the menu, status bar, and window functionality are included. They are framed by special commands of the macro assembler .xlist (disabling listing) and .list (enabling listing) this was done only so that if the listing was issued by the macro assembler, there was no code from these files / for only extra code towels / The following is a description of the uninitialized block .data data ?, the variables in this block are not initialized, the system simply allocates memory without resetting it. It is fraught to use such variables without initialization, because anything can be in memory. Here, space is allocated for the variables, which in the first lines of the WinMain method accept the values of the loaded resources and the instance of the application itself.
The macros @DefineMenu, @DefineStatus and @DefineWindow initialize the variables in which the parameters of the objects / menu are stored, the status of the line and window, respectively /
And after all the initializations, the most interesting thing happens.
The first four lines
Initialize the variables / instance of the application, icon, cursor, brush to draw the window /. It uses a nice Result macro . This macro makes the specified API call with the parameters passed and returns the contents of the EAX register, which serves to return the results of the function. If there wasn’t this macro, then each line was broken into a similar code:
Macros for window creation and operation should be called sequentially, @CreateWindow - creates a window, @SetWndSize - sets the window size, @MoveWnd moves the window to the desired coordinates on the screen, @ProcessMsgs fulfills the main cycle of processing messages going to your window, @DestroyWindow - deletes window. When you create a window, you need to create a file with event handlers for this window. In the above project, this is the WndExample.Asm file. This name is set so that the event handler file is automatically turned on by the mask Wnd <window_name> .Asm
I didn’t finish the macros for creating the menu and creating the status line then, I did it only to the functionality I needed.
Menu macros:
@CreateMenu {Menu_name}
Create a menu with the desired name
@AppendMenu {Menu_name}, {Menu item_name header}, {Message_code}
Adds a menu item with the desired title. By clicking on this menu item, the message code will enter the message queue.
@AttachMenu {WindowName}, {MenuName}
Adds a menu to the specified window.
Macros for working with the status line / Requires ComCtl32 /
@CreateStatus {String_Status_Name}, {Window_Name}, {String_Status ID}
Create a string status for the specified window
@SetStatusParts {String_Status_name}, {Number of_parts}, {Part_width}, {}, {}, {}, {} / Up to ten parts, the last indicated size = -1, i.e. stretch /
Separation into several parts, this macro could be finalized, but somehow apparently I didn’t do it then
@SetStatusText {String_status_name}, {Text}, {Style / I don’t remember why /}, {String_status_part}
Setting the status to the necessary part String status
This file specifies the source code of the main window procedure in which user-defined handlers are registered and in which menu event handlers must also be registered. Each window event handler looks like this:
@WndHandlerStart {window_name}, {handler_name}
mov eax, TRUE
@WndHandlerEnd {window_name}, {handler_name}
The main procedure in the above project is at the end of the file and looks like this:
Here, a menu item handler is assigned to which a Message_Code IDC_MENUEXIT handler named Exit is assigned. And also the custom WM_SIZING message handler is registered. The custom event handler must have the name of the message that it is processing. All events that are predefined in the window can be viewed in the Window.Mac file, in the @WndProcedureBegin macro. The list of these events is: Close, Paint, Help, Activate, Deactivate, SysCommand, Show, Hide, Create, Destroy, KeyDown, KeyUp, Resize, DblClick, MouseUp, MouseDown, WheelDown, WheelUp. Examples of these handlers are included in the project source and you can click F1 in the window and spin the mouse wheel.
In principle, everything related to these events can be viewed in MSDN and in the source, there is nothing complicated about it and I will not include it in this description.
Compilation requires the masm32 package (can be found here ) After installation, it is advisable to add the path to the masm32 \ bin directory to the Path environment variable and edit the masm32 / bin / build.bat file by correcting the ml compiler and linker invocation to add the paths of the libraries and included files and not I had to constantly register the path data in the code.
So in the call to ML.Exe you need to add another parameter / IF: \ masm32 \ include - instead of F: \ masm32 you need to specify the path where you installed the masm32 package. And in two calls of the Link.exe linker, you need to add the library path using the / LIBPATH option: F: \ masm32 \ lib. Again, replace the path with the one that matches yours.
Next, in the directory with the project, we give two commands: bres( bres.bat compiles the rsrc.rc resource file in the current directory) and then build window ( build.bat - compiles and links the project).
Projects transferred to GitHub
Recently I came across those projects and decided to lay out some of them, maybe someone will come in handy ...
Project Composition
So let's get started. The project attached below has the following structure.
| \ Macros | Catalog with macros used in the application | |
| Macros.Inc | Here are the basic macros that are needed when writing any Win32 program. Here are macros for allocating memory, making it easier to include files, macros for defining data, and so on. | |
| Window.Mac | Macros that make creating windows easier | |
| Status.Mac | Macros for creating and using row status | |
| Menu.Mac | Macros for creating and using menus | |
| Quake.Bmp | Image to be uploaded and displayed in the program window | |
| Scull.Ico | Image Icon (just a shard) | |
| Rsrc.rc | Resource Definition File | |
| Window.Asm | The main program file | |
| Window.Exe | Compiled program | |
| WndExample.Asm | This file contains the source code for processing messages coming to the “Example” window of our program |
When starting Window.Exe, the displayed window will look like this:
The simplest program, no window
include macros\macros.inc
@Start
@Uses  kernel32
.code
WinMain Proc
    invoke ExitProcess, 0
WinMain Endp
        End WinMain
The first line here is the inclusion of the main macros, then the Start macro , which creates the beginning of the program and substitutes information about the memory model, the processor used, and so on. Next is the Uses macro, it includes the necessary library in the program. In this case, we will use kernel32.dll since it contains the function that we use to complete the ExitProcess process termination.
The following is a block of code specified using .code , which contains the main program procedure. In fact, the procedure itself can be called whatever you like and the name WinMain I gave it just from the bulldozer. The main thing is that at the end of the file there is an End line {Input_function_name_name}
This program does not carry any functional load, so after starting it will not do anything - it just finishes its work. Now the source code of the program in the archive:
include macros\macros.inc
IDC_MAINSTATUS   Equ 1
IDC_MENUEXIT     Equ 10
@Start
@Uses gdi32, user32, comctl32, kernel32
.xlist
include macros\Menu.mac
include macros\Window.mac
include macros\Status.mac
.list
.data?
hIcon           Dd ?
hBrush         Dd ?
hCursor       Dd ?
hImage        Dd ?
hInstance    Dd ?
@DefineMenu    Menu
@DefineStatus  Example
@DefineWindow  Example
.code
; Main program cycle
WinMain Proc
  mov    hInstance, @Result(GetModuleHandle, NULL)
  mov    hIcon, @Result(LoadIcon, hInstance, 100)
  mov    hCursor, @Result(LoadCursor,NULL,IDC_ARROW)
  mov    hBrush, @Result(GetSysColorBrush, COLOR_APPWORKSPACE)
  @CreateWindow  Example, hInstance, NULL,'Example_wnd', \
                 WS_OVERLAPPED+WS_CAPTION+WS_SYSMENU+WS_VISIBLE, \
                 WS_EX_APPWINDOW, 'Example', \
                 hIcon, hBrush, hCursor, NULL
  @SetWndSize Example, 700, 600
  @MoveWnd Example, 100, 100
  @CreateMenu Menu
  @AppendMenu Menu, 'Exit', IDC_MENUEXIT
  @AttachMenu Example, Menu
  @CreateStatus Example, Example, IDC_MAINSTATUS
  @SetStatusParts Example, 2,300,-1,0,0,0,0,0,0,0,0
  @SetStatusText Example, 'Example program window...', 0, 0
  @SetStatusText Example, 'The CHEMI$T Copyright(C)2001', 0, 1
  @ProcessMsgs Example, FALSE
  @DestroyMenu Menu
  @DestroyWindow Example
  invoke ExitProcess, 0
WinMain Endp
        End WinMain
Now I will explain in stages what is happening in this source. First, macros for implementing the menu, status bar, and window functionality are included. They are framed by special commands of the macro assembler .xlist (disabling listing) and .list (enabling listing) this was done only so that if the listing was issued by the macro assembler, there was no code from these files / for only extra code towels / The following is a description of the uninitialized block .data data ?, the variables in this block are not initialized, the system simply allocates memory without resetting it. It is fraught to use such variables without initialization, because anything can be in memory. Here, space is allocated for the variables, which in the first lines of the WinMain method accept the values of the loaded resources and the instance of the application itself.
The macros @DefineMenu, @DefineStatus and @DefineWindow initialize the variables in which the parameters of the objects / menu are stored, the status of the line and window, respectively /
And after all the initializations, the most interesting thing happens.
The first four lines
  mov    hInstance, @Result(GetModuleHandle, NULL)
  mov    hIcon, @Result(LoadIcon, hInstance, 100)
  mov    hCursor, @Result(LoadCursor,NULL,IDC_ARROW)
  mov    hBrush, @Result(GetSysColorBrush, COLOR_APPWORKSPACE)
Initialize the variables / instance of the application, icon, cursor, brush to draw the window /. It uses a nice Result macro . This macro makes the specified API call with the parameters passed and returns the contents of the EAX register, which serves to return the results of the function. If there wasn’t this macro, then each line was broken into a similar code:
  invoke GetModuleHandle, NULL
  mov     hInstance, eax
Macros for window creation and operation should be called sequentially, @CreateWindow - creates a window, @SetWndSize - sets the window size, @MoveWnd moves the window to the desired coordinates on the screen, @ProcessMsgs fulfills the main cycle of processing messages going to your window, @DestroyWindow - deletes window. When you create a window, you need to create a file with event handlers for this window. In the above project, this is the WndExample.Asm file. This name is set so that the event handler file is automatically turned on by the mask Wnd <window_name> .Asm
I didn’t finish the macros for creating the menu and creating the status line then, I did it only to the functionality I needed.
Menu macros:
@CreateMenu {Menu_name}
Create a menu with the desired name
@AppendMenu {Menu_name}, {Menu item_name header}, {Message_code}
Adds a menu item with the desired title. By clicking on this menu item, the message code will enter the message queue.
@AttachMenu {WindowName}, {MenuName}
Adds a menu to the specified window.
Macros for working with the status line / Requires ComCtl32 /
@CreateStatus {String_Status_Name}, {Window_Name}, {String_Status ID}
Create a string status for the specified window
@SetStatusParts {String_Status_name}, {Number of_parts}, {Part_width}, {}, {}, {}, {} / Up to ten parts, the last indicated size = -1, i.e. stretch /
Separation into several parts, this macro could be finalized, but somehow apparently I didn’t do it then
@SetStatusText {String_status_name}, {Text}, {Style / I don’t remember why /}, {String_status_part}
Setting the status to the necessary part String status
Event Handler File
This file specifies the source code of the main window procedure in which user-defined handlers are registered and in which menu event handlers must also be registered. Each window event handler looks like this:
@WndHandlerStart {window_name}, {handler_name}
mov eax, TRUE
@WndHandlerEnd {window_name}, {handler_name}
The main procedure in the above project is at the end of the file and looks like this:
@WndProcedureBegin Example, CW_USEDEFAULT, CW_USEDEFAULT, CW_USEDEFAULT, CW_USEDEFAULT
  ; Menu handlers
  @WndMenuHandler  IDC_MENUEXIT, Exit
  ; Sample user handler
  @WndUserHandler  Example, WM_SIZING
@WndProcedureEnd   Example
Here, a menu item handler is assigned to which a Message_Code IDC_MENUEXIT handler named Exit is assigned. And also the custom WM_SIZING message handler is registered. The custom event handler must have the name of the message that it is processing. All events that are predefined in the window can be viewed in the Window.Mac file, in the @WndProcedureBegin macro. The list of these events is: Close, Paint, Help, Activate, Deactivate, SysCommand, Show, Hide, Create, Destroy, KeyDown, KeyUp, Resize, DblClick, MouseUp, MouseDown, WheelDown, WheelUp. Examples of these handlers are included in the project source and you can click F1 in the window and spin the mouse wheel.
In principle, everything related to these events can be viewed in MSDN and in the source, there is nothing complicated about it and I will not include it in this description.
Program compilation
Compilation requires the masm32 package (can be found here ) After installation, it is advisable to add the path to the masm32 \ bin directory to the Path environment variable and edit the masm32 / bin / build.bat file by correcting the ml compiler and linker invocation to add the paths of the libraries and included files and not I had to constantly register the path data in the code.
So in the call to ML.Exe you need to add another parameter / IF: \ masm32 \ include - instead of F: \ masm32 you need to specify the path where you installed the masm32 package. And in two calls of the Link.exe linker, you need to add the library path using the / LIBPATH option: F: \ masm32 \ lib. Again, replace the path with the one that matches yours.
Next, in the directory with the project, we give two commands: bres( bres.bat compiles the rsrc.rc resource file in the current directory) and then build window ( build.bat - compiles and links the project).
Projects transferred to GitHub