July 16, 2010 at 15:29
"Industrial" chassis for a quick server

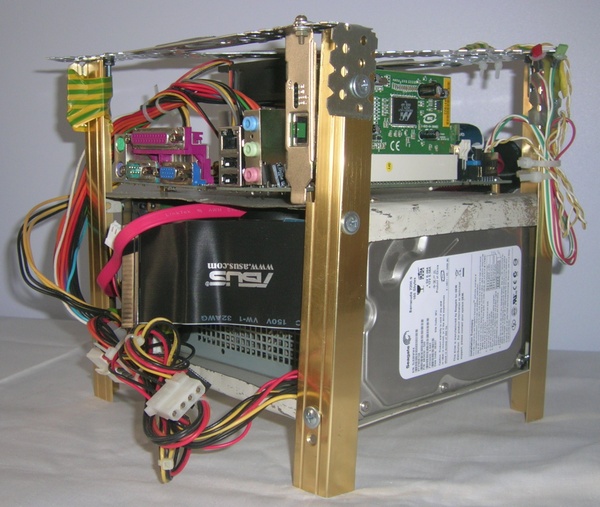
When I needed to quickly assemble another server for the home file storage, everything at hand turned out to be everything: the Intel motherboard with a sealed Celeron processor and a 512MB memory bar, a couple of hard drives and a power supply. There were also many loops, adapters, and other little things useful for assembling a computer. There was only a case. Since the server was needed really quickly, and I didn’t want to spend time and money on buying the case, I decided to make the case out of improvised materials on my own. Basically, these were materials left over from the ongoing repair of the apartment, so the building, or rather the chassis, turned out to be a very "industrial" look.
A design feature was the use of hard drives to stiffen (excuse the pun) the entire chassis. Disks are installed between two metal plates, and a power supply is placed between the disks. The plates were cut with a jigsaw with a metal saw from the cover of the old case (the case itself was not preserved), the edges of the plates were bent by about 10 mm (one edge was already bent, the other I bent with pliers and a hammer). Holes for mounting hard drives were drilled in each plate; in addition, holes for racks for mounting the motherboard were made in the upper plate.
The racks are made of copper and did not work to cut the threads in the steel plate. Therefore, I had to fix the racks on the back with pieces of tin (from a regular tin can). I screwed the stand into the hole in the piece of tin, and then soldered them together. It turned out quite firmly.
Then a piece of aluminum nut (corner) was sawn into 4 equal parts and holes were drilled in them for fastening to the plates. The chassis elements are fastened with 3.5 * 16mm screws, the main thing was to calculate the location of the hard drives so that the screws did not enter them during assembly.
For mounting an additional gigabit network card, which occupied the only PCI slot on the motherboard, as well as for mounting an 80 mm cooling fan, I used profile holders for drywall. They are good because they have a lot of holes and they easily bend with relatively high strength (besides, I had them at hand!) Three profiles fastened with the letter “Z” made it possible to fix the fan over both heatsinks: the processor and the chipset. The control LEDs and the power button are attached to them with electrical tape.
As a result, we obtained the most compact and sufficiently reliable in terms of rigidity fasteners of all server components. His absolutely unaesthetic appearance does not bother me at all, since the server is in a closed cabinet and is not visible to anyone. In the future I plan to disassemble this server and use its components for other purposes, and as a simple temporary solution, the resulting design completely suits me.
During operation, problems with overheating (even in the current hot days) and electromagnetic interference were not detected. The noise level in a closed cabinet is negligible even at night.
A couple of pictures: view from the side of the PSU cooler ...

... and view from the side of the motherboard connectors